Front-end animation through CSS Animation
这篇文章主要介绍了关于通过CSS Animation进行前端动效,有着一定的参考价值,现在分享给大家,有需要的朋友可以参考一下
前言
对于简单的补间动画,我们可以通过transition实现。那到底多简单的动画适合用transtion来实现呢?答案就是——我们只需定义动画起始和结束帧的状态的动画。一旦关键帧数大于2时,我们必须转向CSS Animation了。本文为这段时间学习的记录,欢迎拍砖。
简单粗暴介绍CSS Animation 规则和属性
定义关键帧动画
语法:
@keyframes <animation> {
  [<animation> {
    /* CSS Properties */
  }]*
}</animation></animation>示例:
@keyframes rotate {
  from { transform: rotate(0deg); }
  to { transform: rotate(360deg); }
}注意项:
1.<animation name></animation>的命名规范
// 命名需要遵循以下规则
const rIsInvalid = /^--|^[0-9]+-|^(?:unset|initial|inherit|none)$/
    , rIsValid = /^[0-9a-z-_\\]+$/i
function isValidAnimationName(animationName: string): boolean{
  return !rIsInvalid.test(animationName) && rIsValid(animationName)
}2.<animation time offset></animation>取值0-100%、from,等价与0%、 to,等价与100%。
3.<animation name></animation>重复怎么办
@keyframes CSS规则不支持层叠样式,因此当出现多个同名keyframes,那么仅最后出现的那个有效。
/* 无效 */
@keyframes rotate {
  from { transform: rotate(0deg); }
  to { transform: rotate(360deg); }
}
/* 生效 */
@keyframes rotate {
  from { transform: rotate(90deg); }
  to { transform: rotate(-360deg); }
}4.<animation time offset></animation>重复怎么办
与@keyframes CSS规则一样,标准规定相同的关键帧不产生层叠,仅最后出现的认定为有效。
但实际上FireFox14+和Chrome均将关键帧设计为可层叠的。
@keyframes rotate {
  from { transform: rotate(0deg); }
  from { background: red; }
  /* 上述两条time offset实际上等价于
   * from { transform: rotate(0deg); background: red; }
   */
  to {
    transform: rotate(360deg);
    background: yellow;
  }
}5.!important导致属性失效
一般情况下使用!important会让CSS属性获得最高权重,但在@keyframes下却会导致该CSS属性失效。
@keyframes rotate {
  from {
    transform: rotate(90deg);
    background: red!important; /* background属性无效 */
  }
  to { transform: rotate(-360deg); }
}6.必须提供至少两个关键帧
/* 不会根据缓动函数产生动画效果,而是在动画持续时间的最后瞬间移动过去 */
@keyframes move-left{
   to {
       left: 100px;
   }
}使用动画
<css-selector> {
  animation: <animation-name>
             <animation-duration>
             <animation-timing-function>
             <animation-delay>
             <animation-iteration-count>
             <animation-direction>
             <animation-fill-mode>
             <animation-play-state>;
}</animation-play-state></animation-fill-mode></animation-direction></animation-iteration-count></animation-delay></animation-timing-function></animation-duration></animation-name></css-selector>示例:
.box.rotate {
  animation: rotate 10s infinite alternate;
}子属性介绍
<animation-name></animation-name>,指定通过@keyframes定义的补间动画名称。<animation-duration></animation-duration>,动画持续时长,默认为0s。单位为s和ms。<animation-delay></animation-delay>,动画播放延迟,默认为0s。单位为s和ms。<animation-iteration-count></animation-iteration-count>,动画重复播放次数,默认为1,infinite表示无限循环。动画播放总时长为<animation-direction></animation-direction>,可选值为normal | reverse | alternate | alternate-reverse,分别表示动画播放顺序是从from到to,从to到from,从from到to再从to到from和从to到from再从from到to。注意:设置alternate|alternate-reverse时,animation-iteration-count必须大于1才能看到效果<animation-fill-mode></animation-fill-mode>,可选值为none | forwards | backwards | both,用于设置动画开始前和结束后是否应用0%和100%的样式对元素上。分别表示不应用,应用100%的样式,延迟播放期间应用0%的样式和0%和100%的样式均应用。
注意:
默认情况下(none),动画结束后会恢复动画前的样式;
设置backwards时,
值大于0才能看到效果。
<animation-play-state></animation-play-state>,可选值running | paused,获取和设置播放状态。注意:通过这个属性,我们仅能实现暂停和继续播放的效果,无法实现重播,更别说回放了<animation-timing-function></animation-timing-function>,用于设置缓动函数类型,值为ease | ease-in | ease-out | ease-in-out | linear | step-start | step-end | steps(<integer>, <flag>) | frames(<integer>) | cubic-bezier(<number>,<number>,<number>,<number>)</number></number></number></number></integer></flag></integer>。
其中ease | ease-in | ease-out | ease-in-out | linear | cubic-bezier(<number>,<number>,<number>,<number>)</number></number></number></number>的效果均为连续渐变的,而step-start | step-end | steps(<integer>, <flag>) | frames(<integer>)</integer></flag></integer>则为突变效果。下面我们深入理解后者吧。
缓动函数-step解疑专题
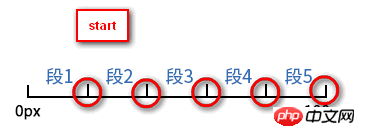
step-start实际上等价于steps(10, start),而step-end则等价于steps(10),所以我们只要理解好steps(<integer>, <flag>)</flag></integer>即可。
/* 通过设置在一个动画周期内(<animation-duration>)的平均刷新帧数,实现突变动效。具体应用有:游戏精灵行走、打字效果等
 * <number_of_steps> - 两个关键帧间的刷新次数
 * <direction> - 方向,可选值为 end | start。
 *               end为默认值,表示动画一结束,动画效果就结束;
 *               start表示动画一开始就马上执行完第一个关键帧的效果。
 */
steps(<number_of_steps>, <direction>)</direction></number_of_steps></direction></number_of_steps></animation-duration>
从张旭鑫那偷来的解释:
start:表示直接开始。也就是时间才开始,就已经执行了一个距离段。于是,动画执行的5个分段点是下面这5个,起始点被忽略,因为时间一开始直接就到了第二个点: end:表示戛然而止。也就是时间一结束,当前距离位移就停止。于是,动画执行的5个分段点是下面这5个,结束点被忽略,因为等要执行结束点的时候已经没时间了:
另外通过将<animation-fill-mode></animation-fill-mode>设置为forwards,那么当<direciton></direciton>设置为end时,也会显示(保持)动画最后一个关键帧的样式。
事件
const target = document.getElementById("target")
target.addEventListener("animationstart", e => {
  // 动画开始时触发
})
target.addEventListener("animationiteration", e => {
  // 每次重复执行动画时触发
  // 当<animation-iteration-count>为1时,不会触发。
})
target.addEventListener("animationend", e => {
  // 当动画结束时触发
})</animation-iteration-count>搞尽脑汁实现重播效果
到这里我们已经可以通过@keyframes定义和应用CSS Animation了,但我们能否获取对动画效果更多的控制权呢?如开始、暂停、继续、重播。通过<animation-play-state></animation-play-state>我们能轻易实现开始、暂停和继续的效果,但重播却没那么容易。
function pause (target: HTMLElement):boolean {
  const isRunning = target.style.animationPlayState == "running"
  if (isRunning) {
    target.style.animationPlayState = "paused"
  }

  return isRunning
}

function play (target: HTMLElement):boolean {
  const isStop = target.style.animationPlayState == "paused"
  if (isStop) {
    target.style.animationPlayState = "running"
  }

  return isStop
}

function replay (target: HTMLElement, animationClassName: string):void {
  // 先移除动画效果
  target.classList.remove(animationName)
  // requestAnimationFrame的回调函数会在下一次界面渲染前执行
  requestAnimationFrame(_ => {
    // 这时动画的影响还在,所以要等界面渲染完后再重新启用动画效果,才能实现重播
    requestAnimationFrame(_ => {
      target.classList.add(animationName)
    })
  })
}总结
CSS3为我们提供了动画效果,除了提供比Transition更丰富的可控性,比JavaScript更简易的API,还让我们可以使用GPU来加速呢^_^
以上就是本文的全部内容,希望对大家的学习有所帮助,更多相关内容请关注PHP中文网!
相关推荐:
The above is the detailed content of Front-end animation through CSS Animation. For more information, please follow other related articles on the PHP Chinese website!

Hot AI Tools

Undresser.AI Undress
AI-powered app for creating realistic nude photos

AI Clothes Remover
Online AI tool for removing clothes from photos.

Undress AI Tool
Undress images for free

Clothoff.io
AI clothes remover

Video Face Swap
Swap faces in any video effortlessly with our completely free AI face swap tool!

Hot Article

Hot Tools

Notepad++7.3.1
Easy-to-use and free code editor

SublimeText3 Chinese version
Chinese version, very easy to use

Zend Studio 13.0.1
Powerful PHP integrated development environment

Dreamweaver CS6
Visual web development tools

SublimeText3 Mac version
God-level code editing software (SublimeText3)

Hot Topics
 How to use bootstrap in vue
Apr 07, 2025 pm 11:33 PM
Using Bootstrap in Vue.js is divided into five steps: Install Bootstrap. Import Bootstrap in main.js. Use the Bootstrap component directly in the template. Optional: Custom style. Optional: Use plug-ins.
 The Roles of HTML, CSS, and JavaScript: Core Responsibilities
Apr 08, 2025 pm 07:05 PM
HTML defines the web structure, CSS is responsible for style and layout, and JavaScript gives dynamic interaction. The three perform their duties in web development and jointly build a colorful website.
 Understanding HTML, CSS, and JavaScript: A Beginner's Guide
Apr 12, 2025 am 12:02 AM
WebdevelopmentreliesonHTML,CSS,andJavaScript:1)HTMLstructurescontent,2)CSSstylesit,and3)JavaScriptaddsinteractivity,formingthebasisofmodernwebexperiences.
 How to write split lines on bootstrap
Apr 07, 2025 pm 03:12 PM
There are two ways to create a Bootstrap split line: using the tag, which creates a horizontal split line. Use the CSS border property to create custom style split lines.
 How to set up the framework for bootstrap
Apr 07, 2025 pm 03:27 PM
To set up the Bootstrap framework, you need to follow these steps: 1. Reference the Bootstrap file via CDN; 2. Download and host the file on your own server; 3. Include the Bootstrap file in HTML; 4. Compile Sass/Less as needed; 5. Import a custom file (optional). Once setup is complete, you can use Bootstrap's grid systems, components, and styles to create responsive websites and applications.
 How to insert pictures on bootstrap
Apr 07, 2025 pm 03:30 PM
There are several ways to insert images in Bootstrap: insert images directly, using the HTML img tag. With the Bootstrap image component, you can provide responsive images and more styles. Set the image size, use the img-fluid class to make the image adaptable. Set the border, using the img-bordered class. Set the rounded corners and use the img-rounded class. Set the shadow, use the shadow class. Resize and position the image, using CSS style. Using the background image, use the background-image CSS property.
 How to use bootstrap button
Apr 07, 2025 pm 03:09 PM
How to use the Bootstrap button? Introduce Bootstrap CSS to create button elements and add Bootstrap button class to add button text
 How to resize bootstrap
Apr 07, 2025 pm 03:18 PM
To adjust the size of elements in Bootstrap, you can use the dimension class, which includes: adjusting width: .col-, .w-, .mw-adjust height: .h-, .min-h-, .max-h-


