

Relevant code of CSS3 region module region

This article mainly introduces CSS3 region module region related writing examples, which is very helpful for the work related to page layout. Friends in need can refer to
print media, such as a magazine or a The biggest advantage of a newspaper compared to a website is its completely flexible page and paragraph layout. For example, print media has been able to elegantly populate content in multiple columns, even as complex as the screenshot below. 
However, trying to imitate a similar layout on the web is very tricky due to the content structure of the web.
In order to make the page layout more flexible like print media, a new CSS3 module has appeared - CSS3 regions. Rather than placing content across multiple elements, this module allows content to flow in designated regions on the page.
Let's see how this module works.
When everyone understands css region, you can understand it this way. I put a container in the document, and this container is filled with water. But I want to move water to area a, area b, and area c. I don't need to manually "divide" the water, but let the browser allocate the water to these areas. Therefore, it doesn't matter which container the water is put into. Once it is divided, it will not be displayed. You only need to tell the area and the large container. The area is where the water is put, and the container is where the water is taken.
Enable browser experimental features
This module is still in the experimental stage and currently only supports prefixed attributes under Google Chrome and IE. If you are using Google Chrome you first need to enable experimental features. Enter chrome://flags/ in the address bar. Set "Enable Experimental WebKit Features" to enabled. 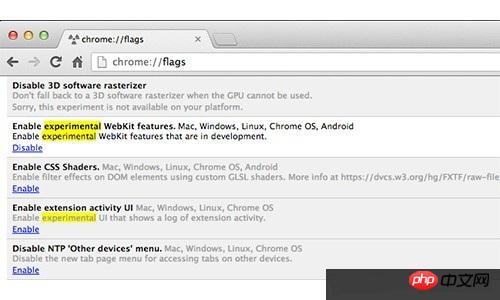
Basic Use Case
In this example, we will have two types of content: primary content and secondary content. Areas 1, 2 and 4 we fill with primary content, while secondary content will be displayed in area 3, see the image below. 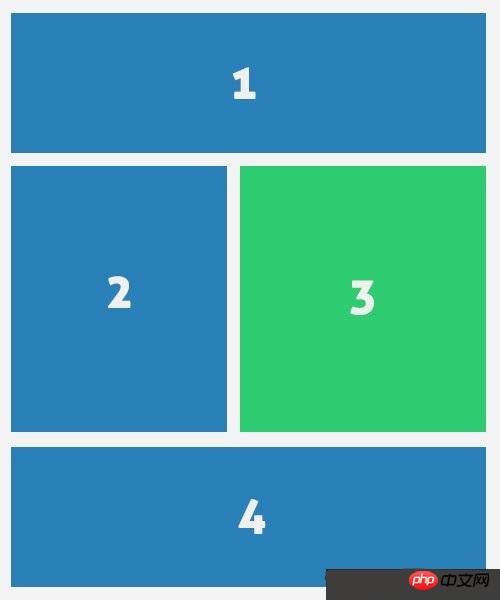
HTML
Let's start writing the HTML structure.
CSS3 area module is not restricted by structure, so we can simply add the html of the secondary content part outside the main content. As we mentioned above, we will display the secondary content in the middle of the main content. Want content.
<header class="cf">
    <h1><span>Lorem ipsum dolor sit amet,</span> consectetur adipisicing elit, sed do eiusmod tempor incididunt ut.</h1>
    <h2>labore et dolore magna aliqua</h2>
</header>
<article class="cf">
    <p>Lorem ipsum dolor sit amet, consectetur ...</p>
</article>
<aside>
    <p><img src="img/stat.jpg" width="500" height="300"></p>
    <p>Lorem ipsum dolor sit amet, consectetur ...</p>
</aside>Then, we need to add zone tags to mark what zone the content flows to. It makes no difference whether the marked area is higher or lower than the actual content.
What this means is that if there is a p with a lot of text in it, and you want to flow these words to another p, it doesn’t matter where this p is placed.
<p class="regions cf">
    <p id="region-1" class="region cf"></p>
    <p id="region-2" class="region"></p>
    <p id="region-3" class="region"></p>
    <p id="region-4" class="region cf"></p>
</p>CSS
In the style sheet, we specify the width and height of the area. The height is required because the height specifies content breakpoints, otherwise the content will not flow to other areas.
What this means is that the height specifies how much content this container can hold. If it exceeds the content, it will flow to other containers. ——@99
.demo-wrapper #region-1,
.demo-wrapper #region-4  {
    width: 100%;
    height: 250px;
}
.demo-wrapper #region-4 {
    height: 400px;
}
.demo-wrapper #region-2,
.demo-wrapper #region-3 {
    width: 50%;
    height: 700px;
    margin-bottom: 25px;
}In order to add content within the area, we use the new CSS properties flow-into and flow-from. These properties create a bridge between content and area. We can write style rules as follows to make content flow to regions.
The words behind flow-into and flow-from here are defined by you! For example, if I want the text in container a to flow into area b and c, I can set flow-into:a or any name you can imagine, and then use flow-from: the name you just used.
article {
    -webkit-flow-into: article;
    flow-into: article;
}
.demo-wrapper aside {
    -webkit-flow-into: aside;
    flow-into: aside;
}
#region-1,
#region-2,
#region-4 {
    -webkit-flow-from: article;
    flow-from: article;
}
#region-3 {
    -webkit-flow-from: aside;
    flow-from: aside;
} Adding some additional css, we will get the following results in the browser. 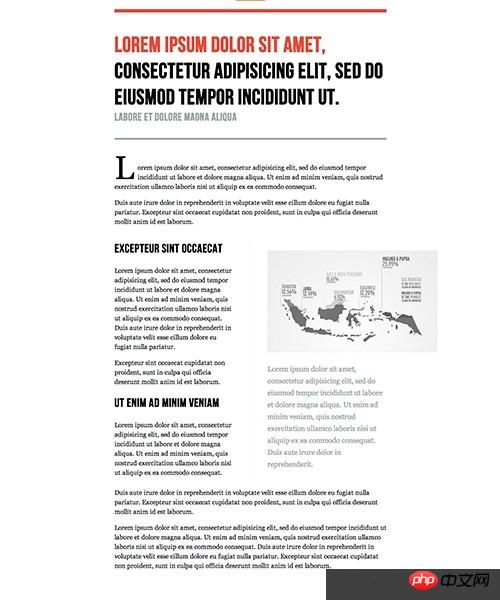
The above is the entire content of this article. I hope it will be helpful to everyone’s study. For more related content, please pay attention to the PHP Chinese website!
Related recommendations:
About the usage analysis of the Animation attribute in CSS3
##Analysis of CSS background and background-position
The above is the detailed content of Relevant code of CSS3 region module region. For more information, please follow other related articles on the PHP Chinese website!

Hot AI Tools

Undresser.AI Undress
AI-powered app for creating realistic nude photos

AI Clothes Remover
Online AI tool for removing clothes from photos.

Undress AI Tool
Undress images for free

Clothoff.io
AI clothes remover

Video Face Swap
Swap faces in any video effortlessly with our completely free AI face swap tool!

Hot Article
Hot Tools

Notepad++7.3.1
Easy-to-use and free code editor

SublimeText3 Chinese version
Chinese version, very easy to use

Zend Studio 13.0.1
Powerful PHP integrated development environment

Dreamweaver CS6
Visual web development tools

SublimeText3 Mac version
God-level code editing software (SublimeText3)
Hot Topics


 How to achieve wave effect with pure CSS3? (code example)
Jun 28, 2022 pm 01:39 PM
How to achieve wave effect with pure CSS3? (code example)
Jun 28, 2022 pm 01:39 PM
How to achieve wave effect with pure CSS3? This article will introduce to you how to use SVG and CSS animation to create wave effects. I hope it will be helpful to you!
 Use CSS skillfully to realize various strange-shaped buttons (with code)
Jul 19, 2022 am 11:28 AM
Use CSS skillfully to realize various strange-shaped buttons (with code)
Jul 19, 2022 am 11:28 AM
This article will show you how to use CSS to easily realize various weird-shaped buttons that appear frequently. I hope it will be helpful to you!
 How to hide elements in css without taking up space
Jun 01, 2022 pm 07:15 PM
How to hide elements in css without taking up space
Jun 01, 2022 pm 07:15 PM
Two methods: 1. Using the display attribute, just add the "display:none;" style to the element. 2. Use the position and top attributes to set the absolute positioning of the element to hide the element. Just add the "position:absolute;top:-9999px;" style to the element.
 How to implement lace borders in css3
Sep 16, 2022 pm 07:11 PM
How to implement lace borders in css3
Sep 16, 2022 pm 07:11 PM
In CSS, you can use the border-image attribute to achieve a lace border. The border-image attribute can use images to create borders, that is, add a background image to the border. You only need to specify the background image as a lace style; the syntax "border-image: url (image path) offsets the image border width inward. Whether outset is repeated;".
 It turns out that text carousel and image carousel can also be realized using pure CSS!
Jun 10, 2022 pm 01:00 PM
It turns out that text carousel and image carousel can also be realized using pure CSS!
Jun 10, 2022 pm 01:00 PM
How to create text carousel and image carousel? The first thing everyone thinks of is whether to use js. In fact, text carousel and image carousel can also be realized using pure CSS. Let’s take a look at the implementation method. I hope it will be helpful to everyone!
 How to enlarge the image by clicking the mouse in css3
Apr 25, 2022 pm 04:52 PM
How to enlarge the image by clicking the mouse in css3
Apr 25, 2022 pm 04:52 PM
Implementation method: 1. Use the ":active" selector to select the state of the mouse click on the picture; 2. Use the transform attribute and scale() function to achieve the picture magnification effect, the syntax "img:active {transform: scale(x-axis magnification, y Axis magnification);}".
 How to set animation rotation speed in css3
Apr 28, 2022 pm 04:32 PM
How to set animation rotation speed in css3
Apr 28, 2022 pm 04:32 PM
In CSS3, you can use the "animation-timing-function" attribute to set the animation rotation speed. This attribute is used to specify how the animation will complete a cycle and set the speed curve of the animation. The syntax is "element {animation-timing-function: speed attribute value;}".
 Does css3 animation effect have deformation?
Apr 28, 2022 pm 02:20 PM
Does css3 animation effect have deformation?
Apr 28, 2022 pm 02:20 PM
The animation effect in css3 has deformation; you can use "animation: animation attribute @keyframes ..{..{transform: transformation attribute}}" to achieve deformation animation effect. The animation attribute is used to set the animation style, and the transform attribute is used to set the deformation style. .
