

How to implement circular progress bar in css3

When developing a WeChat applet, I encountered the need for a circular progress bar. This article mainly introduces examples of using css3 to implement circular progress bars. The detailed code is compiled here, which is of great practical value. Friends who need it can refer to it. I hope it can help everyone.
Using canvas drawing is more troublesome:
1. In order to achieve adaptation on different screens, the size of the progress bar must be dynamically calculated;
2. In the applet , canvas has the highest level and is not easy to expand.
But using css3 and js to implement the progress bar can easily avoid this problem.
Note: This article is implemented using jquery, but the principle is the same. In the mini program, just define and change the corresponding variables.
1. Style of the progress bar style
In daily development, the border of an element is often used to display a circular pattern. This technique is also used when using CSS3 to implement a circular progress bar. In order to realize the circular border above and dynamically cover the circular border below, a total of one circle, 2 rectangles and 2 semicircles are needed: one circle is used to display the underlying background, and two semicircles are used to cover the underlying background. The background shows the progress, and the other two rectangles are used to cover the progress that does not need to be displayed. As shown below:
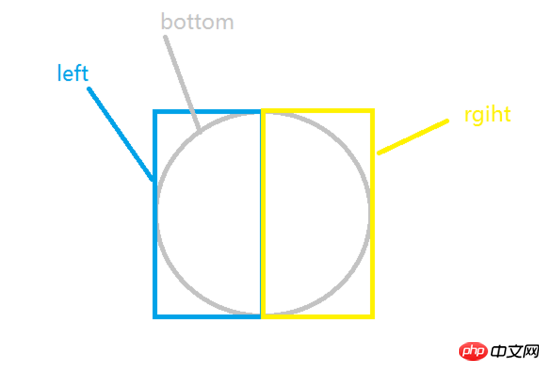
The bottom circle at the bottom is the background of the progress bar. There are two rectangles left and right above the bottom, which are used to cover the progress bar that is not to be displayed. There is a semicircle inside each of the two rectangles to show progress. Under normal circumstances, a semicircle drawn using a square has an included angle of 45 degrees in diameter and horizontally. In order to make the two semicircles just enough to cover the entire circle, you need to use rotate in CSS3 to rotate the original square to achieve the effect of covering the entire background. As shown in the picture below (for clarity, it is represented by a square here):
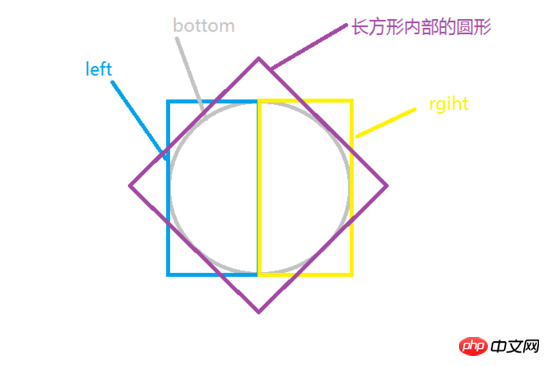
As shown in the picture, rotate the semicircle inside the rectangle 45 degrees to the right (clockwise) to get the progress An image that covers the entire background. Rotate the semicircle 135 degrees to the left (counterclockwise) to get an image with only the progress bar background. Why should we rotate to the left instead of all the way to the right? Of course, the effect we want to achieve is: the progress starts from the top and proceeds in time. At this point, the idea is very clear. You only need to control the display of progress on the left and right by the percentage.
The html and css code to implement this part is as follows:
html code
<p class="progressbar">
    <p class="left-container">
        <p class="left-circle"></p>
    </p>
    <p class="right-container">
        <p class="right-circle"></p>
    </p>
</p>
css code:
.progressbar{
    position: relative;
    margin: 100px auto;
    width: 100px;
    height: 100px;
    border: 20px solid #ccc;
    border-radius: 50%;
}
.left-container,.right-container{
    position: absolute;
    width: 70px;
    height: 140px;
    top:-20px;
    overflow: hidden;
    z-index: 1;
}
.left-container{
    left: -20px;
}
.right-container{
    right: -20px;
}
.left-circle,.right-circle{
    position: absolute;
    top:0;
    width: 100px;
    height: 100px;
    border:20px solid transparent;
    border-radius: 50%;
    transform: rotate(-135deg);
    transition: all .5s linear;
    z-index: 2;
}
.left-circle{
    left: 0;
    border-top-color: 20px solid blue;
    border-left-color: 20px solid blue;
}
.right-circle{
    border-right-color: 20px solid blue;
    border-bottom-color: 20px solid blue;
    right: 0;
}2: js to control the progress bar
In order to make the logic of the progress bar more robust, the implementation of the js part needs to consider four situations:
1. The basic value and the changed value are the same as the progress on the right,
2. The basic value is on the right, and the changed value is on the left.
3. The basic value and the changed value are on the left.
4. The basic value is on the left, and the changed value is on the left. right.
No matter in which case, the core needs to consider only two points: the change of angle and the amount of use time.
In the first case, it is relatively simple, and you can easily calculate the change in angle and the usage time. First, you need to set the time required to change the entire semicircle. After setting, just calculate the time required to change the angle based on the ratio. The code is as follows:
time = (curPercent - oldPercent)/50 * baseTime;
     //确定时间值为正
     curPercent - oldPercent > 0 ? '' : time = - time;
     deg = curPercent/50*180-135;
The second case is a little more troublesome. Because there is a transition from the progress on the right to the progress on the left. In order to change the progress smoothly, we need to use a timer here. After changing the right part, we can then modify the left part. The code is as follows:
//设置右边的进度
  time = (50 - oldPercent)/50 * baseTime;
deg = (50 - oldPercent)/50*180-135;
$rightBar .css({
    transform: 'rotate('+ deg+ 'deg)',
    transition : 'all '+ time + 's linear'
})
//延时设置左边进度条的改变
setTimeout(function(){
    time = (curPercent - 50)/50;
    deg = (curPercent - 50)/50*180 -135;

    $leftBar.css({
        transform: 'rotate('+ deg+ 'deg)',
        transition : 'all '+ time + 's linear'
    })
}, Math.floor(time*1000));000));The third and fourth situations are similar to the previous situations and will not be discussed here.
The complete code of the function that controls the progress bar is as follows (implemented using jQuery):
/**
    *设置进度条的变化
    *@param {number} oldPercent    进度条改变之前的半分比
    *@param {number} curPercent    进度条当前要设置的值
    *@return {boolean} 设置成功返回 true,否则,返回fasle
    */
    function setProgessbar(oldPercent, curPercent){
        var $leftBar = $('#left-bar');
        var $rightBar = $('#right-bar');
        //将传入的参数转换,允许字符串表示的数字
        oldPercent =  + oldPercent;
        curPercent =  + curPercent;
        //检测参数,如果不是number类型或不在0-100,则不执行
        if(typeof oldPercent ==='number' && typeof curPercent ==='number'
            && oldPercent >= 0 && oldPercent <= 100 && curPercent <= 100 && curPercent >= 0){

            var baseTime = 1;    //默认改变半圆进度的时间,单位秒
            var time = 0;    //进度条改变的时间
            var deg = 0;     //进度条改变的角度
            if(oldPercent > 50){//原来进度大于50
                if(curPercent>50){
                    //设置左边的进度
                    time = (curPercent - oldPercent)/50 * baseTime;
                    //确定时间值为正
                    curPercent - oldPercent > 0 ? '' : time = - time;
                    deg = curPercent/50*180-135;
                    $leftBar .css({
                        transform: 'rotate('+ deg+ 'deg)',
                        transition : 'all '+ time + 's linear'
                    })

                }else{
                    //设置左边的进度
                    time = (oldPercent - 50)/50 * baseTime;
                    deg = (oldPercent - 50)/50*180-135;
                    $leftBar .css({
                        transform: 'rotate('+ deg+ 'deg)',
                        transition : 'all '+ time + 's linear'
                    })
                    //延时设置右边进度条的改变
                    setTimeout(function(){
                        time = (50 - curPercent)/50;
                        deg = (50 - curPercent)/50*180 -135;
                        $rightBar.css({
                            transform: 'rotate('+ deg+ 'deg)',
                            transition : 'all '+ time + 's linear'
                        })
                    }, Math.floor(time*1000));
                }
            }else{//原来进度小于50时

                if(curPercent>50){
                    //设置右边的进度
                    time = (50 - oldPercent)/50 * baseTime;
                    deg = (50 - oldPercent)/50*180-135;
                    $rightBar .css({
                        transform: 'rotate('+ deg+ 'deg)',
                        transition : 'all '+ time + 's linear'
                    })
                    //延时设置左边进度条的改变
                    setTimeout(function(){
                        time = (curPercent - 50)/50;
                        deg = (curPercent - 50)/50*180 -135;

                        $leftBar.css({
                            transform: 'rotate('+ deg+ 'deg)',
                            transition : 'all '+ time + 's linear'
                        })
                    }, Math.floor(time*1000));
                }else{
                    //设置右边的进度
                    time = (curPercent - oldPercent)/50 * baseTime;
                    //确定时间值为正
                    curPercent - oldPercent > 0 ? '' : time = - time;
                    deg = curPercent/50*180-135;
                    $rightBar .css({
                        transform: 'rotate('+ deg+ 'deg)',
                        transition : 'all '+ time + 's linear'
                    })

                }
                return true;
            }
        }else{
            return false;
        }
}Have you learned it? Hurry up and give it a try.
Related recommendations:
How to implement download progress bar in WeChat applet
How to use css3 to create a progress bar
A simple implementation method of web page progress bar
The above is the detailed content of How to implement circular progress bar in css3. For more information, please follow other related articles on the PHP Chinese website!

Hot AI Tools

Undresser.AI Undress
AI-powered app for creating realistic nude photos

AI Clothes Remover
Online AI tool for removing clothes from photos.

Undress AI Tool
Undress images for free

Clothoff.io
AI clothes remover

Video Face Swap
Swap faces in any video effortlessly with our completely free AI face swap tool!

Hot Article
Hot Tools

Notepad++7.3.1
Easy-to-use and free code editor

SublimeText3 Chinese version
Chinese version, very easy to use

Zend Studio 13.0.1
Powerful PHP integrated development environment

Dreamweaver CS6
Visual web development tools

SublimeText3 Mac version
God-level code editing software (SublimeText3)
Hot Topics


 How to use bootstrap in vue
Apr 07, 2025 pm 11:33 PM
How to use bootstrap in vue
Apr 07, 2025 pm 11:33 PM
Using Bootstrap in Vue.js is divided into five steps: Install Bootstrap. Import Bootstrap in main.js. Use the Bootstrap component directly in the template. Optional: Custom style. Optional: Use plug-ins.
 The Roles of HTML, CSS, and JavaScript: Core Responsibilities
Apr 08, 2025 pm 07:05 PM
The Roles of HTML, CSS, and JavaScript: Core Responsibilities
Apr 08, 2025 pm 07:05 PM
HTML defines the web structure, CSS is responsible for style and layout, and JavaScript gives dynamic interaction. The three perform their duties in web development and jointly build a colorful website.
 How to write split lines on bootstrap
Apr 07, 2025 pm 03:12 PM
How to write split lines on bootstrap
Apr 07, 2025 pm 03:12 PM
There are two ways to create a Bootstrap split line: using the tag, which creates a horizontal split line. Use the CSS border property to create custom style split lines.
 Understanding HTML, CSS, and JavaScript: A Beginner's Guide
Apr 12, 2025 am 12:02 AM
Understanding HTML, CSS, and JavaScript: A Beginner's Guide
Apr 12, 2025 am 12:02 AM
WebdevelopmentreliesonHTML,CSS,andJavaScript:1)HTMLstructurescontent,2)CSSstylesit,and3)JavaScriptaddsinteractivity,formingthebasisofmodernwebexperiences.
 How to set up the framework for bootstrap
Apr 07, 2025 pm 03:27 PM
How to set up the framework for bootstrap
Apr 07, 2025 pm 03:27 PM
To set up the Bootstrap framework, you need to follow these steps: 1. Reference the Bootstrap file via CDN; 2. Download and host the file on your own server; 3. Include the Bootstrap file in HTML; 4. Compile Sass/Less as needed; 5. Import a custom file (optional). Once setup is complete, you can use Bootstrap's grid systems, components, and styles to create responsive websites and applications.
 How to insert pictures on bootstrap
Apr 07, 2025 pm 03:30 PM
How to insert pictures on bootstrap
Apr 07, 2025 pm 03:30 PM
There are several ways to insert images in Bootstrap: insert images directly, using the HTML img tag. With the Bootstrap image component, you can provide responsive images and more styles. Set the image size, use the img-fluid class to make the image adaptable. Set the border, using the img-bordered class. Set the rounded corners and use the img-rounded class. Set the shadow, use the shadow class. Resize and position the image, using CSS style. Using the background image, use the background-image CSS property.
 How to use bootstrap button
Apr 07, 2025 pm 03:09 PM
How to use bootstrap button
Apr 07, 2025 pm 03:09 PM
How to use the Bootstrap button? Introduce Bootstrap CSS to create button elements and add Bootstrap button class to add button text
 How to resize bootstrap
Apr 07, 2025 pm 03:18 PM
How to resize bootstrap
Apr 07, 2025 pm 03:18 PM
To adjust the size of elements in Bootstrap, you can use the dimension class, which includes: adjusting width: .col-, .w-, .mw-adjust height: .h-, .min-h-, .max-h-
