批改状态:合格
老师批语:
<!DOCTYPE html>
<html>
<head>
	<meta charset="utf-8">
	<title>QQ在线咨询</title>
	<style type="text/css">
	body{
		height: 1000px;
		width: 2000px;
	}
		#fixed{
			width: 190px;
			height: 355px;
			background-color:#FCFCFC;
			position: fixed;
			bottom: 20px;
			right: 20px;
			border:1px solid #EAEAEA;
			box-shadow: 2px 2px 2px #B0B0B0;
		}

		#help{
			width: 191px;
			height: 50px;
			background-color: lightgreen;
			line-height: 50px;
			text-align: center;
			color: white;
			font-size: 18px;
		}

		#qq{
			width: 100px;
			height: 40px;
			text-align: center;
			line-height: 50px;
			vertical-align: middle;
			padding-bottom: 10px;
		}

		#qq a{
			display: inline-block;
			width: 190px;
			height: 40px;
			text-decoration: none;
			display: block;
			color: gray;
			/*margin-left: 25px;*/
		}

		#qq img{
			width: 30px;
			height: 30px;
			/*margin-top: 10px;*/
			margin-bottom: -5px;
		}

		#phone{
			width: 100px;
			height: 40px;
			text-align: center;
			line-height: 50px;
			vertical-align: middle;
			padding-bottom: 10px;
		}

		#phone a{
			display: inline-block;
			width: 190px;
			height: 40px;
			text-decoration: none;
			display: block;
			color: gray;
			/*margin-left: 25px;*/
		}

		#phone img{
			width: 30px;
			height: 25px;
			/*margin-top: 10px;*/
			margin-bottom: -5px;
		}

	</style>
</head>
<body>
	<div id="fixed">
		<div id="help">免 费 咨 询</div>
		<div id="qq"><a href="#"><img src="img/qqcus.jpg">  售前小姐姐1</a></div>
		<div id="qq"><a href="#"><img src="img/qqcus.jpg">  售前小姐姐2</a></div>
		<div id="qq"><a href="#"><img src="img/qqcus.jpg">  售后小哥哥1</a></div>
		<div id="qq"><a href="#"><img src="img/qqcus.jpg">  售后小哥哥2</a></div>
		<div id="phone"><a href="#"><img src="img/phone.jpg">  400-2333-123</a></div>
		<div id="phone"><a href="#"><img src="img/phone.jpg">  400-3332-456</a></div>
	</div>
</body>
</html>点击 "运行实例" 按钮查看在线实例
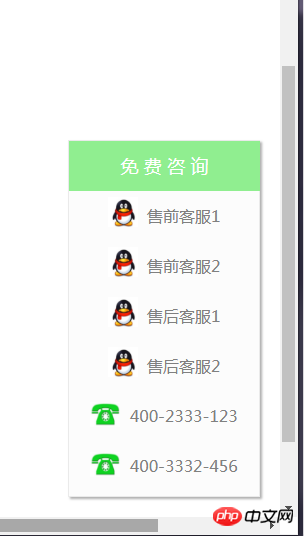
上面是QQ在线咨询的实例,主要运用了固定定位的技术,其余都是div的图文混排。由于图片无法上传,只能结合预览图看下了:

<!DOCTYPE html>
<html>
<head>
	<meta charset="utf-8">
	<title>图文混排</title>

	<style type="text/css">
	body{
		width: 1100px;
		/*height: 800px;*/
		/*border:2px solid green;*/
		margin: auto auto;
	}
		#total{
			background-color: white;
			padding: 20px 10px;
			margin: auto auto;
		}
		#total:after{
			content: '';	/*添加空元素*/
			display: block;
			clear: both;
		}
		img{
			border-radius: 10px;
		}

		#img{
			float: left;
			margin: 0 20px 0 0;
		}
		#right{
			float: left;
			width: 600px;
		}
		#right_title{
			margin: 0;
		}
		#right_con{
			font-size: 14px;
			color: gray;
		}
		#level{
			display: inline-block;
			background-color: rgb(238,238,238);
			width: 30px;
			height: 20px;
			font-size: 12px;
			text-align: center;
			color: rgb(102,102,102);
		}
		#detail{
			overflow: hidden;
		}
		#book{
			color: gray;
			font-size: 14px;
			float: left;
		}
		#book img{
			display: inline-block;
			width: 10px;
			height: 15px;
		}

		#head img{
			display: inline-block;
			width: 22px;
			height: 15px;
		}
		#head{
			color: gray;
			font-size: 14px;
			float: left;
		}
		#time
		{
			color: gray;
			font-size: 14px;
			float: left;
			height: 25px;
		}
		#see
		{
			float: left;
			width: 170px;
			height: 55px;
			background-color: rgb(255,87,34);
			border-radius: 5px;
			font-size: 14px;
			text-align: center;
			line-height: 55px;
		}
		#see a{
			width: 170px;
			height: 55px;
			text-decoration: none;
			display: block;
			color: white;
		}
		#down{
			float: left;
			width: 170px;
			height: 55px;
			background-color: rgb(57,61,73);
			border-radius: 5px;
			font-size: 14px;
			text-align: center;
			line-height: 55px;
			left: 20px;
			margin-left: 30px;
		}
		#down a{
			width: 170px;
			height: 55px;
			text-decoration: none;
			display: block;
			color: white;
		}
		#qq{
			float: left;
			width: 170px;
			height: 55px;
			background-color: rgb(0,150,136);
			border-radius: 5px;
			font-size: 14px;
			text-align: center;
			line-height: 55px;
			left: 20px;
			margin-left: 30px;
		}
		#qq img{
			width: 30px;
			height: 30px;
			margin-top: 10px;
			float: left;
			margin-left: 30px;
			margin-right: -30px;
		}

		#qq a{
			width: 170px;
			height: 55px;
			text-decoration: none;
			display: block;
			color: white;
		}
	</style>

</head>
<body>
	<div id="total">
		<div id="img"><img src="img/img1.jpg"></div>
		<div id="right">
			<div id="right_title" style="font-weight: bold;">第三期培训_前端基础</div>
			<div id="right_con"><p>PHP中文网第三期线上培训教程_前端基础学习内容: HTML5,CSS3,JavaScript,jQuery,Vue.js入门,Bootstrap,页面布局实战	《网站管理后台》的模板开发(综合应用以上所学知识)</p></div>
			<br>
			<div id="level">初级</div>
			<div id="detail">
				<br>
				<div id="book"><img src="img/book.jpg"> 共34章节  |  </div>
				<div id="head"><img src="img/head.jpg">5530次播放  |  </div>
				<div id="time">添加时间:2018-8-20 13:21</div>
			</div>
			<p></p>
			<div id="oper" style="overflow: hidden;">
				<div id="see"><a href="#">观看直播  |  ☆</a></div>
				<div id="down"><a href="#">课件下载</a></div></a>
				<div id="qq"><a href="#"><img src="img/qq.png">QQ群交流</a></div>
			</div>
		</div>
	</div>
</body>
</html>点击 "运行实例" 按钮查看在线实例
上面是仿照PHP中文网的培训直播块做的,主要是用了浮动和行内块以及相关的div图文混排来做的。同样图片无法可视,结合预览图来看:
![1534770163315714.png ]7%0ICVMU)LW2Y[_OF49I@E.png](https://img.php.cn//upload/image/743/899/899/1534770163315714.png)
双飞翼布局:
<!DOCTYPE html>
<html>
<head>
	<meta charset="utf-8">
	<title>双飞翼</title>

	<style type="text/css">
		/*设置头部与底部的样式*/
		.header,.footer{
			width: 100%;
			height: 60px;
			background-color: lightgreen;
		}
		/*清楚底部左右的浮动*/
		.footer{
			clear: both;
		}

		/*设置头部和底部的主体内容的样式*/
		.content{
			width: 1000px;
			min-height: 100%;
			background-color:green;
			margin: auto;
			text-align: center;
			line-height: 60px;
		}
		/*设置整个主体内容区域的样式*/
		.container{
			width: 1000px;
			margin: auto;
			background-color: yellow;
			overflow: hidden;
		}

		/*设置主体区域中的中间区块的基本样式*/
		.wrap{
			width: 100%;
			background-color: cyan;
			float: left;
		}

		/*主题内容区*/
		.main{
			/*宽度在父级已设置*/
			min-height: 600px;
			background-color: wheat;

			/*设置左右外边距,双飞翼与圣杯的本质区别,向外挤压*/
			margin-left: 210px;
			margin-right: 210px;
		}

		/*双飞翼的左翼样式*/
		.left{
			width: 200px;
			min-height: 600px;
			background-color: lightblue;
			float: left;
			/*将左边区块“拉回”主体区域*/
			margin-left: -100%;
		}
		/*双飞翼的右翼样式*/
		.right {
			width: 200px;
			min-height: 600px;
			background-color: purple;
			float: left;
			/*将右边区块“拉回”主体区域*/
			margin-left: -200px;
		}
	</style>
</head>
<body>
	<!-- 头部 -->
	<div class="header">
		<div class="content">头部</div>
	</div>

	<!-- 主体区块 -->
	<div class="container">
		<div class="wrap">
			<div class="main">主体内容</div>
		</div>

		<div class="left">左</div>

		<div class="right">右</div>
	</div>

	<!-- 底部 -->
	<div class="footer">
		<div class="content">底部</div>
	</div>
</body>
</html>点击 "运行实例" 按钮查看在线实例
双飞翼布局的设置,主要是浮动与margin的拉回动作
![1534770820865718.png BLE%1HZM$E3KV~4)7(]2]O9.png](https://img.php.cn//upload/image/157/653/929/1534770820865718.png)
圣杯布局:
<!DOCTYPE html>
<html>
<head>
	<meta charset="utf-8">
	<title>圣杯布局</title>

	<style type="text/css">
		/*设置头部底部的总体样式*/
		.header,.footer{
		width: 100%;
		height: 60px;
		background-color: lightgreen;
		}

		/*清楚底部的左右浮动样式*/
		.footer{
			clear: both;
		}

		/*设置头部底部的主体样式*/
		.content{
			width: 1000px;
			min-height: 100%;
			background-color:green;
			margin: 0 auto;
			text-align: center;
			line-height: 60px;

		}

		/*设置主体区域的总体样式*/
		.container{
			width: 600px;
			margin:auto;
			background-color: lightblue;
			overflow: hidden;	/*溢出隐藏*/
			padding: 0 200px;	/*左右内边距空出,为圣杯两侧挤出位置*/
		}

		/*直接设置主体样式*/
		.main{
			width: 100%;
			min-height: 650px;
			background-color: wheat;
			float: left;
		}

		.left{
			width: 200px;
			min-height: 650px;
			background-color: pink;
			float: left;
			margin-left: -100%;		/*因为父级“挤出了”左边的空格,所以左边区域刚好挤进去*/
			position: relative;
			left: -200px;
		}

		.right{
			width: 200px;
			min-height: 650px;
			background-color: pink;
			margin-left: -200px;	/*因为父级“挤出了”右边的空格,所以右边区域刚好挤进去*/
			float: left;
			position: relative;
			right: -200px;
		}

	</style>
</head>
<body>

	<!-- 头部 -->
	<div class="header">
		<div class="content">头部</div>
	</div>

	<!-- 主体区块 -->
	<div class="container">
		<div class="main">主体内容</div>

		<div class="left">左</div>

		<div class="right">右</div>
	</div>

	<!-- 底部 -->
	<div class="footer">
		<div class="content">底部</div>
	</div>

</body>
</html>点击 "运行实例" 按钮查看在线实例
与双飞翼不同的是圣杯的两侧布局是由父级元素挤出来的,相对来说,省了主体元素的外壳布局
![1534771289765175.png }UL0BCH8G9`W$1M]@2`RW8G.png](https://img.php.cn//upload/image/164/942/149/1534771289765175.png)
这段类容不是一般的少,虽然多,理解起来并不难,但是写起来还是会有点懵,总体来说还是自己没有完全吃透的原因。对于布局的技术,还是得多写多练,不是说听懂了就可以的。主要是margin和padding布局以及定位布局之间的关联性,无他,唯手熟尔。

Copyright 2014-2025 https://www.php.cn/ All Rights Reserved | php.cn | 湘ICP备2023035733号