


 PHPz
PHPz批改状态:合格
老师批语:

常见的请求场景如下:
任何请求都必须通过 url 发起
一个典型的 URL 格式如下:http://hostname:80/path/demo.php/a/b/c/id/5/uname/peter?k1=v1&k2=v2#anchor
-https 端口443 ftp 端口21
parse_url()函数demo1.php全球开发者使用最多的是 Chrome 浏览器,所以我们也会使用它
Chrome 开发者工具面板
%E4%B8%... !*'();:@&=+$,/?#[],所以中文需要进行编码-_.之外的所有非字母数字字符都将被替换成百分号(%)后跟两位十六进制数,空格则编码为加号+POST 数据的编码方式一样enctype application/x-www-form-urlencoded 的媒体类型编码方式一样urlencode() 和 urldecode()demo2.phpphp.cnphp.cn站点所在的 web 服务器图示:
jsonRedis, Memcachedconfig目录,就是这个原因Git提交供测试学习阶段, 学会搭建本地开发环境即可
php.eduWWW/php/
script### 初始化Git,创建本地版本库`cd php``git init`### 设置用户名和邮箱`git config --global user.name peter``git config --global user.email peter@php.cn`### 配置远程版本库`git remote add origin https://gitee.com/bnkt/php_edu.git`### 查看远程库`git remote -v`### 添加到暂存区`git add .`### 提交到本地版本库`git commit -m 'first commit'`### 查看本地状态`git status`### 提交到远程版本库`git push origin master`### 从远程仓库拉到项目到本地`git pull https://gitee.com/bnkt/php_edu.git`### 从远程仓库克隆项目到本地`git clone https://gitee.com/bnkt/php_edu.git`### 如果添加.gitignore不生效,要先清空本地缓存后再提交`git rm -r --cached`
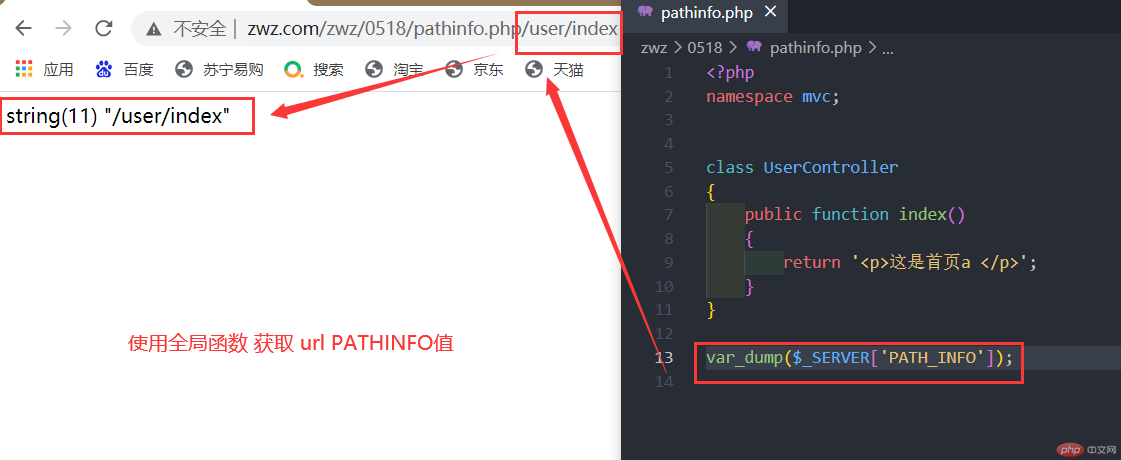
使用全局函数SERVER PATHINFO 获取url地址中的值,进行分解,最后映射到路由中
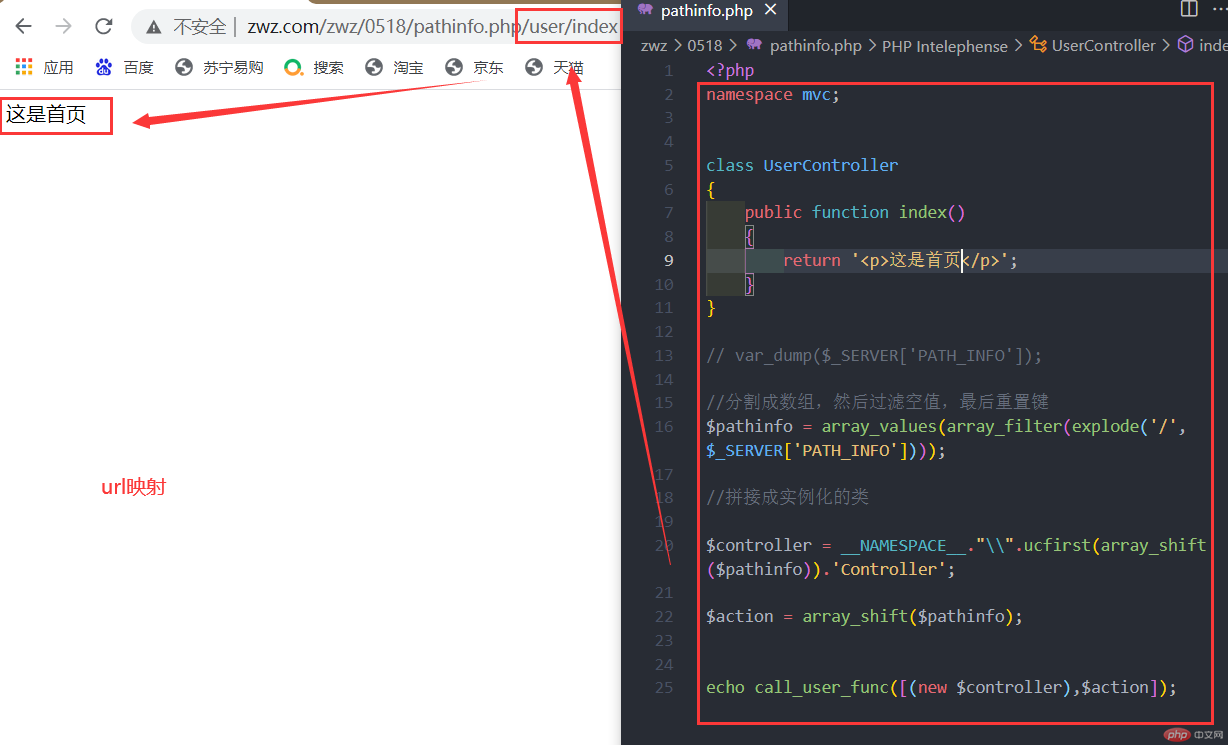
<?phpnamespace mvc;class UserController{public function index(){return '<p>这是首页</p>';}}// var_dump($_SERVER['PATH_INFO']);//分割成数组,然后过滤空值,最后重置键$pathinfo = array_values(array_filter(explode('/',$_SERVER['PATH_INFO'])));//拼接成实例化的类$controller = __NAMESPACE__."\\".ucfirst(array_shift($pathinfo)).'Controller';$action = array_shift($pathinfo);echo call_user_func([(new $controller),$action]);
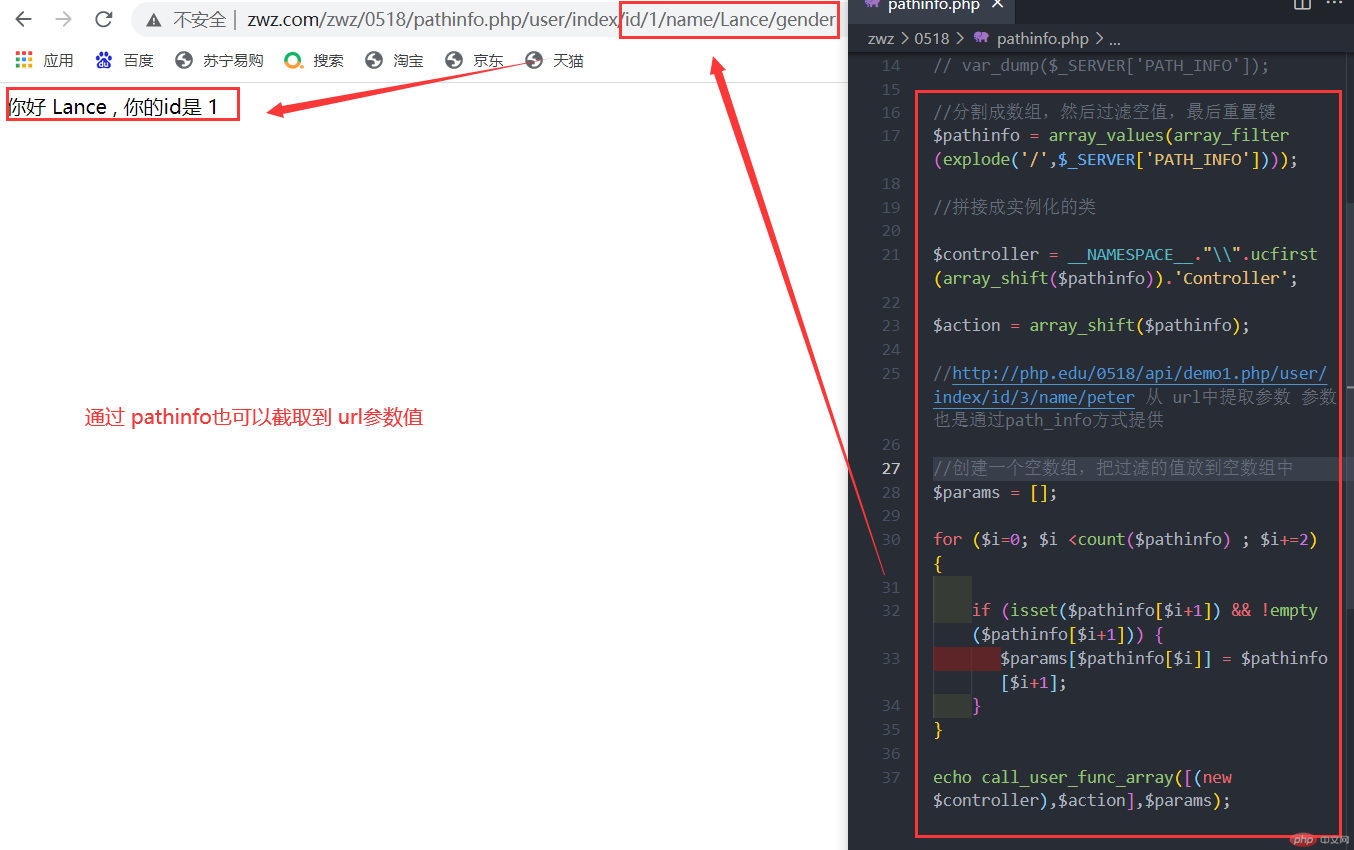
<?phpnamespace mvc;class UserController{public function index($id,$name){return "你好 $name , 你的id是 $id";return '<p>这是首页</p>';}}// var_dump($_SERVER['PATH_INFO']);//分割成数组,然后过滤空值,最后重置键$pathinfo = array_values(array_filter(explode('/',$_SERVER['PATH_INFO'])));//拼接成实例化的类$controller = __NAMESPACE__."\\".ucfirst(array_shift($pathinfo)).'Controller';$action = array_shift($pathinfo);//http://php.edu/0518/api/demo1.php/user/index/id/3/name/peter 从 url中提取参数 参数也是通过path_info方式提供//创建一个空数组,把过滤的值放到空数组中$params = [];for ($i=0; $i <count($pathinfo) ; $i+=2) {if (isset($pathinfo[$i+1]) && !empty($pathinfo[$i+1])) {$params[$pathinfo[$i]] = $pathinfo[$i+1];}}echo call_user_func_array([(new $controller),$action],$params);
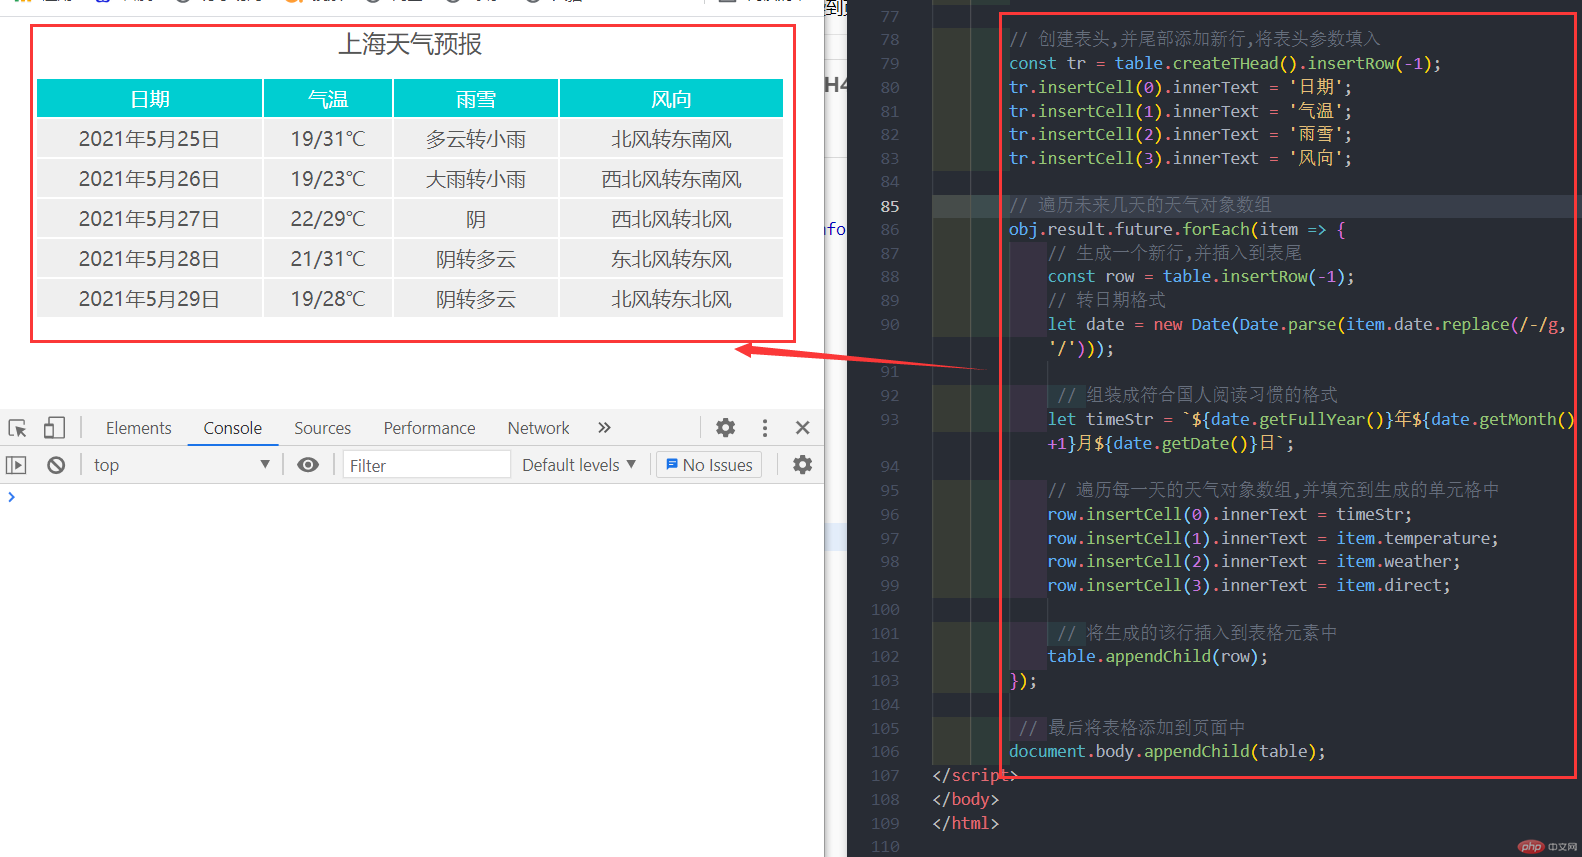
<?php//请求天气预报接口//curl 初始化 获取一个curl句柄 发起http请求$url = 'http://apis.juhe.cn/simpleWeather/query?';$key = 'eb8f148b35bb2f22c3fd59804f58084c';$city = '上海';//http_build_query — 生成 URL-encode 之后的请求字符串$query = http_build_query(['key'=>'eb8f148b35bb2f22c3fd59804f58084c','city'=>'上海']);//curl_init — 初始化 cURL 会话$ch = curl_init();//curl_setopt — 设置 cURL 传输选项//CURLOPT_URL 需要获取的 URL 地址,也可以在curl_init() 初始化会话的时候。curl_setopt($ch,CURLOPT_URL,$url.$query);//CURLOPT_HTTPGET true 时会设置 HTTP 的 method 为 GET,由于默认是 GET,所以只有 method 被修改时才需要这个选项。curl_setopt($ch,CURLOPT_HTTPGET,true);//CURLOPT_HEADER 启用时会将头文件的信息作为数据流输出。curl_setopt($ch,CURLOPT_HEADER,false);//CURLOPT_RETURNTRANSFER true 将curl_exec()获取的信息以字符串返回,而不是直接输出。curl_setopt($ch,CURLOPT_RETURNTRANSFER,true);// 抓取URL并把它传递给浏览器$apiData = curl_exec($ch);//关闭cURL资源,并且释放系统资源curl_close($ch);?><!DOCTYPE html><html lang="en"><head><meta charset="UTF-8"><meta http-equiv="X-UA-Compatible" content="IE=edge"><meta name="viewport" content="width=device-width, initial-scale=1.0"><title>Document</title></head><style>table {color: #555;background-color: #efefef;border-collapse: collapse;width: 600px;text-align: center;margin: auto;}td {border: 2px solid #FFF;padding: 5px;}table caption {font-size: 1.2rem;margin-bottom: 15px;}table thead tr:first-of-type {background-color: darkturquoise;color: white;}</style><body><script>const obj = <?=$apiData?>;// console.log(obj);// 创建表格元素const table = document.createElement('table');// 表头: 城市 + 标题, 如:上海天气预报table.createCaption().textContent = obj.result.city + '天气预报';// 创建表头,并尾部添加新行,将表头参数填入const tr = table.createTHead().insertRow(-1);tr.insertCell(0).innerText = '日期';tr.insertCell(1).innerText = '气温';tr.insertCell(2).innerText = '雨雪';tr.insertCell(3).innerText = '风向';// 遍历未来几天的天气对象数组obj.result.future.forEach(item => {// 生成一个新行,并插入到表尾const row = table.insertRow(-1);// 转日期格式let date = new Date(Date.parse(item.date.replace(/-/g, '/')));// 组装成符合国人阅读习惯的格式let timeStr = `${date.getFullYear()}年${date.getMonth()+1}月${date.getDate()}日`;// 遍历每一天的天气对象数组,并填充到生成的单元格中row.insertCell(0).innerText = timeStr;row.insertCell(1).innerText = item.temperature;row.insertCell(2).innerText = item.weather;row.insertCell(3).innerText = item.direct;// 将生成的该行插入到表格元素中table.appendChild(row);});// 最后将表格添加到页面中document.body.appendChild(table);</script></body></html>
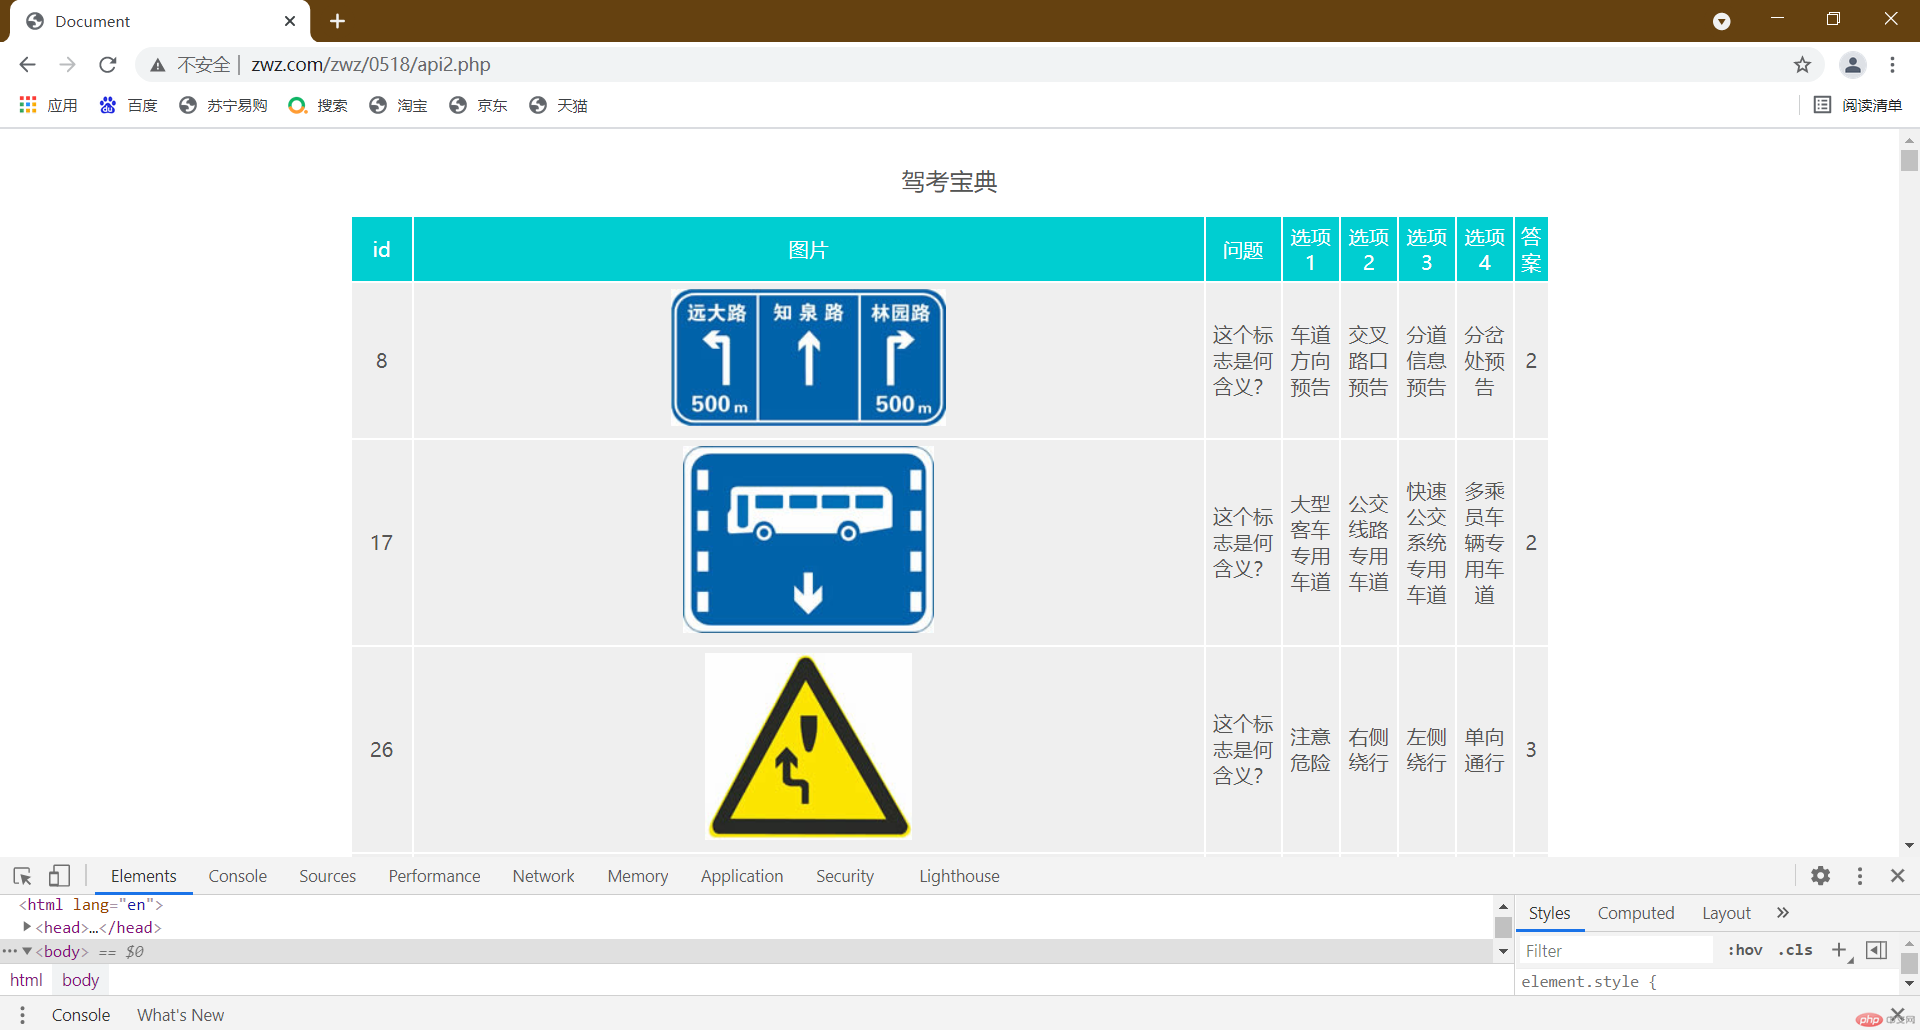
<?php//请求天气预报接口//curl 初始化 获取一个curl句柄 发起http请求$url = 'http://v.juhe.cn/jztk/query?';$key = '304dde4f5025a4d6eec392b0c15fcb1b';$subject = 1;$model = 'c2';$testType = 'rand';//http_build_query — 生成 URL-encode 之后的请求字符串$query = http_build_query(['subject'=>1,'model'=>'c2','testType' =>'rand','key'=>'304dde4f5025a4d6eec392b0c15fcb1b',]);//curl_init — 初始化 cURL 会话$ch = curl_init();//curl_setopt — 设置 cURL 传输选项//CURLOPT_URL 需要获取的 URL 地址,也可以在curl_init() 初始化会话的时候。curl_setopt($ch,CURLOPT_URL,$url.$query);//CURLOPT_HTTPGET true 时会设置 HTTP 的 method 为 GET,由于默认是 GET,所以只有 method 被修改时才需要这个选项。curl_setopt($ch,CURLOPT_HTTPGET,true);//CURLOPT_HEADER 启用时会将头文件的信息作为数据流输出。curl_setopt($ch,CURLOPT_HEADER,false);//CURLOPT_RETURNTRANSFER true 将curl_exec()获取的信息以字符串返回,而不是直接输出。curl_setopt($ch,CURLOPT_RETURNTRANSFER,true);// 抓取URL并把它传递给浏览器$apiData = curl_exec($ch);//关闭cURL资源,并且释放系统资源curl_close($ch);?><!DOCTYPE html><html lang="en"><head><meta charset="UTF-8"><meta http-equiv="X-UA-Compatible" content="IE=edge"><meta name="viewport" content="width=device-width, initial-scale=1.0"><title>Document</title></head><style>table {color: #555;background-color: #efefef;border-collapse: collapse;width: 600px;text-align: center;margin: auto;}td {border: 2px solid #FFF;padding: 5px;}table caption {font-size: 1.2rem;margin-bottom: 15px;}table thead tr:first-of-type {background-color: darkturquoise;color: white;}</style><body><img src="" alt=""><script>const obj = <?=$apiData?>;console.log(obj);// 创建表格元素const table = document.createElement('table');//表头table.createCaption().textContent = '驾考宝典';// 创建表头,并尾部添加新行,将表头参数填入const tr = table.createTHead().insertRow(-1);tr.insertCell(0).innerText = 'id';tr.insertCell(1).innerText = '图片';tr.insertCell(2).innerText = '问题';tr.insertCell(3).innerText = '选项1';tr.insertCell(4).innerText = '选项2';tr.insertCell(5).innerText = '选项3';tr.insertCell(6).innerText = '选项4';tr.insertCell(7).innerText = '答案';//遍历驾考宝典问题document.body.appendChild(table);obj.result.forEach(item => {// 生成一个新行,并插入到表尾const url = item.url;console.log(url);const row = table.insertRow(-1);row.insertCell(0).innerText = item.id;row.insertCell(1).innerHTML = "<img " + "src=" + `'`+ url +`'` + ">";// 将生成的该行插入到表格元素中table.appendChild(row);row.insertCell(2).innerText = item.question;row.insertCell(3).innerText = item.item1;row.insertCell(4).innerText = item.item2;row.insertCell(5).innerText = item.item3;row.insertCell(6).innerText = item.item4;row.insertCell(7).innerText = item.answer;});// 最后将表格添加到页面中document.body.appendChild(table);</script></body></html>
创建 composer.bat:@php "%~dp0composer.phar" %*
php composer.phar -V
composer config -g repo.packagist composer https://mirrors.aliyun.com/composer/
Copyright 2014-2025 https://www.php.cn/ All Rights Reserved | php.cn | 湘ICP备2023035733号


