
ID 选择器:#one { border-radius: 90%; } 选中的1号变为球型;
属性选择器:.three { background-color: lightgreen; border-radius: 90%; } 选中的3号变成球形并且颜色变成浅绿色;
群组选择器:.four, #seven { border-radius: 50%; background-color: mediumslateblue;} 同时选择4号和7号生成球型变成紫色;
属性选择器:li[id="five"] { border-radius: 40px; border: 2px solid;} 选中5号变成球型添加2px的黑色边框;
相邻选择器:#five+* { background-color: cadetblue; border-radius: 50%; } 与5号相邻的6号变成墨绿色4号不变色
兄弟选择器:#seven~* { background-color: yellowgreen;} 与7号后面同级的所有兄弟8,9,10号都变成黄绿色;
伪类选择器:根据位置和类型分成2种:
根据位置:
ul :first of child { border-radius: 40px; color: darkgoldenrod; background-color: yellow; }第一个li(1号球)颜色变成黄色
球型字体变成深黄色;
ul :last of child { background-color: lightseagreen;color: aliceblue; } 最后一个li(10号球)颜色变成黄色
球型字体变成深黄色
ul :nth-child(8) {border: 2px double lightcoral; border-radius: 30%; } 8号边框变成粉色
根据类型:
ul li:first-of-type {
border-radius: 40px;
color: darkgoldenrod;
background-color: yellow;
}
1号小球字体变黄,整体颜色变黄
ul li:last-of-type {
background-color: lightseagreen;
color: aliceblue;
}
最后一个10号小球 字体颜色变白,整体颜色变浅蓝
ul li:nth-of-type(9) {
background-color: lightslategray;
border-radius: 50%;
}
9号变成小球颜色变成浅灰
相邻选择器和兄弟选择器都可以选择后面的元素,但是相邻选择器之能选择相邻的一个元素,而兄弟选择器可以选择后面同级别的所有元素。
nth-of-child 和nth-of-type 可以选择相同的元素,但是它们的关注点不同,如果关注点在位置,用nth-of-child
如果既要关注位置还要关注类型 使用nth-of-type
<!DOCTYPE html>
<html lang="en">

<head>
    <meta charset="UTF-8">
    <meta name="viewport" content="width=device-width, initial-scale=1.0">
    <meta http-equiv="X-UA-Compatible" content="ie=edge">
    <style>
        /* 标签选择器 */

        ul {
            margin: 0;
            padding: 0;
        }

        ul li {
            list-style: none;
            width: 40px;
            height: 40px;
            background-color: pink;
            border: 1px solid black;
            /* 水平垂直 居中*/
            text-align: center;
            line-height: 40px;
            /*将一个块级元素转为内联元素
            内联元素是单行文本,多个元素在一行显示,
            但是不支持宽高,而块级元素支持宽高却不再一行显示,
            而内联块就是两者的综合*/
            display: inline-block;
            /* 加阴影
              第一,二位表示左右 偏移量
              第三位表示扩散范围
              第四位表示颜色
            */
            box-shadow: 2px 2px 1px #888;
            border-radius: 25%;
            padding: 10px;
            margin: 10px;
        }
        /* id 选择器  */

        #one {
            border-radius: 90%;
        }
        /* class 选择器 */

        .three {
            background-color: lightgreen;
            border-radius: 90%;
        }
        /* 群组选择器 */

        .four,
        #seven {
            border-radius: 50%;
            background-color: mediumslateblue;
        }
        /* 属性选择器 */

        li[id="five"] {
            border-radius: 40px;
            border: 2px solid;
        }
        /* 相邻选择器 */

        #five+* {
            background-color: cadetblue;
            border-radius: 50%;
        }
        /* 兄弟选择器 */

        #seven~* {
            background-color: yellowgreen;
        }
        /* 伪类选择器 根据位置和类型来选择*/
        /* 根据位置来选择 */

        ul :first-child {
            border: 5px solid lightcoral;
        }

        ul :last-child {
            border: 2px double lightcoral;
        }

        ul :nth-child(8) {
            border: 2px double lightcoral;
            border-radius: 30%;
        }
        /* 根据类型来选择 */

        ul li:first-of-type {
            border-radius: 40px;
            color: darkgoldenrod;
            background-color: yellow;
        }

        ul li:last-of-type {
            background-color: lightseagreen;
            color: aliceblue;
        }

        ul li:nth-of-type(9) {
            background-color: lightslategray;
            border-radius: 50%;
        }
    </style>
    <title>Document</title>
</head>

<body>
    <ul>
        <li id="one">1</li>
        <li>2</li>
        <li class="three">3</li>
        <li class="four">4</li>
        <li id="five">5</li>
        <li>6</li>
        <li id="seven">7</li>
        <li>8</li>
        <li>9</li>
        <li>10</li>
    </ul>

</body>

</html>点击 "运行实例" 按钮查看在线实例
1padding 对盒子大小的影响与解决
![]()
![]()
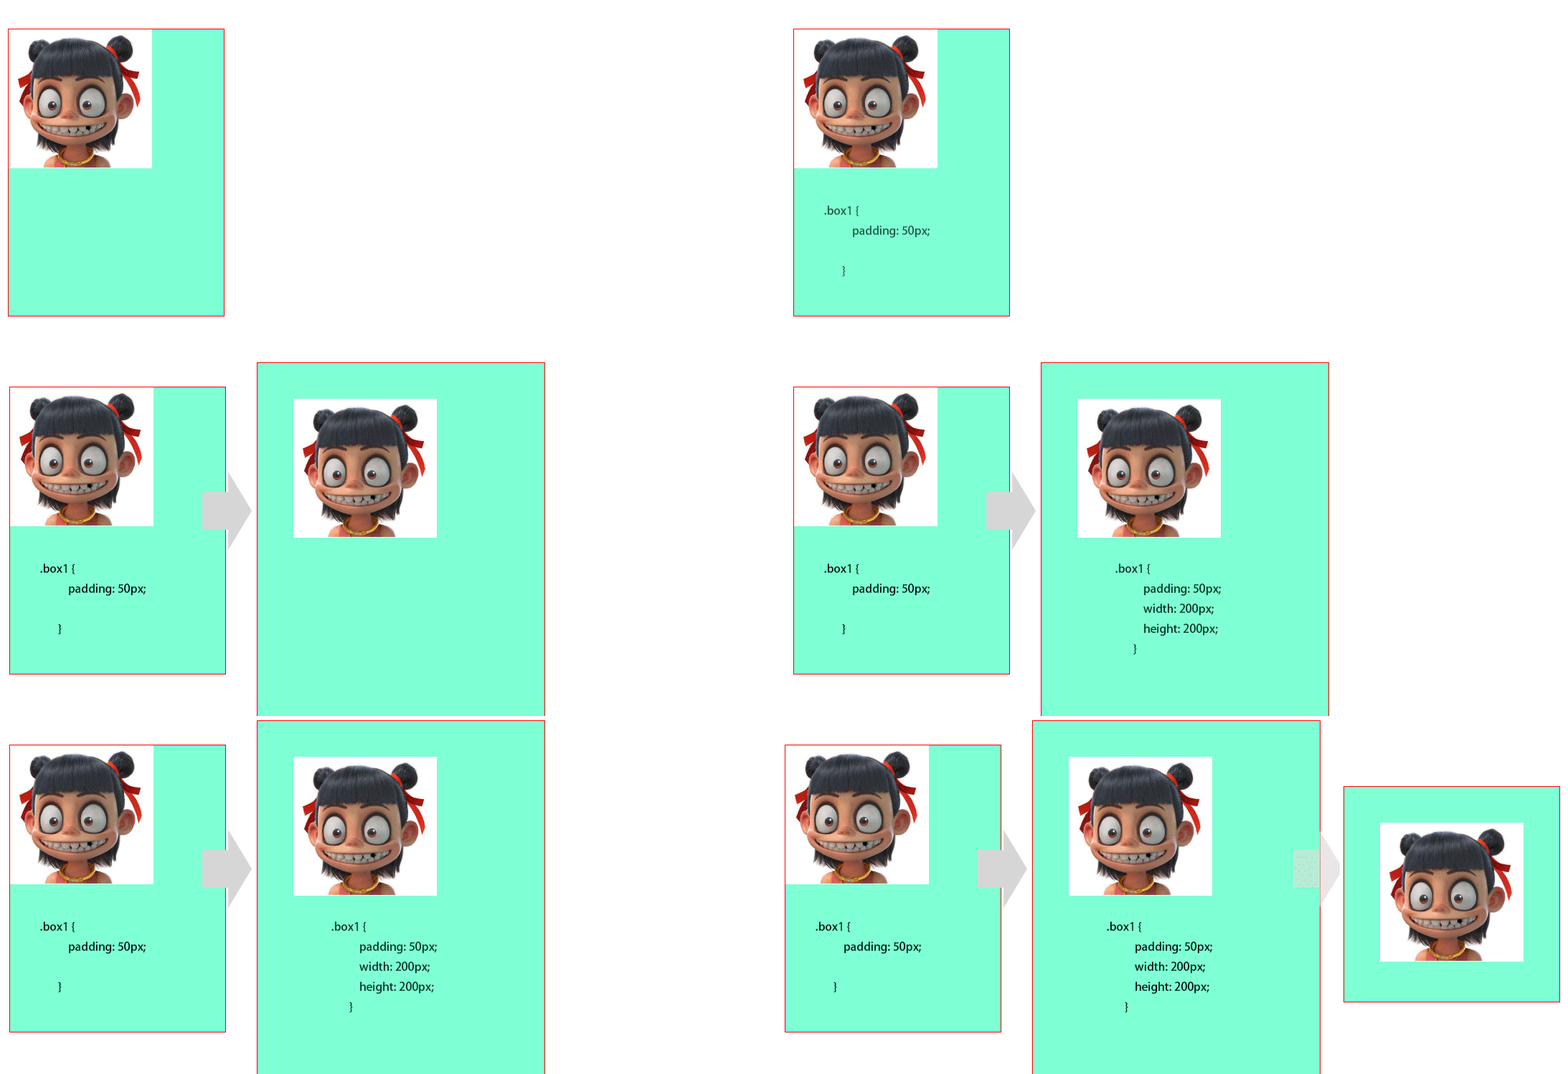
在盒子上添加padding50px后盒子会被撑开,需要再重新设置box的高度和宽度,这样才能使图片居中显示
<!DOCTYPE html>
<html lang="en">

<head>
    <meta charset="UTF-8">
    <meta name="viewport" content="width=device-width, initial-scale=1.0">
    <meta http-equiv="X-UA-Compatible" content="ie=edge">
    <style>
        .box1,
        .box2,
        .box3 {
            width: 300px;
            height: 400px;
            background-color: aquamarine;
            border: 1px solid red;
            margin: 20px;
        }

        .box1 {
            padding: 50px;
            width: 200px;
            height: 200px;
        }
        /* .box2 {} */
    </style>
    <title>Document</title>
</head>

<body>
    <div class="box1">
        <img src="images/2.jpeg" width="200" alt="">

    </div>
    <!-- <div class="box2">
        <img src="images/1.jpeg" width="200" alt="">
    </div>
    <div class="box3">
        <img src="images/3.jpeg" width="200" alt="">
    </div> -->

</body>

</html>;点击 "运行实例" 按钮查看在线实例
2.padding 对盒子大小的影响与解决
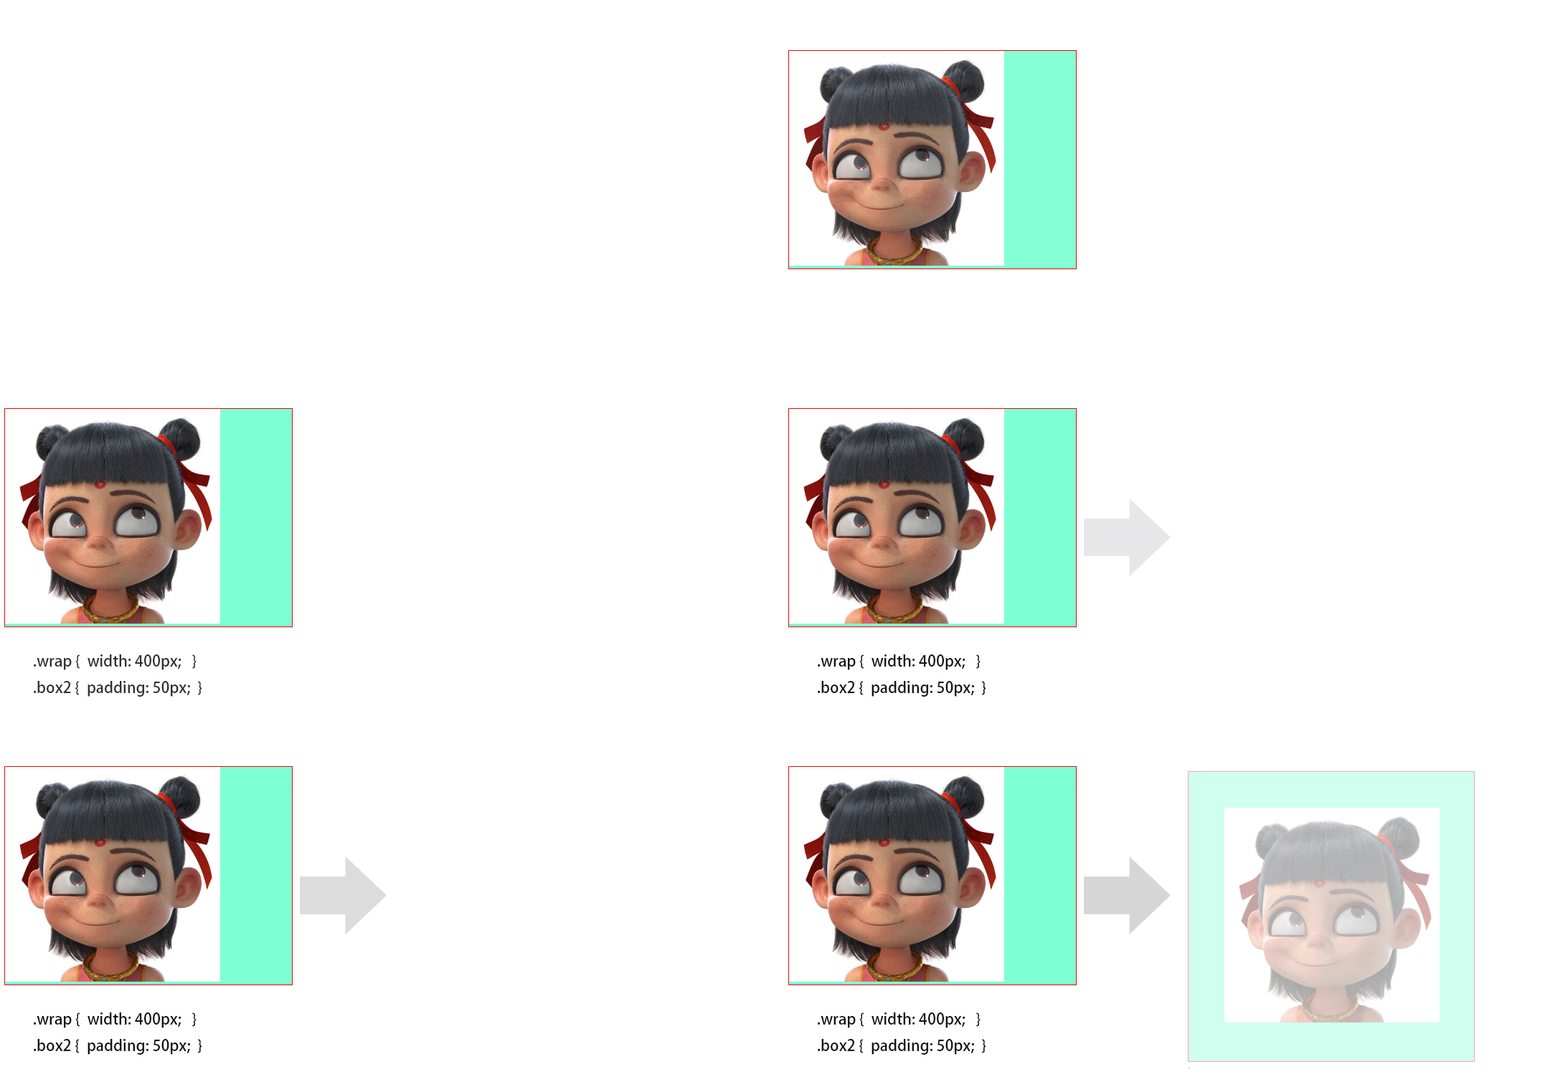
宽度分离:在盒子(box2)的外面再增加一个父级(wrap),设置父级的宽度,在box2上使用padding
<!DOCTYPE html>
<html lang="en">

<head>
    <meta charset="UTF-8">
    <meta name="viewport" content="width=device-width, initial-scale=1.0">
    <meta http-equiv="X-UA-Compatible" content="ie=edge">
    <style>
        /* .box1, */

        .box2,
        .box3 {
            /* width: 400px; */
            background-color: aquamarine;
            border: 1px solid red;
        }
        /* .box1 {
            padding: 50px;
            width: 200px;
            height: 200px;
        } */
        /* 高度分离 */

        .wrap {
            width: 400px;
        }

        .box2 {
            padding: 50px;
        }
        /* .box3 {
            box-sizing: border-box;
            padding: 50px;
            width: 400px;
        } */
    </style>
    <title>Document</title>
</head>

<body>
    <!-- <div class="box1">
        <img src="images/2.jpeg" width="200" alt="">

    </div> -->
    <div class="wrap">
        <div class="box2">
            <img src="images/1.jpeg" width="300" alt="">
        </div>
    </div>
    <!-- <div class="box3">
        <img src="images/3.jpeg" width="300" alt="">
    </div> -->

</body>

</html>;点击 "运行实例" 按钮查看在线实例
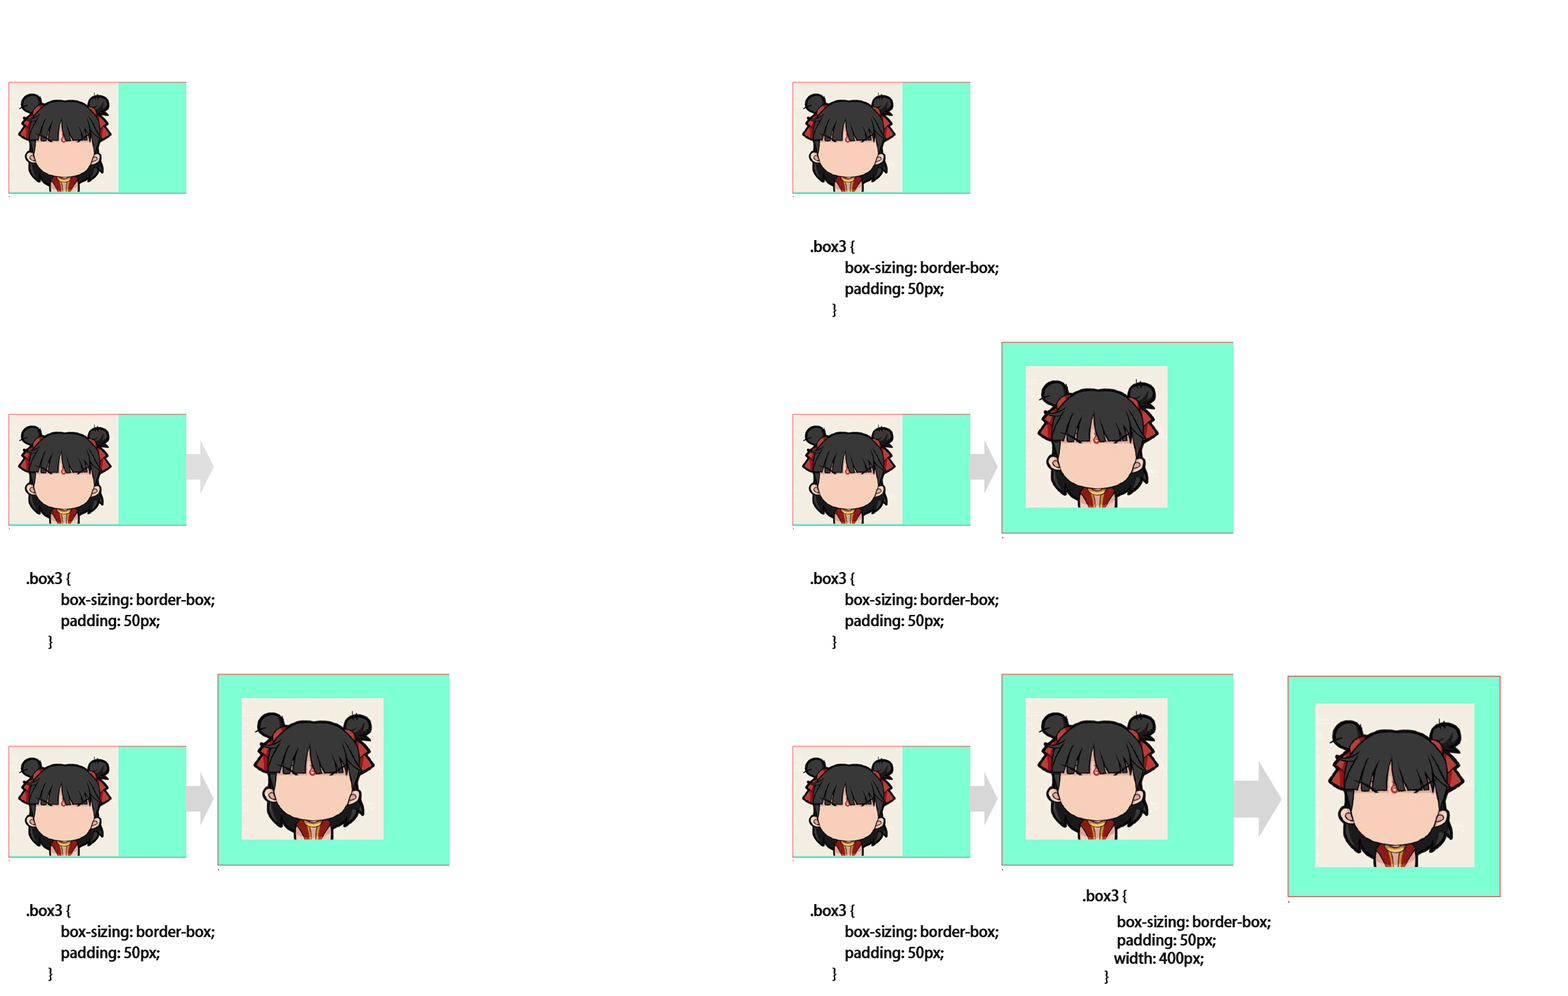
box-sizing
作用于边框上 border-box包含了margin+padding
<!DOCTYPE html>
<html lang="en">

<head>
    <meta charset="UTF-8">
    <meta name="viewport" content="width=device-width, initial-scale=1.0">
    <meta http-equiv="X-UA-Compatible" content="ie=edge">
    <style>
        /* .box1, */

        .box2,
        .box3 {
            /* width: 400px; */
            background-color: aquamarine;
            border: 1px solid red;
        }
        /* .box1 {
            padding: 50px;
            width: 200px;
            height: 200px;
        } */
        /* 高度分离 */
        /*
        .wrap {
            width: 400px;
        }

        .box2 {
            padding: 50px;
        } */

        .box3 {
            box-sizing: border-box;
            padding: 50px;
            width: 400px;
        }
    </style>
    <title>Document</title>
</head>

<body>
    <!-- <div class="box1">
        <img src="images/2.jpeg" width="200" alt="">

    </div> -->
    <!-- <div class="wrap">
        <div class="box2">
            <img src="images/1.jpeg" width="300" alt="">
        </div>
    </div> -->
    <div class="box3">
        <img src="images/3.jpeg" width="300" alt="">
    </div>

</body>

</html>;点击 "运行实例" 按钮查看在线实例
margin中的同级塌陷, 嵌套传递与自动挤压
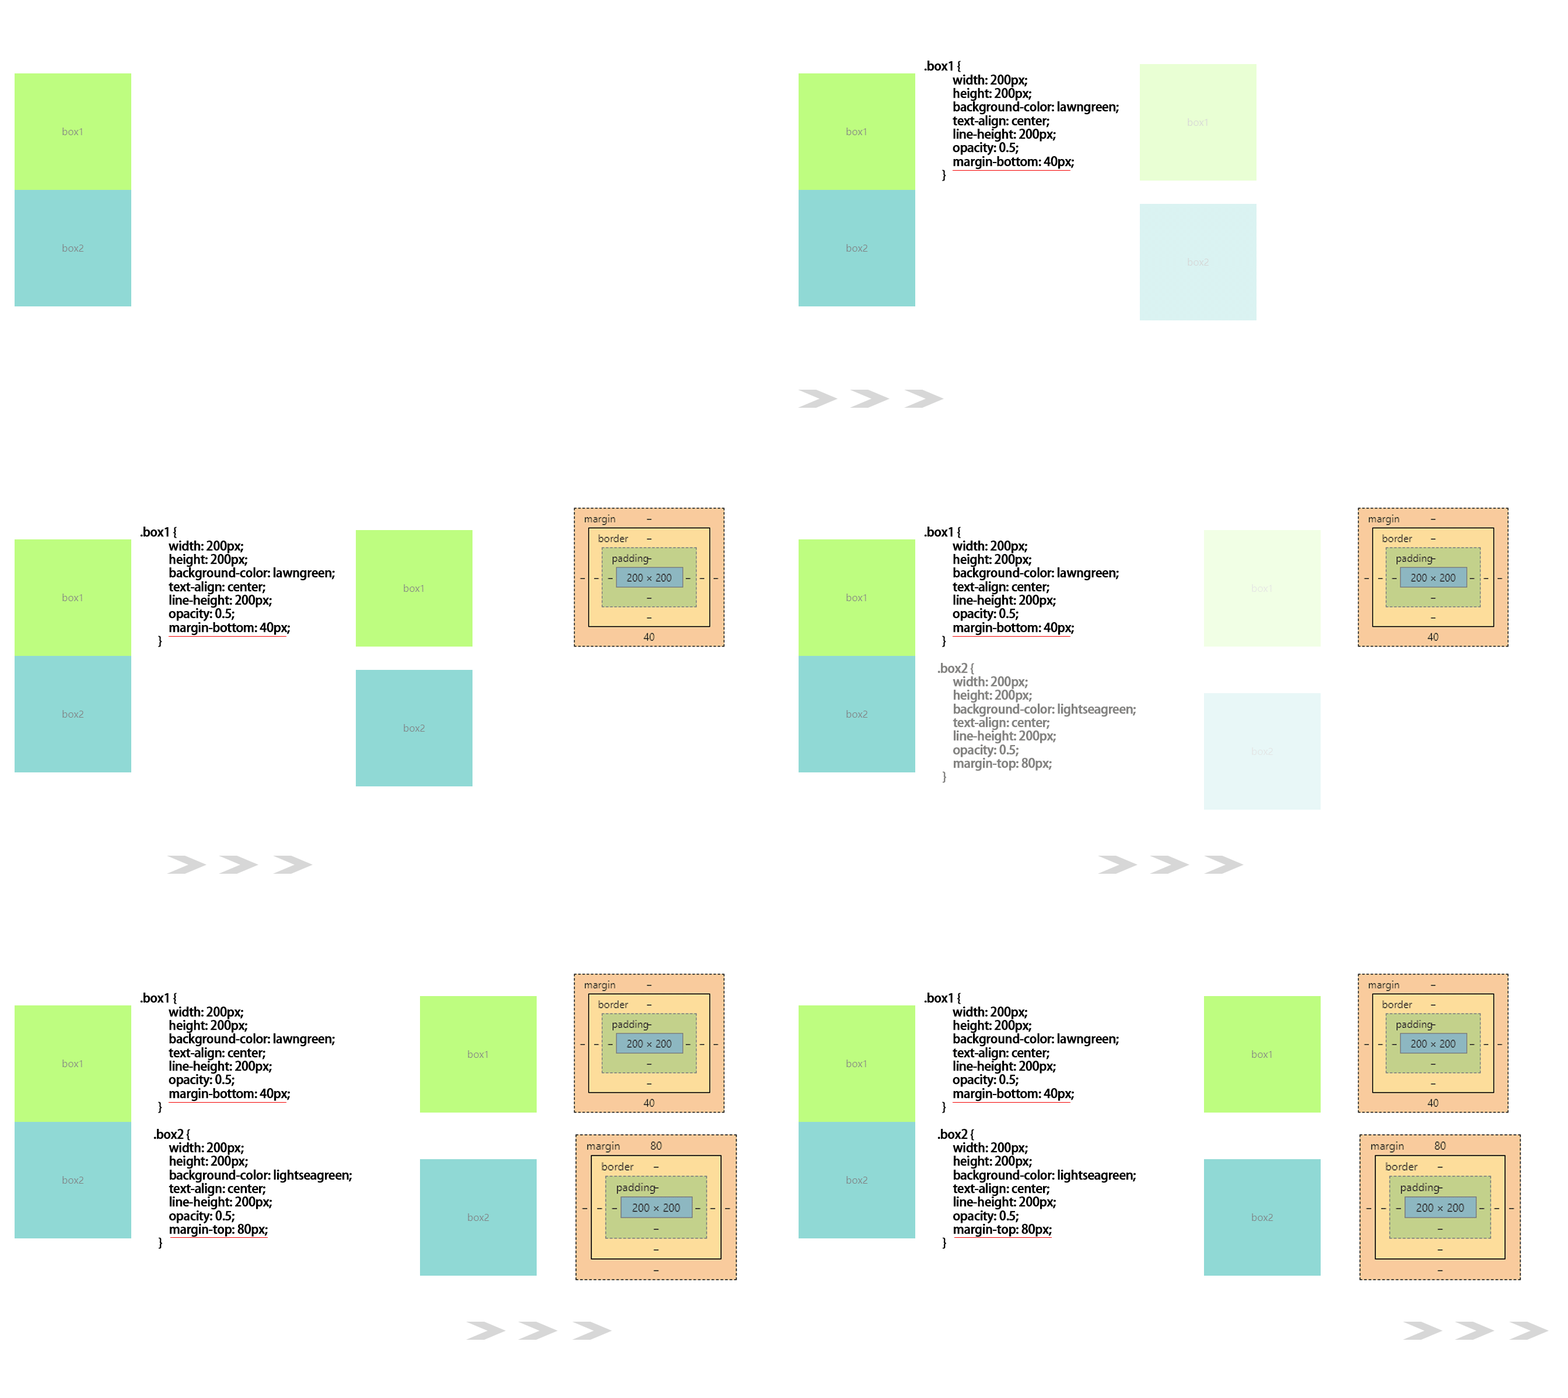
同级塌陷:两个相邻的元素之间的外边距会相互塌陷,塌陷后的间距等于两个元素外边距较大的一个(不受浮动影响)
只作用于垂直方向,
解决的办法就是按照需要的边距进行一方的设置。
<!DOCTYPE html>
<html lang="en">

<head>
    <meta charset="UTF-8">
    <meta name="viewport" content="width=device-width, initial-scale=1.0">
    <meta http-equiv="X-UA-Compatible" content="ie=edge">
    <style>
        .box1 {
            width: 200px;
            height: 200px;
            background-color: lawngreen;
            text-align: center;
            line-height: 200px;
            opacity: 0.5;
            margin-bottom: 40px;
        }

        .box2 {
            width: 200px;
            height: 200px;
            background-color: lightseagreen;
            text-align: center;
            line-height: 200px;
            opacity: 0.5;
            margin-top: 80px;
        }
    </style>


    <title>Document</title>
</head>

<body>
    <div class="box1">box1</div>
    <div class="box2">box2</div>

</body>

</html>点击 "运行实例" 按钮查看在线实例
嵌套传递:当子元素外面有个父元素时,父元素没有margin padding 等边距设定时,子元素如果设置边距就会传递给父元素是父元素的边框也会被撑开(父元素不能浮动)。
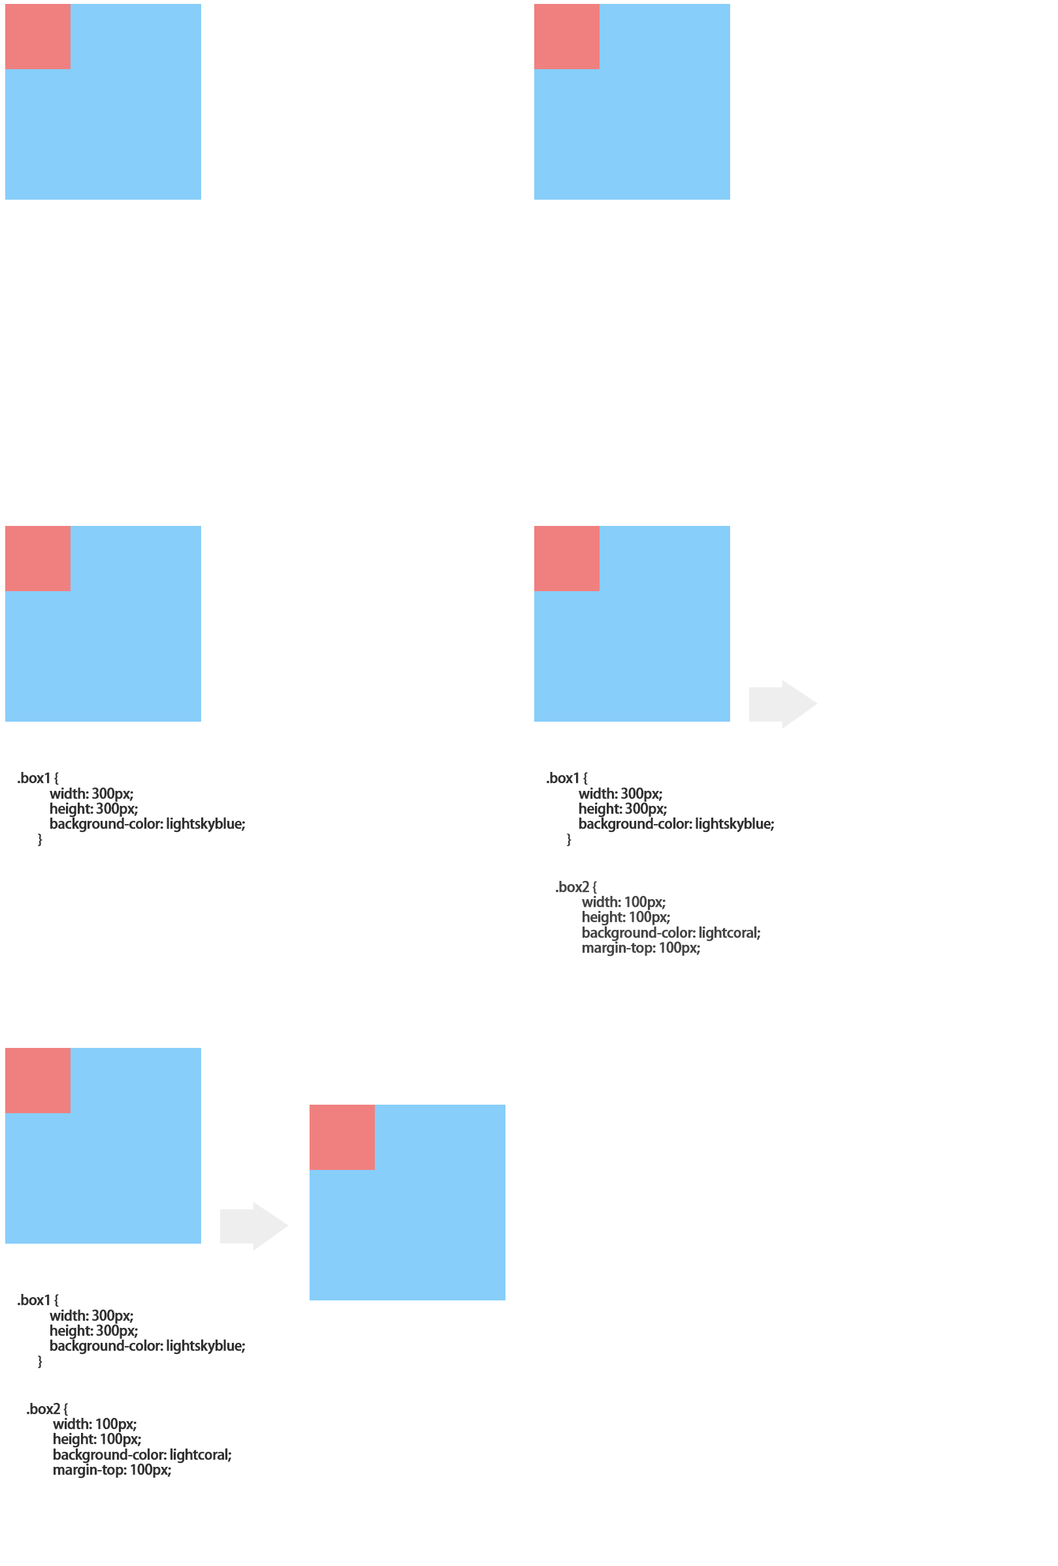
<!DOCTYPE html>
<html lang="en">

<head>
    <meta charset="UTF-8">
    <meta name="viewport" content="width=device-width, initial-scale=1.0">
    <meta http-equiv="X-UA-Compatible" content="ie=edge">
    <style>
        .box1 {
            width: 300px;
            height: 300px;
            background-color: lightskyblue;
        }
        /* .box1 {
            padding-top: 100px;
            height: 200px;
        } */

        .box2 {
            width: 100px;
            height: 100px;
            background-color: lightcoral;
            margin-top: 100px;
        }
    </style>


    <title>Document</title>
</head>

<body>
    <div class="box1">
        <div class="box2">

        </div>
    </div>

</body>

</html>点击 "运行实例" 按钮查看在线实例
解决的办法1.父元素设置padding;
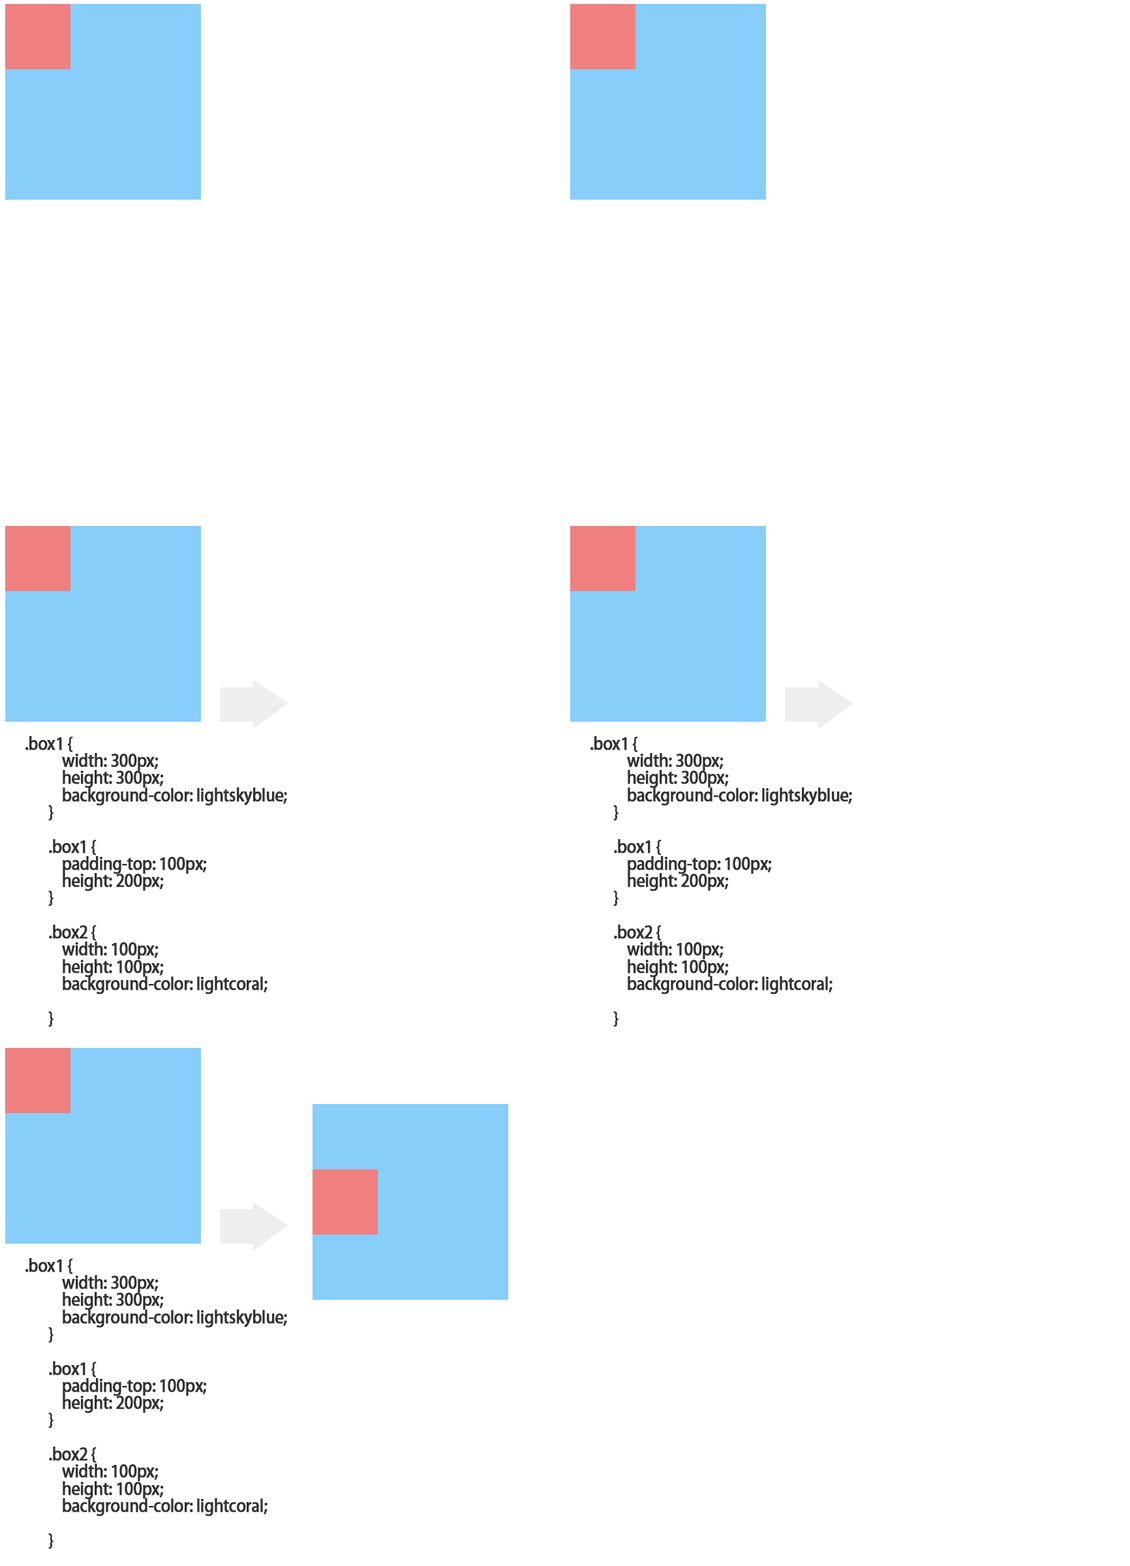
<!DOCTYPE html>
<html lang="en">

<head>
    <meta charset="UTF-8">
    <meta name="viewport" content="width=device-width, initial-scale=1.0">
    <meta http-equiv="X-UA-Compatible" content="ie=edge">
    <style>
        .box1 {
            width: 300px;
            height: 300px;
            background-color: lightskyblue;
        }

        .box1 {
            padding-top: 100px;
            height: 200px;
        }

        .box2 {
            width: 100px;
            height: 100px;
            background-color: lightcoral;
            /* margin-top: 100px; */
        }
    </style>


    <title>Document</title>
</head>

<body>
    <div class="box1">
        <div class="box2">

        </div>
    </div>

</body>

</html>点击 "运行实例" 按钮查看在线实例
2.box-sizing:border-box;
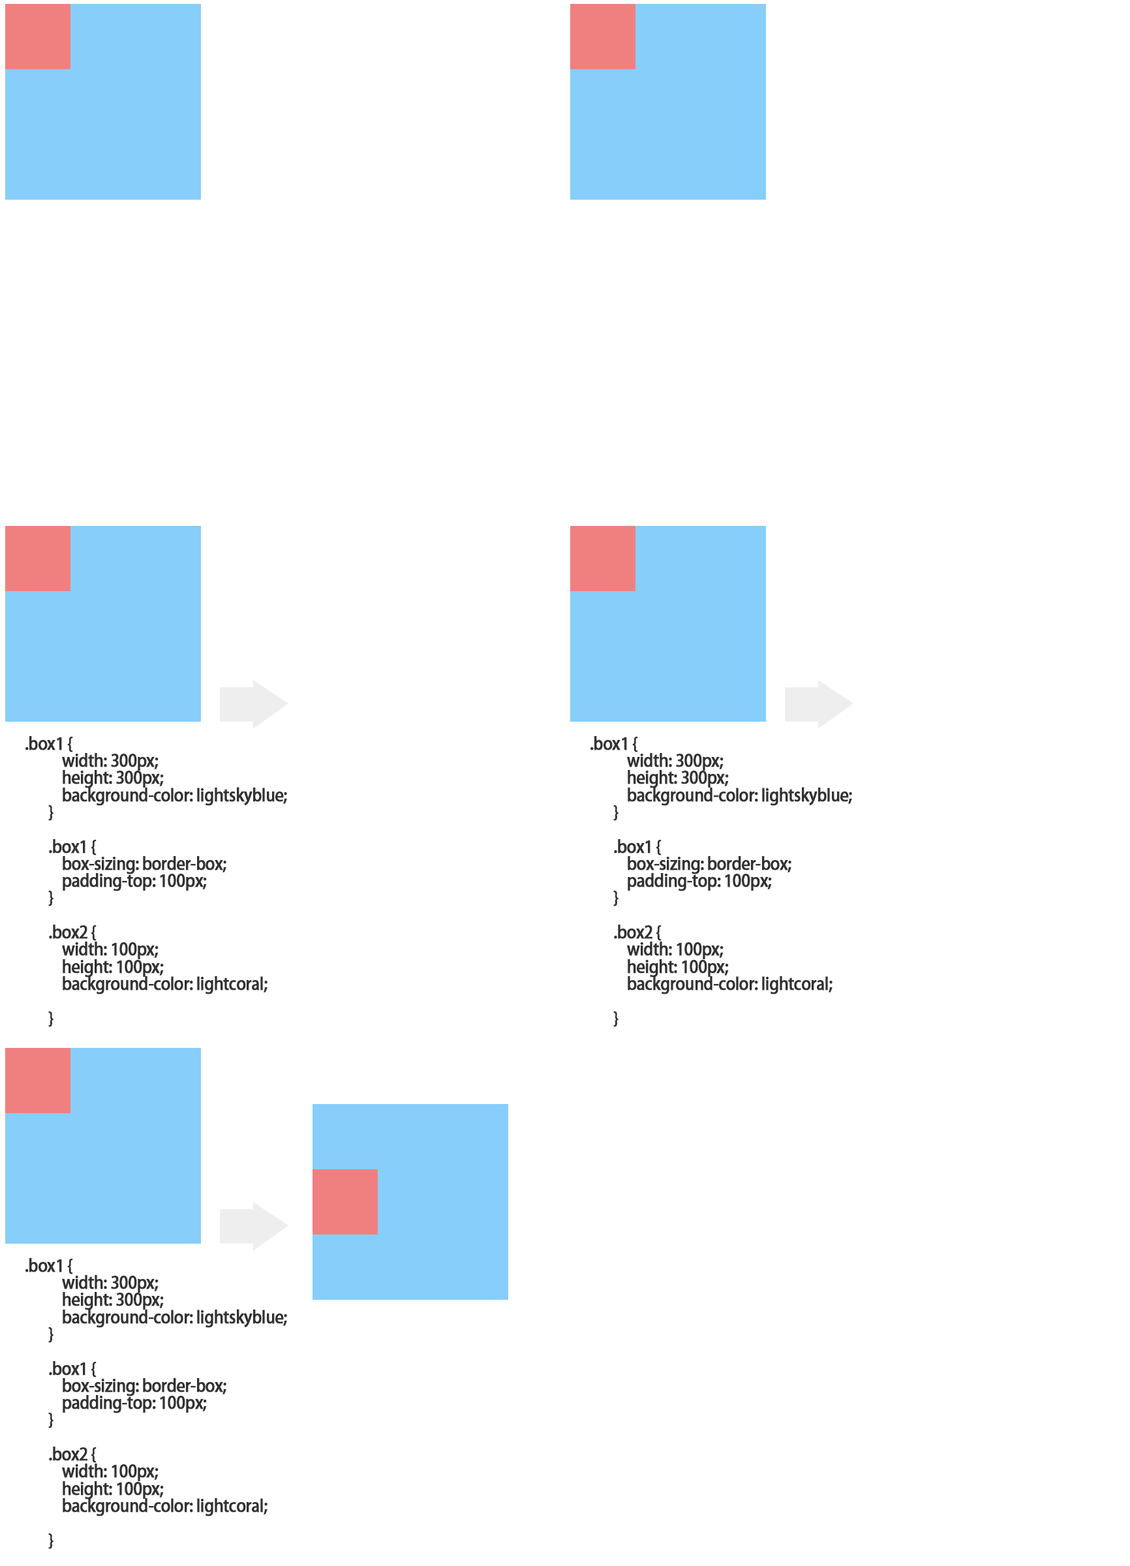
3,父级设置overflow:hidden
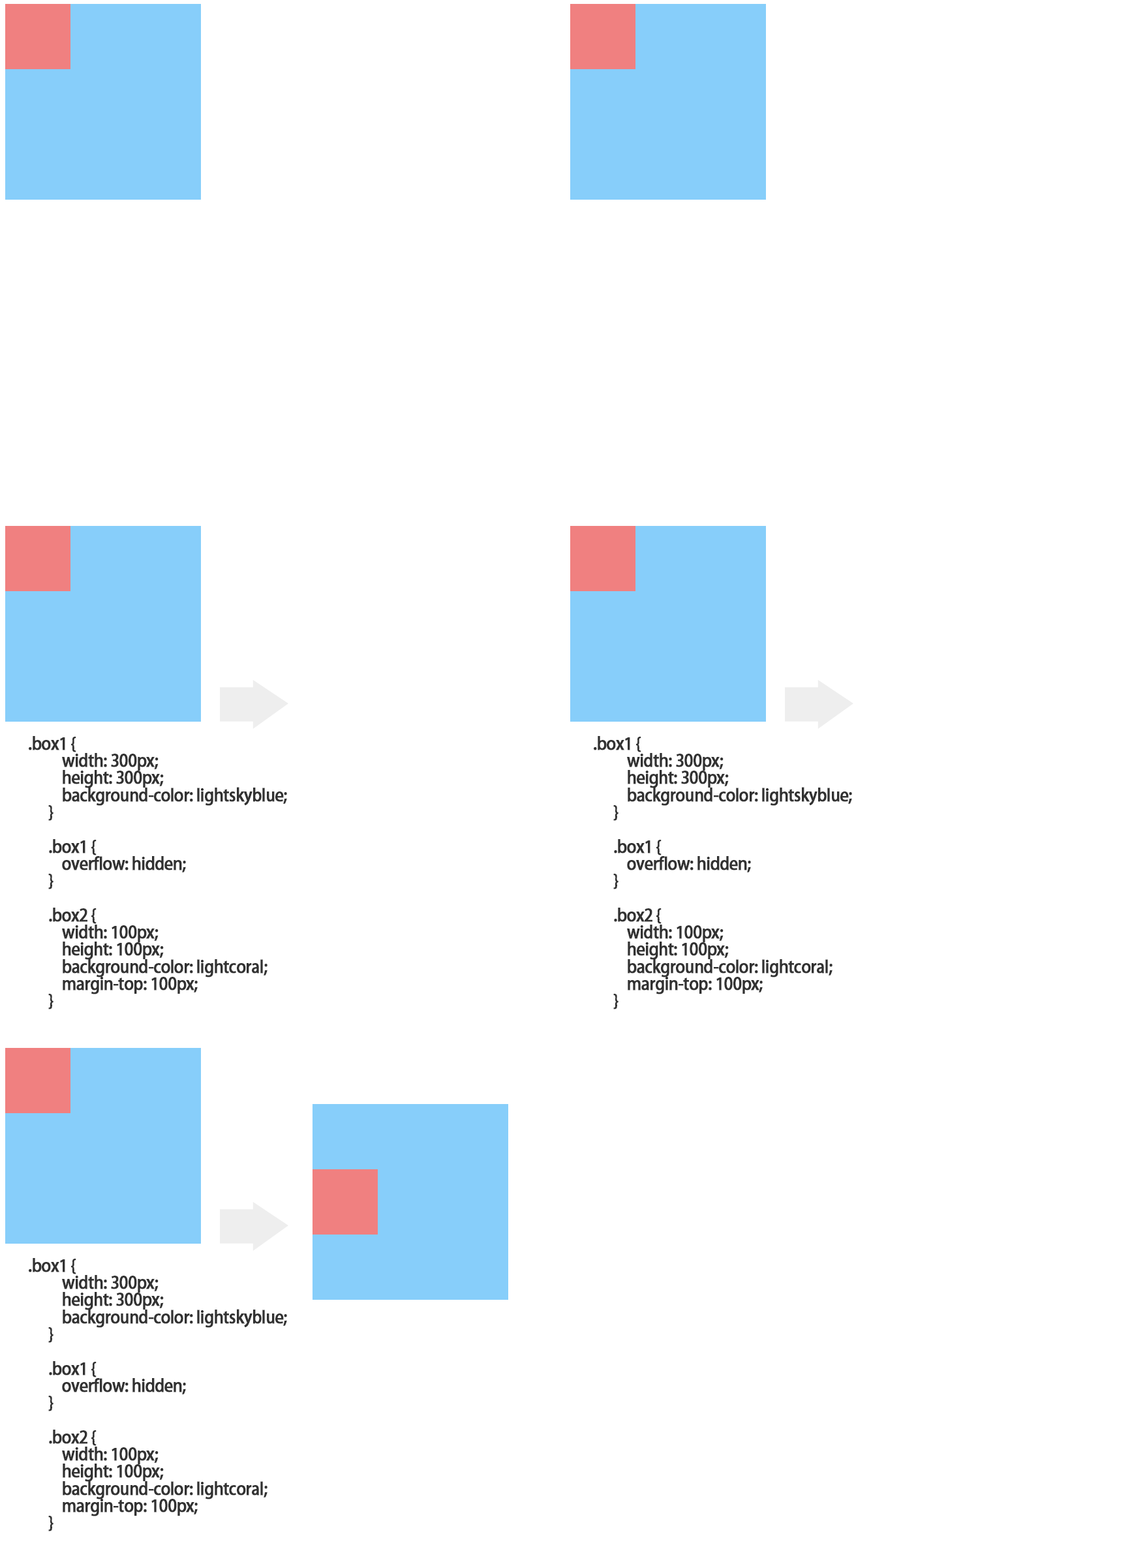
4、float:left/right;
5、display:inline-block;
6、父级加决对定位position:absolute;
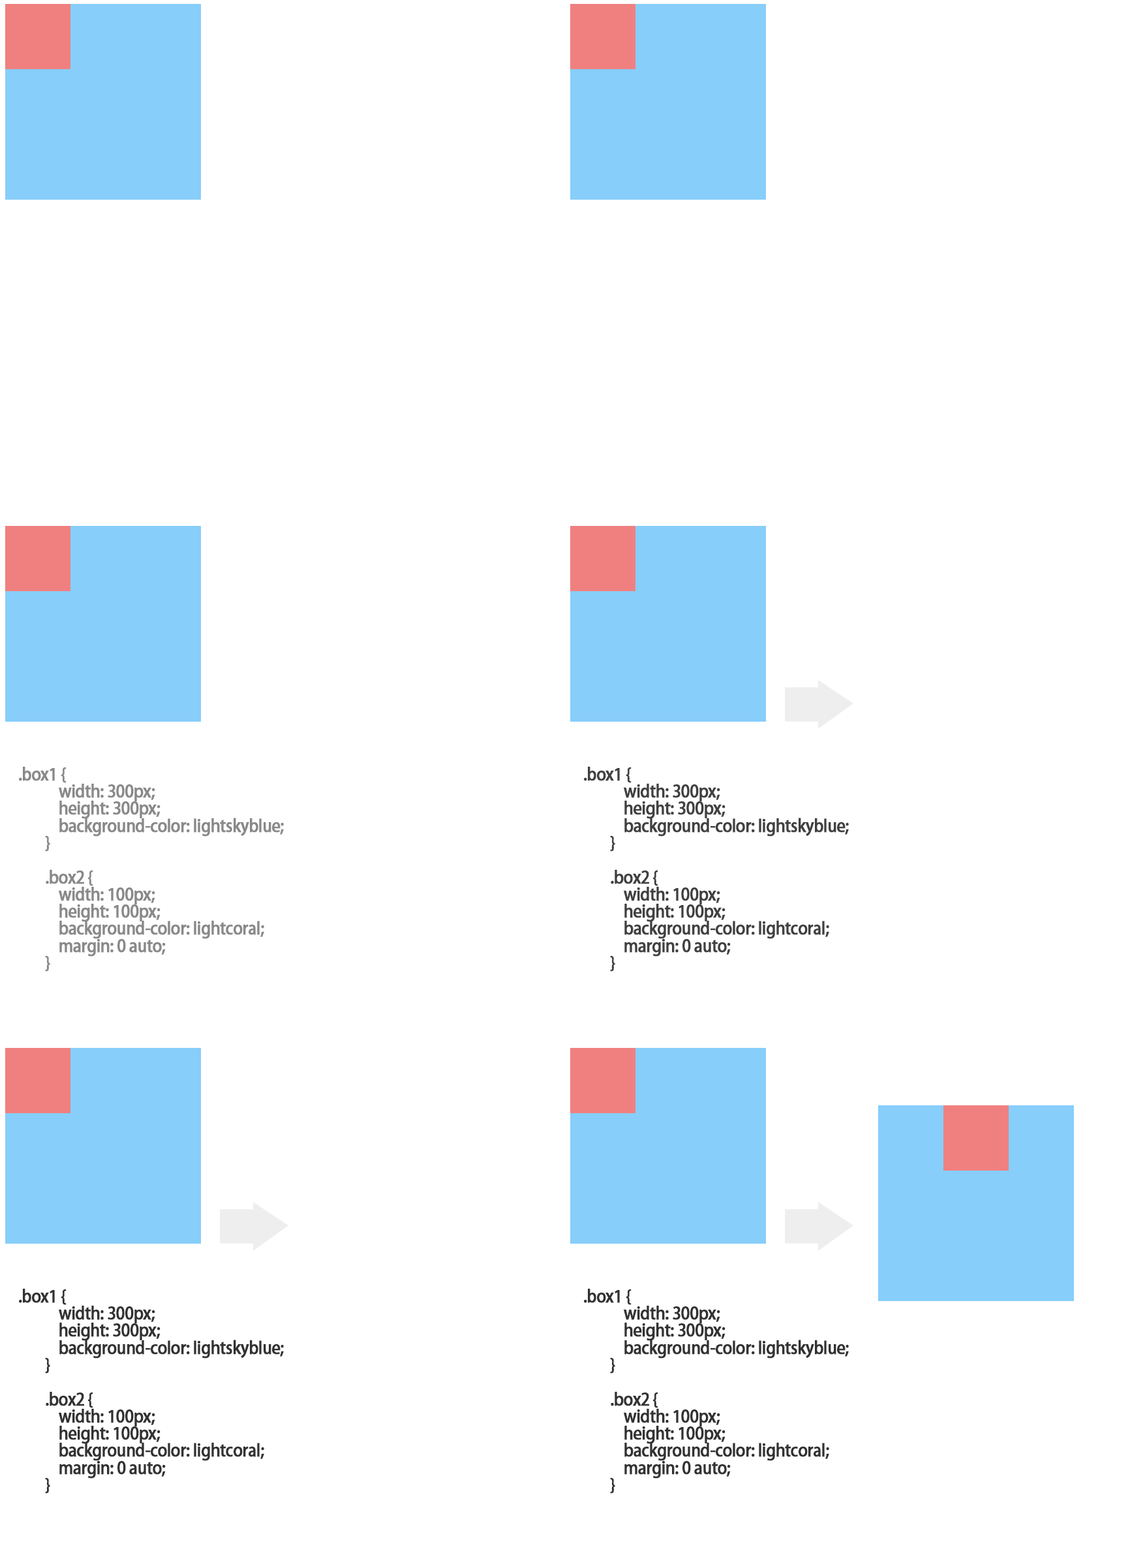
自动挤压:常用在布局中,设置margin:0 atuto;左右两边的外边距自动挤压,如果设置了宽度那就会根据宽度变化;
如果想在整个页面居中 就要设置上下的高度的具体值,因为块级元素的高度默认是内容高度,与父级元素没有直接关系,
垂直方向的auto被重置为0;
![]()

Copyright 2014-2025 https://www.php.cn/ All Rights Reserved | php.cn | 湘ICP备2023035733号