一、网站布局之双飞翼布局练习
双飞翼布局的实现,目的是左右两栏固定宽度,中间部分自适应。这个布局的实现思路是,把三栏布局比作一只大鸟,先把最重要的身体部分放好,然后再将左右翅膀移动到适当的地方。
1.html代码中,将wrap、left、right包含在container中,wrap要放最前边,然后是left、right
2.将wrap、left、right都float:left
3.将wrap继承container的宽度,也就是width:100%
4.因为wrap占满了宽度,所以要把left拉到最左边,使用margin-left:-100%;同理right使用margin-left:-200px
5.wrap被覆盖,内层的main使用padding-left:200px;padding-right:200px。还可以考虑使用margin,margin:0 200px。
<!DOCTYPE html>
<html lang="en">
<head>
    <meta charset="utf-8">
    <title>双飞翼布局</title>
    <style type="text/css">
        .header .content {
            /* 头部内容区居中显示,设置好宽度 */
            width: 1000px;
            height: 60px;
            background-color: black;
            /* 上下外边距为0,左右自动居中 */
            margin: 0 auto;
        }
        /*头部内容区中的导航*/
        .header .content .nav {
            /* 清空UL元素的默认样式 */
            margin-top: 0;
            margin-bottom: 0;
            padding-left: 0;
        }

        /*清除列表项样式*/
        .header .content .nav .item {
            list-style-type: none;
        }

        .header .content .nav .item a {
            /* 将浮动设置到标签<a>上面,否则无法实现导航区的点击与高亮 */
            float: left;
            /* 设置最小宽度与最小高宽,以适应导航文本的变化 */
            min-width: 80px;
            min-height: 60px;
            /* 导航文本垂直居中显示 */
            line-height: 60px;
            color: white;
            /* 设置导航文本的左右内边距 */
            padding: 0 15px;
            /* 去掉下划线 */
            text-decoration-line: none;
            /* 文本居中显示 */
            text-align: center;
        }

        .header .content .nav .item a:hover {
            /* 当鼠标移到导航链接上时改变背景色与文本前景色,实现当前导航高亮功能 */
            background-color: red;
            /* 文本设置为系统根字体大小的1.1倍 */
            font-size: 1.1rem;
        }

       /*主体容器设置总宽度,并水平居中 */
        .container {
            width: 1000px;
            margin: 5px auto;
           /*包住浮动的子元素*/
            overflow: hidden;
        }

        /* 中间区块宽度设置在它的容器wrap中*/
        .wrap {
            /* 继承父级区块container宽度 width:1000px; */
            width: inherit;
           /*没有内容,所以设置一个最小高度*/
            min-height: 800px;
            background-color: cyan;
        }

        /* 左边栏样式 */
        .left {
            width: 200px;
            min-height: 800px;
            background-color: lightcoral;
        }
        /* 右边栏样式 */
        .right {
            width: 200px;
            min-height: 800px;
            background-color: lightseagreen
        }
        .wrap, .left, .right {
            float: left;
        }
        /* 通过设置区块的负外边距的方式,实现向反方向移动区块 */
        .left {
            /* 将左区块拉回到中间的起点处*/
            margin-left: -100%;
        }
        .right {
            /* 将右区块上移到中间区块右侧显示 */
            margin-left: -200px;
        }

        .main {
            /*除padding外,也可使用margin */
            /*padding-left: 200px;*/
            /*padding-right: 200px;*/
            margin:0 200px
        }

        .footer .content {
            width: 1000px;
            height: 60px;
            background-color: #444;
            margin: 0 auto;
        }
        .footer .content p {
            text-align: center;
            line-height: 60px;
        }

        .footer .content  a {
            text-decoration: none;
            color: lightgrey;
        }

        /* 鼠标移入时显示下划线并加深字体前景色 */
        .footer .content  a:hover {
            color: white;
        }
    </style>
</head>
<body>
    <div class="header">
        <div class="content">
            <ul class="nav">
                <li class="item"><a href="">首页</a></li>
                <li class="item"><a href="">公司新闻</a></li>
                <li class="item"><a href="">最新产品</a></li>
                <li class="item"><a href="">联系我们</a></li>
            </ul>
        </div>
    </div>

<!-- 中间主体 -->
    <div class="container">
    <!-- 先创建中间主体区块,确保它优先被渲染出来 -->
    <!-- 中间内容区需要创建一个父级容器进行包裹 -->
    <div class="wrap">
        <!-- 最终要展示的内容写在main区块中 -->
        <div class="main">主体内容区</div>
    </div>

    <!-- 左侧边栏区块 -->
    <div class="left">左侧</div>

    <!-- 右侧边栏区块 -->
    <div class="right">右侧</div>

</div>

<!-- 底部 -->
<div class="footer">
    <div class="content">
        <p>
            <a href="">© AAAAAAAAA</a>
            <a href="">3333-66666666</a>
            <a href="">CN-ICP2019042901-1</a>
        </p>

    </div>
</div>
</body>
</html>点击 "运行实例" 按钮查看在线实例

二、清除浮动
为何要清除浮动?
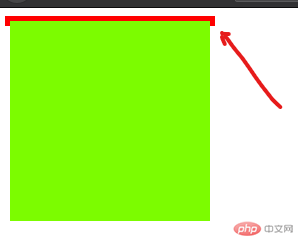
在前端布局的过程中肯定会用到float(浮动)属性。浮动框脱离了文档流,当元素浮动之后,当包含框的高度小于浮动框的时候,此时就会出现“高度塌陷”,即为何我们需要清楚浮动。下面的例子即展示何为塌陷。
<!DOCTYPE html>
<html lang="en">
<head>
    <meta charset="UTF-8">
    <title>清除浮动方法</title>
    <style type="text/css">
        .box1{
            width:200px;
            border:5px solid red;
        }
        .box2{
            width:200px;
            height:200px;
            background-color: lawngreen;
            float: right;
        }
    </style>
</head>
<body>
    <div class="box1">
        <div class="box2"></div>
    </div>
</body>
</html>点击 "运行实例" 按钮查看在线实例

可以看到外层的边框已经处于塌陷状态
清除浮动的五种方式:
方式一:父元素设置与子元素一样的高度,以此来消除子元素浮动后带来的高度塌陷。一般情况下不使用该方法,当子元素高度变化时,需要手动修改父元素高度。
方式二:父元素跟着子元素一起浮动,该方法同样不建议使用,如果嵌套的父元素过多,需要一个个添加float。
方式三:使用额外标签法,在父级盒子内再放一个标签,在这个标签中使用clear:both,会将这个浮动盒子的父盒子高度重新撑开,来清除浮动对页面的影响.
一般情况下也不建议使用这一种方式来清除浮动。因为这种清除浮动的方式会增加页面的标签,造成结构的混乱.
方法四:在父级使用伪元素来清除浮动。
.box1:after {
content:"";//设置内容为空
height:0;//高度为0
display:table;//转为块级元素
clear:both//清除浮动
}
方式五:给父级元素添加overflow属性来清除浮动。
.box1 {
overflow:hidden或者auto
}
五种方式各有利弊,一、二两种方法最直接,简单、粗暴,但是缺点同样粗暴。第三种方式会增加许多不必要的标签。一般推荐使用方法四、五,方法五最为方便。

Copyright 2014-2025 https://www.php.cn/ All Rights Reserved | php.cn | 湘ICP备2023035733号