
 WeChat Applet
WeChat Development
Share an example of Android imitation WeChat menu implemented using C# and Java respectively
WeChat Applet
WeChat Development
Share an example of Android imitation WeChat menu implemented using C# and Java respectively
Share an example of Android imitation WeChat menu implemented using C# and Java respectively

This article mainly introduces the Android imitation WeChat menu (Menu) (implemented using C# and Java respectively). This article gives the operating effects and implementation code of the C# and Java versions respectively. Friends in need can refer to the following
This article uses programming to implement Android menus. Of course, you can use XML to complete the same function. The basic Java and C# writing methods are the same, so using XML to demonstrate using Java in this article requires attention. Yes, if it is not developed by VS, the resource file name must start with lowercase, otherwise an error will be reported.
Running effect
C#realization
using Android.App;
using Android.OS;
using Android.Views;
using Android.Widget;
namespace MenuDemo
{
[Activity(Label = "@string/ApplicationName", MainLauncher = true, Icon = "@drawable/Icon")]
public class MainActivity : Activity
{
protected override void OnCreate(Bundle bundle)
{
base.OnCreate(bundle);
SetContentView(Resource.Layout.Main);
var iv = FindViewById<ImageView>(Resource.Id.iv);
iv.SetImageResource(Resource.Drawable.test);
RegisterForContextMenu(iv);
}
//与一个活动关联
public override bool OnCreateOptionsMenu(IMenu menu)
{
base.OnCreateOptionsMenu(menu);
const int menuItemId = Menu.First;
const int menuItemOrder = Menu.None;
const int munuItemText = Resource.String.menuItem1;
/*
* 第一个参数:组值
* 第二个参数:菜单唯一标示
* 第三个参数:顺序参数
* 第四个参数:文本
*/
menu.Add(1, menuItemId, menuItemOrder, munuItemText);
menu.Add(2, menuItemId + 10, menuItemOrder + 1, "菜单2");
menu.Add(2, menuItemId + 20, menuItemOrder + 2, "菜单3" );
var subMenu = menu.AddSubMenu(0, menuItemId + 30, menuItemOrder + 3, "子菜单" );
subMenu.SetHeaderIcon(Resource.Drawable.more);
var subMenuItem1 = subMenu.Add(0, menuItemId + 40, menuItemOrder + 4,"子菜单-1" );
subMenuItem1.SetIcon(Resource.Drawable.more);
var subMenuItem2 = subMenu.Add(0, menuItemId + 50, menuItemOrder + 5,"子菜单-2" ).SetCheckable(true);
subMenuItem2.SetIcon(Resource.Drawable.blue);
subMenu.Add(0, menuItemId + 60, menuItemOrder + 6, "子菜单-3" ).SetCheckable(true);
return true;
}
public override bool OnOptionsItemSelected(IMenuItem item)
{
Toast.MakeText(this, "当前菜单编号" + item.ItemId, ToastLength.Long).Show();
return base.OnOptionsItemSelected(item);
}
public override void OnCreateContextMenu(IContextMenu menu, View v, IContextMenuContextMenuInfo menuInfo)
{
base.OnCreateContextMenu(menu, v, menuInfo);
menu.SetHeaderTitle("上下文菜单");
menu.SetHeaderIcon(Resource.Drawable.blue);
menu.Add(0, Menu.First, Menu.None, "菜单1");
menu.Add(0, Menu.First+1,Menu.None, "菜单2").SetShortcut('2','B');
menu.Add(0, Menu.First + 2, Menu.None, "菜单3");
var subMenu = menu.AddSubMenu("子菜单");
subMenu.Add("子菜单选项");
}
}
}Layout
<?xml version="1.0" encoding="utf-8"?>
<LinearLayout xmlns:android="http://schemas.android.com/apk/res/android"
  android:orientation="vertical"
  android:layout_width="fill_parent"
  android:layout_height="fill_parent"
  android:minWidth="25px"
  android:minHeight="25px">
  <ImageView
    android:layout_width="fill_parent"
    android:layout_height="wrap_content"
    android:id="@+id/iv" />
</LinearLayout>Running effect

##Java implementation
package com.example.halower.menudemo;

import android.app.Activity;
import android.os.Bundle;
import android.view.ContextMenu;
import android.view.MenuInflater;
import android.view.View;
import android.widget.ImageView;

public class MainActivity extends Activity {
  @Override
  protected void onCreate(Bundle savedInstanceState) {
    super.onCreate(savedInstanceState);
    setContentView(R.layout.activity_main);
    ImageView iv=(ImageView)findViewById(R.id.iamgeView);
    iv.setImageResource(R.drawable.test);
    registerForContextMenu(iv);
  }

  @Override
  public void onCreateContextMenu(ContextMenu menu, View v, ContextMenu.ContextMenuInfo menuInfo) {
    super.onCreateContextMenu(menu, v, menuInfo);
    MenuInflater inflater=new MenuInflater(this);
    inflater.inflate(R.menu.menu_main,menu);
    menu.setHeaderIcon(R.drawable.blue);
    menu.setHeaderTitle(R.string.menuTitle);
  }
}Layout
<?xml version="1.0" encoding="utf-8"?>
<resources>

  <string name="app_name">MenuDemo</string>
  <string name="action_settings">Settings</string>
  <string name="item1Name" >菜单1</string>
  <string name="item2Name" >菜单2</string>
  <string name="item3Name" >菜单3--More</string>
  <string name="item4Name" >菜单4</string>
  <string name="menuTitle">XML中解析菜单</string>
  <string name="subitem1Name">子菜单1</string>
  <string name="subitem2Name">子菜单2</string>
</resources>
The above is the detailed content of Share an example of Android imitation WeChat menu implemented using C# and Java respectively. For more information, please follow other related articles on the PHP Chinese website!

Hot AI Tools

Undresser.AI Undress
AI-powered app for creating realistic nude photos

AI Clothes Remover
Online AI tool for removing clothes from photos.

Undress AI Tool
Undress images for free

Clothoff.io
AI clothes remover

Video Face Swap
Swap faces in any video effortlessly with our completely free AI face swap tool!

Hot Article
Hot Tools

Notepad++7.3.1
Easy-to-use and free code editor

SublimeText3 Chinese version
Chinese version, very easy to use

Zend Studio 13.0.1
Powerful PHP integrated development environment

Dreamweaver CS6
Visual web development tools

SublimeText3 Mac version
God-level code editing software (SublimeText3)
Hot Topics


 Break or return from Java 8 stream forEach?
Feb 07, 2025 pm 12:09 PM
Break or return from Java 8 stream forEach?
Feb 07, 2025 pm 12:09 PM
Java 8 introduces the Stream API, providing a powerful and expressive way to process data collections. However, a common question when using Stream is: How to break or return from a forEach operation? Traditional loops allow for early interruption or return, but Stream's forEach method does not directly support this method. This article will explain the reasons and explore alternative methods for implementing premature termination in Stream processing systems. Further reading: Java Stream API improvements Understand Stream forEach The forEach method is a terminal operation that performs one operation on each element in the Stream. Its design intention is
 The difference between multithreading and asynchronous c#
Apr 03, 2025 pm 02:57 PM
The difference between multithreading and asynchronous c#
Apr 03, 2025 pm 02:57 PM
The difference between multithreading and asynchronous is that multithreading executes multiple threads at the same time, while asynchronously performs operations without blocking the current thread. Multithreading is used for compute-intensive tasks, while asynchronously is used for user interaction. The advantage of multi-threading is to improve computing performance, while the advantage of asynchronous is to not block UI threads. Choosing multithreading or asynchronous depends on the nature of the task: Computation-intensive tasks use multithreading, tasks that interact with external resources and need to keep UI responsiveness use asynchronous.
 How to convert xml into word
Apr 03, 2025 am 08:15 AM
How to convert xml into word
Apr 03, 2025 am 08:15 AM
There are three ways to convert XML to Word: use Microsoft Word, use an XML converter, or use a programming language.
 PHP vs. Python: Understanding the Differences
Apr 11, 2025 am 12:15 AM
PHP vs. Python: Understanding the Differences
Apr 11, 2025 am 12:15 AM
PHP and Python each have their own advantages, and the choice should be based on project requirements. 1.PHP is suitable for web development, with simple syntax and high execution efficiency. 2. Python is suitable for data science and machine learning, with concise syntax and rich libraries.
 PHP: A Key Language for Web Development
Apr 13, 2025 am 12:08 AM
PHP: A Key Language for Web Development
Apr 13, 2025 am 12:08 AM
PHP is a scripting language widely used on the server side, especially suitable for web development. 1.PHP can embed HTML, process HTTP requests and responses, and supports a variety of databases. 2.PHP is used to generate dynamic web content, process form data, access databases, etc., with strong community support and open source resources. 3. PHP is an interpreted language, and the execution process includes lexical analysis, grammatical analysis, compilation and execution. 4.PHP can be combined with MySQL for advanced applications such as user registration systems. 5. When debugging PHP, you can use functions such as error_reporting() and var_dump(). 6. Optimize PHP code to use caching mechanisms, optimize database queries and use built-in functions. 7
 How to open xml format
Apr 02, 2025 pm 09:00 PM
How to open xml format
Apr 02, 2025 pm 09:00 PM
Use most text editors to open XML files; if you need a more intuitive tree display, you can use an XML editor, such as Oxygen XML Editor or XMLSpy; if you process XML data in a program, you need to use a programming language (such as Python) and XML libraries (such as xml.etree.ElementTree) to parse.
 How to Run Your First Spring Boot Application in Spring Tool Suite?
Feb 07, 2025 pm 12:11 PM
How to Run Your First Spring Boot Application in Spring Tool Suite?
Feb 07, 2025 pm 12:11 PM
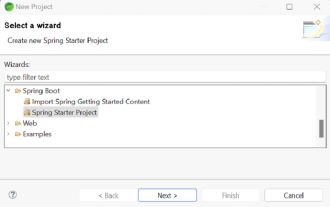
Spring Boot simplifies the creation of robust, scalable, and production-ready Java applications, revolutionizing Java development. Its "convention over configuration" approach, inherent to the Spring ecosystem, minimizes manual setup, allo
 How to change the format of xml
Apr 03, 2025 am 08:42 AM
How to change the format of xml
Apr 03, 2025 am 08:42 AM
There are several ways to modify XML formats: manually editing with a text editor such as Notepad; automatically formatting with online or desktop XML formatting tools such as XMLbeautifier; define conversion rules using XML conversion tools such as XSLT; or parse and operate using programming languages such as Python. Be careful when modifying and back up the original files.
