
 Backend Development
PHP Tutorial
Detailed explanation of the steps to implement WeChat payment (jsapi payment) with ThinkPHP
Backend Development
PHP Tutorial
Detailed explanation of the steps to implement WeChat payment (jsapi payment) with ThinkPHP
Detailed explanation of the steps to implement WeChat payment (jsapi payment) with ThinkPHP
This time I will bring you a detailed explanation of the steps for ThinkPHP to implement WeChat payment (jsapi payment). What are the precautions for ThinkPHP to implement WeChat payment (jsapi payment). The following is a practical case, let's take a look.
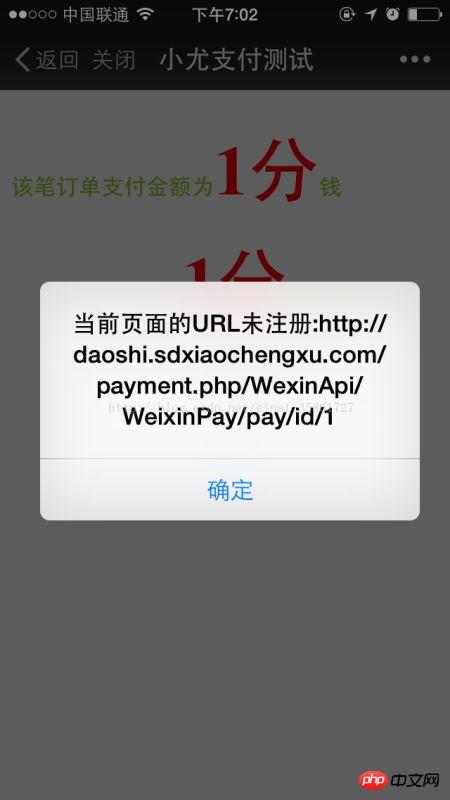
The environment at that time did not use a framework. It was implemented by directly creating a new directory under the directory pointed to by a domain name and then accessing the directory. However, there were still some problems when applied to the framework. In ThinkPHP, due to routing rules There is a discrepancy with the payment authorization directory, so an error will be reported. This article talks about the process of integrating WeChat payment in TP.
The SDK and documentation produced by Goose Factory are difficult to understand, and you will know it after using it. Shouldn’t the documentation and SDK be as simple and understandable as possible? Is it possible that only vigorous refactoring can show the superb technology of Goose Factory programmers? Well...did I expose my rookie attributes...In fact, the SDK is quite easy to use, but as I saw in the previous article, the payment completion callback function is really confusing.
For those who don’t want to be bypassed by the official and want to use WeChat payment in TP, you can take a look at the payment SDK suitable for TP which was restructured and streamlined by a master based on the official documents. I downloaded the source code and read it. Well, the code is written in an elegant and concise manner, and the process is simple and easy to understand. See the blog post for details: http://baijunyao.com/article/78
I still frowned, used the official SDK, and successfully implemented the payment. Let me share the process with you:
1.SDK download and modification
I won’t go into too much detail about this. If you don’t know, you can read my previous article: PHP implements WeChat payment (jsapi payment) process , which details which downloaded files need to be modified.
2. Public account settings
A. You still need to set the web page authorized domain name, this is nothing special;
B. Pay attention to this Payment authorization directory, using TP, many people use the rewrite mode (REWRITE mode) or use the pseudo-static mode while using the REWRITE mode. The generated link at this time is: http://serverName/Home/Blog/read /id/1 ;
If you are using PATHINFO mode, the generated link is: http://serverName/index.php/Home/Blog/read/id/1, such as under the Home module Use a method in the Blog controller to pay. The authorized directory for our payment should be http://serverName/Home/Blog/ or http://serverName/index.php/Home/Blog/, which is based on our own TP. Depends on the URL pattern set.
3. Payment process
(1) Unified order placement
The payment parameter configuration for order placement is basically different from the previous one. Change, the important thing to pay attention to is the payment callback verification link. Because it needs to be called multiple times, I encapsulated the parameter configuration directly in Application/Common/Common/function.php. My SDK is placed in the Api directory under the project root directory. , so the Vendor function is not used when introducing the SDK.
1 2 3 4 5 6 7 8 9 10 11 12 13 14 15 16 17 18 19 20 21 22 23 24 25 26 27 28 29 30 31 32 33 |
|
Attention, attention, here’s the key point:
The payment callback verification link must be verified without permission. If you access that link yourself, you still need to log in and register for verification. , don't try it, the link must be accessible, and there must be no series of parameters passed.
The best is simple and crude http://serverName/xxx.php. I re-wrote a special entry file payment for payment callback in the following directory, similar to index.php. .php, and its corresponding module (WexinApi), controller (WeixinPay) and method (notify) in the Application/ directory:
1 2 3 4 5 6 7 8 9 10 11 12 13 14 15 |
|
Now visit http://serverName/payment.php, you will directly Enter http://serverName/payment.php/WexinApi/WeixinPay/notify, so that the callback verification link can be written as http://serverName/payment.php or http://serverName/payment.php/WexinApi/WeixinPay /notify .
(2) Initiating payment
is still very simple:
1 2 3 4 5 6 7 8 9 10 11 12 13 14 15 16 17 18 19 20 21 22 23 24 25 26 27 28 29 30 31 32 33 34 35 36 37 38 39 40 41 42 43 44 45 46 47 48 49 50 51 52 53 54 55 56 57 58 59 60 61 62 63 64 65 |
|
However, you should pay attention to the URL of the payment page, because the URL of the payment page must have many parameters. Just now Speaking of the REWRITE mode used in TP, your link is similar to [ http://serverName/Home/Blog/read/id/1 ], which may have more parameters. At this time, WeChat Pay will consider your payment The authorization directory is [http://serverName/Home/Blog/read/id/], but your real authorization directory is [http://serverName/Home/Blog/], so an error will be reported. The solution is to reconstruct the URL when entering the payment page and write it in normal mode, which is [http://serverName/Home/Blog/read?id=1], and that's it.
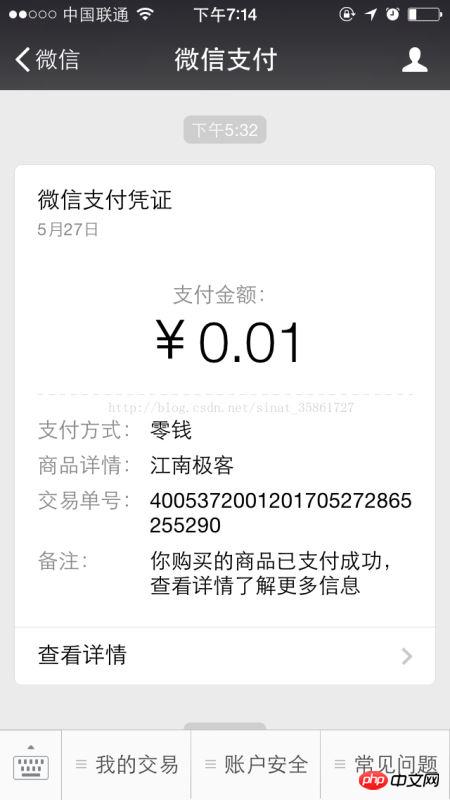
(3)支持成功回调
现在支付完成,就会进入到之前写好的链接对应的方法,即[ http://serverName/payment.php/WexinApi/WeixinPay/notify]:
1 2 3 4 5 6 7 8 9 10 11 12 13 14 15 16 17 18 19 20 21 22 23 24 25 26 27 28 29 30 31 32 33 34 35 36 37 |
|
为了安全起见,对返回过来的签名,要重新验证:
1 2 3 4 5 6 7 8 9 10 11 12 13 14 15 16 17 18 19 20 21 22 23 |
|
至此,TP中微信支付也就搞定了。这是集成了官方的SDK实现的,如果不使用SDK,可以使用更简单的方法,见:PHP实现微信支付(jsapi支付)和退款(无需集成支付SDK)
相信看了本文案例你已经掌握了方法,更多精彩请关注php中文网其它相关文章!
推荐阅读:
The above is the detailed content of Detailed explanation of the steps to implement WeChat payment (jsapi payment) with ThinkPHP. For more information, please follow other related articles on the PHP Chinese website!

Hot AI Tools

Undresser.AI Undress
AI-powered app for creating realistic nude photos

AI Clothes Remover
Online AI tool for removing clothes from photos.

Undress AI Tool
Undress images for free

Clothoff.io
AI clothes remover

Video Face Swap
Swap faces in any video effortlessly with our completely free AI face swap tool!
Hot Article
Hot Tools

Notepad++7.3.1
Easy-to-use and free code editor

SublimeText3 Chinese version
Chinese version, very easy to use

Zend Studio 13.0.1
Powerful PHP integrated development environment

Dreamweaver CS6
Visual web development tools

SublimeText3 Mac version
God-level code editing software (SublimeText3)
Hot Topics


 How to run thinkphp project
Apr 09, 2024 pm 05:33 PM
How to run thinkphp project
Apr 09, 2024 pm 05:33 PM
To run the ThinkPHP project, you need to: install Composer; use Composer to create the project; enter the project directory and execute php bin/console serve; visit http://localhost:8000 to view the welcome page.
 There are several versions of thinkphp
Apr 09, 2024 pm 06:09 PM
There are several versions of thinkphp
Apr 09, 2024 pm 06:09 PM
ThinkPHP has multiple versions designed for different PHP versions. Major versions include 3.2, 5.0, 5.1, and 6.0, while minor versions are used to fix bugs and provide new features. The latest stable version is ThinkPHP 6.0.16. When choosing a version, consider the PHP version, feature requirements, and community support. It is recommended to use the latest stable version for best performance and support.
 How to implement an online speech recognition system using WebSocket and JavaScript
Dec 17, 2023 pm 02:54 PM
How to implement an online speech recognition system using WebSocket and JavaScript
Dec 17, 2023 pm 02:54 PM
How to use WebSocket and JavaScript to implement an online speech recognition system Introduction: With the continuous development of technology, speech recognition technology has become an important part of the field of artificial intelligence. The online speech recognition system based on WebSocket and JavaScript has the characteristics of low latency, real-time and cross-platform, and has become a widely used solution. This article will introduce how to use WebSocket and JavaScript to implement an online speech recognition system.
 WebSocket and JavaScript: key technologies for implementing real-time monitoring systems
Dec 17, 2023 pm 05:30 PM
WebSocket and JavaScript: key technologies for implementing real-time monitoring systems
Dec 17, 2023 pm 05:30 PM
WebSocket and JavaScript: Key technologies for realizing real-time monitoring systems Introduction: With the rapid development of Internet technology, real-time monitoring systems have been widely used in various fields. One of the key technologies to achieve real-time monitoring is the combination of WebSocket and JavaScript. This article will introduce the application of WebSocket and JavaScript in real-time monitoring systems, give code examples, and explain their implementation principles in detail. 1. WebSocket technology
 How to run thinkphp
Apr 09, 2024 pm 05:39 PM
How to run thinkphp
Apr 09, 2024 pm 05:39 PM
Steps to run ThinkPHP Framework locally: Download and unzip ThinkPHP Framework to a local directory. Create a virtual host (optional) pointing to the ThinkPHP root directory. Configure database connection parameters. Start the web server. Initialize the ThinkPHP application. Access the ThinkPHP application URL and run it.
 How to use JavaScript and WebSocket to implement a real-time online ordering system
Dec 17, 2023 pm 12:09 PM
How to use JavaScript and WebSocket to implement a real-time online ordering system
Dec 17, 2023 pm 12:09 PM
Introduction to how to use JavaScript and WebSocket to implement a real-time online ordering system: With the popularity of the Internet and the advancement of technology, more and more restaurants have begun to provide online ordering services. In order to implement a real-time online ordering system, we can use JavaScript and WebSocket technology. WebSocket is a full-duplex communication protocol based on the TCP protocol, which can realize real-time two-way communication between the client and the server. In the real-time online ordering system, when the user selects dishes and places an order
 Which one is better, laravel or thinkphp?
Apr 09, 2024 pm 03:18 PM
Which one is better, laravel or thinkphp?
Apr 09, 2024 pm 03:18 PM
Performance comparison of Laravel and ThinkPHP frameworks: ThinkPHP generally performs better than Laravel, focusing on optimization and caching. Laravel performs well, but for complex applications, ThinkPHP may be a better fit.
 How to install thinkphp
Apr 09, 2024 pm 05:42 PM
How to install thinkphp
Apr 09, 2024 pm 05:42 PM
ThinkPHP installation steps: Prepare PHP, Composer, and MySQL environments. Create projects using Composer. Install the ThinkPHP framework and dependencies. Configure database connection. Generate application code. Launch the application and visit http://localhost:8000.
