
 Backend Development
PHP Tutorial
Detailed introduction to the sample code for compiling and installing PHP7 on CentOS7 (picture)
Backend Development
PHP Tutorial
Detailed introduction to the sample code for compiling and installing PHP7 on CentOS7 (picture)
Detailed introduction to the sample code for compiling and installing PHP7 on CentOS7 (picture)

Create php user and user group
First create a user named php without login permission and a user group named php
#######新建php用户和php组[root@localhost ~]
# groupadd -r php && useradd -r -g php -s /bin/false -d /usr/local/php7 -M php
Compile the dependencies required to install php 7
Compile and install libmcrypt, mhash, mcrypt binary source package
The reason why libmcrypt is compiled and installed here is because the yum installation seems to report an error
######编译安装libmcrypt-2.5.7
[root@localhost ~]# tar zxvf libmcrypt-2.5.7.tar.gz
[root@localhost ~]# cd libmcrypt-2.5.7
[root@localhost libmcrypt-2.5.7]# ./configure --prefix=/usr/local/related/libmcrypt
[root@localhost libmcrypt-2.5.7]# make && make install
[root@localhost libmcrypt-2.5.7]# cd ~
[root@localhost ~]# rm -rf libmcrypt-2.5.7*
######编译安装mhash-0.9.9.9
[root@localhost ~]# tar zxf mhash-0.9.9.9.tar.gz
[root@localhost ~]# cd mhash-0.9.9.9
[root@localhost mhash-0.9.9.9]# ./configure --prefix=/usr/local/related/mhash
[root@localhost mhash-0.9.9.9]# make && make install
[root@localhost mhash-0.9.9.9]# cd ~
[root@localhost ~]# rm -rf mhash-0.9.9.9*
######编译安装mcrypt-2.6.8
[root@localhost ~]# tar zxf mcrypt-2.6.8.tar.gz && cd mcrypt-2.6.8
[root@localhost mcrypt-2.6.8]# export LD_LIBRARY_PATH=/usr/local/related/libmcrypt/lib:/usr/local/related/mhash/lib
[root@localhost mcrypt-2.6.8]# export LDFLAGS="-L/usr/local/related/mhash/lib -I/usr/local/related/mhash/include/"
[root@localhost mcrypt-2.6.8]# export CFLAGS="-I/usr/local/related/mhash/include/"
[root@localhost mcrypt-2.6.8]# ./configure --prefix=/usr/local/related/mcrypt --with-libmcrypt-prefix=/usr/local/related/libmcrypt
[root@localhost mcrypt-2.6.8]# make && make install
[root@localhost mcrypt-2.6.8]# cd ~
[root@localhost ~]# rm -rf mcrypt-2.6.8*
######其他依赖yum安装[root@localhost ~]
# yum -y install libxml2 libxml2-devel openssl openssl-devel curl-devel libjpeg-devel libpng-devel freetype-devel
Configuration of PHP 7 compilation parameters
Note that during operation, you must first remove the comment text added after the backslash "\" below! ! !
######生成配置文件
[root@localhost ~]# tar -zxf php-7.0.0.tar.gz && cd php-7.0.0
[root@localhost php-7.0.0]# ./buildconf --force
Forcing buildconf
Removing configure caches
buildconf: checking installation...
buildconf: autoconf version 2.69 (ok)
rebuilding configure
rebuilding main/php_config.h.in
######开始配置

[root@localhost php-7.0.0]# ./configure \
--prefix=/usr/local/php7 \                              [PHP7安装的根目录]
--exec-prefix=/usr/local/php7 \
--bindir=/usr/local/php7/bin \
--sbindir=/usr/local/php7/sbin \
--includedir=/usr/local/php7/include \
--libdir=/usr/local/php7/lib/php \
--mandir=/usr/local/php7/php/man \
--with-config-file-path=/usr/local/php7/etc \           [PHP7的配置目录]
--with-mysql-sock=/var/run/mysql/mysql.sock \           [PHP7的Unix socket通信文件]
--with-mcrypt=/usr/include \
--with-mhash \
--with-openssl \
--with-mysql=shared,mysqlnd \                           [PHP7依赖mysql库]
--with-mysqli=shared,mysqlnd \                          [PHP7依赖mysql库]
--with-pdo-mysql=shared,mysqlnd \                       [PHP7依赖mysql库]
--with-gd \
--with-iconv \
--with-zlib \
--enable-zip \
--enable-inline-optimization \
--disable-debug \
--disable-rpath \
--enable-shared \
--enable-xml \
--enable-bcmath \
--enable-shmop \
--enable-sysvsem \
--enable-mbregex \
--enable-mbstring \
--enable-ftp \
--enable-gd-native-ttf \
--enable-pcntl \
--enable-sockets \
--with-xmlrpc \
--enable-soap \
--without-pear \
--with-gettext \
--enable-session \                                      [允许php会话session]
--with-curl \                                           [允许curl扩展]
--with-jpeg-dir \
--with-freetype-dir \
--enable-opcache \                                      [使用opcache缓存]
--enable-fpm \
--enable-fastcgi \
--with-fpm-user=nginx \                                 [php-fpm的用户]
--with-fpm-group=nginx \                                [php-fpm的用户组]
--without-gdbm \
--with-mcrypt=/usr/local/related/libmcrypt \            [指定libmcrypt位置]
--disable-fileinfo
The results of executing the above configuration command are as follows: 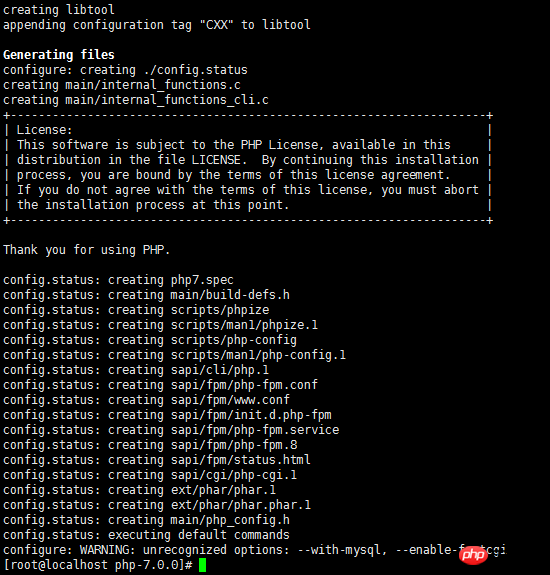
Start compiling and installing PHP 7
[root@localhost php-7.0.0]# make clean && make && make install
PHP 7 was compiled and installed successfully
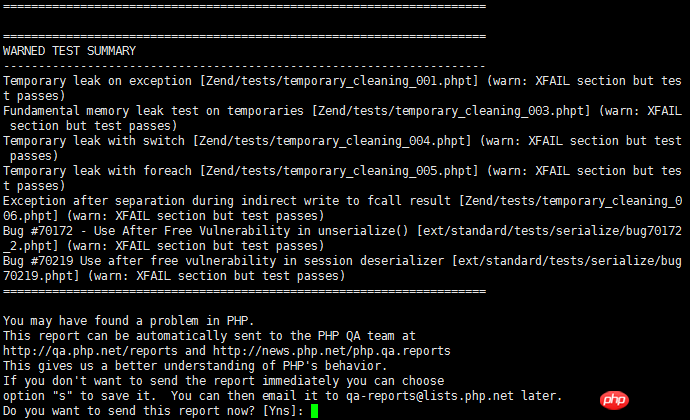
Optional steps: execute the make test command for testing
This is an optional step, execute the make test command
Check the PHP7 installation directory after successful compilation
Since you need to communicate with MySQL, you need to specifically check the lib extension library directory after PHP7 is installed (/usr/local/php7/lib/php/ extensions/no-debug-non-zts-20151012/). You need to ensure that at least two dynamic library files mysqli.so and pdo_mysql.so exist, as shown in the figure below.
[root@localhost php-7.0.0]# ls -lrt /usr/local/php7/lib/php/extensions/no-debug-non-zts-20151012/

Start setting up the PHP7 configuration files php.ini, php-fpm.conf, www.conf and php-fpm scripts
can be compiled with Copy the configuration file to the PHP7 configuration directory (/usr/local/php7/etc/). It is recommended to use the configuration in github. This configuration comes from "Configuration of php.ini, php-fpm and www.conf in PHP7"
#######方法一:直接使用编译后未经优化处理的配置
[root@localhost php-7.0.0]# cp php.ini-production /usr/local/php7/etc/php.ini
[root@localhost php-7.0.0]# cp /root/php-7.0.0/sapi/fpm/init.d.php-fpm /etc/init.d/php-fpm
[root@localhost php-7.0.0]# cp /usr/local/php7/etc/php-fpm.conf.default /usr/local/php7/etc/php-fpm.conf
[root@localhost php-7.0.0]# cp /usr/local/php7/etc/php-fpm.d/www.conf.default /usr/local/php7/etc/php-fpm.d/www.conf

#######方法二:使用https://github.com/lizer2014/mylnmp/tree/master/PHP文中的配置
[root@localhost php-7.0.0]# mv ~/php.ini /usr/local/php7/etc/php.ini && mv ~/php-fpm /etc/init.d/php-fpm
[root@localhost php-7.0.0]# mv ~/php-fpm.conf /usr/local/php7/etc/php-fpm.conf && mv ~/www.conf /usr/local/php7/etc/php-fpm.d/www.conf
Note: You need to modify the parameters in the php.ini configuration and change extension_dir to your own
extension_dir = "/usr/local/php7/lib/php/extensions/no-debug-non-zts-20151012/"
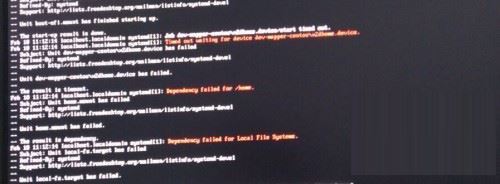
In /etc/init.d/php-fpm, there must be a make /var/run/php-fpm command before the daemon process of the start function. Otherwise, restarting the server will cause the startup to fail. In nginx Configuration also has this problem
Add php environment variables
[root@localhost php-7.0.0]# echo -e '\nexport PATH=/usr/local/php7/bin:/usr/local/php7/sbin:$PATH\n' >> /etc/profile && source /etc/profile
Set the PHP log directory and the php-fpm process file (php-fpm.sock) directory
Among them, set php -The user and user group of the fpm process directory are nginx, and create a php session session directory
#######设置PHP日志目录和php-fpm的运行进程ID文件(php-fpm.sock)目录
[root@localhost php-7.0.0]
# groupadd -r nginx && useradd -r -g nginx -s /bin/false -M nginx
[root@localhost php-7.0.0]
# mkdir -p /var/log/php-fpm/ && mkdir -p /var/run/php-fpm && cd /var/run/ && chown -R nginx:nginx php-fpm
#######修改session的目录配置
[root@localhost run]# mkdir -p /var/lib/php/session
[root@localhost run]
# chown -R nginx:nginx /var/lib/php
Set up PHP startup and test whether the configuration file is correct
######配置开机自启动,增加到主机sysV服务
[root@localhost run]# chmod +x /etc/init.d/php-fpm
[root@localhost run]# chkconfig --add php-fpm
[root@localhost run]# chkconfig php-fpm on
######测试PHP的配置文件是否正确合法
[root@localhost run]# php-fpm -t
[05-Dec-2015 17:33:03] NOTICE: configuration file /usr/local/php7/etc/php-fpm.conf test is successful
Start the php service
After completing the above operations, you can officially use the php service. The command to start the php process service is as follows:
[root@localhost init.d]# service php-fpm startStarting php-fpm done
Then you can check whether it is successful through the command ps -aux|grep php (the number of php-fpm processes and the process user nginx in the picture are both determined by pm in www.conf. The values of start_servers and user are determined respectively):

View PHP7 version information
Finally, you can view the current PHP version information through the command php -v, as shown in Figure You can see that currently PHP7 also uses Zend OPcache cache because the zend_extension=opcache.so configuration was added to the php.ini file.

Related articles:
Mac uses the php installed by itself by default
centos6.7 installation Detailed introduction to php7
The above is the detailed content of Detailed introduction to the sample code for compiling and installing PHP7 on CentOS7 (picture). For more information, please follow other related articles on the PHP Chinese website!

Hot AI Tools

Undresser.AI Undress
AI-powered app for creating realistic nude photos

AI Clothes Remover
Online AI tool for removing clothes from photos.

Undress AI Tool
Undress images for free

Clothoff.io
AI clothes remover

Video Face Swap
Swap faces in any video effortlessly with our completely free AI face swap tool!

Hot Article
Hot Tools

Notepad++7.3.1
Easy-to-use and free code editor

SublimeText3 Chinese version
Chinese version, very easy to use

Zend Studio 13.0.1
Powerful PHP integrated development environment

Dreamweaver CS6
Visual web development tools

SublimeText3 Mac version
God-level code editing software (SublimeText3)
Hot Topics


 CentOS7 various version image download addresses and version descriptions (including Everything version)
Feb 29, 2024 am 09:20 AM
CentOS7 various version image download addresses and version descriptions (including Everything version)
Feb 29, 2024 am 09:20 AM
When loading CentOS-7.0-1406, there are many optional versions. For ordinary users, they don’t know which one to choose. Here is a brief introduction: (1) CentOS-xxxx-LiveCD.ios and CentOS-xxxx- What is the difference between bin-DVD.iso? The former only has 700M, and the latter has 3.8G. The difference is not only in size, but the more essential difference is that CentOS-xxxx-LiveCD.ios can only be loaded into the memory and run, and cannot be installed. Only CentOS-xxx-bin-DVD1.iso can be installed on the hard disk. (2) CentOS-xxx-bin-DVD1.iso, Ce
 Steps to enter CentOS 7 emergency repair mode
Jan 13, 2024 am 09:36 AM
Steps to enter CentOS 7 emergency repair mode
Jan 13, 2024 am 09:36 AM
Open the centos7 page and appear: welcome to emergency mode! afterloggingin, type "journalctl -xb" to viewsystemlogs, "systemctlreboot" toreboot, "systemctldefault" to tryagaintobootintodefaultmode. giverootpasswordformaintenance(??Control-D???): Solution: execute r
 How to access and clean junk files in /tmp directory in CentOS 7?
Dec 27, 2023 pm 09:10 PM
How to access and clean junk files in /tmp directory in CentOS 7?
Dec 27, 2023 pm 09:10 PM
There is a lot of garbage in the tmp directory in the centos7 system. If you want to clear the garbage, how should you do it? Let’s take a look at the detailed tutorial below. To view the list of files in the tmp file directory, execute the command cdtmp/ to switch to the current file directory of tmp, and execute the ll command to view the list of files in the current directory. As shown below. Use the rm command to delete files. It should be noted that the rm command deletes files from the system forever. Therefore, it is recommended that when using the rm command, it is best to give a prompt before deleting the file. Use the command rm-i file name, wait for the user to confirm deletion (y) or skip deletion (n), and the system will perform corresponding operations. As shown below.
 How to set password rules in centos7? How to set password rules in centos7
Jan 07, 2024 pm 01:17 PM
How to set password rules in centos7? How to set password rules in centos7
Jan 07, 2024 pm 01:17 PM
Set password rules for security reasons Set the number of days after which passwords expire. User must change password within days. This setting only affects created users, not existing users. If setting to an existing user, run the command "chage -M (days) (user)". PASS_MAX_DAYS60#Password expiration time PASS_MIN_DAYS3#Initial password change time PASS_MIN_LEN8#Minimum password length PASS_WARN_AGE7#Password expiration prompt time Repeat password restriction use [root@linuxprobe~]#vi/etc/pam.d/system-auth#nearline15:
 How to install mbstring extension under CENTOS7?
Jan 06, 2024 pm 09:59 PM
How to install mbstring extension under CENTOS7?
Jan 06, 2024 pm 09:59 PM
1.UncaughtError:Calltoundefinedfunctionmb_strlen(); When the above error occurs, it means that we have not installed the mbstring extension; 2. Enter the PHP installation directory cd/temp001/php-7.1.0/ext/mbstring 3. Start phpize(/usr/local/bin /phpize or /usr/local/php7-abel001/bin/phpize) command to install php extension 4../configure--with-php-config=/usr/local/php7-abel
 Detailed explanation of decompression file command (zip) under centos7
Jan 07, 2024 pm 06:30 PM
Detailed explanation of decompression file command (zip) under centos7
Jan 07, 2024 pm 06:30 PM
1. The compressed folder is a zip file [root@cgls]#zip-rmydata.zipmydata2. Unzip mydata.zip into the mydatabak directory [root@cgls]#unzipmydata.zip-dmydatabak3.mydata01 folder and mydata02.txt are compressed into mydata.zip[root@cgls]#zipmydata.zipmydata01mydata02.txt4. Decompress the mydata.zip file directly [root@cgls]#unzipmydata.zip5. View myd
 What should I do if the plug-in is installed in php7.0 but it still shows that it is not installed?
Apr 02, 2024 pm 07:39 PM
What should I do if the plug-in is installed in php7.0 but it still shows that it is not installed?
Apr 02, 2024 pm 07:39 PM
To resolve the plugin not showing installed issue in PHP 7.0: Check the plugin configuration and enable the plugin. Restart PHP to apply configuration changes. Check the plugin file permissions to make sure they are correct. Install missing dependencies to ensure the plugin functions properly. If all other steps fail, rebuild PHP. Other possible causes include incompatible plugin versions, loading the wrong version, or PHP configuration issues.
 How to modify and set the default shortcut keys of CentOS7?
Jan 09, 2024 pm 06:14 PM
How to modify and set the default shortcut keys of CentOS7?
Jan 09, 2024 pm 06:14 PM
When the default shortcut keys conflict with the keys of the software you are using or you need to use the shortcut keys according to your own habits, you have to modify and set the default shortcut keys. How to modify the default shortcut keys of CentOS7? Let’s take a look at the detailed tutorial below. 1. Start the Centos7 system in the virtual machine and enter the desktop. 2. Click Applications->System Tools->Settings in the upper left corner. 3. Enter the setting interface and click the device. 4. Select Keyboard and click any item on the right. And press the shortcut key to be set on the keyboard to change its shortcut key (note that some cannot be changed!) 5. After the change, as shown below, finally click Settings, so that the shortcut key setting modification is completed.
