Introduction to users and permissions in mongoDB
The content of this article is an introduction to users and permissions in mongoDB. It has a good reference value and I hope it can help friends in need.
Preface
For databases, users and permissions are a very important part, because they involve security. So what are the users and permissions of mongoDB?
Instructions
Environment Description
The mongoDB version used in this article is 3.6, and the operating system is windows.
Other instructions
Due to space limitations, this article will not introduce the process from downloading to installing the database. Regarding installation tutorials, there are a large number of tutorials on the Internet. You can follow these tutorials to install and run it. This article will focus on the users and permissions part of mongoDB.
Server and client
For mongoDB, it is divided into server and client.
In the installation directory of the windows environment, double-click to open mongod.exe to start the mongoDB service.
When the service is started, you can double-click mongo.exe to open the client to connect to the mongoDB service.
Enable authorization mode
After mongoDB is installed, if you directly use mongod.exe to start the service, the default is not to enable authorization mode, if your mongoDB does not enable authorization mode , then anyone can log in to the mongoDB server without a username and password, and do whatever they want with your database, or even directly delete the database and run away. Therefore, in a production environment, please make sure you remember to turn on authorization mode.
So, how to enable authorization mode?
Open cmd, enter the bin directory of the installation directory, and execute the following command:
mongod --auth --port 27017 --dbpath /data/db
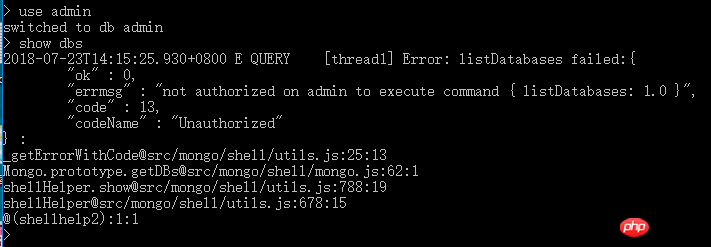
After turning on the authorization mode, open mongo.exe, and under the admin database, execute show dbs, at this time, the database will report an error, reminding you that there is no authorization. As follows:

First, open the mongoDB service in
non-authorized mode.
mongod --port 27017 --dbpath /data/db
use admin
db.createUser(
  {
    user: "larry",
    pwd: "123456",
    roles: [ { role: "userAdminAnyDatabase", db: "admin" } ]
  }
)First, close all mongo shell windows above.
Then open the mongoDB service in
authorization mode.
mongod --auth --port 27017 --dbpath /data/db
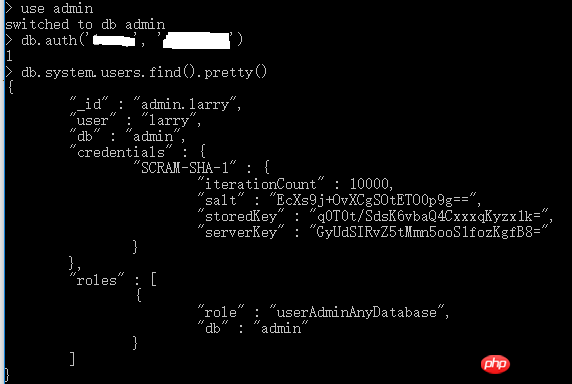
db.auth().

The result returns 1, indicating that the administrator larry logged in successfully.
Next, use this administrator to create a normal user moddx for the photo_app database, and specify its permissions as readWrite.
use photo_app
db.createUser(
{
  user: "moddx",
  pwd: "123456",
  roles: [{ role: "readWrite", db: "photo_app"}]
}
)admin account, and then execute the following command:
db.system.users.find().pretty()

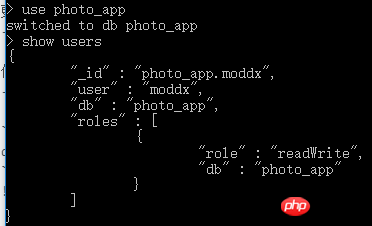
show users

The command to delete ordinary user moddx is as follows:
db.dropUser("moddx", {w: "majority", wtimeout: 5000})db.revokeRolesFromUser(
"moddx",
[
{ role: "readWrite", db: "photo_app" }
]
)use photo_app
db.grantRolesToUser(
"moddx",
[ "readWrite" , { role: "read", db: "demodb" } ],
{ w: "majority" , wtimeout: 4000 }
)use photo_app
db.changeUserPassword("moddx", "newpwd")[MongoDB] mongodb and php php mongodb update php connection mongodb php mongodb not authorize
MongoDB Journey (2) Basic Operations (MongoDB Javascript Shell)
The above is the detailed content of Introduction to users and permissions in mongoDB. For more information, please follow other related articles on the PHP Chinese website!

Hot AI Tools

Undresser.AI Undress
AI-powered app for creating realistic nude photos

AI Clothes Remover
Online AI tool for removing clothes from photos.

Undress AI Tool
Undress images for free

Clothoff.io
AI clothes remover

Video Face Swap
Swap faces in any video effortlessly with our completely free AI face swap tool!

Hot Article

Hot Tools

Notepad++7.3.1
Easy-to-use and free code editor

SublimeText3 Chinese version
Chinese version, very easy to use

Zend Studio 13.0.1
Powerful PHP integrated development environment

Dreamweaver CS6
Visual web development tools

SublimeText3 Mac version
God-level code editing software (SublimeText3)

Hot Topics
 What is the use of net4.0
May 10, 2024 am 01:09 AM
.NET 4.0 is used to create a variety of applications and it provides application developers with rich features including: object-oriented programming, flexibility, powerful architecture, cloud computing integration, performance optimization, extensive libraries, security, Scalability, data access, and mobile development support.
 How to configure MongoDB automatic expansion on Debian
Apr 02, 2025 am 07:36 AM
This article introduces how to configure MongoDB on Debian system to achieve automatic expansion. The main steps include setting up the MongoDB replica set and disk space monitoring. 1. MongoDB installation First, make sure that MongoDB is installed on the Debian system. Install using the following command: sudoaptupdatesudoaptinstall-ymongodb-org 2. Configuring MongoDB replica set MongoDB replica set ensures high availability and data redundancy, which is the basis for achieving automatic capacity expansion. Start MongoDB service: sudosystemctlstartmongodsudosys
 How to ensure high availability of MongoDB on Debian
Apr 02, 2025 am 07:21 AM
This article describes how to build a highly available MongoDB database on a Debian system. We will explore multiple ways to ensure data security and services continue to operate. Key strategy: ReplicaSet: ReplicaSet: Use replicasets to achieve data redundancy and automatic failover. When a master node fails, the replica set will automatically elect a new master node to ensure the continuous availability of the service. Data backup and recovery: Regularly use the mongodump command to backup the database and formulate effective recovery strategies to deal with the risk of data loss. Monitoring and Alarms: Deploy monitoring tools (such as Prometheus, Grafana) to monitor the running status of MongoDB in real time, and
 Navicat's method to view MongoDB database password
Apr 08, 2025 pm 09:39 PM
It is impossible to view MongoDB password directly through Navicat because it is stored as hash values. How to retrieve lost passwords: 1. Reset passwords; 2. Check configuration files (may contain hash values); 3. Check codes (may hardcode passwords).
 Use Composer to solve the dilemma of recommendation systems: andres-montanez/recommendations-bundle
Apr 18, 2025 am 11:48 AM
When developing an e-commerce website, I encountered a difficult problem: how to provide users with personalized product recommendations. Initially, I tried some simple recommendation algorithms, but the results were not ideal, and user satisfaction was also affected. In order to improve the accuracy and efficiency of the recommendation system, I decided to adopt a more professional solution. Finally, I installed andres-montanez/recommendations-bundle through Composer, which not only solved my problem, but also greatly improved the performance of the recommendation system. You can learn composer through the following address:
 MongoDB and relational database: a comprehensive comparison
Apr 08, 2025 pm 06:30 PM
MongoDB and relational database: In-depth comparison This article will explore in-depth the differences between NoSQL database MongoDB and traditional relational databases (such as MySQL and SQLServer). Relational databases use table structures of rows and columns to organize data, while MongoDB uses flexible document-oriented models to better suit the needs of modern applications. Mainly differentiates data structures: Relational databases use predefined schema tables to store data, and relationships between tables are established through primary keys and foreign keys; MongoDB uses JSON-like BSON documents to store them in a collection, and each document structure can be independently changed to achieve pattern-free design. Architectural design: Relational databases need to pre-defined fixed schema; MongoDB supports
 What is the CentOS MongoDB backup strategy?
Apr 14, 2025 pm 04:51 PM
Detailed explanation of MongoDB efficient backup strategy under CentOS system This article will introduce in detail the various strategies for implementing MongoDB backup on CentOS system to ensure data security and business continuity. We will cover manual backups, timed backups, automated script backups, and backup methods in Docker container environments, and provide best practices for backup file management. Manual backup: Use the mongodump command to perform manual full backup, for example: mongodump-hlocalhost:27017-u username-p password-d database name-o/backup directory This command will export the data and metadata of the specified database to the specified backup directory.
 Major update of Pi Coin: Pi Bank is coming!
Mar 03, 2025 pm 06:18 PM
PiNetwork is about to launch PiBank, a revolutionary mobile banking platform! PiNetwork today released a major update on Elmahrosa (Face) PIMISRBank, referred to as PiBank, which perfectly integrates traditional banking services with PiNetwork cryptocurrency functions to realize the atomic exchange of fiat currencies and cryptocurrencies (supports the swap between fiat currencies such as the US dollar, euro, and Indonesian rupiah with cryptocurrencies such as PiCoin, USDT, and USDC). What is the charm of PiBank? Let's find out! PiBank's main functions: One-stop management of bank accounts and cryptocurrency assets. Support real-time transactions and adopt biospecies


