Usage and configuration of React+mongodb
This article mainly introduces the use and configuration of React mongodb, which has certain reference value. Now I share it with everyone. Friends in need can refer to it
React environment construction (step by step)
Basic configuration of React
(React is a JAVASCRIPT library used to build user interfaces. React is mainly used to build UI. Many people think that React
is the V (view) in MVC. )
Although there are many tutorials on the Internet (but you will encounter some pitfalls when building it yourself, so you have to solve it yourself and experience your own shortcomings)
npm install -g create-react-app Global installation
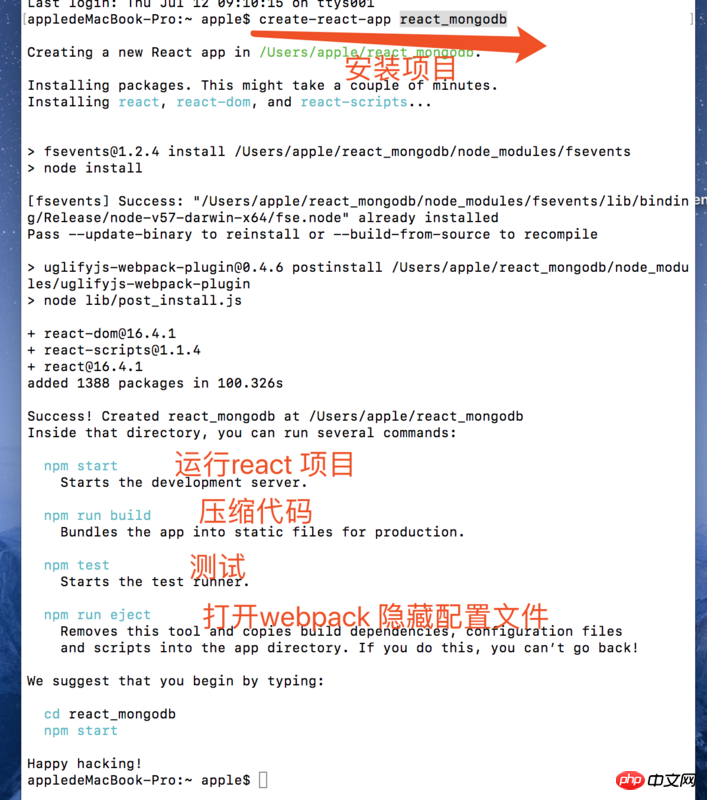
create-react-app react_mongodb (This is my project name)
The following is my installation process
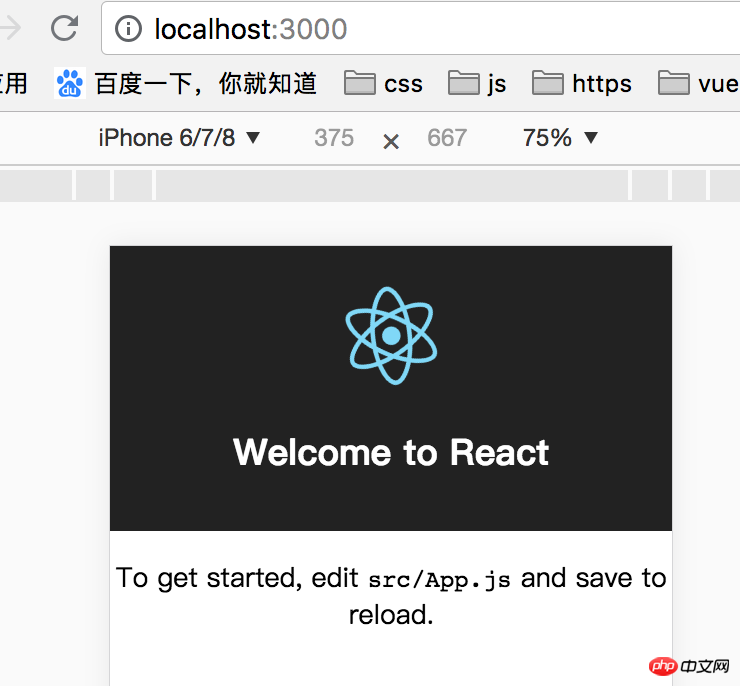
4. Enter the project npm start and see the following effect to indicate that the project has been The construction was successful
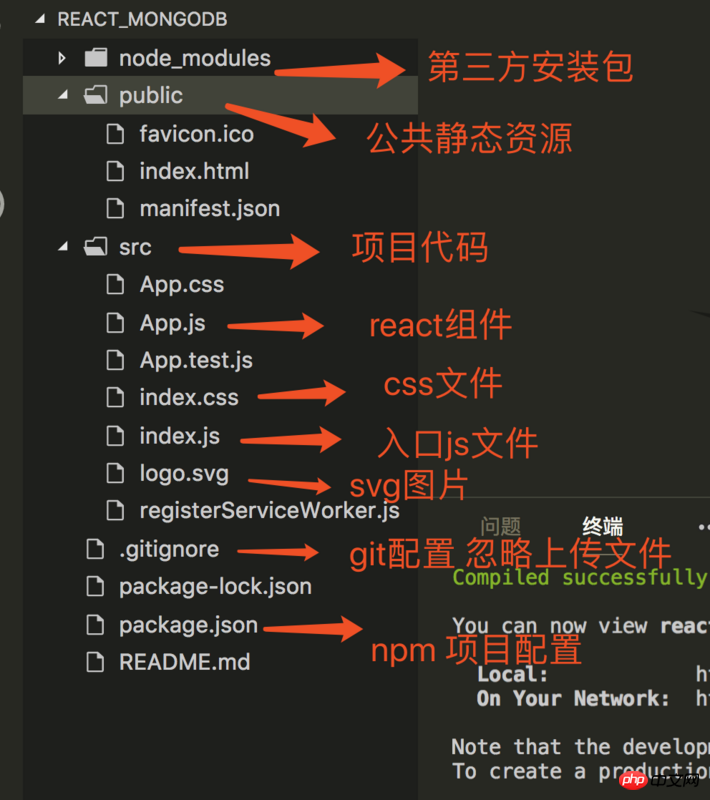
5. Let me analyze the directory structure for everyone to understand
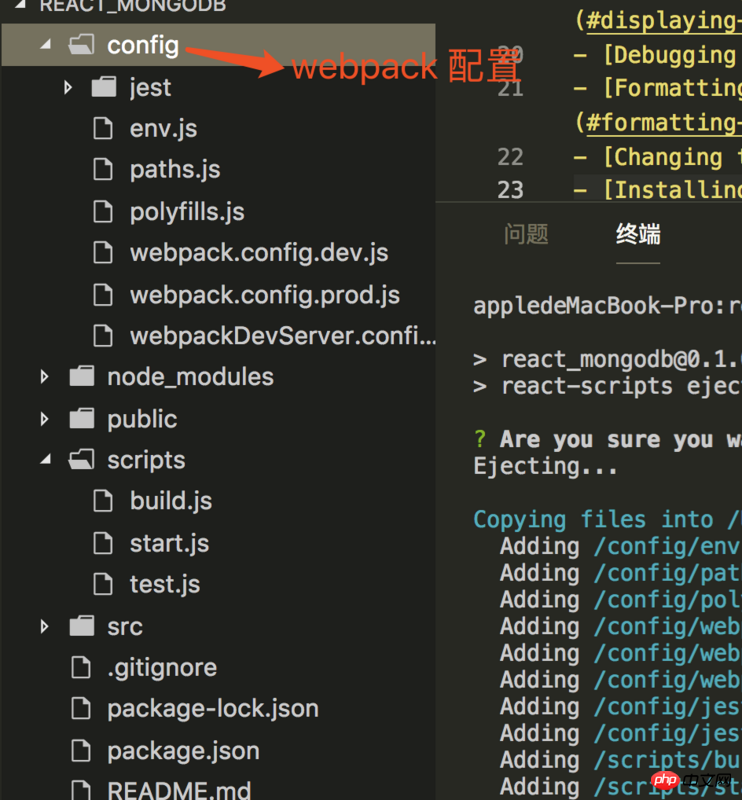
6 .Open webpack configuration (npm run eject) or configure it yourself
After running the command, you will see the following directory
Basic use of redux
-
Lead everyone to get started with redux
1> First download npm i redux --save
2> After we have seen the redux example, now we split the code3> Introduction to synchronous and asynchronous (react requires the redux-thunk plug-in to handle asynchronous processing)
   * redux.js
         const ADD = '嘻嘻'
         const REMOVE = '呵呵'

         // reducer
         export function counter(state = 0, action) {
             switch (action.type) {
                 case ADD:
                     return state + 1;
                 case REMOVE:
                     return state - 1;
                 default:
                     return 10;
             }
         }

         // action creator
         export function addgun() {
             return { type: ADD }
         }

         export function removegun() {
             return { type: REMOVE }
         }

         // 异步函数操作
         export function addgunAsync() {
             return dispatch => { // dispatch参数
                 setTimeout(() => {
                     dispatch(addgun())
                 }, 2000)
             }
         }


   * 在index.js中引入
         import React from 'react';
         import ReactDOM from 'react-dom';
         import { createStore, applyMiddleware } from 'redux'; // applyMiddleware 处理中间键
         import thunk from 'redux-thunk';  // 中间键
         import registerServiceWorker from './registerServiceWorker';
         import App from './App';

         import { counter, addgun, removegun, addgunAsync } from './redux';

         // 创建一个store counter执行reducer方法
         const store = createStore(counter, applyMiddleware(thunk))
         // const store = createStore(counter)

         function render() {
             ReactDOM.render(<app></app>, document.getElementById('root'));
         }
         render()

         // 更新后重新渲染
         store.subscribe(render)
         // ReactDOM.render(<app></app>, document.getElementById('root'));
         registerServiceWorker();

   * App.js 组件
       import React, { Component } from 'react';

         export default class App extends Component {
             render() {
                 const store = this.props.store
                 const num = store.getState()

                 // 由父组件中传入
                 const addgun = this.props.addgun
                 const removegun = this.props.removegun
                 const addgunAsync = this.props.addgunAsync
                 return (
                     <p>
                         </p><h1>
                             hello
                             <br>
                             {num}
                         </h1>
                         <button> store.dispatch(addgun())}>加一</button>
                         <button> store.dispatch(removegun())}>减一</button>
                         <button> store.dispatch(addgunAsync())}>异步添加</button>

                 )
             }
         }

 * 这里你可以打开浏览器查看效果
Copy after login -
react-redux is installed using npm i react-redux -S (abbreviation of --save)
  Provider 组件应用在最外层, 传入store,只调用一次
  connect 负责从外部获取组件需要的参数
  connect 可以用装饰器的方式来写

  & 下面是修改过的代码: 依然使用redux.js

    修改了**App.js index.js**

        index.js
             import React from 'react';
             import ReactDOM from 'react-dom';
             import { createStore, applyMiddleware, compose } from 'redux'; // applyMiddleware 处理中间键
             import thunk from 'redux-thunk';  // 中间键
             import { Provider } from 'react-redux';
             import registerServiceWorker from './registerServiceWorker';
             import App from './App';

             import { counter } from './redux';

             // 创建一个store counter执行reducer方法
             const store = createStore(counter, compose(
                 applyMiddleware(thunk),
                 window.devToolsExtension ? window.devToolsExtension() : f => f
             ))

             ReactDOM.render(
                 <provider>
                     <app></app>
                 </provider>,
                 document.getElementById('root'));
             registerServiceWorker();
Copy after login
           App.js 组件
                import React, { Component } from 'react';
                // 连接使用
                import { connect } from 'react-redux';
                import { addgun, removegun, addgunAsync } from './redux/index.redux';
                class App extends Component {
                    render() {
                        return (
                            <p>
                                </p><h1>
                                    hello
                                    <br>
                                    {this.props.num}
                                </h1>
                                <button>加一</button>
                                <button>减一</button>
                                <button>异步添加</button>

                        )
                    }
                }

                const mapStatetoProps = (state)=> {
                    return { num: state }
                }
                const actionCreators = { addgun, removegun, addgunAsync }
                // 装饰器的使用 connect  链接过后可以用  this.props 获取
                App = connect(mapStatetoProps, actionCreators)(App)
                export default App;

        ** 这里是不是感觉比store.subscribe方便一点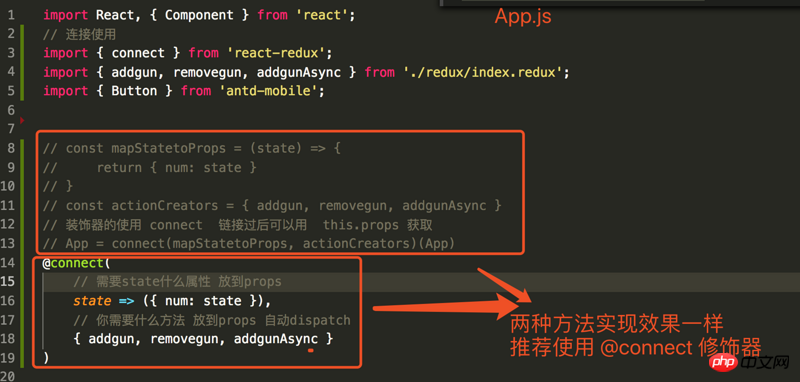
(调试react 推荐谷歌插件 Redux DevTools) 在谷歌商店下载需要翻墙
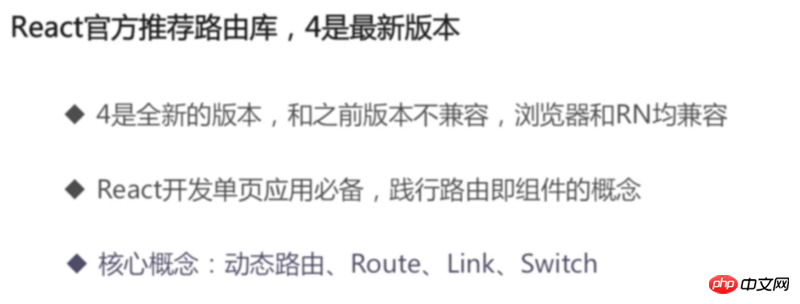
react-router4
 ##
##
 *注意点*: 下载router包   npm i react-router-dom --save
             react-router-dom 也有2个路由参数
                 HashRouter(带#路由)
                 BrowserRouter (不带#号) 如果使用这种路由 和Vue一样需要后台配置

    下面提供代码 供朋友参考:
        import React from 'react';
        import ReactDOM from 'react-dom';
        import registerServiceWorker from './registerServiceWorker';
        import { createStore, applyMiddleware, compose } from 'redux'; // applyMiddleware 处理中间键
        import thunk from 'redux-thunk';  // 中间键
        import { Provider } from 'react-redux';
        import { BrowserRouter, Route, Link, Redirect, Switch } from 'react-router-dom';
        import App from './App';

        import { counter } from './redux/index.redux';

        // 创建一个store counter执行reducer方法
        const store = createStore(counter, compose(
            applyMiddleware(thunk),
            window.devToolsExtension ? window.devToolsExtension() : f => f
        ))

        class about extends React.Component {
            render () {
                return (
                    <h1 id="关于详情-this-props-match-params-id">关于详情: {this.props.match.params.id}</h1>
                )
            }
        }

        function home() {
            return <h1 id="我的详情">我的详情</h1>
        }

        ReactDOM.render(
            (
                <provider>
                    <browserrouter>
                        <p>
                            </p>
<ul>
                                <li>
                                    <link>嘻嘻嘻
                                </li>
                                <li>
                                    <link>关于
                                </li>
                                <li>
                                    <link>我的
                                </li>
                            </ul>
                            <switch>
                                {/* {Switch} 默认只会匹配第一个 */}
                                <route></route>
                                <route></route>
                                {/* match.params.id 取值 */}
                                <route></route>
                            </switch>

                    </browserrouter>
                    {/* <app></app> */}
                </provider>
            ),
            document.getElementById('root'));
            registerServiceWorker();

       *
     如果使用一下跳转方式 会包错 push
     this.props.history.push('/about')

          在4.x 中提供了一个高阶组件  withRouter

          import { withRouter } from "react-router-dom";

          eg: 以下事例

            import React, { Component } from 'react';
            import { withRouter } from "react-router-dom";

            class Info extends Component {
                handleClick() {
                    this.props.history.push('/about')
                }
                render() {
                    return (
                        <button> this.handleClick()}>加一</button>
                    )
                }
            }

            export default withRouter(Info);


后续更新全部!!!!Simple analysis of react-router routing
The above is the detailed content of Usage and configuration of React+mongodb. For more information, please follow other related articles on the PHP Chinese website!

Hot AI Tools

Undresser.AI Undress
AI-powered app for creating realistic nude photos

AI Clothes Remover
Online AI tool for removing clothes from photos.

Undress AI Tool
Undress images for free

Clothoff.io
AI clothes remover

Video Face Swap
Swap faces in any video effortlessly with our completely free AI face swap tool!

Hot Article

Hot Tools

Notepad++7.3.1
Easy-to-use and free code editor

SublimeText3 Chinese version
Chinese version, very easy to use

Zend Studio 13.0.1
Powerful PHP integrated development environment

Dreamweaver CS6
Visual web development tools

SublimeText3 Mac version
God-level code editing software (SublimeText3)

Hot Topics
 What is the use of net4.0
May 10, 2024 am 01:09 AM
.NET 4.0 is used to create a variety of applications and it provides application developers with rich features including: object-oriented programming, flexibility, powerful architecture, cloud computing integration, performance optimization, extensive libraries, security, Scalability, data access, and mobile development support.
 Comparison of Golang and Node.js in backend development
Jun 03, 2024 pm 02:31 PM
Go and Node.js have differences in typing (strong/weak), concurrency (goroutine/event loop), and garbage collection (automatic/manual). Go has high throughput and low latency, and is suitable for high-load backends; Node.js is good at asynchronous I/O and is suitable for high concurrency and short requests. Practical cases of the two include Kubernetes (Go), database connection (Node.js), and web applications (Go/Node.js). The final choice depends on application needs, team skills, and personal preference.
 How to configure MongoDB automatic expansion on Debian
Apr 02, 2025 am 07:36 AM
This article introduces how to configure MongoDB on Debian system to achieve automatic expansion. The main steps include setting up the MongoDB replica set and disk space monitoring. 1. MongoDB installation First, make sure that MongoDB is installed on the Debian system. Install using the following command: sudoaptupdatesudoaptinstall-ymongodb-org 2. Configuring MongoDB replica set MongoDB replica set ensures high availability and data redundancy, which is the basis for achieving automatic capacity expansion. Start MongoDB service: sudosystemctlstartmongodsudosys
 How to ensure high availability of MongoDB on Debian
Apr 02, 2025 am 07:21 AM
This article describes how to build a highly available MongoDB database on a Debian system. We will explore multiple ways to ensure data security and services continue to operate. Key strategy: ReplicaSet: ReplicaSet: Use replicasets to achieve data redundancy and automatic failover. When a master node fails, the replica set will automatically elect a new master node to ensure the continuous availability of the service. Data backup and recovery: Regularly use the mongodump command to backup the database and formulate effective recovery strategies to deal with the risk of data loss. Monitoring and Alarms: Deploy monitoring tools (such as Prometheus, Grafana) to monitor the running status of MongoDB in real time, and
 Navicat's method to view MongoDB database password
Apr 08, 2025 pm 09:39 PM
It is impossible to view MongoDB password directly through Navicat because it is stored as hash values. How to retrieve lost passwords: 1. Reset passwords; 2. Check configuration files (may contain hash values); 3. Check codes (may hardcode passwords).
 Use Composer to solve the dilemma of recommendation systems: andres-montanez/recommendations-bundle
Apr 18, 2025 am 11:48 AM
When developing an e-commerce website, I encountered a difficult problem: how to provide users with personalized product recommendations. Initially, I tried some simple recommendation algorithms, but the results were not ideal, and user satisfaction was also affected. In order to improve the accuracy and efficiency of the recommendation system, I decided to adopt a more professional solution. Finally, I installed andres-montanez/recommendations-bundle through Composer, which not only solved my problem, but also greatly improved the performance of the recommendation system. You can learn composer through the following address:
 What is the CentOS MongoDB backup strategy?
Apr 14, 2025 pm 04:51 PM
Detailed explanation of MongoDB efficient backup strategy under CentOS system This article will introduce in detail the various strategies for implementing MongoDB backup on CentOS system to ensure data security and business continuity. We will cover manual backups, timed backups, automated script backups, and backup methods in Docker container environments, and provide best practices for backup file management. Manual backup: Use the mongodump command to perform manual full backup, for example: mongodump-hlocalhost:27017-u username-p password-d database name-o/backup directory This command will export the data and metadata of the specified database to the specified backup directory.
 MongoDB and relational database: a comprehensive comparison
Apr 08, 2025 pm 06:30 PM
MongoDB and relational database: In-depth comparison This article will explore in-depth the differences between NoSQL database MongoDB and traditional relational databases (such as MySQL and SQLServer). Relational databases use table structures of rows and columns to organize data, while MongoDB uses flexible document-oriented models to better suit the needs of modern applications. Mainly differentiates data structures: Relational databases use predefined schema tables to store data, and relationships between tables are established through primary keys and foreign keys; MongoDB uses JSON-like BSON documents to store them in a collection, and each document structure can be independently changed to achieve pattern-free design. Architectural design: Relational databases need to pre-defined fixed schema; MongoDB supports


