

Writing a crawler example using NodeJS
This article mainly explains to you how to use NodeJS to learn crawlers, and explains the usage and effects by crawling the Encyclopedia of Embarrassing Things. Let's learn together.
1. Preface analysis
Usually we use Python/.NET language to implement crawlers, but now as a front-end developer, naturally Requires proficiency in NodeJS. Let's use NodeJS language to implement a crawler for Encyclopedia of Embarrassing Things. In addition, some of the codes used in this article are es6 syntax.
The dependent libraries required to implement this crawler are as follows.
request: Use get or post methods to obtain the source code of the web page. cheerio: Parse the web page source code and obtain the required data.
This article first introduces the dependency libraries required by the crawler and their use, and then uses these dependency libraries to implement a web crawler for Encyclopedia of Embarrassing Things.
2. request library
request is a lightweight http library that is very powerful and easy to use. You can use it to implement Http requests, and supports HTTP authentication, custom request headers, etc. Below is an introduction to some of the functions in the request library.
Install the request module as follows:
npm install request
After request is installed, it can be used. Now use request to request Baidu web pages.
const req = require('request');
req('http://www.baidu.com', (error, response, body) => {
 if (!error && response.statusCode == 200) {
 console.log(body)
 }
})When the options parameter is not set, the request method defaults to a get request. The specific method I like to use the request object is as follows:
req.get({
 url: 'http://www.baidu.com'
},(err, res, body) => {
 if (!err && res.statusCode == 200) {
 console.log(body)
 }
});However, many times, we often do not get the information we need by directly requesting the html source code obtained from a URL. In general, request headers and web page encoding need to be taken into consideration.
Web page request header web page encoding
The following describes how to add a web page request header and set the correct encoding when requesting.
req.get({
 url : url,
 headers: {
  "User-Agent" : "Mozilla/5.0 (Windows NT 10.0; Win64; x64) AppleWebKit/537.36 (KHTML, like Gecko) Chrome/62.0.3202.94 Safari/537.36",
  "Host" : "www.zhihu.com",
  "Upgrade-Insecure-Requests" : "1"
 },
 encoding : 'utf-8'
}, (err, res, body)=>{
 if(!err)
  console.log(body);
})Set the options parameter, add the headers attribute to set the request header; add the encoding attribute to set the encoding of the web page. It should be noted that if encoding: null, then the content obtained by the get request is a Buffer object, that is, the body is a Buffer object.
The functions introduced above are sufficient to meet the following needs
3. cheerio library
cheerio is a Server-side Jquery is loved by developers for its features such as being light, fast, and easy to learn. It is very easy to learn the cheerio library after having a basic knowledge of Jquery. It can quickly locate elements in web pages, and its rules are the same as Jquery's method of locating elements; it can also modify the content of elements in html and obtain their data in a very convenient form. The following mainly introduces cheerio to quickly locate elements in web pages and obtain their contents.
First install the cheerio library
npm install cheerio
The following is a piece of code, and then explains the usage of the cheerio library. Analyze the homepage of the blog park, and then extract the titles of the articles on each page.
First analyze the home page of the blog park. As shown below:
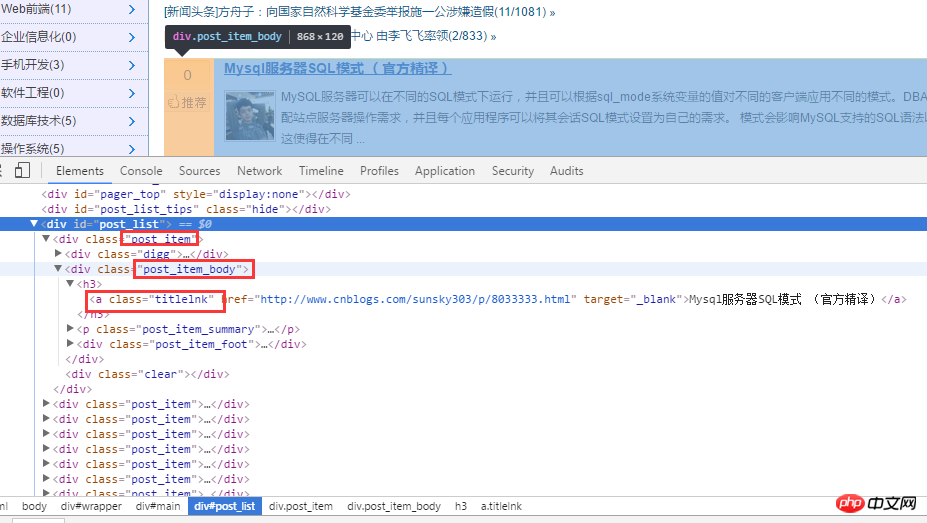
After analyzing the html source code, first obtain all titles through .post_item, and then obtain each .post_item For analysis, use a.titlelnk to match the a tag of each title. The following is implemented through code.
const req = require('request');
const cheerio = require('cheerio');

req.get({
 url: 'https://www.cnblogs.com/'
 }, (err, res, body) => {
 if (!err && res.statusCode == 200) {
  let cnblogHtmlStr = body;
  let $ = cheerio.load(cnblogHtmlStr);
  $('.post_item').each((index, ele) => {
  let title = $(ele).find('a.titlelnk');
  let titleText = title.text();
  let titletUrl = title.attr('href');
  console.log(titleText, titletUrl);
  });
 }
});Of course, the cheerio library also supports chain calls, and the above code can also be rewritten as:
let cnblogHtmlStr = body;
let $ = cheerio.load(cnblogHtmlStr);
let titles = $('.post_item').find('a.titlelnk');
titles.each((index, ele) => {
 let titleText = $(ele).text();
 let titletUrl = $(ele).attr('href');
console.log(titleText, titletUrl);The above code is very simple, so I won’t elaborate on it in words. Below I summarize some of the points that I think are more important.
Use the find() method to obtain the node set A. If you use the elements in the A set as the root node again to locate its child nodes and obtain the content and attributes of the child elements, you need to The sub-elements in the A collection are $(A[i]) wrapped, just like $(ele) above. Use $(ele) in the above code. In fact, you can also use $(this), but since I am using the arrow function of es6, I changed each This pointer of the callback function in the method, therefore, I use $(ele); The cheerio library also supports chain calls, such as the above $('.post_item').find('a .titlelnk'), it should be noted that the cheerio object A calls the method find(). If A is a collection, then each sub-element in the collection A calls find( ) method and put back a result combined. If A calls text(), then each child element in A's collection calls text() and returns a string that is the union of the contents of all child elements ( merge directly, without delimiters).
Finally, I will summarize some of my more commonly used methods.
first() last() children([selector]): This method is similar to find, except that this method only searches child nodes, while find searches the entire descendant nodes.
4. Embarrassing Encyclopedia Crawler
通过上面对 request 和 cheerio 类库的介绍,下面利用这两个类库对糗事百科的页面进行爬取。
1、在项目目录中,新建 httpHelper.js 文件,通过 url 获取糗事百科的网页源码,代码如下:
//爬虫
const req = require('request');

function getHtml(url){
 return new Promise((resolve, reject) => {
  req.get({
   url : url,
   headers: {
    "User-Agent" : "Mozilla/5.0 (Windows NT 10.0; WOW64) AppleWebKit/537.36 (KHTML, like Gecko) Chrome/55.0.2883.87 Safari/537.36",
    "Referer" : "https://www.qiushibaike.com/"
   },
   encoding : 'utf-8'
  }, (err, res, body)=>{
   if(err) reject(err);
   else resolve(body);
  })
 });
}
exports.getHtml = getHtml;2、在项目目录中,新建一个 Splider.js 文件,分析糗事百科的网页代码,提取自己需要的信息,并且建立一个逻辑通过更改 url 的 id 来爬取不同页面的数据。
const cheerio = require('cheerio');
const httpHelper = require('./httpHelper');
function getQBJok(htmlStr){
 let $ = cheerio.load(htmlStr);
 let jokList = $('#content-left').children('p');
 let rst = [];
 jokList.each((i, item)=>{
  let node = $(item);
  let titleNode = node.find('h2');
  let title = titleNode ? titleNode.text().trim() : '匿名用户';
  let content = node.find('.content span').text().trim();
  let likeNumber = node.find('i[class=number]').text().trim();
  rst.push({
   title : title,
   content : content,
   likeNumber : likeNumber
  });
 });
 return rst;
}
async function splider(index = 1){
 let url = `https://www.qiushibaike.com/8hr/page/${index}/`;
 let htmlStr = await httpHelper.getHtml(url);
 let rst = getQBJok(htmlStr);
 return rst;
}
splider(1);在获取糗事百科网页信息的时候,首先在浏览器中对源码进行分析,定位到自己所需要标签,然后提取标签的文本或者属性值,这样就完成了网页的解析。
Splider.js 文件入口是 splider 方法,首先根据传入该方法的 index 索引,构造糗事百科的 url,接着获取该 url 的网页源码,最后将获取的源码传入 getQBJok 方法,进行解析,本文只解析每条文本笑话的作者、内容以及喜欢个数。
直接运行 Splider.js 文件,即可爬取第一页的笑话信息。然后可以更改 splider 方法的参数,实现抓取不同页面的信息。
在上面已有代码的基础上,使用 koa 和 vue2.0 搭建一个浏览文本的页面,效果如下:

源码已上传到 github 上。下载地址:https://github.com/StartAction/SpliderQB ;
项目运行依赖 node v7.6.0 以上, 首先从 Github 上面克隆整个项目。
git clone https://github.com/StartAction/SpliderQB.git
克隆之后,进入项目目录,运行下面命令即可。
node app.js
上面是我整理给大家的,希望今后会对大家有帮助。
相关文章:
The above is the detailed content of Writing a crawler example using NodeJS. For more information, please follow other related articles on the PHP Chinese website!

Hot AI Tools

Undresser.AI Undress
AI-powered app for creating realistic nude photos

AI Clothes Remover
Online AI tool for removing clothes from photos.

Undress AI Tool
Undress images for free

Clothoff.io
AI clothes remover

Video Face Swap
Swap faces in any video effortlessly with our completely free AI face swap tool!

Hot Article
Hot Tools

Notepad++7.3.1
Easy-to-use and free code editor

SublimeText3 Chinese version
Chinese version, very easy to use

Zend Studio 13.0.1
Powerful PHP integrated development environment

Dreamweaver CS6
Visual web development tools

SublimeText3 Mac version
God-level code editing software (SublimeText3)
Hot Topics


 The difference between nodejs and vuejs
Apr 21, 2024 am 04:17 AM
The difference between nodejs and vuejs
Apr 21, 2024 am 04:17 AM
Node.js is a server-side JavaScript runtime, while Vue.js is a client-side JavaScript framework for creating interactive user interfaces. Node.js is used for server-side development, such as back-end service API development and data processing, while Vue.js is used for client-side development, such as single-page applications and responsive user interfaces.
 Is nodejs a backend framework?
Apr 21, 2024 am 05:09 AM
Is nodejs a backend framework?
Apr 21, 2024 am 05:09 AM
Node.js can be used as a backend framework as it offers features such as high performance, scalability, cross-platform support, rich ecosystem, and ease of development.
 How to connect nodejs to mysql database
Apr 21, 2024 am 06:13 AM
How to connect nodejs to mysql database
Apr 21, 2024 am 06:13 AM
To connect to a MySQL database, you need to follow these steps: Install the mysql2 driver. Use mysql2.createConnection() to create a connection object that contains the host address, port, username, password, and database name. Use connection.query() to perform queries. Finally use connection.end() to end the connection.
 What are the global variables in nodejs
Apr 21, 2024 am 04:54 AM
What are the global variables in nodejs
Apr 21, 2024 am 04:54 AM
The following global variables exist in Node.js: Global object: global Core module: process, console, require Runtime environment variables: __dirname, __filename, __line, __column Constants: undefined, null, NaN, Infinity, -Infinity
 What is the difference between npm and npm.cmd files in the nodejs installation directory?
Apr 21, 2024 am 05:18 AM
What is the difference between npm and npm.cmd files in the nodejs installation directory?
Apr 21, 2024 am 05:18 AM
There are two npm-related files in the Node.js installation directory: npm and npm.cmd. The differences are as follows: different extensions: npm is an executable file, and npm.cmd is a command window shortcut. Windows users: npm.cmd can be used from the command prompt, npm can only be run from the command line. Compatibility: npm.cmd is specific to Windows systems, npm is available cross-platform. Usage recommendations: Windows users use npm.cmd, other operating systems use npm.
 Is there a big difference between nodejs and java?
Apr 21, 2024 am 06:12 AM
Is there a big difference between nodejs and java?
Apr 21, 2024 am 06:12 AM
The main differences between Node.js and Java are design and features: Event-driven vs. thread-driven: Node.js is event-driven and Java is thread-driven. Single-threaded vs. multi-threaded: Node.js uses a single-threaded event loop, and Java uses a multi-threaded architecture. Runtime environment: Node.js runs on the V8 JavaScript engine, while Java runs on the JVM. Syntax: Node.js uses JavaScript syntax, while Java uses Java syntax. Purpose: Node.js is suitable for I/O-intensive tasks, while Java is suitable for large enterprise applications.
 Is nodejs a back-end development language?
Apr 21, 2024 am 05:09 AM
Is nodejs a back-end development language?
Apr 21, 2024 am 05:09 AM
Yes, Node.js is a backend development language. It is used for back-end development, including handling server-side business logic, managing database connections, and providing APIs.
 Which one to choose between nodejs and java?
Apr 21, 2024 am 04:40 AM
Which one to choose between nodejs and java?
Apr 21, 2024 am 04:40 AM
Node.js and Java each have their pros and cons in web development, and the choice depends on project requirements. Node.js excels in real-time applications, rapid development, and microservices architecture, while Java excels in enterprise-grade support, performance, and security.
