

How to implement random layout waterfall flow in ionic3
This article mainly introduces to you the implementation method of random layout waterfall flow in ionic3 practical tutorial. The article introduces it in detail through sample code and pictures. It has certain reference learning value for everyone's study or work. It needs Friends, let’s study together.
Preface
Recently I came into contact with ionic3 due to project needs, and found that it is really a sharp tool! The ionic project provides a rich set of icons The library has also been upgraded in ionic3.
In one of the company's projects, a waterfall flow special effect was required. After searching for a long time, I couldn't find the relevant resources. I had no choice but to do it~
Without further ado, here are the pictures


Automatic typesetting
Our requirement is to create that random and messy feeling, so we need to make a mechanism , to choose the best arrangement method for the pictures to display on the page, that is, to ensure that the ratio of the picture to the adjacent pictures is the most appropriate and then implement the arrangement.angular4
I believe this effect is not difficult to achieve in ordinary jq plug-ins. Indeed, some jq plug-ins can also be found on the Internet. But our technology stack is angular4~In ng, our DOM operations are basically placed in instructions. I believe students who have used angularjs1.x are familiar with it~, the same is true in angular4 Same.Okay, let’s post the code~
Create instructions
We assume you have After you have established the relevant components in your ionic and already have the image data, if you do not have the relevant foundation, I suggest you take a look at the introduction to ionic3 and angular4 first.
Create a directive ts
ionic g directive image-sortExecute the directive that created us.

Write our logic
1.1 Receive and inject something:
Look at the picture!
([[imagr-sort]="item"]);then of course we should also include it in the directive Receive the input data; as shown by the red arrow in the screenshot, I saved the input data ->sourceArr;
1.2 Be practical! The picture is loaded asynchronously!
Let’s first think about this question: Our instructions start executing when angular data is rendered. This is basically understood by everyone. but! Our pictures are all loaded asynchronously~, so naturally we have to have a picture loading process:
image.onload, yes, that’s right~
image.onerror, I believe you all understand this, this is a function that fails to load the image. What I do inside is to remove the image that failed to load from the original DOM, angular data removal.
Our angular renderer is used herethis.render2();
You can check out the source code for related functions and methods, basically all commonly used ones Dom operations are implemented.
The for loop is because our image data has multiple pieces, so we have to wait for each image to be loaded successfully.
ps:Note that when using this in the onerror and onload functions, you must use a variable reference in imgOnlodlet _self = this;
The picture is loaded and we start our renovation project
1.3 Divide our delicious food into grids
imageStartStort()!
Above picture

Look at the red circle in picture 1. I have divided five horizontal grid standards myself to facilitate the proportion of the picture later. Make comparisons.
1.4 Occupy our picture definition grid


We created an array allImageArr=[]; used to save the data of all images currently processed.
Remember the angular data we obtained before, we divide the image into grids by looping it.
What do we do in our loop?
1. The width and height of the picture, and find the proportion of each picture.
2. Divide the obtained image ratio into intervals with our own defined grid ratio.
3. Calculate the new width of the picture occupying the grid according to the grid we divided. The number of grids occupied is stored and the record is saved to our custom allImageArr, and in the original angular Add the gridding number to the data to record the corresponding grid number.
Executionthis.pictureColumnSort method;
Our pictures have been divided. Next, let’s have a moment of passion~
1.5 Picture arrangement, select the most suitable neighbor according to the grid~
pictureColumnSort()!
Above picture

There is actually nothing to say about this process. It mainly involves looping, checking the number of grids in each picture, sorting the most suitable ones adjacently (execute the next step: goExchange function), and finally making a separate 5 for those that do not match. The grid tactics come out.
The format can be many:
3 2, 1 4, 1 1 3, 1 3 1, 2 3.. . . . .
How come you are happy~
There is nothing to say, just cycle screening, just look at the picture.
1.6 Change from disorder to order, there should be no better choice except exchange
goExchange()! Above picture

Look at the code in 1.5. We execute this function every time after matching a suitable image, because we need to change the position of the matched image!
The repeatI and repeatA received in this function are the indexes of the double loop in 1.5. This index determines the position where we change the picture.
The principle shown in the code is to change the matched picture to the back of our current picture, and fill the original picture behind it to the position of the changed picture. It is a bit convoluted and may be due to my poor typing ability. ,Ha ha.
There is nothing to say about this function, it just changes the position.
1.7 Learn from each other’s strengths and complete the project!
setHeight()! The above picture

loops again (the code should still have a lot of improvements, the loop is used a lot~) ;
At this point, our layout page has been completed, but the size of our pictures is actually irregular, which can’t be looked at directly.
So we smooth out the differences in this function and learn from each other’s strengths. .
In fact, our picture will definitely be stretched a little, so we also take a balanced middle point to perform appropriate stretching.
This function can definitely make some appropriate restrictions to refine the image size adjustment. At this point we have finished writing the entire command logic.
Complete! ioinc serve

As for the middle call process, I want to explain one thing:
setTimeout(() => {
  _self.setHeight(angularImageList, ele);
});I only used the entire call when I was helpless on the night shift. If I don’t add the angle and data set in the setHeight function of the entire call, There will be an error in changing the picture position inexplicably. I still misunderstand it. If you can see the whole solution, please share it.
The above is what I compiled for everyone. I hope it will be helpful to everyone in the future.
Related articles:
How to implement calls between methods in vue
How vux implements the pull-up refresh function
How to implement image carousel with jQuery
The above is the detailed content of How to implement random layout waterfall flow in ionic3. For more information, please follow other related articles on the PHP Chinese website!

Hot AI Tools

Undresser.AI Undress
AI-powered app for creating realistic nude photos

AI Clothes Remover
Online AI tool for removing clothes from photos.

Undress AI Tool
Undress images for free

Clothoff.io
AI clothes remover

Video Face Swap
Swap faces in any video effortlessly with our completely free AI face swap tool!

Hot Article
Hot Tools

Notepad++7.3.1
Easy-to-use and free code editor

SublimeText3 Chinese version
Chinese version, very easy to use

Zend Studio 13.0.1
Powerful PHP integrated development environment

Dreamweaver CS6
Visual web development tools

SublimeText3 Mac version
God-level code editing software (SublimeText3)
Hot Topics


 Windows 11: The easy way to import and export start layouts
Aug 22, 2023 am 10:13 AM
Windows 11: The easy way to import and export start layouts
Aug 22, 2023 am 10:13 AM
In Windows 11, the Start menu has been redesigned and features a simplified set of apps arranged in a grid of pages, unlike its predecessor, which had folders, apps, and apps on the Start menu. Group. You can customize the Start menu layout and import and export it to other Windows devices to personalize it to your liking. In this guide, we’ll discuss step-by-step instructions for importing Start Layout to customize the default layout on Windows 11. What is Import-StartLayout in Windows 11? Import Start Layout is a cmdlet used in Windows 10 and earlier versions to import customizations for the Start menu into
 How to save desktop icon position layout in Windows 11
Aug 23, 2023 pm 09:53 PM
How to save desktop icon position layout in Windows 11
Aug 23, 2023 pm 09:53 PM
Windows 11 brings a lot to the table in terms of user experience, but the iteration isn't entirely error-proof. Users run into issues from time to time, and changes to icon positioning are common. So how to save desktop layout in Windows 11? There are built-in and third-party solutions for this task, whether it's saving the screen resolution of the current window or the arrangement of desktop icons. This becomes even more important for users who have a bunch of icons on their desktop. Read on to learn how to save desktop icon locations in Windows 11. Why doesn't Windows 11 save icon layout positions? Here are the main reasons why Windows 11 does not save desktop icon layout: Changes to display settings: Typically, when you modify display settings, the configured customizations
 Guide to solving misalignment of WordPress web pages
Mar 05, 2024 pm 01:12 PM
Guide to solving misalignment of WordPress web pages
Mar 05, 2024 pm 01:12 PM
Guide to solving misaligned WordPress web pages In WordPress website development, sometimes we encounter web page elements that are misaligned. This may be due to screen sizes on different devices, browser compatibility, or improper CSS style settings. To solve this misalignment, we need to carefully analyze the problem, find possible causes, and debug and repair it step by step. This article will share some common WordPress web page misalignment problems and corresponding solutions, and provide specific code examples to help develop
 How to create a responsive carousel layout using HTML and CSS
Oct 20, 2023 pm 04:24 PM
How to create a responsive carousel layout using HTML and CSS
Oct 20, 2023 pm 04:24 PM
How to create a responsive carousel layout using HTML and CSS Carousels are a common element in modern web design. It can attract the user's attention, display multiple contents or images, and switch automatically. In this article, we will introduce how to create a responsive carousel layout using HTML and CSS. First, we need to create a basic HTML structure and add the required CSS styles. The following is a simple HTML structure: <!DOCTYPEhtml&g
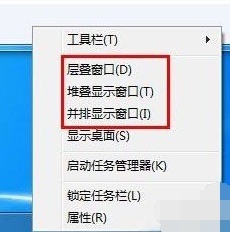 Introducing the window arrangement method in win7
Dec 26, 2023 pm 04:37 PM
Introducing the window arrangement method in win7
Dec 26, 2023 pm 04:37 PM
When we open multiple windows at the same time, win7 has the function of arranging multiple windows in different ways and then displaying them at the same time, which allows us to view the contents of each window more clearly. So how many window arrangements are there in win7? What do they look like? Let’s take a look with the editor. There are several ways to arrange Windows 7 windows: three, namely cascading windows, stacked display windows and side-by-side display windows. When we open multiple windows, we can right-click on an empty space on the taskbar. You can see three window arrangements. 1. Cascading windows: 2. Stacked display windows: 3. Display windows side by side:
 Flexible application skills of position attribute in H5
Dec 27, 2023 pm 01:05 PM
Flexible application skills of position attribute in H5
Dec 27, 2023 pm 01:05 PM
How to flexibly use the position attribute in H5. In H5 development, the positioning and layout of elements are often involved. At this time, the CSS position property will come into play. The position attribute can control the positioning of elements on the page, including relative positioning, absolute positioning, fixed positioning and sticky positioning. This article will introduce in detail how to flexibly use the position attribute in H5 development.
 Syntax usage scenarios of contain in CSS
Feb 21, 2024 pm 02:00 PM
Syntax usage scenarios of contain in CSS
Feb 21, 2024 pm 02:00 PM
Syntax usage scenarios of contain in CSS In CSS, contain is a useful attribute that specifies whether the content of an element is independent of its external style and layout. It helps developers better control page layout and optimize performance. This article will introduce the syntax usage scenarios of the contain attribute and provide specific code examples. The syntax of the contain attribute is as follows: contain:layout|paint|size|style|'none'|'stric
 Methods and techniques on how to implement waterfall flow layout through pure CSS
Oct 20, 2023 pm 06:01 PM
Methods and techniques on how to implement waterfall flow layout through pure CSS
Oct 20, 2023 pm 06:01 PM
Methods and techniques on how to implement waterfall flow layout through pure CSS. Waterfall layout (Waterfall Layout) is a common layout method in web design. It arranges content in multiple columns with inconsistent heights to form an image. Waterfall-like visual effects. This layout is often used in situations where a large amount of content needs to be displayed, such as picture display and product display, and has a good user experience. There are many ways to implement a waterfall layout, and it can be done using JavaScript or CSS.
