

Using Angular5 to implement server-side rendering practice
This article mainly introduces the detailed explanation of Angular5 server-side rendering practice. Now I share it with you and give it as a reference.
This article continues development based on the previous Angular5 article. The above article talks about the process of building Angular5 Youdao Translation and the solutions to the problems encountered.

Then the UI was changed from bootstrap4 to angular material. I won’t go into details here. Server-side rendering has nothing to do with modifying the UI.
Those who have read the previous articles will find that the content of the articles is biased towards server-side rendering, vue’s nuxt, and react’s next.
Before this revision, I also tried to find top-level packaging libraries like nuxt.js and next.js, which can greatly save time, but to no avail.
Finally decided to use the front-end and back-end isomorphic solution Angular Universal (Universal (isomorphic) JavaScript support for Angular.) that has been available since Angular2.
I will not introduce the document content in detail here. This article also Try to use easy-to-understand language to bring Angular's SSR
Prerequisite
The udao project written above is completely compliant with angular-cli, from construction to packaging , which also makes this article universally applicable to all angular5 projects built with angular-cli.
Building process
First install the server dependencies
yarn add @angular/platform-server express
yarn add -D ts-loader webpack-node-externals npm-run-all
It should be noted here that the version number of @angular/platform-server is best based on the current Install the angular version, such as: @angular/platform-server@5.1.0 to avoid version conflicts with other dependencies.
Create file: src/app/app.server.module.ts
import { NgModule } from '@angular/core'
import { ServerModule } from '@angular/platform-server'

import { AppModule } from './app.module'
import { AppComponent } from './app.component'

@NgModule({
 imports: [
  AppModule,
  ServerModule
 ],
 bootstrap: [AppComponent],
})
export class AppServerModule { }Update file: src/app/app.module.ts
import { BrowserModule } from '@angular/platform-browser'
import { NgModule } from '@angular/core'
// ...

import { AppComponent } from './app.component'
// ...

@NgModule({
 declarations: [
  AppComponent
  // ...
 ],
 imports: [
  BrowserModule.withServerTransition({ appId: 'udao' })
  // ...
 ],
 providers: [],
 bootstrap: [AppComponent]
})
export class AppModule { }We need a master File to export the server module
Create the file: src/main.server.ts
export { AppServerModule } from './app/app.server.module'Now let’s update the configuration file of @angular/cli.angular-cli.json
{
 "$schema": "./node_modules/@angular/cli/lib/config/schema.json",
 "project": {
  "name": "udao"
 },
 "apps": [
  {
   "root": "src",
   "outDir": "dist/browser",
   "assets": [
    "assets",
    "favicon.ico"
   ]
   // ...
  },
  {
   "platform": "server",
   "root": "src",
   "outDir": "dist/server",
   "assets": [],
   "index": "index.html",
   "main": "main.server.ts",
   "test": "test.ts",
   "tsconfig": "tsconfig.server.json",
   "testTsconfig": "tsconfig.spec.json",
   "prefix": "app",
   "scripts": [],
   "environmentSource": "environments/environment.ts",
   "environments": {
    "dev": "environments/environment.ts",
    "prod": "environments/environment.prod.ts"
   }
  }
 ]
 // ...
}The //... above means omitting it, but there is no comment in json, which looks weird....
Of course, the configuration of .angular-cli.json is not fixed, and it depends on the needs. Modify by yourself
We need to create a tsconfig configuration file for the server: src/tsconfig.server.json
{
 "extends": "../tsconfig.json",
 "compilerOptions": {
  "outDir": "../out-tsc/app",
  "baseUrl": "./",
  "module": "commonjs",
  "types": []
 },
 "exclude": [
  "test.ts",
  "**/*.spec.ts",
  "server.ts"
 ],
 "angularCompilerOptions": {
  "entryModule": "app/app.server.module#AppServerModule"
 }
}Then update: src/tsconfig.app.json
{
 "extends": "../tsconfig.json",
 "compilerOptions": {
  "outDir": "../out-tsc/app",
  "baseUrl": "./",
  "module": "es2015",
  "types": []
 },
 "exclude": [
  "test.ts",
  "**/*.spec.ts",
  "server.ts"
 ]
}Now You can execute the following command to see if the configuration is valid
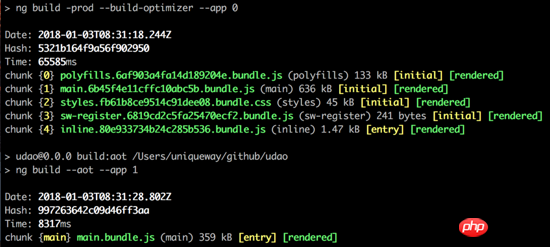
ng build -prod --build-optimizer --app 0
ng build --aot --app 1
The running result should be as shown in the figure below
Then create the Express.js service and create the file: src /server.ts
import 'reflect-metadata'
import 'zone.js/dist/zone-node'
import { renderModuleFactory } from '@angular/platform-server'
import { enableProdMode } from '@angular/core'
import * as express from 'express'
import { join } from 'path'
import { readFileSync } from 'fs'

enableProdMode();

const PORT = process.env.PORT || 4200
const DIST_FOLDER = join(process.cwd(), 'dist')

const app = express()

const template = readFileSync(join(DIST_FOLDER, 'browser', 'index.html')).toString()
const { AppServerModuleNgFactory } = require('main.server')

app.engine('html', (_, options, callback) => {
 const opts = { document: template, url: options.req.url }

 renderModuleFactory(AppServerModuleNgFactory, opts)
  .then(html => callback(null, html))
});

app.set('view engine', 'html')
app.set('views', 'src')

app.get('*.*', express.static(join(DIST_FOLDER, 'browser')))

app.get('*', (req, res) => {
 res.render('index', { req })
})

app.listen(PORT, () => {
 console.log(`listening on http://localhost:${PORT}!`)
})Of course you need a webpack configuration file to package the server.ts file: webpack.config.js
const path = require('path');
var nodeExternals = require('webpack-node-externals');

module.exports = {
 entry: {
  server: './src/server.ts'
 },
 resolve: {
  extensions: ['.ts', '.js'],
  alias: {
   'main.server': path.join(__dirname, 'dist', 'server', 'main.bundle.js')
  }
 },
 target: 'node',
 externals: [nodeExternals()],
 output: {
  path: path.join(__dirname, 'dist'),
  filename: '[name].js'
 },
 module: {
  rules: [
   { test: /\.ts$/, loader: 'ts-loader' }
  ]
 }
}For the convenience of packaging, it is best to add a few lines of scripts to package.json , as follows:
"scripts": {
 "ng": "ng",
 "start": "ng serve",
 "build": "run-s build:client build:aot build:server",
 "build:client": "ng build -prod --build-optimizer --app 0",
 "build:aot": "ng build --aot --app 1",
 "build:server": "webpack -p",
 "test": "ng test",
 "lint": "ng lint",
 "e2e": "ng e2e"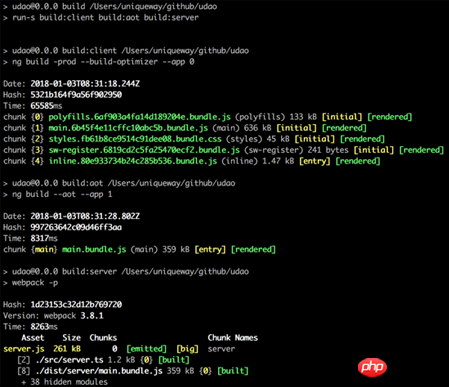
}Now try to run npm run build and you will see the following output:
node Run the node dist/server you just packaged. js file
Open http://localhost:4200/ and the project main page will be displayed normally
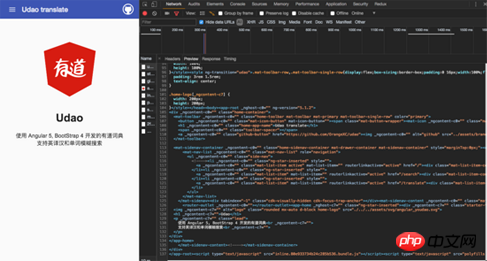
It can be seen from the above developer tools that the html document is The server renders directly. Next, try to request data.
Note: None of the explicit (clickable menu) route initializations of this project request data, but the details page of word explanation will obtain data in the ngOnInit() method, for example: http:// A strange phenomenon will occur when localhost:4200/detail/add is opened directly. The request is sent once to the server and the client respectively. The request for the initialization data of the first screen of the normal server-side rendering project is executed on the server side and not twice on the client side. requests!
After discovering the problem, let’s eliminate this pit
Imagine if a mark is used to distinguish whether the server has obtained the data. If the data is not obtained, the client requests it. , do not send a request if the data has been obtained
Of course Angular has already prepared it, that is Angular Modules for Transfer State
So how to actually use it? See below
Request to fill in the pit
Introduce TransferStateModule at the server entrance and client entrance respectively
import { ServerModule, ServerTransferStateModule } from '@angular/platform-server';
// ...

@NgModule({
 imports: [
  // ...
  ServerModule,
  ServerTransferStateModule
 ]
 // ...
})
export class AppServerModule { }
import { BrowserModule, BrowserTransferStateModule } from '@angular/platform-browser';
// ...

@NgModule({
 declarations: [
  AppComponent
  // ...
 ],
 imports: [
  BrowserModule.withServerTransition({ appId: 'udao' }),
  BrowserTransferStateModule
  // ...
 ]
 // ...
})
export class AppModule { }Take this project as an example in detail.component.ts and modify it as follows
import { Component, OnInit } from '@angular/core'
import { HttpClient } from '@angular/common/http'
import { Router, ActivatedRoute, NavigationEnd } from '@angular/router'
import { TransferState, makeStateKey } from '@angular/platform-browser'

const DETAIL_KEY = makeStateKey('detail')

// ...

export class DetailComponent implements OnInit {
 details: any

 // some variable

 constructor(
  private http: HttpClient,
  private state: TransferState,
  private route: ActivatedRoute,
  private router: Router
 ) {}

 transData (res) {
  // translate res data
 }

 ngOnInit () {
  this.details = this.state.get(DETAIL_KEY, null as any)

  if (!this.details) {
   this.route.params.subscribe((params) => {
    this.loading = true

    const apiURL = `https://dict.youdao.com/jsonapi?q=${params['word']}`

    this.http.get(`/?url=${encodeURIComponent(apiURL)}`)
    .subscribe(res => {
     this.transData(res)
     this.state.set(DETAIL_KEY, res as any)
     this.loading = false
    })
   })
  } else {
   this.transData(this.details)
  }
 }
}The code is simple and clear enough, consistent with the principle described above
Now we only need to make small adjustments to the main.ts file to run our code when DOMContentLoaded, so that TransferState works normally:
import { enableProdMode } from '@angular/core'
import { platformBrowserDynamic } from '@angular/platform-browser-dynamic'

import { AppModule } from './app/app.module'
import { environment } from './environments/environment'

if (environment.production) {
 enableProdMode()
}

document.addEventListener('DOMContentLoaded', () => {
 platformBrowserDynamic().bootstrapModule(AppModule)
  .catch(err => console.log(err))
})Go here and run npm run build && node dist/server.js and then refresh http://localhost:4200/detail/add to the console to view the network as follows:
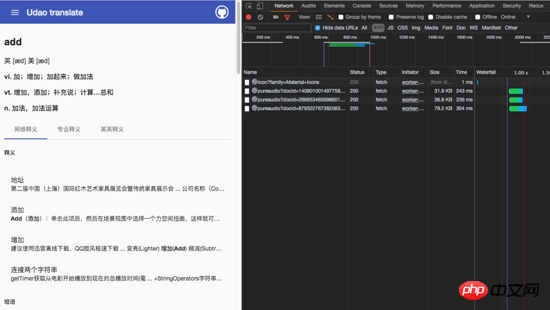
It was found that no request was initiated in the XHR category, only the cache of service-worker was hit.
All the pitfalls have been overcome here. The project is running normally and no other bugs have been found.
Summarize
2018 The first article aims to explore the implementation of server-side rendering in all popular frameworks, and opens up angular, a framework that was not tried in the end.
Of course, Orange is still a front-end elementary school student. I only know how to implement it. The principles are not very clear, and the source code is not very clear. If there are any mistakes, I hope you can enlighten me.
The final Github address is the same as the previous article: https://github.com/OrangeXC/udao
The above is what I compiled for everyone. I hope it will be helpful to everyone in the future.
Related articles:
Detailed explanation of how to implement vuex (detailed tutorial)
Implement WeChat payment through vue.js
Implementing user permission control in Vue2.0
The above is the detailed content of Using Angular5 to implement server-side rendering practice. For more information, please follow other related articles on the PHP Chinese website!

Hot AI Tools

Undresser.AI Undress
AI-powered app for creating realistic nude photos

AI Clothes Remover
Online AI tool for removing clothes from photos.

Undress AI Tool
Undress images for free

Clothoff.io
AI clothes remover

Video Face Swap
Swap faces in any video effortlessly with our completely free AI face swap tool!

Hot Article
Hot Tools

Notepad++7.3.1
Easy-to-use and free code editor

SublimeText3 Chinese version
Chinese version, very easy to use

Zend Studio 13.0.1
Powerful PHP integrated development environment

Dreamweaver CS6
Visual web development tools

SublimeText3 Mac version
God-level code editing software (SublimeText3)
Hot Topics


 What should I do if I encounter garbled code printing for front-end thermal paper receipts?
Apr 04, 2025 pm 02:42 PM
What should I do if I encounter garbled code printing for front-end thermal paper receipts?
Apr 04, 2025 pm 02:42 PM
Frequently Asked Questions and Solutions for Front-end Thermal Paper Ticket Printing In Front-end Development, Ticket Printing is a common requirement. However, many developers are implementing...
 Who gets paid more Python or JavaScript?
Apr 04, 2025 am 12:09 AM
Who gets paid more Python or JavaScript?
Apr 04, 2025 am 12:09 AM
There is no absolute salary for Python and JavaScript developers, depending on skills and industry needs. 1. Python may be paid more in data science and machine learning. 2. JavaScript has great demand in front-end and full-stack development, and its salary is also considerable. 3. Influencing factors include experience, geographical location, company size and specific skills.
 Demystifying JavaScript: What It Does and Why It Matters
Apr 09, 2025 am 12:07 AM
Demystifying JavaScript: What It Does and Why It Matters
Apr 09, 2025 am 12:07 AM
JavaScript is the cornerstone of modern web development, and its main functions include event-driven programming, dynamic content generation and asynchronous programming. 1) Event-driven programming allows web pages to change dynamically according to user operations. 2) Dynamic content generation allows page content to be adjusted according to conditions. 3) Asynchronous programming ensures that the user interface is not blocked. JavaScript is widely used in web interaction, single-page application and server-side development, greatly improving the flexibility of user experience and cross-platform development.
 How to merge array elements with the same ID into one object using JavaScript?
Apr 04, 2025 pm 05:09 PM
How to merge array elements with the same ID into one object using JavaScript?
Apr 04, 2025 pm 05:09 PM
How to merge array elements with the same ID into one object in JavaScript? When processing data, we often encounter the need to have the same ID...
 How to achieve parallax scrolling and element animation effects, like Shiseido's official website?
or:
How can we achieve the animation effect accompanied by page scrolling like Shiseido's official website?
Apr 04, 2025 pm 05:36 PM
How to achieve parallax scrolling and element animation effects, like Shiseido's official website?
or:
How can we achieve the animation effect accompanied by page scrolling like Shiseido's official website?
Apr 04, 2025 pm 05:36 PM
Discussion on the realization of parallax scrolling and element animation effects in this article will explore how to achieve similar to Shiseido official website (https://www.shiseido.co.jp/sb/wonderland/)...
 Is JavaScript hard to learn?
Apr 03, 2025 am 12:20 AM
Is JavaScript hard to learn?
Apr 03, 2025 am 12:20 AM
Learning JavaScript is not difficult, but it is challenging. 1) Understand basic concepts such as variables, data types, functions, etc. 2) Master asynchronous programming and implement it through event loops. 3) Use DOM operations and Promise to handle asynchronous requests. 4) Avoid common mistakes and use debugging techniques. 5) Optimize performance and follow best practices.
 The difference in console.log output result: Why are the two calls different?
Apr 04, 2025 pm 05:12 PM
The difference in console.log output result: Why are the two calls different?
Apr 04, 2025 pm 05:12 PM
In-depth discussion of the root causes of the difference in console.log output. This article will analyze the differences in the output results of console.log function in a piece of code and explain the reasons behind it. �...
 How to implement panel drag and drop adjustment function similar to VSCode in front-end development?
Apr 04, 2025 pm 02:06 PM
How to implement panel drag and drop adjustment function similar to VSCode in front-end development?
Apr 04, 2025 pm 02:06 PM
Explore the implementation of panel drag and drop adjustment function similar to VSCode in the front-end. In front-end development, how to implement VSCode similar to VSCode...
