

New features of webpack 4.0.0-beta.0 version (detailed tutorial)
This article mainly introduces the new features of webpack 4.0.0-beta.0 version. Now I share it with you and give you a reference.
Front-end technology has mushroomed in recent years, and we are constantly learning and growing under this trend. The continuous development of front-end technology has provided us with many conveniences. For example: the emergence of JSX provides us with a clear and intuitive way to describe component trees, the emergence of LESS/SASS improves our ability to write CSS, and the emergence of AMD/CommonJS/ES6 facilitates our modular development. However, we need to use other tools to convert these tools into native languages to run on the browser. In order to better integrate these different resources, we need a packaging tool, and webpack is the product of this demand.
Webpack can be regarded as a module packager. What it does is: analyze your project structure, find JavaScript modules and other extension languages that browsers cannot run directly (Scss, TypeScript, etc.), and package them into a suitable format for browser use. Currently, webpack has released a total of three stable versions. Starting from the end of August 2017, after a five-month development cycle, the webpack team recently released the beta version of webpack 4.0.0 by adding a large number of new features, bug fixes, and problem improvements. If you are interested in webpack, let's learn about the new features of webpack 4.0.0-beta.0.
P.S. All code demonstration codes below are based on webpack 4.0.0-beta.0.
1. Install webpack v4.0.0-beta.0
If you use yarn:
yarn add webpack@next webpack-cli --dev
If you use npm:
npm install webpack@next webpack-cli --save-dev
2, webpack 4.0.0.beta.0 new features introduction
Here are some new features that you will definitely be interested in characteristic. If you still feel unsatisfied after reading this chapter, you can view the complete changelog here.
This chapter will introduce webpack 4.0.0-beta.0 from the following parts.
2.1 Environment
Webpack running environment upgrade. Node.js 4 version is no longer supported. Source code upgraded to a higher ECMAScript version.
According to the webpack package.json configuration, the minimum supported version of Node.js is displayed: "node": ">=6.11.5"
2.2 Module
Webpack module type and .mjs support:
For a long time, JS has been the only module type in webapck. Because of this, developers cannot efficiently package other types of files. Currently, webpack implements five module types, each of which has its own advantages and can be used as needed (will be explained in detail later).
javascript/auto: (default in webpack3) supports all JS module systems: CommonJS, AMD, ESM.
javascript/esm: EcmaScript module, all other module systems are unavailable (default in .mjs files).
javascript/dynamic: CommonJS and EcmaScript modules are not supported.
json: JSON data, which can be imported through require and import (default for .json files).
webassembly/experimental: WebAssembly mode (currently in the experimental stage, default for .wasm files).
Usage:
type in module.rules is a newly added attribute used to support different module types.
 module: {
  rules: [{
    test: /\.special\.json$/,
    type: "javascript/auto",
    use: "special-loader"
  }]
}In addition, webpack now parses extensions in the order of .wasm, .mjs, .js, and .json.
javascript/esm is more strict in handling ESM than javascript/auto:
This is reflected in two aspects: 1. The imported name must exist in the imported module. 2. Dynamic modules (non-ESM, such as CommonJS) can only be imported through the default import. All other imports (including namespace imports) will report an error.
2.3 Usage
You must select a mode in "Development or Production" (there is a hidden mode none, which can disable all functions).
1) Production mode does not support monitoring, and development mode is optimized for fast incremental reconstruction.
2) Production mode also supports module concatenation, that is, variable promotion (this feature has been implemented in webpack 3).
3) Supports comments and prompts in development mode, and supports eval's source map.
Move the CLI into webpack-cli. You need to install webpack-cli to use the CLI.
You can configure your own custom mode using optimization.* flags.
webpackInclude and webpackExclude can support import() through magic annotations, which allow filtering files when using dynamic expressions.
Using System.import() will issue a warning:
1) You can use Rule.parser.system:true to turn off the warning.
2) You can also use Rule.parser.system:false to turn off System.import().
For plugins migrated to the new plugin system ProgressPlugin now displays the plugin name.
webpack can now handle JSON natively. If you use loader to convert json to js, you need to set: type: "javascript/auto". Of course, webpack can still work normally without loader.
2.4 Configuration
Deleted some common built-in plug-ins:
1) NoEmitOnErrorsPlugin -> optimization.noEmitOnErrors (default in production mode).
2) ModuleConcatenationPlugin -> optimization.concatenateModules (default in production mode).
3) NamedModulesPlugin -> optimization.namedModules (default in development mode).
Removed the commonly used CommonsChunkPlugin -> optimization.splitChunks For those who need fine-grained control over caching strategies, optimization.splitChunks and optimization.runtimeChunks can be used. Resolution can now be configured using module.rules[].resolve. It is merged with the global configuration.
optimization.minimize is used to control the switch of minimizing. The default is on for production mode and off for development mode.
optimization.minimizer is used to configure minimizers and options.
Many configuration options that support placeholders now also support functional form.
Incorrect options.dependencies configuration will now throw an exception.
sideEffects can be overridden through module.rules.
Add output.globalObject configuration option to allow selection of global object references at runtime.
There is no need to explicitly set the entry and output attributes. Webpack sets the entry attribute to ./src and the output attribute to ./dist by default.
Remove module.loaders.
2.5 Optimization
uglifyjs-webpack-plugin has been upgraded to v 1 and supports ES6 syntax.
sideEffects:false can be configured in package.json. When this field is set, the flag has no side effects in the library used. This means webpack can safely clean out any re-exports from your code.
Use JSONP array instead of JSONP function –> Asynchronous support.
Introduced new optimization.splitChunks option.
Webpack can delete useless code. Previously, Uglify deleted useless code. Now webpack can also delete useless code. This effectively prevents crashes that occur after importing useless code.
The following are some internal optimizations:
1) Replace plugin calls with tap calls (new plugin system).
2) Migrate many deprecated plugins to the new plugin system API.
3) Add buildMeta.exportsType:default for the json module.
4) Removed unused methods in Parser (parserStringArray, parserCalculatedStringArray).
2.6 Performance
By default, UglifyJS defaults to caching and parallelization (caching and parallelization are not fully implemented, a milestone for webpack5).
A new version of the plug-in system has been released, so event hooks and handlers have become single.
Multiple performance improvements, especially faster incremental rebuilds.
Improved the performance of RemoveParentModluesPlugin.
2.7 Incompatible changes (plug-in, loader related)
New plug-in system:
1) The plug-in method is backward compatible
2) The plugin should now use Compiler.hooks.xxx.tap(
Chunk.chunks/parents/blocks is no longer an array. Uses a collection internally and has methods to access it.
Parser.scope.renames and Parser.scope.definitions are no longer objects/arrays, but Map/Sets.
The parser uses StackedSetMap (a data structure similar to LevelDB) instead of arrays.
Compiler.options are no longer set when applying plugins.
The construction parameters of all modules have changed.
Merge options into the options object of ContextModule and resolveDependencies.
Change and rename the dependencies of import()
Move Compiler.resolvers into a Compiler accessible through the plugin .resolverFactory.
Dependency.isEqualResource has been replaced by Dependency.getResourceIdentifier
Template methods are all static.
A new RuntimeTemplate class has been added, and outputOptions and requestShortener have been moved to this class.
1) Many methods have been updated to replace the use of RuntimeTemplate.
2) We plan to move the code that accesses the runtime into this new class
Module.meta has been replaced by Module.buildMeta
Module.buildInfo and Module.factoryMeta have been added
Some properties of the Module have been moved to the new object
Add loaderContext.rootContext pointing to the context option. Loaders can use this to create things relative to the application root.
When HMR is enabled, add the this.hot flag to the loader context.
buildMeta.harmony has been replaced with buildMeta.exportsType: namespace.
The chunk graph has changed:
Before: Chunks were joined with nested dependencies.
Now: The connection of ChunksGroups is related to the reference dependency, and is concatenated in order.
Before: AsyncDependenciesBlocks reference a list of Chunks in order.
Now: AsyncDependenciesBlocks reference a ChunkGroup.
★★ Note: The above contents are all about major changes in loaders and plugins.
3. Detailed explanation of key updates
3.1 Better default values
直到今日,webpack 总是要求显式地设置 entry 和 output 属性。webpack 4.0.0-beta.0 中,webpack 会自动设定你的 entry 属性为 ./src 以及 output 的属性为 ./dist。
这意味着您不再需要配置文件来启动 webpack。接下来我们为你演示webpack 4.0.0-beta.0的便捷操作:
1、我们需要安装好 webpack 之后,在 package.json 中添加如下脚本即可启动:
 "scripts": {
  "build": "webpack"
},2、在工程中添加简单示例代码如下图(整个工程没有 webpack 配置文件,即可运行打包):
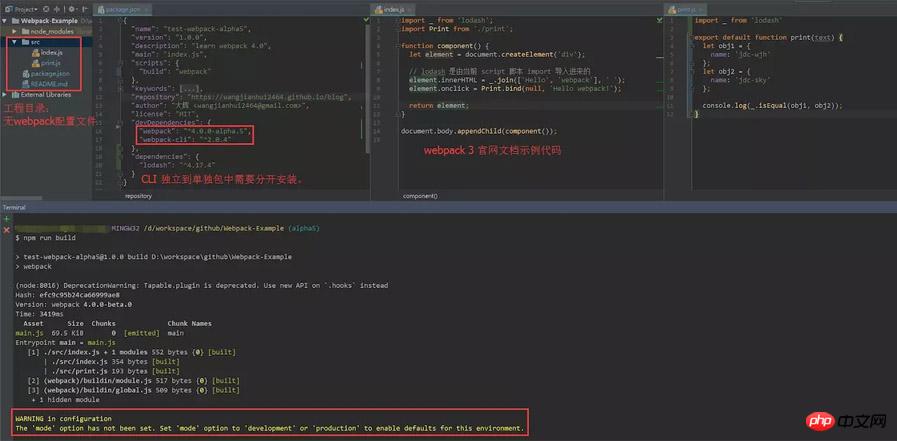
3、打包过程中我们发现有新特性的提示:
WARNING in configuration
The 'mode' option has not been set. Set 'mode' option to 'development' or 'production' to enable defaults for this environment.
这就是我们下节要说的内容模式设置。
★★ 注意:入口默认为 ./src 如果缺少此文件夹会报错!
> webpack --mode production
ERROR in Entry module not found: Error: Can't resolve './src' in 'D:\workspace\github\Webpack-Example'
3.2 模式设置
以往的项目使用 webpack3 脚手架生成项目初始模板都会有两个甚至三个配置文件,比如
webpack.base.conf.js、webpack.prod.conf.js、webpack.dev.conf.js 而现在可以做到一个配置文件都不需要,直接在启动命令中传入参数 --mode development | production 达到区分不同模式的效果。
接下来修改 package.json 设置不同的模式:
 "scripts": {
   "dev": "webpack --mode development",
   "build": "webpack --mode production"
},重新执行 npm run dev 或 npm run build 即可看到不同的打包结果:
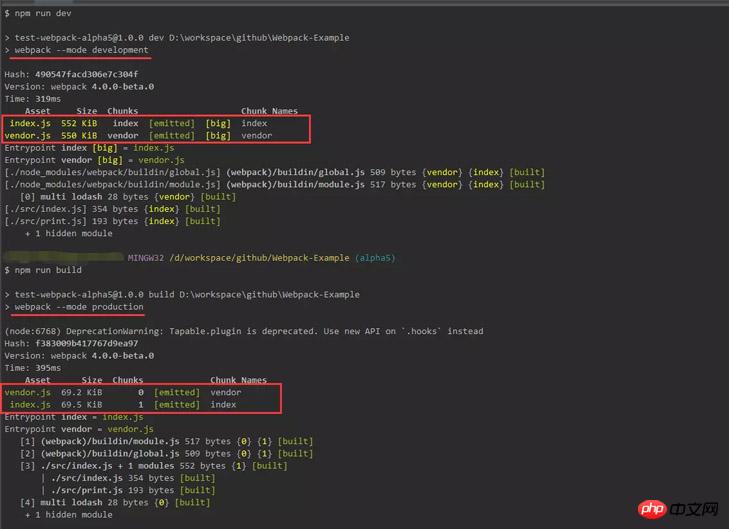
我们可以看到两种模式的结果完全不同,下面我们会更深入的按照我们真实的需求来讲解一些常用配置。
接下来这个配置是最常用到的,我们使用 webpack 的主要目的之一就是为了更好的支撑前段模块化的能力,既然需要模块化当然少不了代码分割,目前代码分割有以下几种:
通过 entry 分割不同入口,常用于多页应用;
通过 CommonsChunkPlugin 插件来分割不同功能模块;
通过动态 import 来分割。
下面我们主要讲解 webpack 4.0.0-beta.0 版本的重大变化删除了 CommonsChunkPlugin 插件。
3.3 删除 CommonsChunkPlugin
webpack 4.0.0-beta.0删除了 CommonsChunkPlugin,以支持两个新的选项(optimization.splitChunks 和 optimization.runtimeChunk)。
从webpack 4.0.0-beta.0 开始分割 Chunk 将不在使用 CommonsChunkPlugin 插件,而是使用 optimization 配置项,具体的实现原理可以参考 CommonsChunkPlugin。
由于还没有正式官方文档出来,以下是我们通过实践出的 optimization 配置方法:
其中用到了新增的 splitChunks 属性,此属性看字面意思就明白是分割代码块的选项,其下可配置项已在下面示例代码中列出(有兴趣的朋友可以自行实践):
entry: {
   vendor: ['lodash']
},

...

optimization: {
   splitChunks: {
   chunks: "initial", // 必须三选一: "initial" | "all"(默认就是all) | "async"
   minSize: 0, // 最小尺寸,默认0
   minChunks: 1, // 最小 chunk ,默认1
   maxAsyncRequests: 1, // 最大异步请求数, 默认1
   maxInitialRequests : 1, // 最大初始化请求书,默认1
   name: function(){}, // 名称,此选项可接收 function
   cacheGroups:{ // 这里开始设置缓存的 chunks
     priority: 0, // 缓存组优先级
     vendor: { // key 为entry中定义的 入口名称
       chunks: "initial", // 必须三选一: "initial" | "all" | "async"(默认就是异步)
       test: /react|lodash/, // 正则规则验证,如果符合就提取 chunk
       name: "vendor", // 要缓存的 分隔出来的 chunk 名称
       minSize: 0,
       minChunks: 1,
       enforce: true,
       maxAsyncRequests: 1, // 最大异步请求数, 默认1
       maxInitialRequests : 1, // 最大初始化请求书,默认1
       reuseExistingChunk: true // 可设置是否重用该chunk(查看源码没有发现默认值)
     }
   }
 }
},以上就是 optimization.splitChunks 的所有可用的配置项属性。
总结
以上就是我们初步整理的关于 webpack 4.0.0-beta.0 的新特性,包含了一部分的官方更新日志的翻译,还有我们自己试验的一些属性。当然如果你有兴趣,也可以等到正式的官方文档发布之后进行实践。
如果上面的信息不能够完全满足你的兴趣,还请关注官方日志。在未来不到一个月的时间里,webpack 将对插件、加载器以及整个生态系统进行更加严格的测试,并发布最终的官方稳定版本。如果你喜欢 webpack,你可以参与使用 webpack 4.0.0-beta.0。测试阶段发现、解决的问题越多,正式版本才会更加稳定。
上面是我整理给大家的,希望今后会对大家有帮助。
相关文章:
在angular中如何使用json对象push到数组中的方法
The above is the detailed content of New features of webpack 4.0.0-beta.0 version (detailed tutorial). For more information, please follow other related articles on the PHP Chinese website!

Hot AI Tools

Undresser.AI Undress
AI-powered app for creating realistic nude photos

AI Clothes Remover
Online AI tool for removing clothes from photos.

Undress AI Tool
Undress images for free

Clothoff.io
AI clothes remover

Video Face Swap
Swap faces in any video effortlessly with our completely free AI face swap tool!

Hot Article
Hot Tools

Notepad++7.3.1
Easy-to-use and free code editor

SublimeText3 Chinese version
Chinese version, very easy to use

Zend Studio 13.0.1
Powerful PHP integrated development environment

Dreamweaver CS6
Visual web development tools

SublimeText3 Mac version
God-level code editing software (SublimeText3)
Hot Topics


 VUE3 Getting Started Tutorial: Packaging and Building with Webpack
Jun 15, 2023 pm 06:17 PM
VUE3 Getting Started Tutorial: Packaging and Building with Webpack
Jun 15, 2023 pm 06:17 PM
Vue is an excellent JavaScript framework that can help us quickly build interactive and efficient web applications. Vue3 is the latest version of Vue, which introduces many new features and functionality. Webpack is currently one of the most popular JavaScript module packagers and build tools, which can help us manage various resources in our projects. This article will introduce how to use Webpack to package and build Vue3 applications. 1. Install Webpack
 Google app beta APK teardown reveals new extensions coming to Gemini AI assistant
Jul 30, 2024 pm 01:06 PM
Google app beta APK teardown reveals new extensions coming to Gemini AI assistant
Jul 30, 2024 pm 01:06 PM
Google's AI assistant, Gemini, is set to become even more capable, if the APK teardown of the latest update (v15.29.34.29 beta) is to be considered. The tech behemoth's new AI assistant could reportedly get several new extensions. These extensions wi
 What is the difference between vite and webpack
Jan 11, 2023 pm 02:55 PM
What is the difference between vite and webpack
Jan 11, 2023 pm 02:55 PM
Differences: 1. The startup speed of the webpack server is slower than that of Vite; because Vite does not require packaging when starting, there is no need to analyze module dependencies and compile, so the startup speed is very fast. 2. Vite hot update is faster than webpack; in terms of HRM of Vite, when the content of a certain module changes, just let the browser re-request the module. 3. Vite uses esbuild to pre-build dependencies, while webpack is based on node. 4. The ecology of Vite is not as good as webpack, and the loaders and plug-ins are not rich enough.
 How to use PHP and webpack for modular development
May 11, 2023 pm 03:52 PM
How to use PHP and webpack for modular development
May 11, 2023 pm 03:52 PM
With the continuous development of web development technology, front-end and back-end separation and modular development have become a widespread trend. PHP is a commonly used back-end language. When doing modular development, we need to use some tools to manage and package modules. Webpack is a very easy-to-use modular packaging tool. This article will introduce how to use PHP and webpack for modular development. 1. What is modular development? Modular development refers to decomposing a program into different independent modules. Each module has its own function.
 How does webpack convert es6 to es5 module?
Oct 18, 2022 pm 03:48 PM
How does webpack convert es6 to es5 module?
Oct 18, 2022 pm 03:48 PM
Configuration method: 1. Use the import method to put the ES6 code into the packaged js code file; 2. Use the npm tool to install the babel-loader tool, the syntax is "npm install -D babel-loader @babel/core @babel/preset- env"; 3. Create the configuration file ".babelrc" of the babel tool and set the transcoding rules; 4. Configure the packaging rules in the webpack.config.js file.
 Use Spring Boot and Webpack to build front-end projects and plug-in systems
Jun 22, 2023 am 09:13 AM
Use Spring Boot and Webpack to build front-end projects and plug-in systems
Jun 22, 2023 am 09:13 AM
As the complexity of modern web applications continues to increase, building excellent front-end engineering and plug-in systems has become increasingly important. With the popularity of Spring Boot and Webpack, they have become a perfect combination for building front-end projects and plug-in systems. SpringBoot is a Java framework that creates Java applications with minimal configuration requirements. It provides many useful features, such as automatic configuration, so that developers can build and deploy web applications faster and easier. W
 Apple Intelligence rolls out globally in iOS 18.1 beta 3 — EU and China still in Apple\'s dog box
Aug 31, 2024 am 10:19 AM
Apple Intelligence rolls out globally in iOS 18.1 beta 3 — EU and China still in Apple\'s dog box
Aug 31, 2024 am 10:19 AM
Apple announced its Apple Intelligence features back in June, and they initially made an appearance in the latest iOS 18 beta versions for the iPhone 15 Pro models and any iPad or Mac with an M1 SoC or newer. However, there have been a few location-r
 What files can vue webpack package?
Dec 20, 2022 pm 07:44 PM
What files can vue webpack package?
Dec 20, 2022 pm 07:44 PM
In vue, webpack can package js, css, pictures, json and other files into appropriate formats for browser use; in webpack, js, css, pictures, json and other file types can be used as modules. Various module resources in webpack can be packaged and merged into one or more packages, and during the packaging process, the resources can be processed, such as compressing images, converting scss to css, converting ES6 syntax to ES5, etc., which can be recognized by HTML. file type.
