

Ajax method to obtain data and then display it on the page
Below I will bring you an implementation method of Ajax obtaining data and then displaying it on the page. Let me share it with you now and give it as a reference for everyone.
Introduction to the main function process
Loop to obtain list data

Click on the list data to enter the details page

Click to register and a successful registration prompt box will pop up
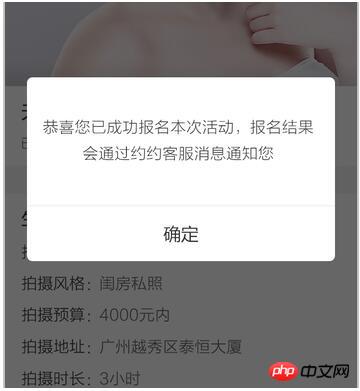
Click on the prompt box Click the OK button to jump back to the list page
Code implementation process and explanation
##1. List page
1. When accessing the link list.php, determine whether it is the PC side or the client side$user_agent_arr = mall_get_user_agent_arr();
if(MALL_UA_IS_PC == 1)
{
//****************** pc版 ******************
include_once './list-pc.php';
}
else
{
//****************** wap版 ******************
include_once './list-wap.php';
}$pc_wap = 'wap/'; $tpl = $my_app_pai->getView(TASK_TEMPLATES_ROOT.$pc_wap.'trade/list.tpl.htm');
<p class="page-view " data-role="page-container">

    <p class="sales-list-page">
      <p id="render-ele"></p>
    </p>

</p>$(function()
// 渲染模块
{
//请求php的url
var TRADE_AJAX_URL = window.$__ajax_domain + 'get_trade_list.php';
//获取已经封装在list.js里面的一个对象list_item_class
var list_item_class = require('../../../../modules/list/list.js');
//获取模板块
var template = __inline('./list-item.tmpl');
var list_obj = new list_item_class({
ele : $("#render-ele"),//渲染数据到id为render-ele中
url : TRADE_AJAX_URL,//请求数据连接
template : template //渲染的模板
});
});<p class="item-wrap">
{{#each list}}
{{#if is_enroll}}
<a href="./detail.php?topic_id={{id}}&state=is_enter">
{{else}}
<a href="./detail.php?topic_id={{id}}&state=no_enter">
{{/if}}
<p class="item ui-border-b" >
<p class="img-item">
<i class="img" style="background-image: url({{img}});">
</i>
</p>
<p class="text-item">
<p class="txt-con-1">
<h3 class="title f14">{{title}}</h3>
<p class="txt f10 color-999">所属品类:{{type}}</p>
</p>
<p class="txt-con-2">
<span class="color-333 join-in ">
{{ enroll_text }}
</span>
</p>
</p>
</p>
</a>
{{/each}}
</p>
 _self.ajax_obj = utility.ajax_request
({
  url : self.send_url,
  data : self.ajax_params,
  beforeSend : function()
  {
self._sending = true;
_self.$loading = $.loading
({
  content:'加载中...'
});

  },
  success : function(data)
  {
self._sending = false;
//获取数据
var list_data = data.result_data.list;
console.log(data);
//渲染前处理事件
self.$el.trigger('list_render:before',[self.$list_container,data]);

_self.$loading.loading("hide");

//是否有分页
self.has_next_page = data.result_data.has_next_page;

// 无数据处理
if(!list_data.length && page == 1)
{
  abnormal.render(self.$render_ele[0],{});

  self.$load_more.addClass('fn-hide');

  return;
}
else
{
  self.$load_more.removeClass('fn-hide');
}

//把数据放入模板
var html_str = self.template
({
  list : list_data
});
//插入渲染列表
self.$list_container.append(html_str);
//渲染后处理事件
self.$el.trigger('list_render:after',[self.$list_container,data,$(html_str)]);

self.setup_event();
  },
  error : function()
  {
self._sending = false;
_self.$loading.loading("hide");
$.tips
  ({
content:'网络异常',
stayTime:3000,
type:'warn'
  });
  }
})// 接收参数
$page = intval($_INPUT['page']);
if(empty($page))
{
$page = 1;
}
// 分页使用的page_count
$page_count = 5;
if($page > 1)
{
$limit_start = ($page - 1)*($page_count - 1);
}
else
{
$limit_start = ($page - 1)*$page_count;
}
$limit = "{$limit_start},{$page_count}";
//请求数据库的借口
$sales_list_obj = POCO::singleton ( 'pai_topic_class' );
$ret = $sales_list_obj-> get_task_list(false, '', 'id DESC', $limit);
// 输出前进行过滤最后一个数据,用于真实输出
$rel_page_count = 4;
$has_next_page = (count($ret)>$rel_page_count);
if($has_next_page)
{
array_pop($ret);
}
$output_arr['page'] = $page;
$output_arr['has_next_page'] = $has_next_page;
$output_arr['list'] = $ret;
// 输出数据
mall_mobile_output($output_arr,false);$tpl->output();
Details page
1. Click the list page to enter the details page (detail.php)detail. The php page receives the data from the list//接收list传过来的参数
$topic_id = intval($_INPUT['topic_id']);
$state = $_INPUT['state'];
if (empty($topic_id))
{
header("location: ".'./list.php');
}
//数据库借口
$trade_detail_obj = POCO::singleton ( 'pai_topic_class' );
$ret = $trade_detail_obj->get_task_detail($topic_id,$yue_login_id);$pc_wap = 'wap/'; $tpl = $my_app_pai->getView(TASK_TEMPLATES_ROOT.$pc_wap.'trade/detail.tpl.htm'); //模板附带以下三个参数到detail.tpl.htm中 $tpl->assign('ret', $ret); $tpl->assign('topic_id', $topic_id); $tpl->assign('state', $state);
<p class="sales-detail-page">
  <p class="item-wrap">
<p class="item-1 item">
  <p class="img-item">
<i class="img" >
<img src="{ret.img}"/>
</i>
  </p>
  <p class="txt-item">
<h3 class="title f16 color-333 fb">{ret.title}</h3>
<p class="sign-in-txt color-666">
  {ret.enroll_text}
</p>
  </p>
</p>

<p class="item-3 item">
  <p class="txt-item">
<h3 class="title f14 color-333 fb">生意机会详情</h3>
<p class="txt-con f14 color-666">
  <p class="txt">{ret.content}</p>
</p>
  </p>
</p>
  </p>
  <p class="sign-name-item">
  <!-- IF state = "is_enter" -->
<button class="ui-button-submit had-joined">
  <span class="ui-button-content">已参加</span>
</button>
  <!-- ELSE -->
  <button class="ui-button-submit" id="submit">
<span class="ui-button-content">报名参加</span>
  </button>
  <!-- ENDIF -->
  </p>
</p>var _self = {};
$btn.on('click', function() {
var data =
{
topic_id : {ret.id}
}
utility.ajax_request({
url : window.$__ajax_domain+'add_task_enroll_trade.php',
data : data,
type : 'POST',
cache : false,
beforeSend : function()
{
_self.$loading = $.loading({
content : '发送中.....'
});
},
success : function(data)
{
_self.$loading.loading("hide");
//请求成功后显示成功报名提示框,点击报名提示框确定按钮跳回列表页面
if (data.result_data.result==1)
{
var dialog = utility.dialog
({
"title" : '' ,
"content" : '提交成功,点击确定返回',
"buttons" : ["确定"]
});
dialog.on('confirm',function(event,args)
{
window.location.href = document.referrer;
});
return;
}
},
error : function()
{
_self.$loading.loading("hide");
$.tips({
content : '网络异常',
stayTime : 3000,
type : 'warn'
});
}
});
});Ajax request and Filter cooperation case analysis
How to solve the problem of arrays in AJAX requests
Ajax summary of 5 ways to solve cache
The above is the detailed content of Ajax method to obtain data and then display it on the page. For more information, please follow other related articles on the PHP Chinese website!

Hot AI Tools

Undresser.AI Undress
AI-powered app for creating realistic nude photos

AI Clothes Remover
Online AI tool for removing clothes from photos.

Undress AI Tool
Undress images for free

Clothoff.io
AI clothes remover

Video Face Swap
Swap faces in any video effortlessly with our completely free AI face swap tool!

Hot Article
Hot Tools

Notepad++7.3.1
Easy-to-use and free code editor

SublimeText3 Chinese version
Chinese version, very easy to use

Zend Studio 13.0.1
Powerful PHP integrated development environment

Dreamweaver CS6
Visual web development tools

SublimeText3 Mac version
God-level code editing software (SublimeText3)
Hot Topics


 How to solve the 403 error encountered by jQuery AJAX request
Feb 20, 2024 am 10:07 AM
How to solve the 403 error encountered by jQuery AJAX request
Feb 20, 2024 am 10:07 AM
Title: Methods and code examples to resolve 403 errors in jQuery AJAX requests. The 403 error refers to a request that the server prohibits access to a resource. This error usually occurs because the request lacks permissions or is rejected by the server. When making jQueryAJAX requests, you sometimes encounter this situation. This article will introduce how to solve this problem and provide code examples. Solution: Check permissions: First ensure that the requested URL address is correct and verify that you have sufficient permissions to access the resource.
 Reasons and solutions for desktop layout being locked
Feb 19, 2024 pm 06:08 PM
Reasons and solutions for desktop layout being locked
Feb 19, 2024 pm 06:08 PM
What happens when the desktop layout is locked? When using the computer, sometimes we may encounter the situation where the desktop layout is locked. This problem means that we cannot freely adjust the position of desktop icons or change the desktop background. So, what exactly is going on when it says that the desktop layout is locked? 1. Understand the desktop layout and locking functions. First, we need to understand the two concepts of desktop layout and desktop locking. Desktop layout refers to the arrangement of various elements on the desktop, including shortcuts, folders, widgets, etc. we can be free
 How to solve jQuery AJAX request 403 error
Feb 19, 2024 pm 05:55 PM
How to solve jQuery AJAX request 403 error
Feb 19, 2024 pm 05:55 PM
jQuery is a popular JavaScript library used to simplify client-side development. AJAX is a technology that sends asynchronous requests and interacts with the server without reloading the entire web page. However, when using jQuery to make AJAX requests, you sometimes encounter 403 errors. 403 errors are usually server-denied access errors, possibly due to security policy or permission issues. In this article, we will discuss how to resolve jQueryAJAX request encountering 403 error
 PHP and Ajax: Building an autocomplete suggestion engine
Jun 02, 2024 pm 08:39 PM
PHP and Ajax: Building an autocomplete suggestion engine
Jun 02, 2024 pm 08:39 PM
Build an autocomplete suggestion engine using PHP and Ajax: Server-side script: handles Ajax requests and returns suggestions (autocomplete.php). Client script: Send Ajax request and display suggestions (autocomplete.js). Practical case: Include script in HTML page and specify search-input element identifier.
 How to solve the problem of jQuery AJAX error 403?
Feb 23, 2024 pm 04:27 PM
How to solve the problem of jQuery AJAX error 403?
Feb 23, 2024 pm 04:27 PM
How to solve the problem of jQueryAJAX error 403? When developing web applications, jQuery is often used to send asynchronous requests. However, sometimes you may encounter error code 403 when using jQueryAJAX, indicating that access is forbidden by the server. This is usually caused by server-side security settings, but there are ways to work around it. This article will introduce how to solve the problem of jQueryAJAX error 403 and provide specific code examples. 1. to make
 How to get variables from PHP method using Ajax?
Mar 09, 2024 pm 05:36 PM
How to get variables from PHP method using Ajax?
Mar 09, 2024 pm 05:36 PM
Using Ajax to obtain variables from PHP methods is a common scenario in web development. Through Ajax, the page can be dynamically obtained without refreshing the data. In this article, we will introduce how to use Ajax to get variables from PHP methods, and provide specific code examples. First, we need to write a PHP file to handle the Ajax request and return the required variables. Here is sample code for a simple PHP file getData.php:
 How to check the current directory in Linux?
Feb 23, 2024 pm 05:54 PM
How to check the current directory in Linux?
Feb 23, 2024 pm 05:54 PM
In Linux systems, you can use the pwd command to display the current path. The pwd command is the abbreviation of PrintWorkingDirectory and is used to display the path of the current working directory. Enter the following command in the terminal to display the current path: pwd After executing this command, the terminal will display the full path of the current working directory, such as: /home/user/Documents. In addition, you can use some other options to enhance the functionality of the pwd command. For example, the -P option can display
 How to display the wifi password QR code? It is recommended to scan the wifi password on WeChat in 3 seconds.
Feb 20, 2024 pm 01:42 PM
How to display the wifi password QR code? It is recommended to scan the wifi password on WeChat in 3 seconds.
Feb 20, 2024 pm 01:42 PM
You don’t need to enter the WIFI password often, so it’s normal to forget it. Today I will teach you the simplest way to find the password of your own WIFI. It can be done in 3 seconds. To check the WIFI password, use WeChat to scan it. The premise of this method is: there must be a mobile phone that can connect to WIFI. Okay, let’s start the tutorial: Step 1. We enter the phone, pull down from the top of the phone, bring up the status bar, and the WIFI icon. Step 2. Long press the WIFI icon to enter the WLAN settings; long press the WIFI icon. Step 3. Click Connected. Enter the WIFI name of your home, click Share Password, and a QR code will pop up; Step 4 of sharing WIFI password, we take a screenshot and save this QR code; Step 5, long press the WeChat icon on the desktop, and click Scan
