
 Web Front-end
JS Tutorial
Detailed explanation of the steps to introduce tinymce rich text editor into Vue
Web Front-end
JS Tutorial
Detailed explanation of the steps to introduce tinymce rich text editor into Vue
Detailed explanation of the steps to introduce tinymce rich text editor into Vue
This time I will bring you a detailed explanation of the steps to introduce tinymce rich text into VueEditor, what are the precautions for introducing tinymce rich text editor into Vue, the following is a practical case , let’s take a look.
The rich text editor originally used in the project was wangEditor, which is a very lightweight and concise editor
However, the company's business has been upgraded and it wants an editor with more comprehensive functions. I've been looking for it for a long time, and the common editors currently include these:
UEditor: Baidu's front-end open source project, powerful, based on jQuery, but it is no longer maintained, and the back-end code is limited, making modifications more difficult.
bootstrap-wysiwyg: Micro, easy to use, small and beautiful, just Bootstrap jQuery...
kindEditor: powerful, simple code, needs to configure the background, and Long time no update
wangEditor: lightweight, concise, and easy to use, but after upgrading to 3.x, it is not convenient for customized development. But the author is very diligent. In a broad sense, he and I are family members. Please give me a call
quill: It doesn’t have many functions, but it can be expanded by itself. The API is also easy to understand. If you can understand English...
summernote: I didn’t study it in depth. The UI is quite beautiful and it is a small and beautiful editor, but I need a big one.
With such a reference, I finally chose tinymce. The editor cannot even open the official website without a ladder (it is simply asking for trouble), mainly because of two points:
1. There are many stars on GitHub and the functions are complete;
2 . The only editor that can maintain most of the formatting when pasting from word;
3. No need to find back-end personnel to scan the code to change the interface, the front-end and back-end are separated;
4. Say Two good points!
1. Resource download
tinymce officially provides a component tinymce-vue
npm install @tinymce/tinymce-vue -S
in vscode, The webstorm terminal may report an error when running this code. It is best to use the command line tool that comes with the operating system
If you have purchased the tinymce service, you can refer to the instructions of tinymce-vue and use tinymce directly through the api-key.
If you haven’t purchased it like me, you still have to download tinymce
npm install tinymce -S
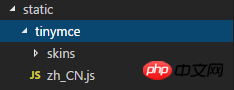
After installation, find the tinymce/skins directory in node_modules, and then add skins Copy the directory to the static directory
// If it is a typescript project built using vue-cli 3.x, put it in the public directory. All static directories in this article are handled in this way
tinymce The default is the English interface, so you also need to download a Chinese language pack (remember to build a ladder! Build a ladder! Build a ladder!)
Then put this language pack in the static directory. In order to have a clear structure, I included it Layer tinymce directory
2. Initialization
Introduce the following files into the page
import tinymce from 'tinymce/tinymce'
import 'tinymce/themes/modern/theme'
import Editor from '@tinymce/tinymce-vue'
tinymce-vue is a component that needs to be registered in components and then used directly.

The init here is the tinymce initialization configuration item. Some key APIs will be discussed later. , the complete api can refer to the official documentation
The editor needs a skin to work properly, so you need to set a skin_url to point to the previously copied skin file
init: {
 language_url: '/static/tinymce/zh_CN.js',
 language: 'zh_CN',
 skin_url: '/static/tinymce/skins/lightgray',
 height: 300
}// vue-cli 3.x creation Typescript project, remove the static in the url, that is, skin_url: '/tinymce/skins/lightgray'
At the same time, it also needs to be initialized once in mounted:

If you pass in the above init object here, it will not take effect, but if you do not pass any parameters, an error will be reported, so an empty object is passed in here
3. Extension plug-in
完成了上面的初始化之后,就已经能正常运行编辑器了,但只有一些基本功能
tinymce 通过添加插件 plugins 的方式来添加功能
比如要添加一个上传图片的功能,就需要用到 image 插件,添加超链接需要用到 link 插件

同时还需要在页面引入这些插件:

添加了插件之后,默认会在工具栏 toolbar 上添加对应的功能按钮,toolbar 也可以自定义

贴一下完整的组件代码:
<template>
<p class='tinymce'>
<h1>tinymce</h1>
<editor id='tinymce' v-model='tinymceHtml' :init='init'></editor>
<p v-html='tinymceHtml'></p>
</p>
</template>
<script>
import tinymce from 'tinymce/tinymce'
import 'tinymce/themes/modern/theme'
import Editor from '@tinymce/tinymce-vue'
import 'tinymce/plugins/image'
import 'tinymce/plugins/link'
import 'tinymce/plugins/code'
import 'tinymce/plugins/table'
import 'tinymce/plugins/lists'
import 'tinymce/plugins/contextmenu'
import 'tinymce/plugins/wordcount'
import 'tinymce/plugins/colorpicker'
import 'tinymce/plugins/textcolor'
export default {
name: 'tinymce',
data () {
return {
tinymceHtml: '请输入内容',
init: {
language_url: '/static/tinymce/zh_CN.js',
language: 'zh_CN',
skin_url: '/static/tinymce/skins/lightgray',
height: 300,
plugins: 'link lists image code table colorpicker textcolor wordcount contextmenu',
toolbar:
'bold italic underline strikethrough | fontsizeselect | forecolor backcolor | alignleft aligncenter alignright alignjustify | bullist numlist | outdent indent blockquote | undo redo | link unlink image code | removeformat',
branding: false
}
}
},
mounted () {
tinymce.init({})
},
components: {Editor}
}
</script>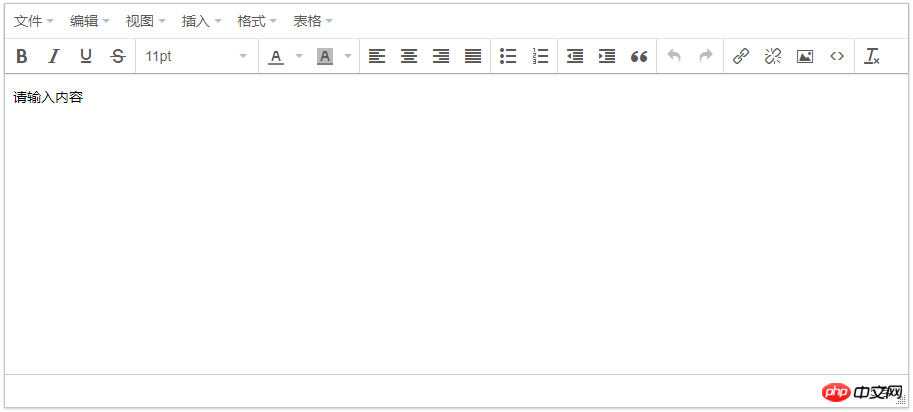
四、上传图片
tinymce 提供了 images_upload_url 等 api 让用户配置上传图片的相关参数
但为了在不麻烦后端的前提下适配自家的项目,还是得用 images_upload_handler 来自定义一个上传方法

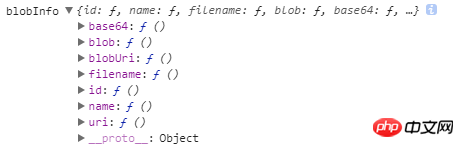
这个方法会提供三个参数:blobInfo, success, failure
其中 blobinfo 是一个对象,包含上传文件的信息:
success 和 failure 是函数,上传成功的时候向 success 传入一个图片地址,失败的时候向 failure 传入报错信息
相信看了本文案例你已经掌握了方法,更多精彩请关注php中文网其它相关文章!
推荐阅读:
The above is the detailed content of Detailed explanation of the steps to introduce tinymce rich text editor into Vue. For more information, please follow other related articles on the PHP Chinese website!

Hot AI Tools

Undresser.AI Undress
AI-powered app for creating realistic nude photos

AI Clothes Remover
Online AI tool for removing clothes from photos.

Undress AI Tool
Undress images for free

Clothoff.io
AI clothes remover

Video Face Swap
Swap faces in any video effortlessly with our completely free AI face swap tool!

Hot Article
Hot Tools

Notepad++7.3.1
Easy-to-use and free code editor

SublimeText3 Chinese version
Chinese version, very easy to use

Zend Studio 13.0.1
Powerful PHP integrated development environment

Dreamweaver CS6
Visual web development tools

SublimeText3 Mac version
God-level code editing software (SublimeText3)
Hot Topics


 How to make Google Maps the default map in iPhone
Apr 17, 2024 pm 07:34 PM
How to make Google Maps the default map in iPhone
Apr 17, 2024 pm 07:34 PM
The default map on the iPhone is Maps, Apple's proprietary geolocation provider. Although the map is getting better, it doesn't work well outside the United States. It has nothing to offer compared to Google Maps. In this article, we discuss the feasible steps to use Google Maps to become the default map on your iPhone. How to Make Google Maps the Default Map in iPhone Setting Google Maps as the default map app on your phone is easier than you think. Follow the steps below – Prerequisite steps – You must have Gmail installed on your phone. Step 1 – Open the AppStore. Step 2 – Search for “Gmail”. Step 3 – Click next to Gmail app
 Steps to upgrade to the latest version of WeChat (Easily master the upgrade method to the latest version of WeChat)
Jun 01, 2024 pm 10:24 PM
Steps to upgrade to the latest version of WeChat (Easily master the upgrade method to the latest version of WeChat)
Jun 01, 2024 pm 10:24 PM
WeChat is one of the social media platforms in China that continuously launches new versions to provide a better user experience. Upgrading WeChat to the latest version is very important to keep in touch with family and colleagues, to stay in touch with friends, and to keep abreast of the latest developments. 1. Understand the features and improvements of the latest version. It is very important to understand the features and improvements of the latest version before upgrading WeChat. For performance improvements and bug fixes, you can learn about the various new features brought by the new version by checking the update notes on the WeChat official website or app store. 2. Check the current WeChat version We need to check the WeChat version currently installed on the mobile phone before upgrading WeChat. Click to open the WeChat application "Me" and then select the menu "About" where you can see the current WeChat version number. 3. Open the app
 This Apple ID is not yet in use in the iTunes Store: Fix
Jun 10, 2024 pm 05:42 PM
This Apple ID is not yet in use in the iTunes Store: Fix
Jun 10, 2024 pm 05:42 PM
When logging into iTunesStore using AppleID, this error saying "This AppleID has not been used in iTunesStore" may be thrown on the screen. There are no error messages to worry about, you can fix them by following these solution sets. Fix 1 – Change Shipping Address The main reason why this prompt appears in iTunes Store is that you don’t have the correct address in your AppleID profile. Step 1 – First, open iPhone Settings on your iPhone. Step 2 – AppleID should be on top of all other settings. So, open it. Step 3 – Once there, open the “Payment & Shipping” option. Step 4 – Verify your access using Face ID. step
 Shazam app not working in iPhone: Fix
Jun 08, 2024 pm 12:36 PM
Shazam app not working in iPhone: Fix
Jun 08, 2024 pm 12:36 PM
Having issues with the Shazam app on iPhone? Shazam helps you find songs by listening to them. However, if Shazam isn't working properly or doesn't recognize the song, you'll have to troubleshoot it manually. Repairing the Shazam app won't take long. So, without wasting any more time, follow the steps below to resolve issues with Shazam app. Fix 1 – Disable Bold Text Feature Bold text on iPhone may be the reason why Shazam is not working properly. Step 1 – You can only do this from your iPhone settings. So, open it. Step 2 – Next, open the “Display & Brightness” settings there. Step 3 – If you find that “Bold Text” is enabled
 Detailed explanation of the steps to obtain Win11 system administrator permissions
Mar 08, 2024 pm 09:09 PM
Detailed explanation of the steps to obtain Win11 system administrator permissions
Mar 08, 2024 pm 09:09 PM
Windows 11, as the latest operating system launched by Microsoft, is deeply loved by users. In the process of using Windows 11, sometimes we need to obtain system administrator rights in order to perform some operations that require permissions. Next, we will introduce in detail the steps to obtain system administrator rights in Windows 11. The first step is to click "Start Menu". You can see the Windows icon in the lower left corner. Click the icon to open the "Start Menu". In the second step, find and click "
 iPhone screenshots not working: How to fix it
May 03, 2024 pm 09:16 PM
iPhone screenshots not working: How to fix it
May 03, 2024 pm 09:16 PM
Screenshot feature not working on your iPhone? Taking a screenshot is very easy as you just need to hold down the Volume Up button and the Power button at the same time to grab your phone screen. However, there are other ways to capture frames on the device. Fix 1 – Using Assistive Touch Take a screenshot using the Assistive Touch feature. Step 1 – Go to your phone settings. Step 2 – Next, tap to open Accessibility settings. Step 3 – Open Touch settings. Step 4 – Next, open the Assistive Touch settings. Step 5 – Turn on Assistive Touch on your phone. Step 6 – Open “Customize Top Menu” to access it. Step 7 – Now you just need to link any of these functions to your screen capture. So click on the first
 Clock app missing in iPhone: How to fix it
May 03, 2024 pm 09:19 PM
Clock app missing in iPhone: How to fix it
May 03, 2024 pm 09:19 PM
Is the clock app missing from your phone? The date and time will still appear on your iPhone's status bar. However, without the Clock app, you won’t be able to use world clock, stopwatch, alarm clock, and many other features. Therefore, fixing missing clock app should be at the top of your to-do list. These solutions can help you resolve this issue. Fix 1 – Place the Clock App If you mistakenly removed the Clock app from your home screen, you can put the Clock app back in its place. Step 1 – Unlock your iPhone and start swiping to the left until you reach the App Library page. Step 2 – Next, search for “clock” in the search box. Step 3 – When you see “Clock” below in the search results, press and hold it and
 Slow Cellular Data Internet Speeds on iPhone: Fixes
May 03, 2024 pm 09:01 PM
Slow Cellular Data Internet Speeds on iPhone: Fixes
May 03, 2024 pm 09:01 PM
Facing lag, slow mobile data connection on iPhone? Typically, the strength of cellular internet on your phone depends on several factors such as region, cellular network type, roaming type, etc. There are some things you can do to get a faster, more reliable cellular Internet connection. Fix 1 – Force Restart iPhone Sometimes, force restarting your device just resets a lot of things, including the cellular connection. Step 1 – Just press the volume up key once and release. Next, press the Volume Down key and release it again. Step 2 – The next part of the process is to hold the button on the right side. Let the iPhone finish restarting. Enable cellular data and check network speed. Check again Fix 2 – Change data mode While 5G offers better network speeds, it works better when the signal is weaker
