

Introducing tinymce rich text editor into Vue project

This article mainly introduces the example code of introducing tinymce rich text editor into the Vue project. It is very good and has certain reference value. Friends in need can refer to the code originally used in the
project. The rich text editor is wangEditor, which is a very lightweight and concise editor
But the company’s business has been upgraded and I want an editor with more comprehensive functions. I have been looking for it for a long time. Currently, the common editors are These:
UEditor: Baidu front-end open source project, powerful, based on jQuery, but it is no longer maintained, and the back-end code is limited, which is more difficult to modify
bootstrap-wysiwyg: Micro , easy to use, small and beautiful, just Bootstrap jQuery...
kindEditor: powerful, simple code, needs to configure the background, and it has not been updated for a long time
wangEditor: lightweight and simple , easy to use, but after upgrading to 3.x, it is not convenient for customized development. But the author is very diligent. In a broad sense, he and I are family members. Please give me a call
quill: It doesn’t have many functions, but it can be expanded by itself. The API is also easy to understand. If you can understand English...
summernote: I didn’t study it in depth. The UI is quite beautiful and it is a small and beautiful editor, but I need a big one.
With such a reference, I finally chose tinymce. The editor cannot even open the official website without a ladder (it is simply asking for trouble), mainly because of two points:
1. There are many stars on GitHub and the functions are complete;
2 . The only editor that can maintain most of the formatting when pasting from word;
3. No need to find back-end personnel to scan the code to change the interface, the front-end and back-end are separated;
4. Say Two good points!
1. Resource download
tinymce officially provides a component tinymce-vue for the vue project
npm install @tinymce/tinymce-vue -S
You may get an error when running this code in the terminal of vscode or webstorm. It is best to use the command line tool that comes with the operating system.
If you have purchased tinymce service, you can refer to tinymce -Vue instructions, use tinymce directly through api-key
If you haven’t purchased it like me, you still have to download tinymce
npm install tinymce -S
After installation, find the tinymce/skins directory in node_modules, and then copy the skins directory to the static directory
// If it is a typescript project built using vue-cli 3.x, put it in the public directory , all static directories in the article are handled in this way
tinymce defaults to an English interface, so you also need to download a Chinese language pack (remember to build a ladder! Build a ladder! Build a ladder!)
Then add this The language package is placed in the static directory. In order to have a clear structure, I included a layer of tinymce directory

2. Initialization
Introduce the following files into the page
import tinymce from 'tinymce/tinymce'
import 'tinymce/themes/modern/theme'
import Editor from '@tinymce/tinymce-vue'
tinymce-vue is a component that needs to be registered in components and then used directly

The init here is the initialization configuration item of tinymce. Some key APIs will be discussed later. For the complete API, please refer to the official documentation
The editor requires a skin to work properly. So you need to set a skin_url to point to the previously copied skin file
init: {
 language_url: '/static/tinymce/zh_CN.js',
 language: 'zh_CN',
 skin_url: '/static/tinymce/skins/lightgray',
 height: 300
}// The typescript project created by vue-cli 3.x, remove the static in the url , that is, skin_url: '/tinymce/skins/lightgray'
At the same time, it also needs to be initialized once in mounted:
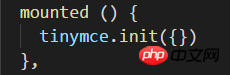
If the above init is passed here Object will not take effect, but an error will be reported if no parameters are passed, so an empty object is passed in here
3. Extension plug-in
After completing the above initialization, the editor can run normally, but only has some basic functions
tinymce adds functions by adding plugins
For example, to add an uploaded image To function, you need to use the image plug-in. To add a hyperlink, you need to use the link plug-in

At the same time, you need to introduce these plug-ins on the page:

After adding the plug-in, the corresponding function button will be added to the toolbar by default. The toolbar can also be customized

Post the complete component Code:
tinymce
<script> import tinymce from &#39;tinymce/tinymce&#39; import &#39;tinymce/themes/modern/theme&#39; import Editor from &#39;@tinymce/tinymce-vue&#39; import 'tinymce/plugins/image' import 'tinymce/plugins/link' import 'tinymce/plugins/code' import 'tinymce/plugins/table' import 'tinymce/plugins/lists' import 'tinymce/plugins/contextmenu' import 'tinymce/plugins/wordcount' import 'tinymce/plugins/colorpicker' import 'tinymce/plugins/textcolor' export default { name: 'tinymce', data () { return { tinymceHtml: '请输入内容', init: { language_url: '/static/tinymce/zh_CN.js', language: 'zh_CN', skin_url: '/static/tinymce/skins/lightgray', height: 300, plugins: 'link lists image code table colorpicker textcolor wordcount contextmenu', toolbar: 'bold italic underline strikethrough | fontsizeselect | forecolor backcolor | alignleft aligncenter alignright alignjustify | bullist numlist | outdent indent blockquote | undo redo | link unlink image code | removeformat', branding: false } } }, mounted () { tinymce.init({}) }, components: {Editor} } </script>

4. Upload images
tinymce provides APIs such as images_upload_url to allow users to configure relevant parameters for uploading images
But in order to adapt to your own project without troublesome backend, you still have to use images_upload_handler to customize an upload method

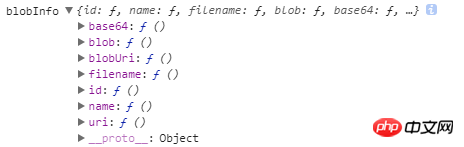
This method will provide three parameters : blobInfo, success, failure
where blobinfo is an object, containing the information of the uploaded file:
success and failure are functions, which are reported to when the upload is successful. Success passes in an image address, and upon failure, passes the error message
to failure.
The above is the detailed content of Introducing tinymce rich text editor into Vue project. For more information, please follow other related articles on the PHP Chinese website!

Hot AI Tools

Undresser.AI Undress
AI-powered app for creating realistic nude photos

AI Clothes Remover
Online AI tool for removing clothes from photos.

Undress AI Tool
Undress images for free

Clothoff.io
AI clothes remover

Video Face Swap
Swap faces in any video effortlessly with our completely free AI face swap tool!

Hot Article
Hot Tools

Notepad++7.3.1
Easy-to-use and free code editor

SublimeText3 Chinese version
Chinese version, very easy to use

Zend Studio 13.0.1
Powerful PHP integrated development environment

Dreamweaver CS6
Visual web development tools

SublimeText3 Mac version
God-level code editing software (SublimeText3)
Hot Topics


 How to use tinymce in vue3 project
May 19, 2023 pm 08:40 PM
How to use tinymce in vue3 project
May 19, 2023 pm 08:40 PM
tinymce is a fully functional rich text editor plug-in, but introducing tinymce into vue is not as smooth as other Vue rich text plug-ins. tinymce itself is not suitable for Vue, and @tinymce/tinymce-vue needs to be introduced, and It is a foreign rich text plug-in and has not passed the Chinese version. You need to download the translation package from its official website (you may need to bypass the firewall). 1. Install related dependencies npminstalltinymce-Snpminstall@tinymce/tinymce-vue-S2. Download the Chinese package 3. Introduce the skin and Chinese package. Create a new tinymce folder in the project public folder and download the
 Detailed guide to 15 Python editors/IDEs, there is always one that suits you!
Aug 09, 2023 pm 05:44 PM
Detailed guide to 15 Python editors/IDEs, there is always one that suits you!
Aug 09, 2023 pm 05:44 PM
There is no better way to write Python code than using an integrated development environment (IDE). Not only can they make your work simpler and more logical, they can also improve programming experience and efficiency. Everyone knows this. The question is, how to choose the best Python development environment among the many options.
 Essential software for C language programming: five good helpers recommended for beginners
Feb 20, 2024 pm 08:18 PM
Essential software for C language programming: five good helpers recommended for beginners
Feb 20, 2024 pm 08:18 PM
C language is a basic and important programming language. For beginners, it is very important to choose appropriate programming software. There are many different C programming software options on the market, but for beginners, it can be a bit confusing to choose which one is right for you. This article will recommend five C language programming software to beginners to help them get started quickly and improve their programming skills. Dev-C++Dev-C++ is a free and open source integrated development environment (IDE), especially suitable for beginners. It is simple and easy to use, integrating editor,
 What to do if win7 system cannot open txt text
Jul 06, 2023 pm 04:45 PM
What to do if win7 system cannot open txt text
Jul 06, 2023 pm 04:45 PM
What should I do if win7 system cannot open txt text? When we need to edit text files on our computers, the easiest way is to use text tools. However, some users find that their computers cannot open txt text files. So how to solve this problem? Let’s take a look at the detailed tutorial to solve the problem of unable to open txt text in win7 system. Tutorial to solve the problem that win7 system cannot open txt text. 1. Right-click any txt file on the desktop. If there is no txt file, you can right-click to create a new text document, and then select properties, as shown below: 2. In the opened txt properties window , find the change button under the general options, as shown in the figure below: 3. In the pop-up open mode setting
 Fix the issue where Windows 11/10 login options are disabled
May 07, 2023 pm 01:10 PM
Fix the issue where Windows 11/10 login options are disabled
May 07, 2023 pm 01:10 PM
Many Windows users have encountered the problem of being unable to log in to Windows 11/10 systems due to failed login attempts or multiple system shutdowns. Users are frustrated because there is nothing they can do about it. Users may forget their PIN code to log into the system, or experience lags when using or installing software, and the system may be forced to shut down multiple times. Therefore, we have compiled a list of the best available solutions that will undoubtedly help consumers solve this problem. To learn more, continue reading this article. Note: Before doing this, make sure you have your system's administrator credentials and Microsoft account password to reset your PIN. If not, wait an hour or so and try with the correct PIN
 Try new ringtones and text tones: Experience the latest sound alerts on iPhone in iOS 17
Oct 12, 2023 pm 11:41 PM
Try new ringtones and text tones: Experience the latest sound alerts on iPhone in iOS 17
Oct 12, 2023 pm 11:41 PM
In iOS 17, Apple has overhauled its entire selection of ringtones and text tones, offering more than 20 new sounds that can be used for calls, text messages, alarms, and more. Here's how to see them. Many new ringtones are longer and sound more modern than older ringtones. They include arpeggio, broken, canopy, cabin, chirp, dawn, departure, dolop, journey, kettle, mercury, galaxy, quad, radial, scavenger, seedling, shelter, sprinkle, steps, story time , tease, tilt, unfold and valley. Reflection remains the default ringtone option. There are also 10+ new text tones available for incoming text messages, voicemails, incoming mail alerts, reminder alerts, and more. To access new ringtones and text tones, first, make sure your iPhone
 Introduction to Go language development tools: a list of essential tools
Mar 29, 2024 pm 01:06 PM
Introduction to Go language development tools: a list of essential tools
Mar 29, 2024 pm 01:06 PM
Title: Introduction to Go language development tools: List of essential tools In the development process of Go language, using appropriate development tools can improve development efficiency and code quality. This article will introduce several essential tools commonly used in Go language development, and attach specific code examples to allow readers to understand their usage and functions more intuitively. 1.VisualStudioCodeVisualStudioCode is a lightweight and powerful cross-platform development tool with rich plug-ins and functions.
 Using large models to create a new paradigm for text summary training
Jun 10, 2023 am 09:43 AM
Using large models to create a new paradigm for text summary training
Jun 10, 2023 am 09:43 AM
1. Text task This article mainly discusses the method of generative text summarization, and how to use contrastive learning and large models to implement the latest generative text summarization training paradigm. It mainly involves two articles, one is BRIO: Bringing Order to Abstractive Summarization (2022), which uses contrastive learning to introduce ranking tasks in the generative model; the other is OnLearning to Summarize with Large Language Models as References (2023), which further introduces large models to generate high-quality training data based on BRIO. 2. Generative text summarization training methods and
