

Detailed explanation of vue-cli3.0 configuration
This time I will bring you a detailed explanation of vue-cli3.0 configuration. What are the precautions when using vue-cli3.0 configuration? The following is a practical case, let’s take a look.
New project
# 安装
npm install -g @vue/cli
# 新建项目
vue create my-project
# 项目启动
npm run serve
# 打包
npm run build
The packaged file has preloading (preload/prefetch) injected into the reference resources, and the manifest/icon link is injected when the PWA plug-in is enabled, and Inlines webpack runtime/chunk manifest for best performance.
Function configuration
Function selection
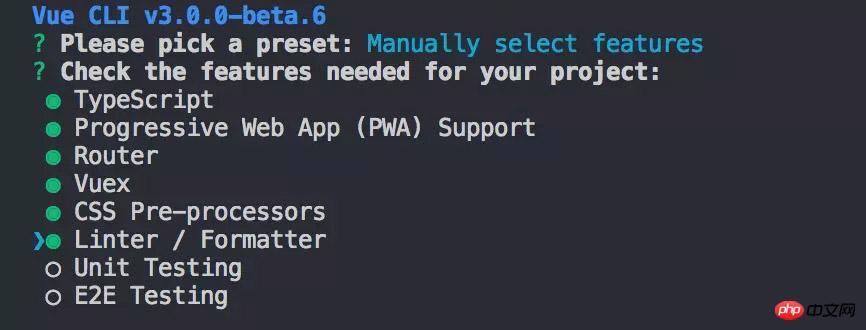
- TypeScript ##Progressive Web App (PWA) Support
- Router
- ##Vuex
##CSS Pre-processors
Linter / Formatter
Unit Testing
E2E Testing
can be experienced according to the project size and functionality To configure different functions, use the space bar to select/invert selection, press the a key to select all/unselect all, press the i key to invert the selected items, and use the up and down keys to move the selection up and down.
After selecting the function, you will be asked for more detailed configuration,
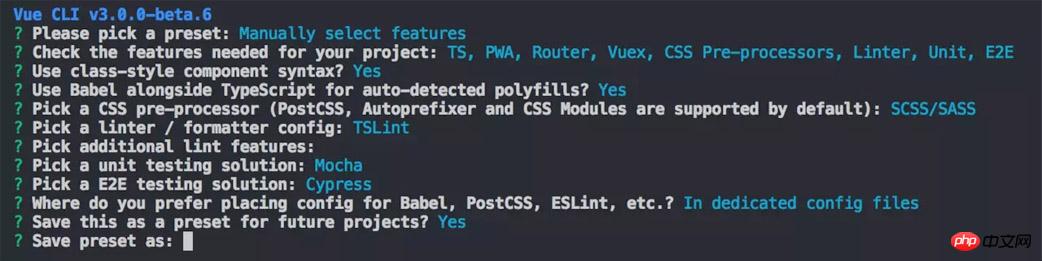 TypeScript:
Whether to use class-style component syntax: Use class-style component syntax?
Whether to use babel for escaping: Use Babel alongside TypeScript for auto-detected polyfills?
CSS Pre-processors:
Select CSS pre-processing type: Pick a CSS pre-processor
Linter / Formatter
Select Linter / Formatter specification type: Pick a linter / formatter config
Select lint mode, check when saving/check when submitting: Pick additional lint features
Testing
Select Unit testing mode
Select E2E testing method
Select the storage location of custom configurations such as Babel, PostCSS, ESLint, etc. Where do you prefer placing config for Babel, PostCSS, ESLint, etc. ?
vue.config.js Complete default configurationmodule.exports = {
// 基本路径
baseUrl: '/',
// 输出文件目录
outputDir: 'dist',
// eslint-loader 是否在保存的时候检查
lintOnSave: true,
// use the full build with in-browser compiler?
// https://vuejs.org/v2/guide/installation.html#Runtime-Compiler-vs-Runtime-only
compiler: false,
// webpack配置
// see https://github.com/vuejs/vue-cli/blob/dev/docs/webpack.md
chainWebpack: () => {},
configureWebpack: () => {},
// vue-loader 配置项
// https://vue-loader.vuejs.org/en/options.html
vueLoader: {},
// 生产环境是否生成 sourceMap 文件
productionSourceMap: true,
// css相关配置
css: {
// 是否使用css分离插件 ExtractTextPlugin
extract: true,
// 开启 CSS source maps?
sourceMap: false,
// css预设器配置项
loaderOptions: {},
// 启用 CSS modules for all css / pre-processor files.
modules: false
},
// use thread-loader for babel & TS in production build
// enabled by default if the machine has more than 1 cores
parallel: require('os').cpus().length > 1,
// 是否启用dll
// See https://github.com/vuejs/vue-cli/blob/dev/docs/cli-service.md#dll-mode
dll: false,
// PWA 插件相关配置
// see https://github.com/vuejs/vue-cli/tree/dev/packages/%40vue/cli-plugin-pwa
pwa: {},
// webpack-dev-server 相关配置
devServer: {
open: process.platform === 'darwin',
host: '0.0.0.0',
port: 8080,
https: false,
hotOnly: false,
proxy: null, // 设置代理
before: app => {}
},
// 第三方插件配置
pluginOptions: {
// ...
}
}
# string
module.exports = {
 devServer: {
  proxy: '<url>'
 }
}
# Object
module.exports = {
 devServer: {
  proxy: {
   '/api': {
    target: '<url>',
    ws: true,
    changeOrigin: true
   },
   '/foo': {
    target: '<other_url>'
   }
  }
 }
}After enabling dll, the [chunkhash] value of the vendor generated by our dynamic library file will be the same every time it is packaged. The value can be true/false, or it can be specified. Specific code base. module.exports = {
dll: true
}
module.exports = {
dll: [
'dep-a',
'dep-b/some/nested/file.js'
]
}
Relative path
The static resource path starting with @ represents
The static resource path starts with ~, which can import resources in node modules
-
Static resource references in the public folder
 # 在 public/index.html中引用静态资源
 <%= webpackConfig.output.publicPath %>
 <link rel="shortcut icon" href="<%= webpackConfig.output.publicPath %>favicon.ico" rel="external nofollow" >
 # vue templates中,需要在data中定义baseUrl
 <template>
  <img :src="`${baseUrl}my-image.png`">
 </template>
 <script>
  data () {
   return {
    baseUrl: process.env.BASE_URL
   }
  }
 </script>
Copy after login
Use webpack-chain to modify webpack-related configurations. It is strongly recommended to be familiar with webpack-chain and vue-cli source code in order to better understand the configuration items of this option. Module processing configuration
// vue.config.js
module.exports = {
 chainWebpack: config => {
  config.module
   .rule('js')
    .include
     .add(/some-module-to-transpile/) // 要处理的模块
 }
}Modify webpack Loader configuration
// vue.config.js
module.exports = {
 chainWebpack: config => {
  config.module
   .rule('scss')
   .use('sass-loader')
   .tap(options =>
    merge(options, {
     includePaths: [path.resolve(dirname, 'node_modules')],
    })
   )
 }
}Modify webpack Plugin configuration
// vue.config.js
module.exports = {
 chainWebpack: config => {
  config
   .plugin('html')
   .tap(args => {
    return [/* new args to pass to html-webpack-plugin's constructor */]
   })
 }
}eg: This project is small, only for uglifyjs has made a small amount of modifications, and will be added later if there are configuration optimizations.
chainWebpack: config => {
  if (process.env.NODE_ENV === 'production') {
    config
      .plugin('uglify')
      .tap(([options]) =>{
        // 去除 console.log
        return [Object.assign(options, {
          uglifyOptions: { compress: {
            drop_console : true,
            pure_funcs: ['console.log']
          }}
        })]
      })
  }
}在项目根目录创建以下项目:
.env        # 在所有环节中执行
.env.local     # 在所有环境中执行,git会ignored
.env.[mode]     # 只在特定环境执行( [mode] 可以是 "development", "production" or "test" )
.env.[mode].local  # 在特定环境执行, git会ignored
.env.development  # 只在生产环境执行
.env.production   # 只在开发环境执行
在文件里配置键值对:
# 键名须以VUE_APP开头
VUE_APP_SECRET=secret
在项目中访问:
console.log(process.env.VUE_APP_SECRET)
这样项目中的 process.env.VUE_APP_SECRET 就会被 secret 所替代。
vue-cli 3 就项目性能而言已经相当友好了,私有制定性也特别强,各种配置也特别贴心,可以根据项目大小和特性制定私有预设,对前期项目搭建而言效率极大提升了。
相信看了本文案例你已经掌握了方法,更多精彩请关注php中文网其它相关文章!
推荐阅读:
The above is the detailed content of Detailed explanation of vue-cli3.0 configuration. For more information, please follow other related articles on the PHP Chinese website!

Hot AI Tools

Undresser.AI Undress
AI-powered app for creating realistic nude photos

AI Clothes Remover
Online AI tool for removing clothes from photos.

Undress AI Tool
Undress images for free

Clothoff.io
AI clothes remover

Video Face Swap
Swap faces in any video effortlessly with our completely free AI face swap tool!

Hot Article
Hot Tools

Notepad++7.3.1
Easy-to-use and free code editor

SublimeText3 Chinese version
Chinese version, very easy to use

Zend Studio 13.0.1
Powerful PHP integrated development environment

Dreamweaver CS6
Visual web development tools

SublimeText3 Mac version
God-level code editing software (SublimeText3)
Hot Topics


 The working principle and configuration method of GDM in Linux system
Mar 01, 2024 pm 06:36 PM
The working principle and configuration method of GDM in Linux system
Mar 01, 2024 pm 06:36 PM
Title: The working principle and configuration method of GDM in Linux systems In Linux operating systems, GDM (GNOMEDisplayManager) is a common display manager used to control graphical user interface (GUI) login and user session management. This article will introduce the working principle and configuration method of GDM, as well as provide specific code examples. 1. Working principle of GDM GDM is the display manager in the GNOME desktop environment. It is responsible for starting the X server and providing the login interface. The user enters
 Detailed explanation of obtaining administrator rights in Win11
Mar 08, 2024 pm 03:06 PM
Detailed explanation of obtaining administrator rights in Win11
Mar 08, 2024 pm 03:06 PM
Windows operating system is one of the most popular operating systems in the world, and its new version Win11 has attracted much attention. In the Win11 system, obtaining administrator rights is an important operation. Administrator rights allow users to perform more operations and settings on the system. This article will introduce in detail how to obtain administrator permissions in Win11 system and how to effectively manage permissions. In the Win11 system, administrator rights are divided into two types: local administrator and domain administrator. A local administrator has full administrative rights to the local computer
 Understand Linux Bashrc: functions, configuration and usage
Mar 20, 2024 pm 03:30 PM
Understand Linux Bashrc: functions, configuration and usage
Mar 20, 2024 pm 03:30 PM
Understanding Linux Bashrc: Function, Configuration and Usage In Linux systems, Bashrc (BourneAgainShellruncommands) is a very important configuration file, which contains various commands and settings that are automatically run when the system starts. The Bashrc file is usually located in the user's home directory and is a hidden file. Its function is to customize the Bashshell environment for the user. 1. Bashrc function setting environment
 Detailed explanation of division operation in Oracle SQL
Mar 10, 2024 am 09:51 AM
Detailed explanation of division operation in Oracle SQL
Mar 10, 2024 am 09:51 AM
Detailed explanation of division operation in OracleSQL In OracleSQL, division operation is a common and important mathematical operation, used to calculate the result of dividing two numbers. Division is often used in database queries, so understanding the division operation and its usage in OracleSQL is one of the essential skills for database developers. This article will discuss the relevant knowledge of division operations in OracleSQL in detail and provide specific code examples for readers' reference. 1. Division operation in OracleSQL
 How to configure and install FTPS in Linux system
Mar 20, 2024 pm 02:03 PM
How to configure and install FTPS in Linux system
Mar 20, 2024 pm 02:03 PM
Title: How to configure and install FTPS in Linux system, specific code examples are required. In Linux system, FTPS is a secure file transfer protocol. Compared with FTP, FTPS encrypts the transmitted data through TLS/SSL protocol, which improves Security of data transmission. In this article, we will introduce how to configure and install FTPS in a Linux system and provide specific code examples. Step 1: Install vsftpd Open the terminal and enter the following command to install vsftpd: sudo
 Detailed explanation of the role and usage of PHP modulo operator
Mar 19, 2024 pm 04:33 PM
Detailed explanation of the role and usage of PHP modulo operator
Mar 19, 2024 pm 04:33 PM
The modulo operator (%) in PHP is used to obtain the remainder of the division of two numbers. In this article, we will discuss the role and usage of the modulo operator in detail, and provide specific code examples to help readers better understand. 1. The role of the modulo operator In mathematics, when we divide an integer by another integer, we get a quotient and a remainder. For example, when we divide 10 by 3, the quotient is 3 and the remainder is 1. The modulo operator is used to obtain this remainder. 2. Usage of the modulo operator In PHP, use the % symbol to represent the modulus
 MyBatis Generator configuration parameter interpretation and best practices
Feb 23, 2024 am 09:51 AM
MyBatis Generator configuration parameter interpretation and best practices
Feb 23, 2024 am 09:51 AM
MyBatisGenerator is a code generation tool officially provided by MyBatis, which can help developers quickly generate JavaBeans, Mapper interfaces and XML mapping files that conform to the database table structure. In the process of using MyBatisGenerator for code generation, the setting of configuration parameters is crucial. This article will start from the perspective of configuration parameters and deeply explore the functions of MyBatisGenerator.
 Where can I check the configuration of my win11 computer? How to find the configuration information of win11 computer
Mar 06, 2024 am 10:10 AM
Where can I check the configuration of my win11 computer? How to find the configuration information of win11 computer
Mar 06, 2024 am 10:10 AM
When we use win11 system, we sometimes need to check the configuration of our computer, but many users are also asking where to check the configuration of win11 computer? In fact, the method is very simple. Users can directly open the system information under settings, and then view the computer configuration information. Let this site carefully introduce to users how to find win11 computer configuration information. How to find win11 computer configuration information. Method 1: 1. Click Start and open Computer Settings. 3. You can view computer configuration information on this page. 2. In the command prompt window, enter systeminfo and press Enter to view the computer configuration.
