

Detailed explanation of the use of jquery plug-in uploadify
This time I will bring you a detailed explanation of the use of the jquery plug-in uploadify. What are the precautions when using the jquery plug-in uploadify? Here are practical cases, let’s take a look.
Sometimes when a project requires a file batch upload function, I personally think that uploadify is a quick and easy solution. I share it with you for your reference. The details are as follows
First, the renderings:
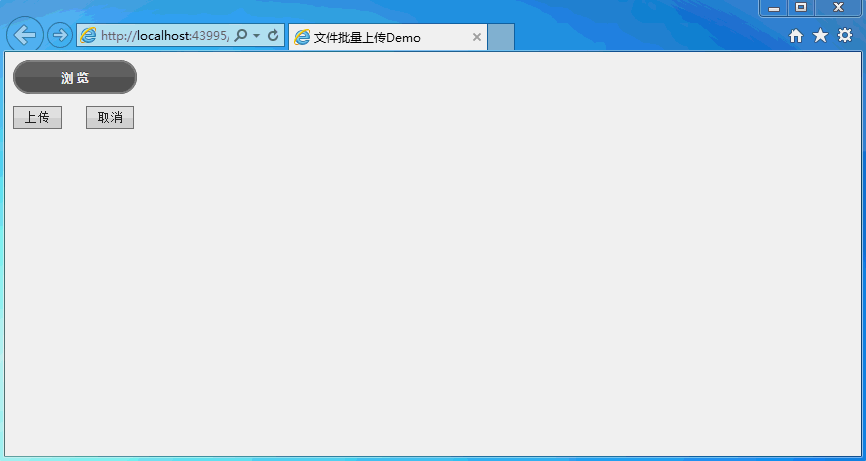
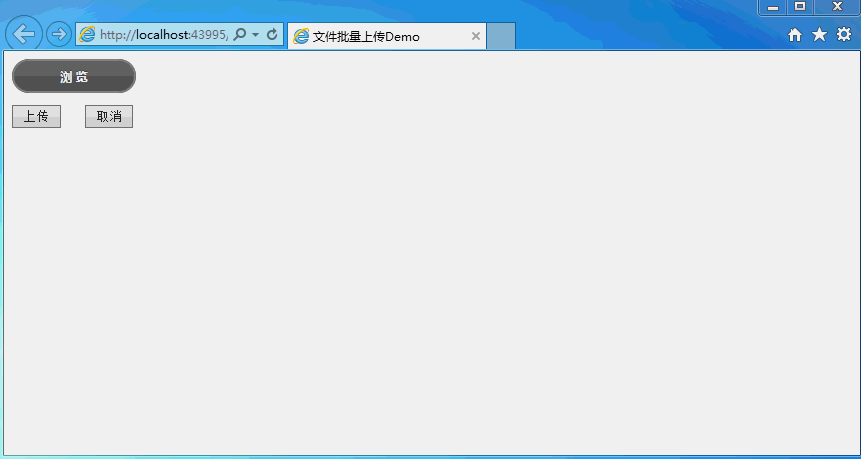
The specific code is as follows:
is as follows on the page
Complete page code
<%@ Page Language="C#" AutoEventWireup="true" CodeFile="Default.aspx.cs" Inherits="_Default" %>
<!DOCTYPE html>
<html xmlns="http://www.w3.org/1999/xhtml">
<head runat="server">
<meta http-equiv="Content-Type" content="text/html; charset=utf-8"/>
<title>文件批量上传Demo</title>
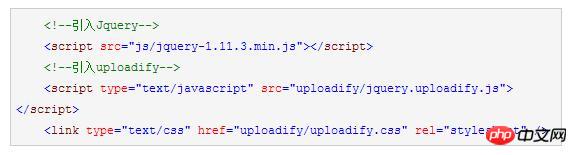
<!--引入Jquery-->
<script src="js/jquery-1.11.3.min.js"></script>
<!--引入uploadify-->
<script type="text/javascript" src="uploadify/jquery.uploadify.js"></script>
<link type="text/css" href="uploadify/uploadify.css" rel="stylesheet" />
<script type="text/javascript">
$(function () {
var guid = '<%=Request["guid"] %>';
var type = '<%=Request["type"] %>';
if (guid == null || guid == "") {
guid = newGuid();
}
if (type != null) {
type = type + '/';
}
$('#file_upload').uploadify({
'swf': 'uploadify/uploadify.swf', //FLash文件路径
'buttonText': '浏 览', //按钮文本
'uploader': 'uploadhandler.ashx?guid=' + guid, //处理ASHX页面
'formData': { 'folder': 'picture', 'isCover': 1 }, //传参数
'queueID': 'fileQueue', //队列的ID
'queueSizeLimit': 10, //队列最多可上传文件数量,默认为999
'auto': false, //选择文件后是否自动上传,默认为true
'multi': true, //是否为多选,默认为true
'removeCompleted': true, //是否完成后移除序列,默认为true
'fileSizeLimit': '0', //单个文件大小,0为无限制,可接受KB,MB,GB等单位的字符串值
'fileTypeDesc': 'All Files', //文件描述
'fileTypeExts': '*.*', //上传的文件后缀过滤器
'onQueueComplete': function (queueData) { //所有队列完成后事件
alert("上传完毕!");
},
'onError': function (event, queueId, fileObj, errorObj) {
alert(errorObj.type + ":" + errorObj.info);
},
'onUploadStart': function (file) {
},
'onUploadSuccess': function (file, data, response) { //一个文件上传成功后的响应事件处理
//var data = $.parseJSON(data);//如果data是json格式
//var errMsg = "";
}
});
});
function newGuid() {
var guid = "";
for (var i = 1; i <= 32; i++) {
var n = Math.floor(Math.random() * 16.0).toString(16);
guid += n;
if ((i == 8) || (i == 12) || (i == 16) || (i == 20))
guid += "-";
}
return guid;
}
//执行上传
function doUpload() {
$('#file_upload').uploadify('upload', '*');
}
</script>
</head>
<body>
<form id="form1" runat="server" enctype="multipart/form-data">
<p id="fileQueue" class="fileQueue"></p>
<p>
<input type="file" name="file_upload" id="file_upload" />
<p>
<input type="button" class="shortbutton" id="btnUpload" onclick="doUpload()" value="上传" />
<input type="button" class="shortbutton" id="btnCancelUpload" onclick="$('#file_upload').uploadify('cancel')" value="取消" />
</p>
<p id="p_show_files"></p>
</p>
</form>
</body>
</html>UploadHandler.ashx code:
using System;
using System.Web;
using System.IO;
public class UploadHandler : IHttpHandler {

 public void ProcessRequest (HttpContext context) {
  context.Response.ContentType = "text/plain";
  context.Request.ContentEncoding = System.Text.Encoding.GetEncoding("UTF-8");
  context.Response.ContentEncoding = System.Text.Encoding.GetEncoding("UTF-8");
  context.Response.Charset = "UTF-8";
  if (context.Request.Files.Count > 0)
  {
   #region 获取上传路径
   string uploadFolder = GetUploadFolder();
   #endregion
   if (System.IO.Directory.Exists(uploadFolder))
   {//如果上传路径存在
    HttpPostedFile file = context.Request.Files["Filedata"];
    string filePath = Path.Combine(uploadFolder, file.FileName);
    file.SaveAs(filePath);
    context.Response.Write("0");
   }
   else
   {
    context.Response.Write("2");
   }
  }
 }

 public bool IsReusable {
  get {
   return false;
  }
 }
 /// <summary>
 /// 返回不带后缀的文件名
 /// </summary>
 /// <param name="fileName"></param>
 /// <returns></returns>
 public static string GetFirstFileName(string fileName)
 {
  return Path.GetFileNameWithoutExtension(fileName);
 }
 /// <summary>
 /// 获取上传目录
 /// </summary>
 /// <returns></returns>
 public static string GetUploadFolder()
 {
  string rootPath = HttpContext.Current.Server.MapPath("~");
  return Path.Combine(rootPath, "test");
 }
}File upload. NET has a size limit by default, like the 30M default request size limited by IIS. If you don't want to modify IIS, but want to break through this size limit, for example, upload a 1GB file.
This can be achieved by modifying Web.config.
<?xml version="1.0" encoding="utf-8"?>
<!--
 -->
<configuration>
 <system.web>
  <compilation debug="true" targetFramework="4.0" />
  <httpRuntime maxRequestLength="1073741824"/>
 </system.web>
 <!--用于设置文件上传的最大允许大小(单位:bytes)-->
 <system.webServer>
  <security>
  <requestFiltering>
   <!--修改服务器允许最大长度(1GB)-->
   <requestLimits maxAllowedContentLength="1073741824"/>
  </requestFiltering>
  </security>
 </system.webServer>

</configuration>
I believe you have mastered the method after reading the case in this article. For more exciting information, please pay attention to other related articles on the php Chinese website!
Recommended reading:
jQuery allows browsers to jump to each other and pass parameters. Detailed explanation of usage
Detailed explanation of jQuery basic knowledge points
The above is the detailed content of Detailed explanation of the use of jquery plug-in uploadify. For more information, please follow other related articles on the PHP Chinese website!

Hot AI Tools

Undresser.AI Undress
AI-powered app for creating realistic nude photos

AI Clothes Remover
Online AI tool for removing clothes from photos.

Undress AI Tool
Undress images for free

Clothoff.io
AI clothes remover

Video Face Swap
Swap faces in any video effortlessly with our completely free AI face swap tool!

Hot Article
Hot Tools

Notepad++7.3.1
Easy-to-use and free code editor

SublimeText3 Chinese version
Chinese version, very easy to use

Zend Studio 13.0.1
Powerful PHP integrated development environment

Dreamweaver CS6
Visual web development tools

SublimeText3 Mac version
God-level code editing software (SublimeText3)
Hot Topics


 Detailed explanation of obtaining administrator rights in Win11
Mar 08, 2024 pm 03:06 PM
Detailed explanation of obtaining administrator rights in Win11
Mar 08, 2024 pm 03:06 PM
Windows operating system is one of the most popular operating systems in the world, and its new version Win11 has attracted much attention. In the Win11 system, obtaining administrator rights is an important operation. Administrator rights allow users to perform more operations and settings on the system. This article will introduce in detail how to obtain administrator permissions in Win11 system and how to effectively manage permissions. In the Win11 system, administrator rights are divided into two types: local administrator and domain administrator. A local administrator has full administrative rights to the local computer
 Detailed explanation of division operation in Oracle SQL
Mar 10, 2024 am 09:51 AM
Detailed explanation of division operation in Oracle SQL
Mar 10, 2024 am 09:51 AM
Detailed explanation of division operation in OracleSQL In OracleSQL, division operation is a common and important mathematical operation, used to calculate the result of dividing two numbers. Division is often used in database queries, so understanding the division operation and its usage in OracleSQL is one of the essential skills for database developers. This article will discuss the relevant knowledge of division operations in OracleSQL in detail and provide specific code examples for readers' reference. 1. Division operation in OracleSQL
 How to use PUT request method in jQuery?
Feb 28, 2024 pm 03:12 PM
How to use PUT request method in jQuery?
Feb 28, 2024 pm 03:12 PM
How to use PUT request method in jQuery? In jQuery, the method of sending a PUT request is similar to sending other types of requests, but you need to pay attention to some details and parameter settings. PUT requests are typically used to update resources, such as updating data in a database or updating files on the server. The following is a specific code example using the PUT request method in jQuery. First, make sure you include the jQuery library file, then you can send a PUT request via: $.ajax({u
 Detailed explanation of the role and usage of PHP modulo operator
Mar 19, 2024 pm 04:33 PM
Detailed explanation of the role and usage of PHP modulo operator
Mar 19, 2024 pm 04:33 PM
The modulo operator (%) in PHP is used to obtain the remainder of the division of two numbers. In this article, we will discuss the role and usage of the modulo operator in detail, and provide specific code examples to help readers better understand. 1. The role of the modulo operator In mathematics, when we divide an integer by another integer, we get a quotient and a remainder. For example, when we divide 10 by 3, the quotient is 3 and the remainder is 1. The modulo operator is used to obtain this remainder. 2. Usage of the modulo operator In PHP, use the % symbol to represent the modulus
 jQuery Tips: Quickly modify the text of all a tags on the page
Feb 28, 2024 pm 09:06 PM
jQuery Tips: Quickly modify the text of all a tags on the page
Feb 28, 2024 pm 09:06 PM
Title: jQuery Tips: Quickly modify the text of all a tags on the page In web development, we often need to modify and operate elements on the page. When using jQuery, sometimes you need to modify the text content of all a tags in the page at once, which can save time and energy. The following will introduce how to use jQuery to quickly modify the text of all a tags on the page, and give specific code examples. First, we need to introduce the jQuery library file and ensure that the following code is introduced into the page: <
 Use jQuery to modify the text content of all a tags
Feb 28, 2024 pm 05:42 PM
Use jQuery to modify the text content of all a tags
Feb 28, 2024 pm 05:42 PM
Title: Use jQuery to modify the text content of all a tags. jQuery is a popular JavaScript library that is widely used to handle DOM operations. In web development, we often encounter the need to modify the text content of the link tag (a tag) on the page. This article will explain how to use jQuery to achieve this goal, and provide specific code examples. First, we need to introduce the jQuery library into the page. Add the following code in the HTML file:
 Understand the role and application scenarios of eq in jQuery
Feb 28, 2024 pm 01:15 PM
Understand the role and application scenarios of eq in jQuery
Feb 28, 2024 pm 01:15 PM
jQuery is a popular JavaScript library that is widely used to handle DOM manipulation and event handling in web pages. In jQuery, the eq() method is used to select elements at a specified index position. The specific usage and application scenarios are as follows. In jQuery, the eq() method selects the element at a specified index position. Index positions start counting from 0, i.e. the index of the first element is 0, the index of the second element is 1, and so on. The syntax of the eq() method is as follows: $("s
 How to tell if a jQuery element has a specific attribute?
Feb 29, 2024 am 09:03 AM
How to tell if a jQuery element has a specific attribute?
Feb 29, 2024 am 09:03 AM
How to tell if a jQuery element has a specific attribute? When using jQuery to operate DOM elements, you often encounter situations where you need to determine whether an element has a specific attribute. In this case, we can easily implement this function with the help of the methods provided by jQuery. The following will introduce two commonly used methods to determine whether a jQuery element has specific attributes, and attach specific code examples. Method 1: Use the attr() method and typeof operator // to determine whether the element has a specific attribute
