

Pastate.js responsive framework for multi-component applications

The content of this article is about the multi-component application of the Pastate.js responsive framework. It has a certain reference value. Friends in need can refer to it.
This is the first tutorial in the pastate series. Chapter 2, welcome to pay attention and continue to update.
In this chapter, we add more information to the state structure in the previous chapter and use multiple components to organize the paste application.
Update the state structure
We package the personal basic information data in the previous chapter into an object with the state.basicInfo attribute, and add it to state Add the address attribute to save personal address information:
const initState = {
    basicInfo: {
        name: 'Peter',
        isBoy: true,
        age: 10
    },
    address: {
        country: 'China',
        city: 'Guangzhou'
    }
}Due to limitations of the JavaScript language, pastate cannot detect adding new properties to the object through assignment to automatically convert the new properties into responsive ones. node. So you should define all the state attributes you need to use in initState. It is okay to initialize the attribute values to null or an empty array. The following is an wrong example:
const initState = {
    basicInfo: ...,
    address: ...
}
const store = new Pastore(initState)
const state = store.state

state.hobby = 'coding' // 错误,state.hobby 属性不具有受 pastate 控制,不具有响应式特点Even if this feature is supported, it will make it difficult for developers to fully grasp the structure of state, making the application difficult to develop and maintain, so we should use initState The structure of state is completely defined here.
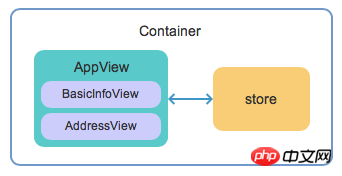
Develop the view components of basicInfo and address respectively
We first use a simple temporary method to build sub-components:
...
/** @type {initState} */
const state = store.state;
class BasicInfoView extends Component {
render(){
return (
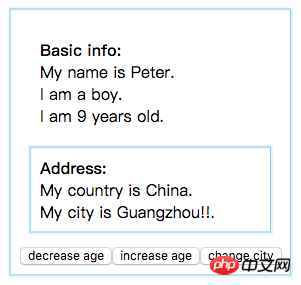
<p style={{padding: 10, margin: 10}}>
<strong>Basic info:</strong><br/>
My name is {state.basicInfo.name}.<br/>
I am a {state.basicInfo.isBoy == true ? "boy" : "girl"}.<br/>
I am {state.basicInfo.age} years old.<br/>
</p>
)
}
}class AddressView extends Component {
render(){
return (
<p style={{padding: 10, margin: 10}}>
<strong>Address:</strong><br/>
My country is {state.address.country}.<br/>
My city is {state.address.city}.<br/>
</p>
)
}
}As you can see, the BasicInfoView component directly references the store The value of .state.basicInfo, the AddressView component directly references the value of store.state.address. Then modify the original AppView parent component, nest the two sub-components, and add a method to modify the value of address.city:
...
class AppView extends Component {
    increaseAge(){
        state.basicInfo.age += 1
    }
    decreaseAge(){
        state.basicInfo.age -= 1
    }
    changeCity(){
        state.address.city += '!'
    }
    render() {
        return (
            <p style={{padding: 10, margin: 10, display: "inline-block"}}>
                <BasicInfoView />
                <AddressView />
                <button onClick={this.decreaseAge}> decrease age </button>
                <button onClick={this.increaseAge}> increase age </button>
                <button onClick={this.changeCity}> change city </button>
            </p>
        )
    }
}
...
Finish! Let’s run it:
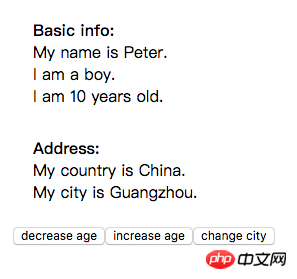
Click the button and everything looks fine! We use Chrome's react dev tools to observe the rendering of each component when the state changes. Open the browser's developer tools, select the react tag, and check Highlight Updates. When the component is re-rendered, it will be framed by a colored box.

Let’s try it by clicking the decrease age button on the page. The result of component re-rendering is as follows:
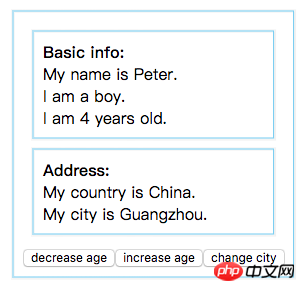
We can find that when only state.basicInfo.age changes, the three components AppView, BasicInfoView and AddressView will be re-rendered, even if the data referenced by AddressView has not occurred Any changes! This is a common situation in react multi-component rendering. When the application components are simple and the nesting levels are not many, we will not feel that this mode will have any obvious impact; but when the nesting relationship of the application components becomes more complex, Sometimes, it will bring performance risks, and we need to pay attention to this issue.
store.imState and store.state
Let’s first introduce the two different states in the store: store.imState and store.state , you can try to understand:
store.imState is the data entity of the application state. It is managed by pastate using the immutable mechanism. When the content of the node is updated , the "references" of all ancestors of the node will be updated. Each node value of imState is a wrapper type (String, Number, Boolean, Object, Array) except null or undefined.
store.state is the
responsive shadowof store.imState. You can directly assign and modify any node of store.state, and pastate will Apply the modification results to store.imState and trigger view updates asynchronously.
Or simplified to the following two points:
store.imState is used to render the view
store.state Used to manipulate data
These two concepts are useful for people who have not used redux and have not understood the principles of vue.js It may be a bit difficult to understand. But it doesn’t matter. Not understanding these two concepts does not prevent you from using paste. You can not feel the existence of imState at all during the process of using paste. The idea of paste is to encapsulate complex concepts so that you can implement complex functions in a simple way.
If you want to understand the detailed principles of paste, you can view the principles chapter.
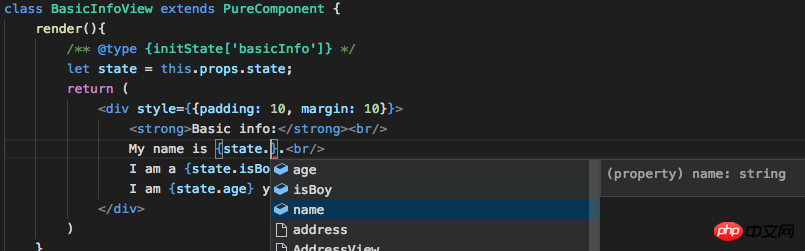
Use props to receive imState to implement on-demand rendering of components
When a component is connected to the store, the store will pass the imState to the component's props
.state, so we can Receive state in the props of the AppView component, and change the base class of the AppView component to the react pure component PureComponent, thus enabling the on-demand rendering effect of the component:
import React, { PureComponent } from 'react'; // 1. 改用 PureComponent 代替 Component
...
class AppView extends PureComponent { // 1. 改用 PureComponent
    ...
    render() {
        /** @type {initState} */
        let state = this.props.state; // 2. 从 props 接收 state
        return (
            <p style={{padding: 10, margin: 10, display: "inline-block"}}>

                {/**  3. 把 state 的子节点传递给对于的子组件 */}

                <BasicInfoView state={state.basicInfo}/>
                <AddressView state={state.address}/>
                ...
            </p>
        )
    }
}
...注意上面代码的第3点注释,我们把 state 数据的子节点通过 props 传递给子组件: <BasicInfoView state={state.basicInfo}/>。对于不直接与 store 直接连接的子组件,我们同样也需要修改为从
props 获取 state, 并把组件的基类改成 PureComponent:
class BasicInfoView extends PureComponent { // 1. 基类改为 PureComponent
    render(){
        let state = this.props.state; // 2. 从 props 接收 state
        return (
            <p style={{padding: 10, margin: 10}}>
                <strong>Basic info:</strong><br/>

                {/**  3. 这里的 state 是 basicInfo 对象 */}

                My name is {state.name}.<br/>
                I am a {state.isBoy == true ? "boy" : "girl"}.<br/>
                I am {state.age} years old.<br/>
            </p>
        )
    }
}class AddressView extends PureComponent { // 1. 基类改为 PureComponent
render(){
let state = this.props.state; // 2. 从 props 接收 state
return (
<p style={{padding: 10, margin: 10}}>
<strong>Address:</strong><br/>
{/** 3. 这里的 state 是 address 对象 */}
My country is {state.country}.<br/>
My city is {state.city}.<br/>
</p>
)
}
}可以看到,分配到子组件的 props 中的 state 是 根state 的子节点。因此在 BasicInfoView 中的 this.props.state 是 basicInfo 对象, 而在 AddressView 中的 this.props.state 是 address 对象。
完成!我们来看看运行效果!
点击
decrease age按钮或increase age按钮,我们看到的组件重新渲染情况是:
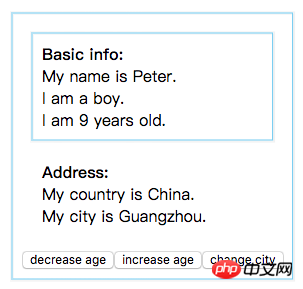
点击
change city按钮,我们看到的组件重新渲染情况是:
Amazing!可以看到当我们点击按钮改变 state 节点时,只有引用被改变的 state 节点的组件才会进行重新渲染, 我们成功地实现了多组件按需渲染的效果!当应用具有大量不与 store 直接连接的子组件时,这种按需渲染的策略可以大幅提高应用的渲染性能。
使用 imState 渲染视图的注意事项
从 props 中接收到的 state 的每个节点都是特殊的包装类型 , 当需要在 if(...) 语句或 ... ? A : B 使用其布尔值结果时, 需要使用 == 进行显式比较来获取,如下
class BasicInfoView extends PureComponent {

    render() {
        /** @type {initState['basicInfo']} */
        let state = this.props.state;
        return (
            <p style={{ padding: 10, margin: 10 }}>

               {state.isBoy == true ? "boy" : "girl"}  {/* 正确 */}
               {state.isBoy ? "boy" : "girl"}  {/* 错误 */}

               {state.age != 0 ? "Not 0" : "0"}  {/* 正确 */}
               {state.age ? "Not 0" : "0"}  {/* 错误 */}

            </p>
        )
    }
}了解 PureComponent
React 的 PureComponent 会在渲染前对新的 props / state 与老的 props / state 进行浅层比较( shallow comparison),仅当发现 props / state 发生改变时,才执行重新渲染。浅层比较即是比较 props / state 的根级属性值是否改变,如果属性值是数组 / 对象类型,比较的结果使其引用是否相等:
console.log(["a"] == ["a"]) // 结果是 false

let a = ["a"]
console.log(a == a) // 结果是 true
console.log({a: "a"} == {a: "a"}) // 结果是 false

let a = {a: "a"}
console.log(a == a) // 结果是 truePastate 符合 immutable data 规范的 state 数据,可以确保当某个 state 节点改变时,其祖先节点的引用都会进行更新,所以可以配合使用 PureComponent 实现高效的按需渲染。
按需渲染时需要对 state 的结构进行模块化设计,如果把所有的属性都放在 state 根节点上,就没法实现按需渲染了:
// 注意:这样的 state 设计无法实现子组件的按需渲染
initState = {
     name: 'Peter',
     isBoy: true,
     age: 10,
     country: 'China',
     city: 'Guangzhou'
}当然,只有当应用的 state 比较复杂且对 state 的操作比较繁多时候,才会体现按需渲染对性能的提升;当应用比较简单的时候,不一定要对 state 和视图进行太详细的划分。
子组件 state 的 intelliSense
同样,我们可以使用 jsDoc 注释让子组件中 state 的具有智能提示,如下:
class BasicInfoView extends PureComponent {
    render(){
        /** @type {initState['basicInfo']} */
        let state = this.props.state;
        ...
    }
}class AddressView extends PureComponent {
render(){
/** @type {initState['address']} */
let state = this.props.state;
...
}
}请使用 xxx['xxx'] 的格式指明对象的子节点: /** @type {initState['address']} */。在 vs code 里,暂时无法使用 xxx.xxx 的嵌套格式指定一个变量的类型。
单实例子组件
如果某组件只在视图中出现一次,那么这种组件被称为单实例组件。这种组件可以把对子组件设计的 state 操作函数简单地封装在子组件内部,提高组件的内聚性,便于维护管理。下面以 BasicInfoView 为例,把操作按钮移入子组件,并把两个操作函数移入子组件:
...
class BasicInfoView extends PureComponent {

    increaseAge(){
        state.basicInfo.age += 1
    }

    decreaseAge(){
        state.basicInfo.age -= 1
    }

    render(){
        /** @type {initState['basicInfo']} */
        let state = this.props.state;
        return (
            <p style={{padding: 10, margin: 10}}>
                ...
                <button onClick={this.decreaseAge}> decrease age </button>
                <button onClick={this.increaseAge}> increase age </button>
            </p>
        )
    }
}
...同样,你也可以对 AddressView 做类似的处理。
下一章, 我们将会介绍如何在 pastate 中渲染和操作 state 中的数组。
这是 pastate 系列教程的第二章,欢迎关注,持续更新。
这一章,我们在上一章的 state 结构中添加多一些信息,并用多个组件来组织 pastate 应用。
相关推荐:
Pastate.js 之响应式 react state 管理框架
The above is the detailed content of Pastate.js responsive framework for multi-component applications. For more information, please follow other related articles on the PHP Chinese website!

Hot AI Tools

Undresser.AI Undress
AI-powered app for creating realistic nude photos

AI Clothes Remover
Online AI tool for removing clothes from photos.

Undress AI Tool
Undress images for free

Clothoff.io
AI clothes remover

Video Face Swap
Swap faces in any video effortlessly with our completely free AI face swap tool!

Hot Article
Hot Tools

Notepad++7.3.1
Easy-to-use and free code editor

SublimeText3 Chinese version
Chinese version, very easy to use

Zend Studio 13.0.1
Powerful PHP integrated development environment

Dreamweaver CS6
Visual web development tools

SublimeText3 Mac version
God-level code editing software (SublimeText3)
Hot Topics


 How to install the Windows 10 old version component DirectPlay
Dec 28, 2023 pm 03:43 PM
How to install the Windows 10 old version component DirectPlay
Dec 28, 2023 pm 03:43 PM
Many users always encounter some problems when playing some games on win10, such as screen freezes and blurred screens. At this time, we can solve the problem by turning on the directplay function, and the operation method of the function is also Very simple. How to install directplay, the old component of win10 1. Enter "Control Panel" in the search box and open it 2. Select large icons as the viewing method 3. Find "Programs and Features" 4. Click on the left to enable or turn off win functions 5. Select the old version here Just check the box
 How to implement an online speech recognition system using WebSocket and JavaScript
Dec 17, 2023 pm 02:54 PM
How to implement an online speech recognition system using WebSocket and JavaScript
Dec 17, 2023 pm 02:54 PM
How to use WebSocket and JavaScript to implement an online speech recognition system Introduction: With the continuous development of technology, speech recognition technology has become an important part of the field of artificial intelligence. The online speech recognition system based on WebSocket and JavaScript has the characteristics of low latency, real-time and cross-platform, and has become a widely used solution. This article will introduce how to use WebSocket and JavaScript to implement an online speech recognition system.
 WebSocket and JavaScript: key technologies for implementing real-time monitoring systems
Dec 17, 2023 pm 05:30 PM
WebSocket and JavaScript: key technologies for implementing real-time monitoring systems
Dec 17, 2023 pm 05:30 PM
WebSocket and JavaScript: Key technologies for realizing real-time monitoring systems Introduction: With the rapid development of Internet technology, real-time monitoring systems have been widely used in various fields. One of the key technologies to achieve real-time monitoring is the combination of WebSocket and JavaScript. This article will introduce the application of WebSocket and JavaScript in real-time monitoring systems, give code examples, and explain their implementation principles in detail. 1. WebSocket technology
 How to use JavaScript and WebSocket to implement a real-time online ordering system
Dec 17, 2023 pm 12:09 PM
How to use JavaScript and WebSocket to implement a real-time online ordering system
Dec 17, 2023 pm 12:09 PM
Introduction to how to use JavaScript and WebSocket to implement a real-time online ordering system: With the popularity of the Internet and the advancement of technology, more and more restaurants have begun to provide online ordering services. In order to implement a real-time online ordering system, we can use JavaScript and WebSocket technology. WebSocket is a full-duplex communication protocol based on the TCP protocol, which can realize real-time two-way communication between the client and the server. In the real-time online ordering system, when the user selects dishes and places an order
 How to implement an online reservation system using WebSocket and JavaScript
Dec 17, 2023 am 09:39 AM
How to implement an online reservation system using WebSocket and JavaScript
Dec 17, 2023 am 09:39 AM
How to use WebSocket and JavaScript to implement an online reservation system. In today's digital era, more and more businesses and services need to provide online reservation functions. It is crucial to implement an efficient and real-time online reservation system. This article will introduce how to use WebSocket and JavaScript to implement an online reservation system, and provide specific code examples. 1. What is WebSocket? WebSocket is a full-duplex method on a single TCP connection.
 Angular components and their display properties: understanding non-block default values
Mar 15, 2024 pm 04:51 PM
Angular components and their display properties: understanding non-block default values
Mar 15, 2024 pm 04:51 PM
The default display behavior for components in the Angular framework is not for block-level elements. This design choice promotes encapsulation of component styles and encourages developers to consciously define how each component is displayed. By explicitly setting the CSS property display, the display of Angular components can be fully controlled to achieve the desired layout and responsiveness.
 How to open the settings of the old version of win10 components
Dec 22, 2023 am 08:45 AM
How to open the settings of the old version of win10 components
Dec 22, 2023 am 08:45 AM
Win10 old version components need to be turned on by users themselves in the settings, because many components are usually closed by default. First we need to enter the settings. The operation is very simple. Just follow the steps below. Where are the win10 old version components? Open 1. Click Start, then click "Win System" 2. Click to enter the Control Panel 3. Then click the program below 4. Click "Enable or turn off Win functions" 5. Here you can choose what you want to open
 JavaScript and WebSocket: Building an efficient real-time weather forecasting system
Dec 17, 2023 pm 05:13 PM
JavaScript and WebSocket: Building an efficient real-time weather forecasting system
Dec 17, 2023 pm 05:13 PM
JavaScript and WebSocket: Building an efficient real-time weather forecast system Introduction: Today, the accuracy of weather forecasts is of great significance to daily life and decision-making. As technology develops, we can provide more accurate and reliable weather forecasts by obtaining weather data in real time. In this article, we will learn how to use JavaScript and WebSocket technology to build an efficient real-time weather forecast system. This article will demonstrate the implementation process through specific code examples. We
