

React Native custom component implements drawer menu control effect

1. Requirements Analysis
In native development, it is common to customize Views. Often the system controls cannot meet the actual needs. A variety of product designs require us to create different views. There are many blog posts on the Internet about custom View content. This blog will share with you how to implement drawer menu control effects with custom components in React Native. The importance of sharing function in App must be self-evident, so how to achieve this effect in RN? This article mainly introduces you to the example of the drawer menu at the bottom of the React Native custom control.
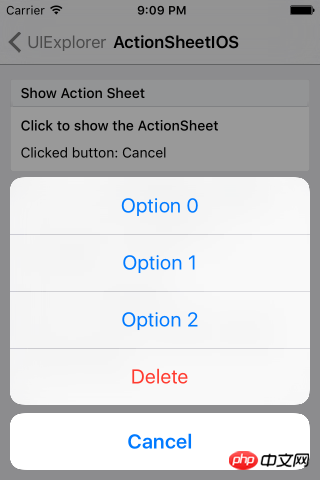
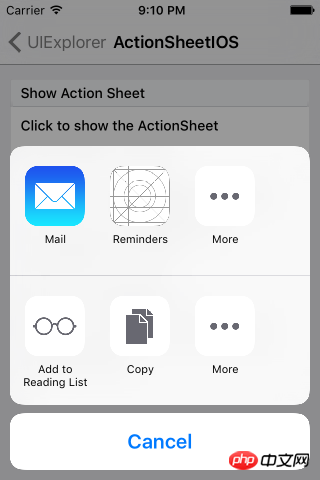
The React Native system library only provides the implementation of IOS, namely ActionSheetIOS. There are two implementations of the display mode of this control:
(1) showActionSheetWithOptions
(2) showShareActionSheetWithOptions
The first is to display an ActionSheet pop-up box on the iOS device. The second implementation is to display a share popup on the iOS device. Borrowing the official picture description is as follows:
The implementation system on IOS devices has been provided, and then we need to adapt to Android. In native development, customizing View also has a basic process:
(1) Customize the control class, inherit View or system control.
(2) Custom properties
(3) Get custom properties and initialize a series of tool classes
(4) Override the onMeasure method to measure the control
(5) If it is a custom layout, you also need to rewrite onLayout for layout
The idea of customizing components in React Native is basically similar to native customization. So according to this process, we can implement it step by step.
2. Function implementation
1. Custom component, implement Component
export default class AndroidActionSheet extends Component
2. Custom attribute
// 1.声明所需要的属性
static propTypes= {
  title: React.PropTypes.string, // 标题
  content: React.PropTypes.object, // 内容
  show: React.PropTypes.func, // 显示
  hide: React.PropTypes.func, // 隐藏
}constructor(props) {
super(props);
this.translateY = 150;
this.state = {
visible: false,
sheetAnim: new Animated.Value(this.translateY)
}
this.cancel = this.cancel.bind(this);
}3. Basic implementation Layout
/**
* Modal为最外层,ScrollView为内容层
*/
render() {
    const { visible, sheetAnim } = this.state;
    return(
      <Modal
      visible={ visible }
      transparent={ true }
      animationType="none"
      onRequestClose={ this.cancel }
      >
      <View style={ styles.wrapper }>
              <TouchableOpacity style={styles.overlay} onPress={this.cancel}></TouchableOpacity>
          <Animated.View
            style={[styles.bd, {height: this.translateY, transform: [{translateY: sheetAnim}]}]}>
            { this._renderTitle() }
            <ScrollView
                      horizontal={ true }
                      showsHorizontalScrollIndicator={ false }>
              {this._renderContainer()}
            </ScrollView>
          </Animated.View>
        </View>
      </Modal>
    )
}You can see that we have defined the basic layout above. The _renderTitle() method is used in the layout to render the title part. The content area is ScrollView and it is horizontal scrolling, that is, when the menu item exceeds the screen width , you can slide horizontally to select. The renderContainer method is called internally to render the menu:
/**
* 标题
*/
_renderTitle() {
  const { title,titleStyle } = this.props;
  if (!title) {
    return null
  }
    // 确定传入的是不是一个React Element,防止渲染的时候出错
  if (React.isValidElement(title)) {
    return (
      <View style={styles.title}>{title}</View>
    )
  }
  return (
    <Text style={[styles.titleText,titleStyle]}>{title}</Text>
  )
}

/**
* 内容布局
*/
_renderContainer() {
    const { content } = this.props;
    return (
      <View style={styles.container}>
        { content }
      </View>
    )
}When we need to click Modal to close, we also need to process the closing operation. Modal does not provide us with external closing processing, so we need to implement it separately, from In the layout code, we see TouchableOpacity as the mask layer, and add a stand-alone event, calling cancel to process:
/**
 * 控制Modal点击关闭,Android返回键关闭
 */
 cancel() {
  this.hide();
}4. Custom method, external call
Externally we need to control the control Display and hide, so the method of displaying and closing needs to be disclosed to the outside world:
/**
 * 显示
 */
show() {
  this.setState({visible: true})
  Animated.timing(this.state.sheetAnim, {
    toValue: 0,
    duration: 250
  }).start();
}/**
* 隐藏
*/
hide() {
this.setState({ visible: false })
Animated.timing(this.state.sheetAnim, {
toValue: this.translateY,
duration: 150
}).start();
}5. Use
<ActionSheet
ref='sheet'
title='分享'
content={this._renderContent()}
/>At this point, our custom component is completed. Overall, the basic principle is still very simple. It can be easily implemented by mainly using custom attributes, parameter transfer, and animation. The focus of this blog is not to let everyone know how to write this effect, but to let everyone understand how to implement it step by step when we encounter an implementation that needs to be customized.
3. Rendering

Related recommendations:
Drawer menu for WeChat mini program development Detailed explanation of examples
The above is the detailed content of React Native custom component implements drawer menu control effect. For more information, please follow other related articles on the PHP Chinese website!

Hot AI Tools

Undresser.AI Undress
AI-powered app for creating realistic nude photos

AI Clothes Remover
Online AI tool for removing clothes from photos.

Undress AI Tool
Undress images for free

Clothoff.io
AI clothes remover

Video Face Swap
Swap faces in any video effortlessly with our completely free AI face swap tool!

Hot Article
Hot Tools

Notepad++7.3.1
Easy-to-use and free code editor

SublimeText3 Chinese version
Chinese version, very easy to use

Zend Studio 13.0.1
Powerful PHP integrated development environment

Dreamweaver CS6
Visual web development tools

SublimeText3 Mac version
God-level code editing software (SublimeText3)
Hot Topics


 How to quickly set up a custom avatar in Netflix
Feb 19, 2024 pm 06:33 PM
How to quickly set up a custom avatar in Netflix
Feb 19, 2024 pm 06:33 PM
An avatar on Netflix is a visual representation of your streaming identity. Users can go beyond the default avatar to express their personality. Continue reading this article to learn how to set a custom profile picture in the Netflix app. How to quickly set a custom avatar in Netflix In Netflix, there is no built-in feature to set a profile picture. However, you can do this by installing the Netflix extension on your browser. First, install a custom profile picture for the Netflix extension on your browser. You can buy it in the Chrome store. After installing the extension, open Netflix on your browser and log into your account. Navigate to your profile in the upper right corner and click
 Guide to React front-end and back-end separation: How to achieve decoupling and independent deployment of front-end and back-end
Sep 28, 2023 am 10:48 AM
Guide to React front-end and back-end separation: How to achieve decoupling and independent deployment of front-end and back-end
Sep 28, 2023 am 10:48 AM
React front-end and back-end separation guide: How to achieve front-end and back-end decoupling and independent deployment, specific code examples are required In today's web development environment, front-end and back-end separation has become a trend. By separating front-end and back-end code, development work can be made more flexible, efficient, and facilitate team collaboration. This article will introduce how to use React to achieve front-end and back-end separation, thereby achieving the goals of decoupling and independent deployment. First, we need to understand what front-end and back-end separation is. In the traditional web development model, the front-end and back-end are coupled
 How to build a reliable messaging app with React and RabbitMQ
Sep 28, 2023 pm 08:24 PM
How to build a reliable messaging app with React and RabbitMQ
Sep 28, 2023 pm 08:24 PM
How to build a reliable messaging application with React and RabbitMQ Introduction: Modern applications need to support reliable messaging to achieve features such as real-time updates and data synchronization. React is a popular JavaScript library for building user interfaces, while RabbitMQ is a reliable messaging middleware. This article will introduce how to combine React and RabbitMQ to build a reliable messaging application, and provide specific code examples. RabbitMQ overview:
 How to customize shortcut key settings in Eclipse
Jan 28, 2024 am 10:01 AM
How to customize shortcut key settings in Eclipse
Jan 28, 2024 am 10:01 AM
How to customize shortcut key settings in Eclipse? As a developer, mastering shortcut keys is one of the keys to improving efficiency when coding in Eclipse. As a powerful integrated development environment, Eclipse not only provides many default shortcut keys, but also allows users to customize them according to their own preferences. This article will introduce how to customize shortcut key settings in Eclipse and give specific code examples. Open Eclipse First, open Eclipse and enter
 React Router User Guide: How to implement front-end routing control
Sep 29, 2023 pm 05:45 PM
React Router User Guide: How to implement front-end routing control
Sep 29, 2023 pm 05:45 PM
ReactRouter User Guide: How to Implement Front-End Routing Control With the popularity of single-page applications, front-end routing has become an important part that cannot be ignored. As the most popular routing library in the React ecosystem, ReactRouter provides rich functions and easy-to-use APIs, making the implementation of front-end routing very simple and flexible. This article will introduce how to use ReactRouter and provide some specific code examples. To install ReactRouter first, we need
 The operation process of edius custom screen layout
Mar 27, 2024 pm 06:50 PM
The operation process of edius custom screen layout
Mar 27, 2024 pm 06:50 PM
1. The picture below is the default screen layout of edius. The default EDIUS window layout is a horizontal layout. Therefore, in a single-monitor environment, many windows overlap and the preview window is in single-window mode. 2. You can enable [Dual Window Mode] through the [View] menu bar to make the preview window display the playback window and recording window at the same time. 3. You can restore the default screen layout through [View menu bar>Window Layout>General]. In addition, you can also customize the layout that suits you and save it as a commonly used screen layout: drag the window to a layout that suits you, then click [View > Window Layout > Save Current Layout > New], and in the pop-up [Save Current Layout] Layout] enter the layout name in the small window and click OK
 PHP, Vue and React: How to choose the most suitable front-end framework?
Mar 15, 2024 pm 05:48 PM
PHP, Vue and React: How to choose the most suitable front-end framework?
Mar 15, 2024 pm 05:48 PM
PHP, Vue and React: How to choose the most suitable front-end framework? With the continuous development of Internet technology, front-end frameworks play a vital role in Web development. PHP, Vue and React are three representative front-end frameworks, each with its own unique characteristics and advantages. When choosing which front-end framework to use, developers need to make an informed decision based on project needs, team skills, and personal preferences. This article will compare the characteristics and uses of the three front-end frameworks PHP, Vue and React.
 Integration of Java framework and front-end React framework
Jun 01, 2024 pm 03:16 PM
Integration of Java framework and front-end React framework
Jun 01, 2024 pm 03:16 PM
Integration of Java framework and React framework: Steps: Set up the back-end Java framework. Create project structure. Configure build tools. Create React applications. Write REST API endpoints. Configure the communication mechanism. Practical case (SpringBoot+React): Java code: Define RESTfulAPI controller. React code: Get and display the data returned by the API.
