
 Web Front-end
JS Tutorial
Spring shiro bootstrap jquery.validate implementation method of login and registration functions
Web Front-end
JS Tutorial
Spring shiro bootstrap jquery.validate implementation method of login and registration functions
Spring shiro bootstrap jquery.validate implementation method of login and registration functions

This article mainly introduces Spring shiro + bootstrap + jquery.validate to implement login and registration functions. Friends who need it can refer to it. I hope it can help everyone.
In the previous article, we have already built the framework and designed the database.
Now we start to implement the login function, which can be said to be the most common function of Web applications.
Let’s talk about our login logic first:
Enter user name and password (validate for front-end verification) - ajax calls the background action method - calls the business layer to the data layer according to the user name Query database information - compare the queried password with the password entered by the user - shiro login authentication - store user information in session - respond to the front end - front end jump
This is what I want to tell you poses, and there are many, many more poses. Let's look at the specific code below.
First, front-end verification, jquery.validate is used here for verification. The use of jquery.validate is very simple. Here we talk about the way to save js:
$().ready(function() {
 /**登录验证**/
 $("#login_form").validate({
  rules: {
   loginAccount: "required",
   loginPass: {
    required: true,
    minlength: 5
   },
  },
  messages: {
   loginAccount: "请输入姓名",
   loginPass: {
    required: "请输入密码",
    minlength: jQuery.format("密码不能小于{0}个字 符")
   },
  },
  submitHandler:function(form){
   $.ajax({
    dataType : "json",
    url : "sysuser/login.action",
    type : "post",
    data : $("#login_form").serialize(),
    success : function(data) {
     $.alert(data.message);
     if(data.success){
      window.location.href = 'page/main.action';
     }
    },
    error : function (e){
     var d = e.responseJSON;
     if(d){
      $.alert(d.message);
     }
    }
   });
   return false; //阻止form提交
  }
 });
 /**注册验证**/
 $("#register_form").validate({
  rules: {
   loginAccount:{
    required:true,
    remote: {
     url: "sysuser/getUserNameCount.action",
     type: "post",
     dataType: "json",
     data: {
      loginAccount: function () {
       return $("#register_account").val();
      }
     },
     dataFilter: function (data) {    //判断控制器返回的内容
      data = jQuery.parseJSON(data);
      return data.success;
     }
    }
   },
   loginPass: {
    required: true,
    minlength: 5,
    maxlength:20
   },
   rloginPass: {
    equalTo: "#register_password"
   },
   userEmail: {
    required: true,
    email: true,
    remote: {
     url: "sysuser/getEMailCount.action",
     type: "post",
     dataType: "json",
     data: {
      email: function () {
       return $("#register_email").val();
      }
     },
     dataFilter: function (data) {    //判断控制器返回的内容
      data = jQuery.parseJSON(data);
      return data.success;
     }
    }
   }
  },
  messages: {
   loginAccount:{
    required: "请输入姓名",
    remote: "用户名已存在"
   },
   loginPass: {
    required: "请输入密码",
    minlength: jQuery.format("密码不能小于{0}个字 符"),
    maxlength: jQuery.format("密码不能大于{0}个字 符"),
   },
   rloginPass: {
    required: "请输入确认密码",
    equalTo: "两次密码不一样"
   },
   userEmail: {
    required: "请输入邮箱",
    email: "请输入有效邮箱",
    remote: "邮箱已存在"
   }
  },
  submitHandler:function(form){
   $.ajax({
    dataType : "json",
    url : "sysuser/register.action",
    type : "post",
    data : $("#register_form").serialize(),
    success : function(data) {
     $.alert(data.message);
     if(data.success){
      window.location.href = 'page/main.action';
     }
    },
    error : function (e){
     var d = e.responseJSON;
     if(d){
      $.alert(d.message);
     }
    }
   });
   return false; //阻止form提交
  }
 });
 /**隐藏显示登录注册**/
 $("#register_btn").click(function() {
  $("#register_form").css("display", "block");
  $("#login_form").css("display", "none");
 });
 $("#back_btn").click(function() {
  $("#register_form").css("display", "none");
  $("#login_form").css("display", "block");
 });
});
html page:
<%@ page language="java" import="java.util.*" pageEncoding="UTF-8"%>
<%@ taglib prefix="c" uri="http://java.sun.com/jsp/jstl/core"%>
<c:set var="contextPath" value="${pageContext.request.contextPath}"></c:set>
<!DOCTYPE html>
<html lang="en">
<head>
<meta charset="utf-8">
<meta http-equiv="X-UA-Compatible" content="IE=edge">
<meta name="viewport" content="width=device-width, initial-scale=1">
<meta name="description" content="">
<meta name="author" content="">
<title>主页</title>
<!-- Bootstrap core CSS -->
<link href="${contextPath }/static/bootstrap/css/bootstrap.min.css" rel="external nofollow" rel="stylesheet">
<link href="${contextPath }/static/bootstrap/css/font-awesome.min.css" rel="external nofollow" rel="stylesheet">
<link href="${contextPath }/static/alert/jquery-confirm.min.css" rel="external nofollow" rel="stylesheet">
<style type="text/css">
body {
background: url(${contextPath }/static/img/login/bg.jpg) no-repeat;
background-size: cover;
font-size: 16px;
}
.form {
background: rgba(255, 255, 255, 0.2);
width: 400px;
margin: 100px auto;
}
#login_form {
display: block;
}
#register_form {
display: none;
}
.fa {
display: inline-block;
top: 27px;
left: 6px;
position: relative;
color: #ccc;
}
input[type="text"], input[type="password"] {
padding-left: 26px;
}
.checkbox {
padding-left: 21px;
}
</style>
<!-- HTML5 shim and Respond.js for IE8 support of HTML5 elements and media queries -->
<!--[if lt IE 9]>
<script src="${contextPath }/static/bootstrap/html5shiv/html5shiv.js"></script>
<script src="${contextPath }/static/bootstrap/respond/respond.min.js"></script>
<![endif]-->
</head>
<body>
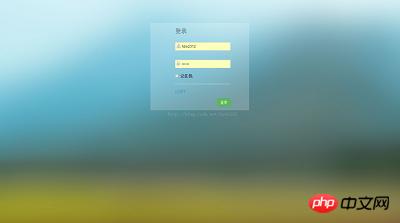
<p class="container">
<p class="form row">
<form class="form-horizontal col-sm-offset-3 col-md-offset-3" id="login_form">
<h3 class="form-title">登录</h3>
<p class="col-sm-9 col-md-9">
<p class="form-group">
<i class="fa fa-user fa-lg"></i> <input
class="form-control required" type="text" placeholder="请输入账号"
name="loginAccount" autofocus="autofocus" maxlength="20" />
</p>
<p class="form-group">
<i class="fa fa-lock fa-lg"></i> <input
class="form-control required" type="password"
placeholder="请输入密码" name="loginPass" maxlength="8" />
</p>
<p class="form-group">
<label class="checkbox"> <input type="checkbox"
name="rememberMe" value="1" /> 记住我
</label>
<hr />
<a href="javascript:;" rel="external nofollow" id="register_btn" class="">注册?</a>
</p>
<p class="form-group">
<input type="submit" class="btn btn-success pull-right" value="登录 " />
</p>
</p>
</form>
</p>
<p class="form row">
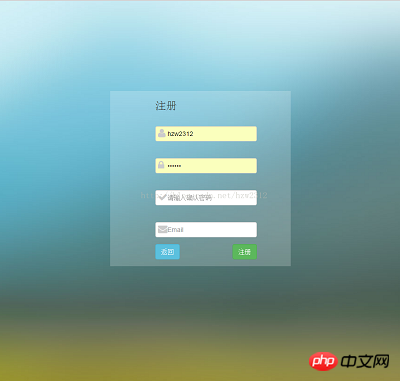
<form class="form-horizontal col-sm-offset-3 col-md-offset-3" id="register_form">
<h3 class="form-title">注册</h3>
<p class="col-sm-9 col-md-9">
<p class="form-group">
<i class="fa fa-user fa-lg"></i> <input
class="form-control required" type="text" placeholder="请输入账号"
name="loginAccount" autofocus="autofocus" id="register_account" />
</p>
<p class="form-group">
<i class="fa fa-lock fa-lg"></i> <input
class="form-control required" type="password"
placeholder="请输入密码" id="register_password" name="loginPass" />
</p>
<p class="form-group">
<i class="fa fa-check fa-lg"></i> <input
class="form-control required" type="password"
placeholder="请输入确认密码" name="rloginPass" />
</p>
<p class="form-group">
<i class="fa fa-envelope fa-lg"></i> <input
class="form-control eamil" type="text" placeholder="Email"
name="userEmail" id="register_email"/>
</p>
<p class="form-group">
<input type="submit" class="btn btn-success pull-right"
value="注册" /> <input type="submit"
class="btn btn-info pull-left" id="back_btn" value="返回" />
</p>
</p>
</form>
</p>
</p>
<script type="text/javascript" src="${contextPath }/static/jquery/jquery.min.js"></script>
<script type="text/javascript" src="${contextPath }/static/bootstrap/js/bootstrap.min.js"></script>
<script type="text/javascript" src="${contextPath }/static/alert/jquery-confirm.min.js" ></script>
<script type="text/javascript" src="${contextPath }/static/jquery/jquery.validate.min.js" ></script>
<script type="text/javascript" src="${contextPath }/static/login/login.js" ></script>
</body>
</html>In the $("#login_form").validate({...}) method, login_form is The id of the form you want to verify; rules are the fields to be verified; messages are the content to be prompted. If not filled in, the default message will be prompted; submitHandler is the callback method after clicking the submit button, and the final return here false is to prevent the submission of the form, because I want to submit it here using ajax; there is an attribute remote in the loginAccount field in the registration. This is for ajax verification. Before submitting the form, we verify the user entered by the user. Whether the name already exists in the system.
When we are programming, we find that there are always several methods used in the same code layer, such as obtaining user session in the control layer, or outputting response information, etc.; in the dao layer Call Hibernate's save method, update method, delete method, etc. Therefore, we should establish some common tool classes or Base methods in the early stages of framework construction. Next, we will create a new BaseController method and let subsequent controllers inherit it.
import java.io.IOException;
import javax.servlet.http.HttpServletRequest;
import javax.servlet.http.HttpServletResponse;
import javax.servlet.http.HttpSession;
import org.springframework.web.bind.annotation.ModelAttribute;
import com.fasterxml.jackson.core.JsonEncoding;
import com.fasterxml.jackson.core.JsonFactory;
import com.fasterxml.jackson.core.JsonGenerator;
import com.fasterxml.jackson.databind.ObjectMapper;
import yfkj.gz.task.entity.SysUser;
import yfkj.gz.task.util.Result;
/**
 * 父类控制器
 * @author 胡汉三
 * @date 2017年1月9日 下午5:23:52
 */
@SuppressWarnings("deprecation")
public class BaseController{
 public static final String USER_SESSION = "USER_SESSION";
 protected static ObjectMapper mapper = new ObjectMapper();
 protected static JsonFactory factory = mapper.getJsonFactory();
 protected static Result result = new Result();
 protected HttpServletRequest request;
 protected HttpServletResponse response;
 protected HttpSession session;
 @ModelAttribute
 public void setReqAndRes(HttpServletRequest request, HttpServletResponse response){
  this.request = request;
  this.response = response;
  this.session = request.getSession();
 }
 /**将json字符串输出**/
 protected void writeJSON(String json) throws IOException {
  response.setContentType("text/html;charset=utf-8");
  response.getWriter().write(json);
 }
 /**将对象转成json输出**/
 protected void writeJSON(Object obj) throws IOException {
  response.setContentType("text/html;charset=utf-8");
  JsonGenerator responseJsonGenerator = factory.createJsonGenerator(response.getOutputStream(), JsonEncoding.UTF8);
  responseJsonGenerator.writeObject(obj);
 }
 /**
  * 获得session用户对象
  * @return
  */
 protected SysUser getUser(){
  Object userObj = session.getAttribute(USER_SESSION);
  if(userObj == null){
   return null;
  }
  return (SysUser)userObj;
 }
}User's controller SysUserController:
package yfkj.gz.task.controller;
import java.io.IOException;
import java.util.Date;
import java.util.List;
import javax.annotation.Resource;
import org.apache.shiro.SecurityUtils;
import org.apache.shiro.authc.UsernamePasswordToken;
import org.apache.shiro.crypto.hash.Sha256Hash;
import org.apache.shiro.subject.Subject;
import org.springframework.stereotype.Controller;
import org.springframework.web.bind.annotation.RequestMapping;
import org.springframework.web.bind.annotation.RequestMethod;
import yfkj.gz.task.entity.SysRole;
import yfkj.gz.task.entity.SysUser;
import yfkj.gz.task.service.ISysRoleService;
import yfkj.gz.task.service.ISysUserService;
import yfkj.gz.task.util.DateUtil;
import yfkj.gz.task.util.StringUtils;
import yfkj.gz.support.BTView;
import yfkj.gz.support.controller.BaseController;
/**
 * 用户控制器
 * @author 胡汉三
 * @date 2017年1月16日 下午2:31:39
 */
@Controller
@RequestMapping("/sysuser")
public class SysUserController extends BaseController{
 @Resource
 private ISysUserService userService;
 @Resource
 private ISysRoleService roleService;
 /**
  * 分页查询用户
  * @param response
  * @param user
  * @param btView
  * @throws IOException
  */
 @RequestMapping(value = "/findUser", method = { RequestMethod.POST, RequestMethod.GET })
 public void findUser(SysUser user,BTView<SysUser> btView) throws IOException{
  List<SysUser> list = userService.findSysUserPage(btView, null);
  btView.setRows(list);
  super.writeJSON(btView);
 }
 /**
  * 用户登录
  * @param response
  * @param user
  * @throws IOException
  */
 @RequestMapping(value = "/login", method = { RequestMethod.POST, RequestMethod.GET })
 public void login(SysUser user,boolean rememberMe) throws IOException{
  //用户登录
  SysUser userInfo = userService.getByProerties(new String[]{"loginAccount"}, new String[]{user.getLoginAccount()},null);
  if(userInfo==null){
   result.setMessage("用户名错误");
   super.writeJSON(result);
   return;
  }
  if(!userInfo.getLoginPass().equals(new Sha256Hash(user.getLoginPass()).toHex())){
   result.setMessage("密码错误");
   super.writeJSON(result);
   return;
  }
  //存入session
  Subject subject = SecurityUtils.getSubject();
  //记得传入明文密码
  subject.login(new UsernamePasswordToken(userInfo.getLoginAccount(), user.getLoginPass(), rememberMe));
  session.setAttribute(USER_SESSION, userInfo);
  result.setMessage("登录成功");
  result.setSuccess(true);
  super.writeJSON(result);
 }
 /**
  * 用户注册
  * @param response
  * @param user
  * @throws IOException
  */
 @RequestMapping(value = "/register", method = { RequestMethod.POST, RequestMethod.GET })
 public void register(SysUser user) throws IOException{
  Long count = userService.getCountByProerties(new String[]{"loginAccount"}, new String[]{user.getLoginAccount()});
  if(count>0){
   result.setMessage("账号已存在");
   super.writeJSON(result);
   return;
  }
  Long countEmail = userService.getCountByProerties(new String[]{"userEmail"}, new String[]{user.getUserEmail()});
  if(countEmail>0){
   result.setMessage("邮箱已存在");
   super.writeJSON(result);
   return;
  }
  try{
   //注册时间
   user.setRegisterTime(DateUtil.getDateTime(new Date()));
   //Sha256Hash加密
   user.setLoginPass(new Sha256Hash(user.getLoginPass()).toHex());
   //默认为注册用户
   SysRole role = roleService.getByProerties(new String[]{"roleKey"},new String[]{"ROLE_USER"},null);
   user.getRoles().add(role);
   userService.save(user);
   //存入session
   Subject subject = SecurityUtils.getSubject();
   subject.login(new UsernamePasswordToken(user.getLoginAccount(), user.getLoginPass()));
   session.setAttribute(USER_SESSION, user);
   result.setMessage("注册成功");
   result.setSuccess(true);
  }catch(Exception e){
   result.setMessage("注册失败");
  }
  super.writeJSON(result);
 }
 /**
  * 判断用户账号是否已存在
  * @param response
  * @param user
  * @throws IOException
  */
 @RequestMapping(value = "/getUserNameCount", method = { RequestMethod.POST, RequestMethod.GET })
 public void getUserNameCount(String loginAccount) throws IOException{
  result.setSuccess(false);
  if(StringUtils.isBlank(loginAccount)){
   result.setMessage("账号不能为空");
   super.writeJSON(result);
   return;
  }
  Long count = userService.getCountByProerties(new String[]{"loginAccount"}, new String[]{loginAccount});
  if(count>0){
   result.setMessage("账号已存在");
  }else{
   result.setSuccess(true);
   result.setMessage("该账号可用");
  }
  super.writeJSON(result);
 }
 /**
  * 判断用户邮箱是否已存在
  * @param response
  * @param email
  * @throws IOException
  */
 @RequestMapping(value = "/getEMailCount", method = { RequestMethod.POST, RequestMethod.GET })
 public void getEMailCount(String email) throws IOException{
  result.setSuccess(false);
  if(StringUtils.isBlank(email)){
   result.setMessage("邮箱不能为空");
   super.writeJSON(result);
   return;
  }
  Long count = userService.getCountByProerties(new String[]{"userEmail"}, new String[]{email});
  if(count>0){
   result.setMessage("邮箱已存在");
  }else{
   result.setSuccess(true);
   result.setMessage("该邮箱可用");
  }
  super.writeJSON(result);
 }
 // 登出
 @RequestMapping("/logout")
 public void logout() throws IOException {
  //退出权限验证
  SecurityUtils.getSubject().logout();
  //销毁session
  session.invalidate();
  response.sendRedirect(request.getContextPath()+"/login.jsp");
 }
}At this point, log in and register OK!
jquery-confirm.js is also used, which is a pop-up box plug-in: click to view
related recommendations :
vue realizes that the page jumps to the previous page after login. Example sharing
AJAX method to realize the non-refresh login function
Judge whether the user is logged in when vue route jumps
The above is the detailed content of Spring shiro bootstrap jquery.validate implementation method of login and registration functions. For more information, please follow other related articles on the PHP Chinese website!

Hot AI Tools

Undresser.AI Undress
AI-powered app for creating realistic nude photos

AI Clothes Remover
Online AI tool for removing clothes from photos.

Undress AI Tool
Undress images for free

Clothoff.io
AI clothes remover

Video Face Swap
Swap faces in any video effortlessly with our completely free AI face swap tool!

Hot Article
Hot Tools

Notepad++7.3.1
Easy-to-use and free code editor

SublimeText3 Chinese version
Chinese version, very easy to use

Zend Studio 13.0.1
Powerful PHP integrated development environment

Dreamweaver CS6
Visual web development tools

SublimeText3 Mac version
God-level code editing software (SublimeText3)
Hot Topics


 How to get the bootstrap search bar
Apr 07, 2025 pm 03:33 PM
How to get the bootstrap search bar
Apr 07, 2025 pm 03:33 PM
How to use Bootstrap to get the value of the search bar: Determines the ID or name of the search bar. Use JavaScript to get DOM elements. Gets the value of the element. Perform the required actions.
 How to use bootstrap in vue
Apr 07, 2025 pm 11:33 PM
How to use bootstrap in vue
Apr 07, 2025 pm 11:33 PM
Using Bootstrap in Vue.js is divided into five steps: Install Bootstrap. Import Bootstrap in main.js. Use the Bootstrap component directly in the template. Optional: Custom style. Optional: Use plug-ins.
 How to do vertical centering of bootstrap
Apr 07, 2025 pm 03:21 PM
How to do vertical centering of bootstrap
Apr 07, 2025 pm 03:21 PM
Use Bootstrap to implement vertical centering: flexbox method: Use the d-flex, justify-content-center, and align-items-center classes to place elements in the flexbox container. align-items-center class method: For browsers that do not support flexbox, use the align-items-center class, provided that the parent element has a defined height.
 How to write split lines on bootstrap
Apr 07, 2025 pm 03:12 PM
How to write split lines on bootstrap
Apr 07, 2025 pm 03:12 PM
There are two ways to create a Bootstrap split line: using the tag, which creates a horizontal split line. Use the CSS border property to create custom style split lines.
 How to insert pictures on bootstrap
Apr 07, 2025 pm 03:30 PM
How to insert pictures on bootstrap
Apr 07, 2025 pm 03:30 PM
There are several ways to insert images in Bootstrap: insert images directly, using the HTML img tag. With the Bootstrap image component, you can provide responsive images and more styles. Set the image size, use the img-fluid class to make the image adaptable. Set the border, using the img-bordered class. Set the rounded corners and use the img-rounded class. Set the shadow, use the shadow class. Resize and position the image, using CSS style. Using the background image, use the background-image CSS property.
 How to set up the framework for bootstrap
Apr 07, 2025 pm 03:27 PM
How to set up the framework for bootstrap
Apr 07, 2025 pm 03:27 PM
To set up the Bootstrap framework, you need to follow these steps: 1. Reference the Bootstrap file via CDN; 2. Download and host the file on your own server; 3. Include the Bootstrap file in HTML; 4. Compile Sass/Less as needed; 5. Import a custom file (optional). Once setup is complete, you can use Bootstrap's grid systems, components, and styles to create responsive websites and applications.
 How to use bootstrap button
Apr 07, 2025 pm 03:09 PM
How to use bootstrap button
Apr 07, 2025 pm 03:09 PM
How to use the Bootstrap button? Introduce Bootstrap CSS to create button elements and add Bootstrap button class to add button text
 How to resize bootstrap
Apr 07, 2025 pm 03:18 PM
How to resize bootstrap
Apr 07, 2025 pm 03:18 PM
To adjust the size of elements in Bootstrap, you can use the dimension class, which includes: adjusting width: .col-, .w-, .mw-adjust height: .h-, .min-h-, .max-h-
