
 Web Front-end
JS Tutorial
Implementation of slider carousel effect with submenus and controls in JavaScript
Web Front-end
JS Tutorial
Implementation of slider carousel effect with submenus and controls in JavaScript
Implementation of slider carousel effect with submenus and controls in JavaScript

You may have done the project of infinite scrolling pictures (photo carousel), but if you use ordinary scrolling, when you reach the last picture, you will scroll back to the first picture. This is a very bad user experience. . Through this article, I will share with you the effect of slider carousel with submenus and controls based on JavaScript. The specific implementation code is as follows:
Achievement effect:
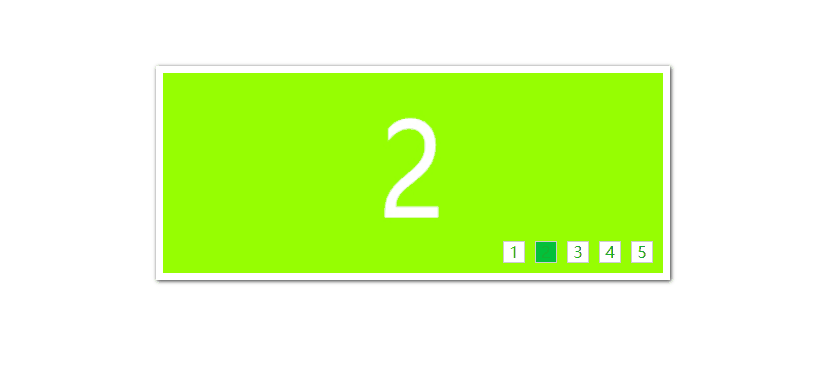
Implementation principle:
// Steps
// 1. Obtain the event source and related elements
// 2. Copy the li where the first picture is located and add it to the end of ul
// 3. Add li to ol, the number in ul -1, and light the first button
// 4. Put the mouse on ol's li to switch pictures
// 5. Add a timer
// 6. Switch pictures left and right (put the mouse on it to hide it, move it away to show it)
Implementation code:
<!DOCTYPE html>
<html>
<head>
  <title>轮播图</title>
  <meta charset="utf-8">
  <style type="text/css">
    *{
      padding: 0;
      margin: 0;
      list-style: none;
      border: 0;
    }
    .all{
      width: 500px;
      height: 200px;
      padding: 7px;
      margin: 100px auto;
      position: relative;
      box-shadow: 1px 1px 5px #2d2d2d;
    }
    .screen{
      width: 500px;
      height: 200px;
      overflow: hidden;
      position: relative;
    }
    .screen li{
      width: 500px;
      height: 200px;
      overflow: hidden;
      float: left;
    }
    .screen ul{
      position: absolute;
      left: 0;
      top: 0;
      width: 3000px;
    }
    .all ol{
      position: absolute;
      right: 10px;
      bottom: 10px;
      line-height: 20px;
      text-align: center;
    }
    .all ol li{
      float: left;
      width: 20px;
      height: 20px;
      text-align: center;
      background-color: #fff;
      border: 1px solid #ccc;
      margin-left: 10px;
      cursor: pointer;
    }
    .all ol li.current{
      background-color: #03c03c;
    }
    #arr{
      display: none;
    }
    #arr span{
      width: 40px;
      height: 40px;
      left: 5px;
      top: 50%;
      position: absolute;
      margin-top: -20px;
      background-color: #000;
      cursor: pointer;
      line-height: 35px;
      text-align: center;
      font-weight: bold;
      font-family: "微软雅黑";
      font-size: 30px;
      color: #fff;
      opacity: 0.3;
      border-radius: 50%;
      box-shadow: 1px 1px 3px #2d2d2d;
    }
    #arr #right{
      right: 5px;
      left: auto;
    }
  </style>
</head>
<body>
<p class="all" id="all">
  <p class="screen" id="screen">
    <ul id="ul">
      <li><img src="./images/01.jpg" width="500" height="200"></li>
      <li><img src="./images/02.jpg" width="500" height="200"></li>
      <li><img src="./images/03.jpg" width="500" height="200"></li>
      <li><img src="./images/04.jpg" width="500" height="200"></li>
      <li><img src="./images/05.jpg" width="500" height="200"></li>
    </ul>
    <!-- 图片子菜单 -->
    <ol>
    </ol>
    <!-- 左右切换按钮 -->
    <p id="arr">
      <span id="left"><</span>
      <span id="right">></span>
    </p>
  </p>
</p>
<!-- script -->
<script type="text/javascript">
  // 赋值第一张图片放到ul的最后,当图片切换到第五张的时候,直接切换第六张,再从第一张切换到第二张的时候先瞬间切换到第一张图片,然后滑倒第二张
  // 步骤
  // 1. 获取事件源以及相关元素
  // 2. 复制第一张图片所在的li,添加到ul的最后面
  // 3. 给ol添加li,ul中的个数-1个,并点亮第一个按钮
  // 4. 鼠标放到ol的li上切换图片
  // 5. 添加定时器
  // 6. 左右切换图片(鼠标放上去隐藏,移开显示)
  // 1. 获取事件源以及相关元素
  var all = document.getElementById("all");
  var screen = all.firstElementChild || all.firstChild;
  var imgWidth = screen.offsetWidth;
  var ul = screen.firstElementChild || screen.firstChild;
  var ol = screen.children[1];
  var p = screen.lastElementChild || screen.lastChild;
  var spanArr = p.children;
  // 2. 复制第一张图片所在的li,添加到ul的最后面
  var ulNewLi = ul.children[0].cloneNode(true);
  ul.appendChild(ulNewLi);
  // 3. 给ol添加li,ul中的个数-1个,并点亮第一个按钮
  for(var i=0; i<ul.children.length-1; i++){
    var olNewLi = document.createElement("li");
    olNewLi.innerHTML = i+1;
    ol.appendChild(olNewLi);
  }
  var olLiArr = ol.children;
  olLiArr[0].className = "current";
  // 4. 鼠标放到ol的li上切换图片
  for(var i=0; i<olLiArr.length; i++){
    // 自定义属性,把索引值绑定到元素的index属性上
    olLiArr[i].index = i;
    olLiArr[i].onmouseover = function(){
      // 排他思想
      for(var j=0; j<olLiArr.length; j++){
        olLiArr[j].className = "";
      }
      this.className = "current"
      // 鼠标放到小方块上时,索引值和key以及square同步
      // key = this.index;
      // square = this.index;
      key = square = this.index;
      // 移动盒子
      animate(ul, -this.index*imgWidth);
    }
  }
  // 5. 添加定时器
  var timer = setInterval(autoPlay, 1000);
  // 固定向右切换图片
  // 两个定时器(一个记录图片,一个记录子菜单栏)
  var key = 0;
  var square = 0;
  function autoPlay(){
    // 通过key的自增来模拟图片的索引值,然后移动ul
    key++;
    if(key > olLiArr.length){
      // 图片已经滑到最后一张,接下来应该跳转到第一张,然后滑动到第二张
      ul.style.left = 0;
      key = 1;
    }
    animate(ul, -key*imgWidth);
    // 通过控制square的自增来模拟小方块的索引值,然后点亮盒子
    // 排他思想做小方块
    square++;
    if(square > olLiArr.length-1){
      // 索引值不能大于5,如果大于5则立即变为0;
      square = 0;
    }
    for(var i=0; i<olLiArr.length; i++){
      olLiArr[i].className = "";
    }
    olLiArr[square].className = "current";
  }
  // 鼠标放上去清除定时器,移开启动定时器
  all.onmouseover = function(){
    p.style.display = "block";
    clearInterval(timer);
  }
  all.onmouseout = function(){
    p.style.display = "none";
    timer = setInterval(autoPlay,1000);
  }
  // 6. 左右切换图片(鼠标放上去显示,移开隐藏)
  spanArr[0].onclick = function(){
    // 通过控制key的自增来模拟图片的索引值,然后移动ul
    key--;
    if(key<0){
      // 先移到最后一张,然后key的值取前一张的索引值,然后向前移动
      ul.style.left = -imgWidth*(olLiArr.length) + "px";
      key = olLiArr.length-1;
    }
    animate(ul, -key*imgWidth);
    // 通过控制square的自增来模拟小方块的索引值,然后点亮小方块
    square--;
    if(square<0){
      // 索引值不能大于等于5,如果为5,立即变为0
      square = olLiArr.length-1;
    }
    for(var i=0; i<olLiArr.length; i++){
      olLiArr[i].className = "";
    }
    olLiArr[square].className = "current";
  }
  spanArr[1].onclick = function(){
    // 右侧的和定时器一模一样
    autoPlay();
  }
  // 动画封装
  var absSpeed = 10; //设定步长
  function animate(ele, target){
    clearInterval(ele.timer);
    var speed = target > ele.offsetLeft ? absSpeed : -absSpeed;
    ele.timer = setInterval(function(){
      var val = target - ele.offsetLeft;
      ele.style.left = ele.offsetLeft + speed + "px";
      if(Math.abs(val) < Math.abs(speed)){
        ele.style.left = target + "px";
        clearInterval(ele.timer);
      }
    }, 10)
  }
</script>
</body>
</html>Summary
The above is the detailed content of Implementation of slider carousel effect with submenus and controls in JavaScript. For more information, please follow other related articles on the PHP Chinese website!

Hot AI Tools

Undresser.AI Undress
AI-powered app for creating realistic nude photos

AI Clothes Remover
Online AI tool for removing clothes from photos.

Undress AI Tool
Undress images for free

Clothoff.io
AI clothes remover

Video Face Swap
Swap faces in any video effortlessly with our completely free AI face swap tool!

Hot Article
Hot Tools

Notepad++7.3.1
Easy-to-use and free code editor

SublimeText3 Chinese version
Chinese version, very easy to use

Zend Studio 13.0.1
Powerful PHP integrated development environment

Dreamweaver CS6
Visual web development tools

SublimeText3 Mac version
God-level code editing software (SublimeText3)
Hot Topics


 How to implement an online speech recognition system using WebSocket and JavaScript
Dec 17, 2023 pm 02:54 PM
How to implement an online speech recognition system using WebSocket and JavaScript
Dec 17, 2023 pm 02:54 PM
How to use WebSocket and JavaScript to implement an online speech recognition system Introduction: With the continuous development of technology, speech recognition technology has become an important part of the field of artificial intelligence. The online speech recognition system based on WebSocket and JavaScript has the characteristics of low latency, real-time and cross-platform, and has become a widely used solution. This article will introduce how to use WebSocket and JavaScript to implement an online speech recognition system.
 Recommended: Excellent JS open source face detection and recognition project
Apr 03, 2024 am 11:55 AM
Recommended: Excellent JS open source face detection and recognition project
Apr 03, 2024 am 11:55 AM
Face detection and recognition technology is already a relatively mature and widely used technology. Currently, the most widely used Internet application language is JS. Implementing face detection and recognition on the Web front-end has advantages and disadvantages compared to back-end face recognition. Advantages include reducing network interaction and real-time recognition, which greatly shortens user waiting time and improves user experience; disadvantages include: being limited by model size, the accuracy is also limited. How to use js to implement face detection on the web? In order to implement face recognition on the Web, you need to be familiar with related programming languages and technologies, such as JavaScript, HTML, CSS, WebRTC, etc. At the same time, you also need to master relevant computer vision and artificial intelligence technologies. It is worth noting that due to the design of the Web side
 WebSocket and JavaScript: key technologies for implementing real-time monitoring systems
Dec 17, 2023 pm 05:30 PM
WebSocket and JavaScript: key technologies for implementing real-time monitoring systems
Dec 17, 2023 pm 05:30 PM
WebSocket and JavaScript: Key technologies for realizing real-time monitoring systems Introduction: With the rapid development of Internet technology, real-time monitoring systems have been widely used in various fields. One of the key technologies to achieve real-time monitoring is the combination of WebSocket and JavaScript. This article will introduce the application of WebSocket and JavaScript in real-time monitoring systems, give code examples, and explain their implementation principles in detail. 1. WebSocket technology
 Essential tools for stock analysis: Learn the steps to draw candle charts with PHP and JS
Dec 17, 2023 pm 06:55 PM
Essential tools for stock analysis: Learn the steps to draw candle charts with PHP and JS
Dec 17, 2023 pm 06:55 PM
Essential tools for stock analysis: Learn the steps to draw candle charts in PHP and JS. Specific code examples are required. With the rapid development of the Internet and technology, stock trading has become one of the important ways for many investors. Stock analysis is an important part of investor decision-making, and candle charts are widely used in technical analysis. Learning how to draw candle charts using PHP and JS will provide investors with more intuitive information to help them make better decisions. A candlestick chart is a technical chart that displays stock prices in the form of candlesticks. It shows the stock price
 How to use JavaScript and WebSocket to implement a real-time online ordering system
Dec 17, 2023 pm 12:09 PM
How to use JavaScript and WebSocket to implement a real-time online ordering system
Dec 17, 2023 pm 12:09 PM
Introduction to how to use JavaScript and WebSocket to implement a real-time online ordering system: With the popularity of the Internet and the advancement of technology, more and more restaurants have begun to provide online ordering services. In order to implement a real-time online ordering system, we can use JavaScript and WebSocket technology. WebSocket is a full-duplex communication protocol based on the TCP protocol, which can realize real-time two-way communication between the client and the server. In the real-time online ordering system, when the user selects dishes and places an order
 How to implement an online reservation system using WebSocket and JavaScript
Dec 17, 2023 am 09:39 AM
How to implement an online reservation system using WebSocket and JavaScript
Dec 17, 2023 am 09:39 AM
How to use WebSocket and JavaScript to implement an online reservation system. In today's digital era, more and more businesses and services need to provide online reservation functions. It is crucial to implement an efficient and real-time online reservation system. This article will introduce how to use WebSocket and JavaScript to implement an online reservation system, and provide specific code examples. 1. What is WebSocket? WebSocket is a full-duplex method on a single TCP connection.
 JavaScript and WebSocket: Building an efficient real-time weather forecasting system
Dec 17, 2023 pm 05:13 PM
JavaScript and WebSocket: Building an efficient real-time weather forecasting system
Dec 17, 2023 pm 05:13 PM
JavaScript and WebSocket: Building an efficient real-time weather forecast system Introduction: Today, the accuracy of weather forecasts is of great significance to daily life and decision-making. As technology develops, we can provide more accurate and reliable weather forecasts by obtaining weather data in real time. In this article, we will learn how to use JavaScript and WebSocket technology to build an efficient real-time weather forecast system. This article will demonstrate the implementation process through specific code examples. We
 PHP and JS Development Tips: Master the Method of Drawing Stock Candle Charts
Dec 18, 2023 pm 03:39 PM
PHP and JS Development Tips: Master the Method of Drawing Stock Candle Charts
Dec 18, 2023 pm 03:39 PM
With the rapid development of Internet finance, stock investment has become the choice of more and more people. In stock trading, candle charts are a commonly used technical analysis method. It can show the changing trend of stock prices and help investors make more accurate decisions. This article will introduce the development skills of PHP and JS, lead readers to understand how to draw stock candle charts, and provide specific code examples. 1. Understanding Stock Candle Charts Before introducing how to draw stock candle charts, we first need to understand what a candle chart is. Candlestick charts were developed by the Japanese
