
 Web Front-end
H5 Tutorial
html5 Canvas drawing tutorial (3)—The reason why 1-pixel lines are blurred on canvas_html5 tutorial skills
Web Front-end
H5 Tutorial
html5 Canvas drawing tutorial (3)—The reason why 1-pixel lines are blurred on canvas_html5 tutorial skills
html5 Canvas drawing tutorial (3)—The reason why 1-pixel lines are blurred on canvas_html5 tutorial skills

Continuing from the previous article Canvas line drawing tutorial
As we mentioned last time, canvas sometimes has 1 pixel lines that are blurred and appear to be wider, as shown below: 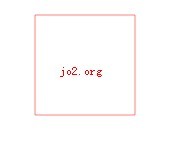
Such a line is obviously not what we want.
The purpose of this article is to clarify the principle and solve it.
Everyone knows that the smallest display size on the screen is 1 pixel. Although things smaller than 1 pixel may not be displayed, the computer does not care, it will try to draw it.
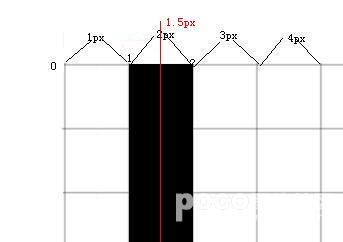
In fact, pixels are also a unit after all. What would happen if we enlarged the canvas to a size large enough to see each pixel clearly? It probably looks like this:
Each pixel has a starting and ending range, as shown in the figure, their range starts from the left, spans 1 pixel, and ends on the right.
If we follow the starting and ending range of pixels when drawing a 1-pixel line, then we will definitely get a very standard thin line. As follows:
But unfortunately, the line drawing method of canvas is different. As we have said in the previous article, each line of canvas has an infinitely thin "center line", and the width of the line extends from the center line to both sides. . If we still draw a line from the second pixel, then the center line of the line will be aligned with the starting point of the second pixel, and then we start drawing, and the problem arises: the line of the Canvas extends to both sides from the center line. Instead of extending to a certain side (for example, here, if it only extends to the right, then our problem is no longer a problem), after extending, our line actually looks like this:
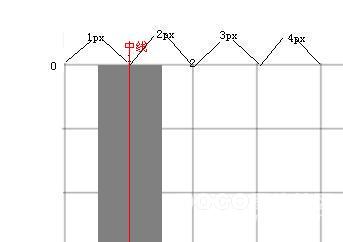
There was another problem at this time: the computer does not allow graphics smaller than 1px, so he made a compromise: draw both pixels.
So, in this way, the original 1px line becomes a line that looks 2px wide.
The reason for the failure was found: the line in the Canvas aligned the center line with the starting point of the pixel, not the middle point of the pixel.
So how do we solve this painful problem? Maybe someone has already thought: Since the starting points of the two are different, let's make their starting points the same!
We just need to align the center line of the line with the middle point of the pixel!
The middle point of the pixel is easy to find. For example, the middle point of the second pixel is located at 1.5 pixels according to the explanation on the picture. Then the middle point of the x pixel is (x-0.5)px.
Of course, in less rigorous situations, you can also use x 0.5.
Now let’s try out our research results on canvas.
ctx.moveTo(100.5,100.5);
ctx.lineTo(200.5,100.5);
ctx.lineTo(200.5,200.5);
ctx.lineTo(100.5,200.5);
ctx.lineTo(100.5,100.5);
ctx.closePath();
ctx.lineWidth = 1;
ctx.strokeStyle = 'rgba(255,0,0,0.5)';
ctx.stroke();

Looks right?
But it seems that this makes us very confused when drawing the line. Do we have to add this depressing 0.5 every time? Of course not, because most of the time we use variables to save values, we don’t need to add 0.5 to each value
Moreover, for lines with lineWidth>1, we don’t need to worry about it: because only when the line width is 1px , this problem is the most obvious.

Hot AI Tools

Undresser.AI Undress
AI-powered app for creating realistic nude photos

AI Clothes Remover
Online AI tool for removing clothes from photos.

Undress AI Tool
Undress images for free

Clothoff.io
AI clothes remover

Video Face Swap
Swap faces in any video effortlessly with our completely free AI face swap tool!

Hot Article
Hot Tools

Notepad++7.3.1
Easy-to-use and free code editor

SublimeText3 Chinese version
Chinese version, very easy to use

Zend Studio 13.0.1
Powerful PHP integrated development environment

Dreamweaver CS6
Visual web development tools

SublimeText3 Mac version
God-level code editing software (SublimeText3)
Hot Topics


 How to blur photos with Yitian camera
Feb 23, 2024 pm 06:40 PM
How to blur photos with Yitian camera
Feb 23, 2024 pm 06:40 PM
You can blur the photos in Yitian Camera, so how to blur the photos? Users can click Edit to select a photo, then click Effects and select Blur to blur the photo. This introduction to how to blur photos can tell you the specific content. The following is a detailed introduction, come and take a look! Yitian Camera usage tutorial. How to blur photos with Yitian Camera. Answer: Go to Edit-Special Effects-Blur. The specific process: 1. First open the app and click Edit on the lower left. 2. Then click on a picture and click the edit button. 3. Then click the special effects button below. 4. You can find the blur function below. 5. Then select the magnification of the blur.
 How to solve the problem of blurry wallpaper in win11
Jan 02, 2024 pm 09:05 PM
How to solve the problem of blurry wallpaper in win11
Jan 02, 2024 pm 09:05 PM
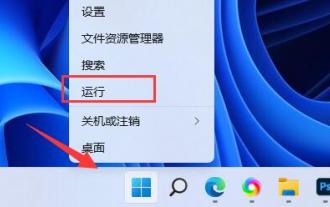
Sometimes the wallpaper is blurred when using Win11. I don’t know what’s going on. In fact, we can solve it by modifying the registry or application compatibility. Win11 wallpaper blur solution: 1. Desktop blur 1. If the desktop is blurred, you can right-click the bottom start menu and open "Run" 2. Then enter "regedit" and press Enter to open the registry. 3. After opening, go to the "Computer\HKEY_CURRENT_USER\ControlPanel\Desktop" location. 4. After entering, right-click on the blank space and select Create a new "DWORD Value" 5. Rename it to "JPEGImportQuality" and double-click to open the data.
 What are the canvas arrow plug-ins?
Aug 21, 2023 pm 02:14 PM
What are the canvas arrow plug-ins?
Aug 21, 2023 pm 02:14 PM
The canvas arrow plug-ins include: 1. Fabric.js, which has a simple and easy-to-use API and can create custom arrow effects; 2. Konva.js, which provides the function of drawing arrows and can create various arrow styles; 3. Pixi.js , which provides rich graphics processing functions and can achieve various arrow effects; 4. Two.js, which can easily create and control arrow styles and animations; 5. Arrow.js, which can create various arrow effects; 6. Rough .js, you can create hand-drawn arrows, etc.
 Learn the canvas framework and explain the commonly used canvas framework in detail
Jan 17, 2024 am 11:03 AM
Learn the canvas framework and explain the commonly used canvas framework in detail
Jan 17, 2024 am 11:03 AM
Explore the Canvas framework: To understand what are the commonly used Canvas frameworks, specific code examples are required. Introduction: Canvas is a drawing API provided in HTML5, through which we can achieve rich graphics and animation effects. In order to improve the efficiency and convenience of drawing, many developers have developed different Canvas frameworks. This article will introduce some commonly used Canvas frameworks and provide specific code examples to help readers gain a deeper understanding of how to use these frameworks. 1. EaselJS framework Ea
 What are the details of the canvas clock?
Aug 21, 2023 pm 05:07 PM
What are the details of the canvas clock?
Aug 21, 2023 pm 05:07 PM
The details of the canvas clock include clock appearance, tick marks, digital clock, hour, minute and second hands, center point, animation effects, other styles, etc. Detailed introduction: 1. Clock appearance, you can use Canvas to draw a circular dial as the appearance of the clock, and you can set the size, color, border and other styles of the dial; 2. Scale lines, draw scale lines on the dial to represent hours or minutes. Position; 3. Digital clock, you can draw a digital clock on the dial to indicate the current hour and minute; 4. Hour hand, minute hand, second hand, etc.
 What versions of html2canvas are there?
Aug 22, 2023 pm 05:58 PM
What versions of html2canvas are there?
Aug 22, 2023 pm 05:58 PM
The versions of html2canvas include html2canvas v0.x, html2canvas v1.x, etc. Detailed introduction: 1. html2canvas v0.x, which is an early version of html2canvas. The latest stable version is v0.5.0-alpha1. It is a mature version that has been widely used and verified in many projects; 2. html2canvas v1.x, this is a new version of html2canvas.
 uniapp implements how to use canvas to draw charts and animation effects
Oct 18, 2023 am 10:42 AM
uniapp implements how to use canvas to draw charts and animation effects
Oct 18, 2023 am 10:42 AM
How to use canvas to draw charts and animation effects in uniapp requires specific code examples 1. Introduction With the popularity of mobile devices, more and more applications need to display various charts and animation effects on the mobile terminal. As a cross-platform development framework based on Vue.js, uniapp provides the ability to use canvas to draw charts and animation effects. This article will introduce how uniapp uses canvas to achieve chart and animation effects, and give specific code examples. 2. canvas
 What properties does tkinter canvas have?
Aug 21, 2023 pm 05:46 PM
What properties does tkinter canvas have?
Aug 21, 2023 pm 05:46 PM
The tkinter canvas attributes include bg, bd, relief, width, height, cursor, highlightbackground, highlightcolor, highlightthickness, insertbackground, insertwidth, selectbackground, selectforeground, xscrollcommand attributes, etc. Detailed introduction
