

H5 realizes rotating three-dimensional Rubik's cube
This time I will bring you H5 to realize the rotating three-dimensional Rubik's Cube. What are the precautions for H5 to realize the rotating three-dimensional Rubik's Cube. The following is a practical case, let's take a look.
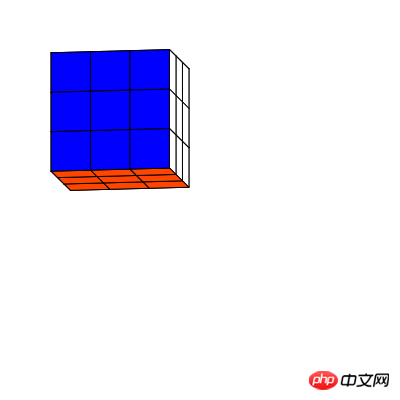
The following is the preview screen.
##Production process
First you need to downloadHtml5Open source library lufylegend-1.4.0
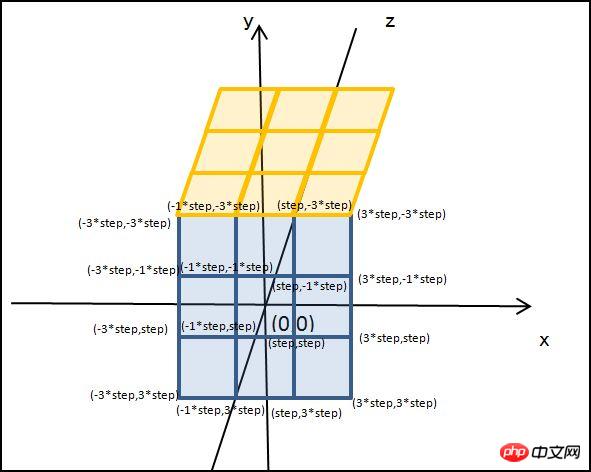
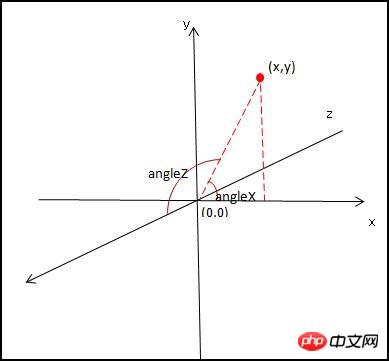
The Rubik's Cube is divided into 6 faces, each face is composed of 9 small rectangles. Now I encapsulate each small rectangle as a class, Because what is being built now is a 3D Rubik's Cube, so to draw each small rectangle, you need to know the 4 fixed points of the small rectangle, and these 4 fixed points will transform according to the rotation angle of the space, so in order to calculate these 4 For fixed-point coordinates, you need to know the angle of rotation of the Rubik's Cube around the x-axis and z-axis. So, create a rectangle class as followsfunction Rect(pointA,pointB,pointC,pointD,angleX,angleZ,color){
base(this,LSprite,[]);
this.pointZ=[(pointA[0]+pointB[0]+pointC[0]+pointD[0])/4,(pointA[1]+pointB[1]+pointC[1]+pointD[1])/4,(pointA[2]+pointB[2]+pointC[2]+pointD[2])/4];
this.z = this.pointZ[2];
this.pointA=pointA,this.pointB=pointB,this.pointC=pointC,this.pointD=pointD,this.angleX=angleX,this.angleZ=angleZ,this.color=color;
}
Rect.prototype.setAngle = function(a,b){
this.angleX = a;
this.angleZ = b;
this.z=this.getPoint(this.pointZ)[2];
};
for(var x=0;x<3;x++){
    for(var y=0;y<3;y++){
        z = 3;
        var rect = new Rect([-3*step + x*2*step,-3*step + y*2*step,-3*step + z*2*step],[-step + x*2*step,-3*step + y*2*step,-3*step + z*2*step],[-step + x*2*step,-step + y*2*step,-3*step + z*2*step],[-3*step + x*2*step,-step + y*2*step,-3*step + z*2*step],0,0,"#FF0000");
        backLayer.addChild(rect);
    }
}
Rect.prototype.getPoint = function(p){
    var u2,v2,w2,u=p[0],v=p[1],w=p[2];
    u2 = u * Math.cos(this.angleX) - v * Math.sin(this.angleX);
    v2 = u * Math.sin(this.angleX) + v * Math.cos(this.angleX);
    w2 = w;
    u = u2; v = v2; w = w2;
    u2 = u;
    v2 = v * Math.cos(this.angleZ) - w * Math.sin(this.angleZ);
    w2 = v * Math.sin(this.angleZ) + w * Math.cos(this.angleZ);
    u = u2; v = v2; w = w2;
    return [u2,v2,w2];
};Rect.prototype.draw = function(layer){
this.graphics.clear();
this.graphics.drawVertices(1,"#000000",[this.getPoint(this.pointA),this.getPoint(this.pointB),this.getPoint(this.pointC),this.getPoint(this.pointD)],true,this.color);
};array.
Finally, the complete code is given. There is very little code and a total of 91 lines of JS code.1, index.html
<!DOCTYPE html> <html> <head> <meta charset="UTF-8"> <title>3D魔方</title> </head> <body> <p id="mylegend">loading……</p> <script type="text/javascript" src="../lufylegend-1.4.0.min.js"></script> <script type="text/javascript" src="./Main.js"></script> <script type="text/javascript" src="./Rect.js"></script> </body> </html>
2, Rect class
function Rect(pointA,pointB,pointC,pointD,angleX,angleZ,color){
base(this,LSprite,[]);
this.pointZ=[(pointA[0]+pointB[0]+pointC[0]+pointD[0])/4,(pointA[1]+pointB[1]+pointC[1]+pointD[1])/4,(pointA[2]+pointB[2]+pointC[2]+pointD[2])/4];
this.z = this.pointZ[2];
this.pointA=pointA,this.pointB=pointB,this.pointC=pointC,this.pointD=pointD,this.angleX=angleX,this.angleZ=angleZ,this.color=color;
}
Rect.prototype.draw = function(layer){
    this.graphics.clear();
    this.graphics.drawVertices(1,"#000000",[this.getPoint(this.pointA),this.getPoint(this.pointB),this.getPoint(this.pointC),this.getPoint(this.pointD)],true,this.color);
};
Rect.prototype.setAngle = function(a,b){
this.angleX = a;
this.angleZ = b;
this.z=this.getPoint(this.pointZ)[2];
};
Rect.prototype.getPoint = function(p){
var u2,v2,w2,u=p[0],v=p[1],w=p[2];
u2 = u * Math.cos(this.angleX) - v * Math.sin(this.angleX);
v2 = u * Math.sin(this.angleX) + v * Math.cos(this.angleX);
w2 = w;
u = u2; v = v2; w = w2;
u2 = u;
v2 = v * Math.cos(this.angleZ) - w * Math.sin(this.angleZ);
w2 = v * Math.sin(this.angleZ) + w * Math.cos(this.angleZ);
u = u2; v = v2; w = w2;
return [u2,v2,w2];
};Three, Main.js
init(50,"mylegend",400,400,main);
var a = 0,b=0,backLayer,step = 20,key = null;
function main(){
    backLayer = new LSprite();
    addChild(backLayer);
    backLayer.x = 120,backLayer.y = 120;
    //后
    for(var x=0;x<3;x++){
        for(var y=0;y<3;y++){
            z = 0;
            var rect = new Rect([-3*step + x*2*step,-3*step + y*2*step,-3*step + z*2*step],[-step + x*2*step,-3*step + y*2*step,-3*step + z*2*step],[-step + x*2*step,-step + y*2*step,-3*step + z*2*step],[-3*step + x*2*step,-step + y*2*step,-3*step + z*2*step],0,0,"#FF4500");
            backLayer.addChild(rect);
        }
    }
    //前
    for(var x=0;x<3;x++){
        for(var y=0;y<3;y++){
            z = 3;
            var rect = new Rect([-3*step + x*2*step,-3*step + y*2*step,-3*step + z*2*step],[-step + x*2*step,-3*step + y*2*step,-3*step + z*2*step],[-step + x*2*step,-step + y*2*step,-3*step + z*2*step],[-3*step + x*2*step,-step + y*2*step,-3*step + z*2*step],0,0,"#FF0000");
            backLayer.addChild(rect);
        }
    }
    //上
    for(var x=0;x<3;x++){
        for(var z=0;z<3;z++){
            y = 0;
            var rect = new Rect([-3*step + x*2*step,-3*step + y*2*step,-3*step + z*2*step],[-step + x*2*step,-3*step + y*2*step,-3*step + z*2*step],[-step + x*2*step,-3*step + y*2*step,-step + z*2*step],[-3*step + x*2*step,-3*step + y*2*step,-step + z*2*step],0,0,"#FFFFFF");
            backLayer.addChild(rect);
        }
    }
    //下
    for(var x=0;x<3;x++){
        for(var z=0;z<3;z++){
            y = 3;
            var rect = new Rect([-3*step + x*2*step,-3*step + y*2*step,-3*step + z*2*step],[-step + x*2*step,-3*step + y*2*step,-3*step + z*2*step],[-step + x*2*step,-3*step + y*2*step,-step + z*2*step],[-3*step + x*2*step,-3*step + y*2*step,-step + z*2*step],0,0,"#FFFF00");
            backLayer.addChild(rect);
        }
    }
    //左
    for(var y=0;y<3;y++){
        for(var z=0;z<3;z++){
            x = 0;
            var rect = new Rect([-3*step + x*2*step,-3*step + y*2*step,-3*step + z*2*step],[-3*step + x*2*step,-3*step + y*2*step,-step + z*2*step],[-3*step + x*2*step,-step + y*2*step,-step + z*2*step],[-3*step + x*2*step,-step + y*2*step,-3*step + z*2*step],0,0,"#008000");
            backLayer.addChild(rect);
        }
    }
    //右
    for(var y=0;y<3;y++){
        for(var z=0;z<3;z++){
            x = 3;
            var rect = new Rect([-3*step + x*2*step,-3*step + y*2*step,-3*step + z*2*step],[-3*step + x*2*step,-3*step + y*2*step,-step + z*2*step],[-3*step + x*2*step,-step + y*2*step,-step + z*2*step],[-3*step + x*2*step,-step + y*2*step,-3*step + z*2*step],0,0,"#0000FF");
            backLayer.addChild(rect);
        }
    }
    backLayer.addEventListener(LEvent.ENTER_FRAME,onframe);
}
function onframe(){
    a += 0.1 , b += 0.1;
    backLayer.childList = backLayer.childList.sort(function(a,b){return a.z - b.z;});
    for(key in backLayer.childList){
        backLayer.childList[key].setAngle(a,b);
        backLayer.childList[key].draw(backLayer);
   }
}spring mvc+localResizeIMG implements H5 image compression and upload
Detailed explanation of canvas drawing api usage
The above is the detailed content of H5 realizes rotating three-dimensional Rubik's cube. For more information, please follow other related articles on the PHP Chinese website!

Hot AI Tools

Undresser.AI Undress
AI-powered app for creating realistic nude photos

AI Clothes Remover
Online AI tool for removing clothes from photos.

Undress AI Tool
Undress images for free

Clothoff.io
AI clothes remover

Video Face Swap
Swap faces in any video effortlessly with our completely free AI face swap tool!

Hot Article
Hot Tools

Notepad++7.3.1
Easy-to-use and free code editor

SublimeText3 Chinese version
Chinese version, very easy to use

Zend Studio 13.0.1
Powerful PHP integrated development environment

Dreamweaver CS6
Visual web development tools

SublimeText3 Mac version
God-level code editing software (SublimeText3)
Hot Topics


 Table Border in HTML
Sep 04, 2024 pm 04:49 PM
Table Border in HTML
Sep 04, 2024 pm 04:49 PM
Guide to Table Border in HTML. Here we discuss multiple ways for defining table-border with examples of the Table Border in HTML.
 Nested Table in HTML
Sep 04, 2024 pm 04:49 PM
Nested Table in HTML
Sep 04, 2024 pm 04:49 PM
This is a guide to Nested Table in HTML. Here we discuss how to create a table within the table along with the respective examples.
 HTML margin-left
Sep 04, 2024 pm 04:48 PM
HTML margin-left
Sep 04, 2024 pm 04:48 PM
Guide to HTML margin-left. Here we discuss a brief overview on HTML margin-left and its Examples along with its Code Implementation.
 HTML Table Layout
Sep 04, 2024 pm 04:54 PM
HTML Table Layout
Sep 04, 2024 pm 04:54 PM
Guide to HTML Table Layout. Here we discuss the Values of HTML Table Layout along with the examples and outputs n detail.
 HTML Input Placeholder
Sep 04, 2024 pm 04:54 PM
HTML Input Placeholder
Sep 04, 2024 pm 04:54 PM
Guide to HTML Input Placeholder. Here we discuss the Examples of HTML Input Placeholder along with the codes and outputs.
 HTML Ordered List
Sep 04, 2024 pm 04:43 PM
HTML Ordered List
Sep 04, 2024 pm 04:43 PM
Guide to the HTML Ordered List. Here we also discuss introduction of HTML Ordered list and types along with their example respectively
 Moving Text in HTML
Sep 04, 2024 pm 04:45 PM
Moving Text in HTML
Sep 04, 2024 pm 04:45 PM
Guide to Moving Text in HTML. Here we discuss an introduction, how marquee tag work with syntax and examples to implement.
 HTML onclick Button
Sep 04, 2024 pm 04:49 PM
HTML onclick Button
Sep 04, 2024 pm 04:49 PM
Guide to HTML onclick Button. Here we discuss their introduction, working, examples and onclick Event in various events respectively.
