Use HTML+CSS to create a warm blue white
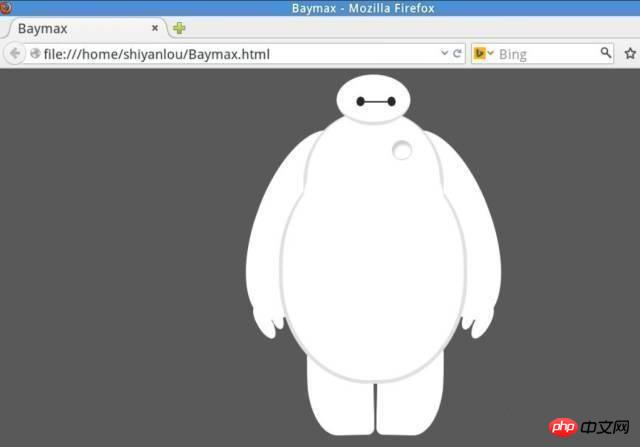
Do you still remember the "warm man" Baymax in "Super Marines"? Do you really want to have one? Let’s use HTML and CSS to create our own “Dabai”!
The final result is like this, isn’t it cute...

PS: You’d better have a certain understanding of HTML and CSS, but It doesn’t matter if you are a novice. It’s okay for a novice to meet “Dabai”!
1. Preparation
Go to the /home/shiyanlou/ directory and create a new blank document:

Name it Baymax.html (other names are also acceptable, but the suffix must be .html):
Open with gedit and prepare to edit the code:

2. Write HTML
Fill in the following code:
/span>>
html>
  head>meta charset="utf-8">title>Baymaxtitle>head>
body>
    p id="baymax">

       p id="head">
           p id="eye">p>
           p id="eye2">p>
           p id="mouth">p>
       p>

       p id="torso">
           p id="heart">p>
       p>

       p id="belly">
           p id="cover">p>
       p>

       p id="left-arm">
           p id="l-bigfinger">p>
           p id="l-smallfinger">p>
       p>

       p id="right-arm">
           p id="r-bigfinger">p>
           p id="r-smallfinger">p>
       p>

       p id="left-leg">p>

       p id="right-leg">p>
   p>
body>
html>3. Add CSS style
We have used HTML has defined each element of "Dabai", and now you need to use CSS to draw its style appearance.
Since "Dabai" is white, in order to make it easier to identify, we set the background to a dark color.
Then first the head:
body {
   background: #595959;
}
#baymax{
   /*设置为 居中*/
   margin: 0 auto;
   /*高度*/
   height: 600px;
   /*隐藏溢出*/
   overflow: hidden;
}
#head{
   height: 64px;
   width: 100px;
   /*以百分比定义圆角的形状*/
   border-radius: 50%;
   /*背景*/
   background: #fff;
   margin: 0 auto;
   margin-bottom: -20px;
   /*设置下边框的样式*/
   border-bottom: 5px solid #e0e0e0;
   /*属性设置元素的堆叠顺序;    拥有更高堆叠顺序的元素总是会处于堆叠顺序较低的元素的前面*/
   z-index: 100;
   /*生成相对定位的元素*/
   position: relative;
}Effect preview:

Hurry up and add eyes and mouth!
#eye,
#eye2{
   width: 11px;
   height: 13px;
   background: #282828;
   border-radius: 50%;
   position: relative;
   top: 30px;
   left: 27px;
   /*旋转该元素*/
   transform: rotate(8deg);
}
#eye2{
   /*使其旋转对称*/
   transform: rotate(-8deg);
   left: 69px;    top: 17px;
}
#mouth{
   width: 38px;
   height: 1.5px;
   background: #282828;
   position: relative;
   left: 34px;
   top: 10px;
}A mini "Babai", the prototype appears:

Next It’s the torso and abdomen:
#torso,
#belly{
   margin: 0 auto;
   height: 200px;
   width: 180px;
   background: #fff;
   border-radius: 47%;
   /*设置边框*/
   border: 5px solid #e0e0e0;
   border-top: none;
   z-index: 1;
}
#belly{
   height: 300px;
   width: 245px;
   margin-top: -140px;
   z-index: 5;
}
#cover{
   width: 190px;
   background: #fff;
   height: 150px;
   margin: 0 auto;
   position: relative;
   top: -20px;
   border-radius: 50%;
}The heart that gives “Baymax” a symbol of life:
#heart{
 width:25px;
 height:25px;
 border-radius:50%;
 position:relative;
 /*向边框四周添加阴影效果*/
 box-shadow:2px 5px 2px #ccc inset;
 rightright:-115px;
 top:40px;
 z-index:111;
 border:1px solid #ccc;
}
Copy after login
This is what “Baymax” looks like now :

He doesn’t have hands or feet yet, he’s so cute... "Baymax" needs warm arms:
#left-arm,
#right-arm{
   height: 270px;
   width: 120px;
   border-radius: 50%;
   background: #fff;
   margin: 0 auto;
   position: relative;
   top: -350px;
   left: -100px;
   transform: rotate(20deg);
   z-index: -1;
}
#right-arm{
   transform: rotate(-20deg);
   left: 100px;
   top: -620px;
}He doesn’t have fingers yet. :
#l-bigfinger,
#r-bigfinger{
   height: 50px;
   width: 20px;
   border-radius: 50%;
   background: #fff;
   position: relative;
   top: 250px;
   left: 50px;
   transform: rotate(-50deg);
}
#r-bigfinger{
   left: 50px;
   transform: rotate(50deg);
}
#l-smallfinger,
#r-smallfinger{
   height: 35px;
   width: 15px;
   border-radius: 50%;
   background: #fff;
   position: relative;
   top: 195px;
   left: 66px;
   transform: rotate(-40deg);
}
#r-smallfinger{
   background: #fff;
   transform: rotate(40deg);
   top: 195px;
   left: 37px;
}
Copy after login
This is interesting:

I can’t wait to add legs to "Dabai" :
#left-leg,
#right-leg{
   height: 170px;
   width: 90px;
   border-radius: 40% 30% 10px 45%;
   background: #fff;
   position: relative;
   top: -640px;
   left: -45px;
   transform: rotate(-1deg);
   z-index: -2;
   margin: 0 auto;
}
#right-leg{
   background: #fff;
   border-radius:30% 40% 45% 10px;
   margin: 0 auto;
   top: -810px;
   left: 50px;
   transform: rotate(1deg);
}
Copy after loginduang~ duang~ duang~ Stunt completed!

The warm man Dabai who belongs to you has come to your side. Doesn’t it feel very safe?
【Related Recommendations】
1. Special Recommendation:"php Programmer Toolbox" V0.1 version Download
2. Free html online video tutorial
3. php.cn original html5 video tutorial
The above is the detailed content of Use HTML+CSS to create a warm blue white. For more information, please follow other related articles on the PHP Chinese website!

Hot AI Tools

Undresser.AI Undress
AI-powered app for creating realistic nude photos

AI Clothes Remover
Online AI tool for removing clothes from photos.

Undress AI Tool
Undress images for free

Clothoff.io
AI clothes remover

Video Face Swap
Swap faces in any video effortlessly with our completely free AI face swap tool!

Hot Article

Hot Tools

Notepad++7.3.1
Easy-to-use and free code editor

SublimeText3 Chinese version
Chinese version, very easy to use

Zend Studio 13.0.1
Powerful PHP integrated development environment

Dreamweaver CS6
Visual web development tools

SublimeText3 Mac version
God-level code editing software (SublimeText3)

Hot Topics
 How to use bootstrap in vue
Apr 07, 2025 pm 11:33 PM
Using Bootstrap in Vue.js is divided into five steps: Install Bootstrap. Import Bootstrap in main.js. Use the Bootstrap component directly in the template. Optional: Custom style. Optional: Use plug-ins.
 The Roles of HTML, CSS, and JavaScript: Core Responsibilities
Apr 08, 2025 pm 07:05 PM
HTML defines the web structure, CSS is responsible for style and layout, and JavaScript gives dynamic interaction. The three perform their duties in web development and jointly build a colorful website.
 React's Role in HTML: Enhancing User Experience
Apr 09, 2025 am 12:11 AM
React combines JSX and HTML to improve user experience. 1) JSX embeds HTML to make development more intuitive. 2) The virtual DOM mechanism optimizes performance and reduces DOM operations. 3) Component-based management UI to improve maintainability. 4) State management and event processing enhance interactivity.
 Understanding HTML, CSS, and JavaScript: A Beginner's Guide
Apr 12, 2025 am 12:02 AM
WebdevelopmentreliesonHTML,CSS,andJavaScript:1)HTMLstructurescontent,2)CSSstylesit,and3)JavaScriptaddsinteractivity,formingthebasisofmodernwebexperiences.
 How to write split lines on bootstrap
Apr 07, 2025 pm 03:12 PM
There are two ways to create a Bootstrap split line: using the tag, which creates a horizontal split line. Use the CSS border property to create custom style split lines.
 How to set up the framework for bootstrap
Apr 07, 2025 pm 03:27 PM
To set up the Bootstrap framework, you need to follow these steps: 1. Reference the Bootstrap file via CDN; 2. Download and host the file on your own server; 3. Include the Bootstrap file in HTML; 4. Compile Sass/Less as needed; 5. Import a custom file (optional). Once setup is complete, you can use Bootstrap's grid systems, components, and styles to create responsive websites and applications.
 How to insert pictures on bootstrap
Apr 07, 2025 pm 03:30 PM
There are several ways to insert images in Bootstrap: insert images directly, using the HTML img tag. With the Bootstrap image component, you can provide responsive images and more styles. Set the image size, use the img-fluid class to make the image adaptable. Set the border, using the img-bordered class. Set the rounded corners and use the img-rounded class. Set the shadow, use the shadow class. Resize and position the image, using CSS style. Using the background image, use the background-image CSS property.
 How to use bootstrap button
Apr 07, 2025 pm 03:09 PM
How to use the Bootstrap button? Introduce Bootstrap CSS to create button elements and add Bootstrap button class to add button text


