

Tutorial on the use of H5 and CSS3 form validation

This article mainly introduces the use of HTML5 and CSS3 form verification functions. Friends who need it can refer to it
Client-side verification is one of the most commonly used functions of web client programs. We have used various Various js libraries are used for form verification. HTML5 actually already provides us with the form validation function. As for why it hasn’t become popular, it’s probably due to compatibility issues and also because the style is too ugly.
Below we will create an HTML5 and CSS3 form validation step by step, using only HTML and CSS.
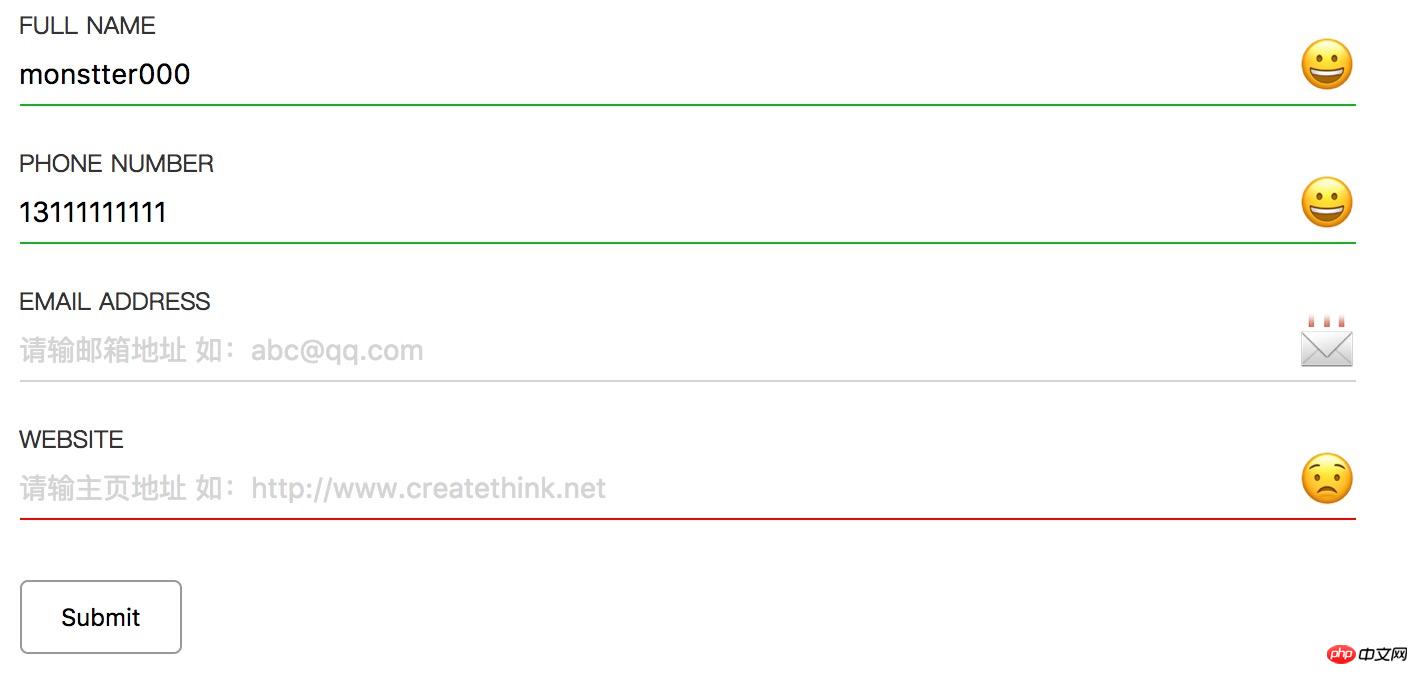
The completed one is as follows:

Step 1: Organize the validation fields and types
First we need The following fields:
Name(full name)
Phone number(phone number)
Email address(email address)
Website(website)
After the user enters some information, we need to verify the user’s information correct to avoid erroneous data and deceptive data being passed to the server.
In the new specifications of HTML5, the input input box provides a variety of input types such as: tel, email, number, range, color, etc. These types are generally not very obvious in desktop clients. If It will be more obvious on the mobile keyboard. For example, number will automatically switch to pure numbers on the mobile keyboard, and the email keyboard will automatically switch to the keyboard with @.
Step 2: Determine the form style
We also need to determine the final style of the form. Generally, this work comes from the designer. Here I found a form style on Dribbble as the demo style this time.
Step 3: Template code
Use standard HTML5 declaration code
<!DOCTYPE html>
<html>
<head>
  <meta charset="utf-8">
  <title>HTML5 Form Validation</title>
</head>
<body>
</body>
</html>
Step 4: Create a form
Create a basic form element. Here we do not submit any data, it is just a demonstration, so the form will not be submitted.
<form action="" onsubmit="return false">
</form>
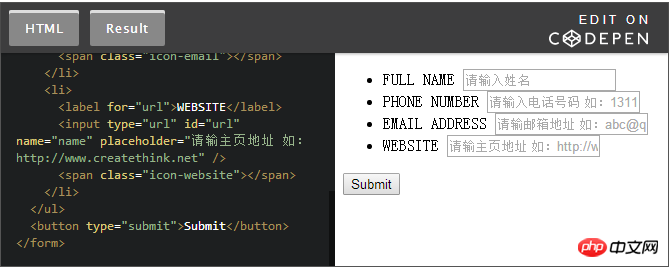
Step 5: Create the form element
The form element consists of the following elements:
ul
li
label
input
span
ul and li elements are used for typesetting and layout, and are used to separate form elements and layout. label is used for form field prompt text. input is used for users to enter data. span is used to use emoji to prompt the user whether the fields are filled in correctly.
<ul>
    <li>
      <label for="name">FULL NAME</label>
      <input type="text" id="name" name="
    name" placeholder="请输入姓名"/>
      <span class="icon-name"></span>
    </li>
</ul>The form form html code completion code is as follows:
Step 6: Add style
Complete the form When writing elements, focus on improving its style to make it look more beautiful.
body {
  display: flex;
}
form {
  padding: 0 10%;
  width: 100%;
  margin: auto;
}
ul {
  list-style-type: none;
  padding: 0;
  margin: 0;
}
li {
  position: relative;
  margin-bottom: 20px;
}
label {
  color: #333;
  display: block;
  font-size: 12px;
}
input {
  width: 100%;
  outline: none;
  border: none;
  padding: 0.5em 0;
  font-size: 14px;
  color: black;
  position: relative;
  border-bottom: 1px solid #d4d4d4;
}
input:-moz-placeholder {
  color: #d4d4d4;
}
input::-webkit-input-placeholder {
  color: #d4d4d4;
}
li span {
  display: block;
  position: absolute;
  right: 0;
  top: 10px;
  font-size: 28px;
}
button {
  cursor: pointer;
  border: 1px solid #999;
  border-radius: 4px;
  padding: 10px 20px;
  margin-top: 10px;
  background: #fff;
}css code completion code is as follows:
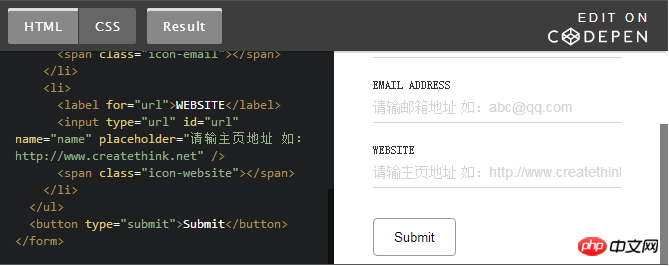
Step 7: Add EMOJI prompt
in each In the form structure, we have added a span tag. For example, in the name field, we have added a tag. Now add a style to it to display the status of the validation field.
li span {
  display: block;
  position: absolute;
  right: 0;
  top: 10px;
  font-size: 28px;
}
/*默认的是一个微笑的表情*/
li span::before {
content: '【Related Recommendations】
2. Complete the gradually glowing border through CSS3 pseudo-elements Detailed explanation of the code
3. Detailed explanation of the process of CSS3 completing the lowpoly animation effect of the image
4. Teach you to use CSS to draw a standard circular pattern
5. Use css to implement text hyperlinks and add an arrow icon to the right of the text
The above is the detailed content of Tutorial on the use of H5 and CSS3 form validation. For more information, please follow other related articles on the PHP Chinese website!

Hot AI Tools

Undresser.AI Undress
AI-powered app for creating realistic nude photos

AI Clothes Remover
Online AI tool for removing clothes from photos.

Undress AI Tool
Undress images for free

Clothoff.io
AI clothes remover

Video Face Swap
Swap faces in any video effortlessly with our completely free AI face swap tool!

Hot Article
Hot Tools

Notepad++7.3.1
Easy-to-use and free code editor

SublimeText3 Chinese version
Chinese version, very easy to use

Zend Studio 13.0.1
Powerful PHP integrated development environment

Dreamweaver CS6
Visual web development tools

SublimeText3 Mac version
God-level code editing software (SublimeText3)
Hot Topics


 Table Border in HTML
Sep 04, 2024 pm 04:49 PM
Table Border in HTML
Sep 04, 2024 pm 04:49 PM
Guide to Table Border in HTML. Here we discuss multiple ways for defining table-border with examples of the Table Border in HTML.
 Nested Table in HTML
Sep 04, 2024 pm 04:49 PM
Nested Table in HTML
Sep 04, 2024 pm 04:49 PM
This is a guide to Nested Table in HTML. Here we discuss how to create a table within the table along with the respective examples.
 HTML margin-left
Sep 04, 2024 pm 04:48 PM
HTML margin-left
Sep 04, 2024 pm 04:48 PM
Guide to HTML margin-left. Here we discuss a brief overview on HTML margin-left and its Examples along with its Code Implementation.
 HTML Table Layout
Sep 04, 2024 pm 04:54 PM
HTML Table Layout
Sep 04, 2024 pm 04:54 PM
Guide to HTML Table Layout. Here we discuss the Values of HTML Table Layout along with the examples and outputs n detail.
 HTML Input Placeholder
Sep 04, 2024 pm 04:54 PM
HTML Input Placeholder
Sep 04, 2024 pm 04:54 PM
Guide to HTML Input Placeholder. Here we discuss the Examples of HTML Input Placeholder along with the codes and outputs.
 HTML Ordered List
Sep 04, 2024 pm 04:43 PM
HTML Ordered List
Sep 04, 2024 pm 04:43 PM
Guide to the HTML Ordered List. Here we also discuss introduction of HTML Ordered list and types along with their example respectively
 Moving Text in HTML
Sep 04, 2024 pm 04:45 PM
Moving Text in HTML
Sep 04, 2024 pm 04:45 PM
Guide to Moving Text in HTML. Here we discuss an introduction, how marquee tag work with syntax and examples to implement.
 HTML onclick Button
Sep 04, 2024 pm 04:49 PM
HTML onclick Button
Sep 04, 2024 pm 04:49 PM
Guide to HTML onclick Button. Here we discuss their introduction, working, examples and onclick Event in various events respectively.
