关于面试:写一个Vue的双向数据绑定
本篇文章给大家分享的内容是关于面试:写一个Vue的双向数据绑定 ,有着一定的参考价值,有需要的朋友可以参考一下
在目前的前端面试中,vue的双向数据绑定已经成为了一个非常容易考到的点,即时不能当场写出来,至少也要能说出原理。本篇文章中我将会仿照vue写一个双向数据绑定的实例,名字就叫myVue吧。结合注释,希望能让大家有所收获。(推荐:vue面试题2020)
1、原理
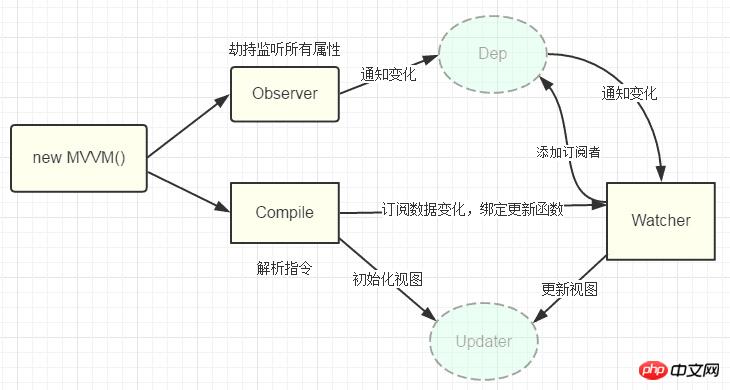
Vue的双向数据绑定的原理相信大家也都十分了解了,主要是通过 Object对象的defineProperty属性,重写data的set和get函数来实现的,这里对原理不做过多描述,只要还是来实现一个实例。为了使代码更加的清晰,这里只会实现最基本的内容,主要实现v-model,v-bind 和v-click三个命令,其他命令也可以自行补充。
添加网上的一张图

2、实现
页面结构很简单,如下
<p id="app">
    <form>
      <input type="text"  v-model="number">
      <button type="button" v-click="increment">增加</button>
    </form>
    <h3 v-bind="number"></h3>
</p>包含:
 1. 一个input,使用v-model指令
 2. 一个button,使用v-click指令
 3. 一个h3,使用v-bind指令。
我们最后会通过类似于vue的方式来使用我们的双向数据绑定,结合我们的数据结构添加注释
var app = new myVue({
      el:'#app',
      data: {
        number: 0
      },
      methods: {
        increment: function() {
          this.number ++;
        },
      }
})首先我们需要定义一个myVue构造函数:
function myVue(options) {

}为了初始化这个构造函数,给它添加一 个_init属性
function myVue(options) {
  this._init(options);
}
myVue.prototype._init = function (options) {
    this.$options = options;  // options 为上面使用时传入的结构体,包括el,data,methods
    this.$el = document.querySelector(options.el); // el是 #app, this.$el是id为app的Element元素
    this.$data = options.data; // this.$data = {number: 0}
    this.$methods = options.methods;  // this.$methods = {increment: function(){}}
}接下来实现_obverse函数,对data进行处理,重写data的set和get函数
并改造_init函数
 myVue.prototype._obverse = function (obj) { // obj = {number: 0}
    var value;
    for (key in obj) {  //遍历obj对象
      if (obj.hasOwnProperty(key)) {
        value = obj[key];
        if (typeof value === 'object') {  //如果值还是对象,则遍历处理
          this._obverse(value);
        }
        Object.defineProperty(this.$data, key, {  //关键
          enumerable: true,
          configurable: true,
          get: function () {
            console.log(`获取${value}`);
            return value;
          },
          set: function (newVal) {
            console.log(`更新${newVal}`);
            if (value !== newVal) {
              value = newVal;
            }
          }
        })
      }
    }
  }

 myVue.prototype._init = function (options) {
    this.$options = options;
    this.$el = document.querySelector(options.el);
    this.$data = options.data;
    this.$methods = options.methods;

    this._obverse(this.$data);
}接下来我们写一个指令类Watcher,用来绑定更新函数,实现对DOM元素的更新
function Watcher(name, el, vm, exp, attr) {
    this.name = name;         //指令名称,例如文本节点,该值设为"text"
    this.el = el;             //指令对应的DOM元素
    this.vm = vm;             //指令所属myVue实例
    this.exp = exp;           //指令对应的值,本例如"number"
    this.attr = attr;         //绑定的属性值,本例为"innerHTML"

    this.update();
  }

  Watcher.prototype.update = function () {
    this.el[this.attr] = this.vm.$data[this.exp]; //比如 H3.innerHTML = this.data.number; 当number改变时,
    会触发这个update函数,保证对应的DOM内容进行了更新。
}更新_init函数以及_obverse函数
myVue.prototype._init = function (options) {
    //...
    this._binding = {};   //_binding保存着model与view的映射关系,也就是我们前面定义的Watcher的实例。
    当model改变时,我们会触发其中的指令类更新,保证view也能实时更新
    //...
  }

  myVue.prototype._obverse = function (obj) {
    //...
      if (obj.hasOwnProperty(key)) {
        this._binding[key] = {    // 按照前面的数据,_binding = {number: _directives: []}
          _directives: []
        };
        //...
        var binding = this._binding[key];
        Object.defineProperty(this.$data, key, {
          //...
          set: function (newVal) {
            console.log(`更新${newVal}`);
            if (value !== newVal) {
              value = newVal;
              binding._directives.forEach(function (item) {  // 当number改变时,
              触发_binding[number]._directives 中的绑定的Watcher类的更新
                item.update();
              })
            }
          }
        })
      }
    }
}那么如何将view与model进行绑定呢?接下来我们定义一个_compile函数,用来解析我们的指令(v-bind,v-model,v-clickde)等,并在这个过程中对view与model进行绑定。
myVue.prototype._init = function (options) {
//...
this._complie(this.$el);
}
myVue.prototype._complie = function (root) { root 为 id为app的Element元素,也就是我们的根元素
var _this = this;
var nodes = root.children;
for (var i = 0; i < nodes.length; i++) {
var node = nodes[i];
if (node.children.length) { // 对所有元素进行遍历,并进行处理
this._complie(node);
}
if (node.hasAttribute('v-click')) { // 如果有v-click属性,我们监听它的onclick事件,触发increment事件,
即number++
node.onclick = (function () {
var attrVal = nodes[i].getAttribute('v-click');
return _this.$methods[attrVal].bind(_this.$data);
//bind是使data的作用域与method函数的作用域保持一致
})();
}
if (node.hasAttribute('v-model') && (node.tagName = 'INPUT' || node.tagName == 'TEXTAREA')) {
// 如果有v-model属性,并且元素是INPUT或者TEXTAREA,我们监听它的input事件
node.addEventListener('input', (function(key) {
var attrVal = node.getAttribute('v-model');
//_this._binding['number']._directives = [一个Watcher实例]
// 其中Watcher.prototype.update = function () {
// node['vaule'] = _this.$data['number']; 这就将node的值保持与number一致
// }
_this._binding[attrVal]._directives.push(new Watcher(
'input',
node,
_this,
attrVal,
'value'
))
return function() {
_this.$data[attrVal] = nodes[key].value; // 使number 的值与 node的value保持一致,
已经实现了双向绑定
}
})(i));
}
if (node.hasAttribute('v-bind')) { // 如果有v-bind属性,我们只要使node的值及时更新为data中number的值即可
var attrVal = node.getAttribute('v-bind');
_this._binding[attrVal]._directives.push(new Watcher(
'text',
node,
_this,
attrVal,
'innerHTML'
))
}
}
}至此,我们已经实现了一个简单vue的双向绑定功能,包括v-bind, v-model, v-click三个指令。效果如下图

附上全部代码,不到150行
myVue <p id="app"> <form> <input type="text" v-model="number"> <button type="button" v-click="increment">增加</button> </form> <h3 v-bind="number"></h3> </p> <script> function myVue(options) { this._init(options); } myVue.prototype._init = function (options) { this.$options = options; this.$el = document.querySelector(options.el); this.$data = options.data; this.$methods = options.methods; this._binding = {}; this._obverse(this.$data); this._complie(this.$el); } myVue.prototype._obverse = function (obj) { var value; for (key in obj) { if (obj.hasOwnProperty(key)) { this._binding[key] = { _directives: [] }; value = obj[key]; if (typeof value === 'object') { this._obverse(value); } var binding = this._binding[key]; Object.defineProperty(this.$data, key, { enumerable: true, configurable: true, get: function () { console.log(`获取${value}`); return value; }, set: function (newVal) { console.log(`更新${newVal}`); if (value !== newVal) { value = newVal; binding._directives.forEach(function (item) { item.update(); }) } } }) } } } myVue.prototype._complie = function (root) { var _this = this; var nodes = root.children; for (var i = 0; i < nodes.length; i++) { var node = nodes[i]; if (node.children.length) { this._complie(node); } if (node.hasAttribute('v-click')) { node.onclick = (function () { var attrVal = nodes[i].getAttribute('v-click'); return _this.$methods[attrVal].bind(_this.$data); })(); } if (node.hasAttribute('v-model') && (node.tagName = 'INPUT' || node.tagName == 'TEXTAREA')) { node.addEventListener('input', (function(key) { var attrVal = node.getAttribute('v-model'); _this._binding[attrVal]._directives.push(new Watcher( 'input', node, _this, attrVal, 'value' )) return function() { _this.$data[attrVal] = nodes[key].value; } })(i)); } if (node.hasAttribute('v-bind')) { var attrVal = node.getAttribute('v-bind'); _this._binding[attrVal]._directives.push(new Watcher( 'text', node, _this, attrVal, 'innerHTML' )) } } } function Watcher(name, el, vm, exp, attr) { this.name = name; //指令名称,例如文本节点,该值设为"text" this.el = el; //指令对应的DOM元素 this.vm = vm; //指令所属myVue实例 this.exp = exp; //指令对应的值,本例如"number" this.attr = attr; //绑定的属性值,本例为"innerHTML" this.update(); } Watcher.prototype.update = function () { this.el[this.attr] = this.vm.$data[this.exp]; } window.onload = function() { var app = new myVue({ el:&#39;#app&#39;, data: { number: 0 }, methods: { increment: function() { this.number ++; }, } }) } </script>
相关推荐:
以上是关于面试:写一个Vue的双向数据绑定的详细内容。更多信息请关注PHP中文网其他相关文章!

热AI工具

Undresser.AI Undress
人工智能驱动的应用程序,用于创建逼真的裸体照片

AI Clothes Remover
用于从照片中去除衣服的在线人工智能工具。

Undress AI Tool
免费脱衣服图片

Clothoff.io
AI脱衣机

Video Face Swap
使用我们完全免费的人工智能换脸工具轻松在任何视频中换脸!

热门文章

热工具

记事本++7.3.1
好用且免费的代码编辑器

SublimeText3汉化版
中文版,非常好用

禅工作室 13.0.1
功能强大的PHP集成开发环境

Dreamweaver CS6
视觉化网页开发工具

SublimeText3 Mac版
神级代码编辑软件(SublimeText3)
 开源!超越ZoeDepth! DepthFM:快速且精确的单目深度估计!
Apr 03, 2024 pm 12:04 PM
0.这篇文章干了啥?提出了DepthFM:一个多功能且快速的最先进的生成式单目深度估计模型。除了传统的深度估计任务外,DepthFM还展示了在深度修复等下游任务中的最先进能力。DepthFM效率高,可以在少数推理步骤内合成深度图。下面一起来阅读一下这项工作~1.论文信息标题:DepthFM:FastMonocularDepthEstimationwithFlowMatching作者:MingGui,JohannesS.Fischer,UlrichPrestel,PingchuanMa,Dmytr
 使用ddrescue在Linux上恢复数据
Mar 20, 2024 pm 01:37 PM
DDREASE是一种用于从文件或块设备(如硬盘、SSD、RAM磁盘、CD、DVD和USB存储设备)恢复数据的工具。它将数据从一个块设备复制到另一个块设备,留下损坏的数据块,只移动好的数据块。ddreasue是一种强大的恢复工具,完全自动化,因为它在恢复操作期间不需要任何干扰。此外,由于有了ddasue地图文件,它可以随时停止和恢复。DDREASE的其他主要功能如下:它不会覆盖恢复的数据,但会在迭代恢复的情况下填补空白。但是,如果指示工具显式执行此操作,则可以将其截断。将数据从多个文件或块恢复到单
 如何多条件使用Excel过滤功能
Feb 26, 2024 am 10:19 AM
如果您需要了解如何在Excel中使用具有多个条件的筛选功能,以下教程将指导您完成相应步骤,确保您可以有效地对数据进行筛选和排序。Excel的筛选功能是非常强大的,能够帮助您从大量数据中提取所需的信息。这个功能可以根据您设定的条件,过滤数据并只显示符合条件的部分,让数据的管理变得更加高效。通过使用筛选功能,您可以快速找到目标数据,节省了查找和整理数据的时间。这个功能不仅可以应用在简单的数据列表上,还可以根据多个条件进行筛选,帮助您更精准地定位所需信息。总的来说,Excel的筛选功能是一个非常实用的
 谷歌狂喜:JAX性能超越Pytorch、TensorFlow!或成GPU推理训练最快选择
Apr 01, 2024 pm 07:46 PM
谷歌力推的JAX在最近的基准测试中性能已经超过Pytorch和TensorFlow,7项指标排名第一。而且测试并不是在JAX性能表现最好的TPU上完成的。虽然现在在开发者中,Pytorch依然比Tensorflow更受欢迎。但未来,也许有更多的大模型会基于JAX平台进行训练和运行。模型最近,Keras团队为三个后端(TensorFlow、JAX、PyTorch)与原生PyTorch实现以及搭配TensorFlow的Keras2进行了基准测试。首先,他们为生成式和非生成式人工智能任务选择了一组主流
 iPhone上的蜂窝数据互联网速度慢:修复
May 03, 2024 pm 09:01 PM
在iPhone上面临滞后,缓慢的移动数据连接?通常,手机上蜂窝互联网的强度取决于几个因素,例如区域、蜂窝网络类型、漫游类型等。您可以采取一些措施来获得更快、更可靠的蜂窝互联网连接。修复1–强制重启iPhone有时,强制重启设备只会重置许多内容,包括蜂窝网络连接。步骤1–只需按一次音量调高键并松开即可。接下来,按降低音量键并再次释放它。步骤2–该过程的下一部分是按住右侧的按钮。让iPhone完成重启。启用蜂窝数据并检查网络速度。再次检查修复2–更改数据模式虽然5G提供了更好的网络速度,但在信号较弱
 特斯拉机器人进厂打工,马斯克:手的自由度今年将达到22个!
May 06, 2024 pm 04:13 PM
特斯拉机器人Optimus最新视频出炉,已经可以在厂子里打工了。正常速度下,它分拣电池(特斯拉的4680电池)是这样的:官方还放出了20倍速下的样子——在小小的“工位”上,拣啊拣啊拣:这次放出的视频亮点之一在于Optimus在厂子里完成这项工作,是完全自主的,全程没有人为的干预。并且在Optimus的视角之下,它还可以把放歪了的电池重新捡起来放置,主打一个自动纠错:对于Optimus的手,英伟达科学家JimFan给出了高度的评价:Optimus的手是全球五指机器人里最灵巧的之一。它的手不仅有触觉
 阿里7B多模态文档理解大模型拿下新SOTA
Apr 02, 2024 am 11:31 AM
多模态文档理解能力新SOTA!阿里mPLUG团队发布最新开源工作mPLUG-DocOwl1.5,针对高分辨率图片文字识别、通用文档结构理解、指令遵循、外部知识引入四大挑战,提出了一系列解决方案。话不多说,先来看效果。复杂结构的图表一键识别转换为Markdown格式:不同样式的图表都可以:更细节的文字识别和定位也能轻松搞定:还能对文档理解给出详细解释:要知道,“文档理解”目前是大语言模型实现落地的一个重要场景,市面上有很多辅助文档阅读的产品,有的主要通过OCR系统进行文字识别,配合LLM进行文字理
 超级智能体生命力觉醒!可自我更新的AI来了,妈妈再也不用担心数据瓶颈难题
Apr 29, 2024 pm 06:55 PM
哭死啊,全球狂炼大模型,一互联网的数据不够用,根本不够用。训练模型搞得跟《饥饿游戏》似的,全球AI研究者,都在苦恼怎么才能喂饱这群数据大胃王。尤其在多模态任务中,这一问题尤为突出。一筹莫展之际,来自人大系的初创团队,用自家的新模型,率先在国内把“模型生成数据自己喂自己”变成了现实。而且还是理解侧和生成侧双管齐下,两侧都能生成高质量、多模态的新数据,对模型本身进行数据反哺。模型是啥?中关村论坛上刚刚露面的多模态大模型Awaker1.0。团队是谁?智子引擎。由人大高瓴人工智能学院博士生高一钊创立,高


