
 Web Front-end
Vue.js
Teach you step by step how to use Vue3 to implement an elegant element dragging function
Web Front-end
Vue.js
Teach you step by step how to use Vue3 to implement an elegant element dragging function
Teach you step by step how to use Vue3 to implement an elegant element dragging function

How to implement element dragging function? The following article will take you step by step to understand how to use Vue3 to implement an elegant element dragging function, and learn relevant knowledge points through examples. I hope it will be helpful to you!

Recommend a few useful tools
- ##var-conv Suitable for VSCode IDE Quick conversion tool for code variable names
- generator-vite-plugin Quickly generate Vite plug-in template projects
- generator-babel-plugin Quickly generate Babel Plug-in template project
Get to the point
Element dragging is a typical front-end learning case, which requires a certain understanding of JavaScript events. Me too I picked up this content again in my recent work, and explained it clearly by dragging the elements once in a declarative programming style framework such as Vue3. [Related recommendations:vuejs video tutorial, web front-end development]
PS: The centered attribute in the Vue3 template global style may cause experimental interference, please pay attention! ! !The position and movement of elements
When implementing element dragging, we use themouse event, and the callback of the mouse event The position of the element when the current event occurs can be obtained in the function. The corresponding attributes are clientX and clientY in MouseEvent. We will read these two later. Property to update the element's position in real time. It is recommended to use translate
transform to move the element first, instead of modifying top and left## of the element. # Attributes will not cause changes to the element layout, avoiding the performance impact caused by reflow and redrawing. PS: There is an article about the use and experience of translate in
define a set of coordinates used to record the initial position of the element (
originalPosition) and the pointer when the element is pressed The coordinates on the element (mousedownOffset) and a set of coordinates that update in real time as the element moves (elementPosition). Record the coordinates of the initial position of the element. The origin is located in the upper left corner of the page. It is used to restore the position of the dragged element after initialization and dragging. The fixed value does not change:
const originalPosition = reactive({
  x: 10,
  y: 10,
})The coordinates of the pointer on the element when the element is pressed. The origin is located at the upper left corner of the dragged element. It is obtained by the coordinates of the pointer when pressed - the initial offset position of the element:
const mousedownOffset = reactive({
  x: 0,
  y: 0,
})The element moves in real time The updated coordinates, the origin is located in the upper left corner of the page, and the initial value should be the same as
originalPosition. When the mousemove event occurs, the real-time coordinates of the pointer - mousedownOffset are obtained: <div class="code" style="position:relative; padding:0px; margin:0px;"><pre class='brush:php;toolbar:false;'>const elementPosition = reactive({
x: 0,
y: 0,
})</pre><div class="contentsignin">Copy after login</div></div>
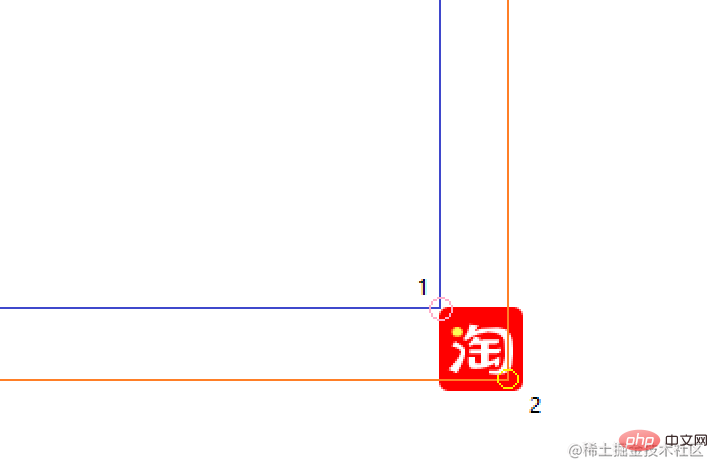 PS: When the origin is the upper left corner of the page, point 1 in the figure represents
or elementPosition, point 2 The point represents the coordinates when the pointer is pressed. When the origin is point 1, point 2 in the figure represents mousedownOffset;
When implementing element dragging, you only need to add the
mousedown event to the dragged element. Remember to clear the listening event after using it. The habit of appearing in pairs must be developed. If you add
and mouseup to the dragged element, you will find that there is an out-of-control phenomenon. After the page is loaded, first reset the default position of the dragged element, and add the
event. After the component is unloaded, delete the mousedown event:<div class="code" style="position:relative; padding:0px; margin:0px;"><pre class='brush:php;toolbar:false;'>const restore = () => {
elementPosition.x = originalPosition.x;
elementPosition.y = originalPosition.y;
}
onMounted(() => {
restore();
floatButton.value.addEventListener(&#39;mousedown&#39;, onMousedown, true);
})
onUnmounted(() => {
floatButton.value.removeEventListener(&#39;mousedown&#39;, onMousedown, true);
})</pre><div class="contentsignin">Copy after login</div></div><h3 id="strong-实现拖拽的核心-strong"><strong>实现拖拽的核心</strong></h3><p>选择 <code>Vuejs 的原因就是因为其是 MVVM 型框架,我们关注点在声明上,内部的运转机制有框架负责,所以在下面的事件处理上就只需要在对应的事件中去更新一开始声明的三组坐标就可以了。
在 onMousedown 时,通过指针所在的坐标 - 被拖拽元素初始位置的坐标得到指针此时在被拖拽元素上的坐标,onMousedown 时要为 document 添加 mousemove 和 mouseup 事件:
const onMousedown = (event: MouseEvent) => {
  event.stopPropagation();

  mousedownOffset.x = event.clientX - originalPosition.x;
  mousedownOffset.y = event.clientY - originalPosition.y;

  document.addEventListener('mousemove', onMousemove, true);
  document.addEventListener('mouseup', onMouseup, true);
}在 onMousemove时,通过指针所在的坐标 - 指针在被拖拽元素上的位置得到被拖拽元素左上角距离页面左上角的距离,并更新到 elementPosition:
const onMousemove = (event: MouseEvent) => {
  event.stopPropagation();

  elementPosition.x = event.clientX - mousedownOffset.x;
  elementPosition.y = event.clientY - mousedownOffset.y;
}在 onMouseup时,主要做的就是为 document 移除在 onMousemove 时注册的两个事件,要注意的是移除的事件要是同一个事件,也就是引用一致的事件,推荐将对应的处理事件赋值给一个变量使用,最后可以在拖拽结束后还原被拖拽元素的位置:
const onMouseup = (event: MouseEvent) => {
  event.stopPropagation();
  document.removeEventListener('mousemove', onMousemove, true);
  document.removeEventListener('mouseup', onMouseup, true);
  restore();
}补充其它部分代码和演示
<div
ref="floatButton"
class="float-button"
:style="{
'transition-duration': '0.1s',
transform: `translate(${elementPosition.x}px, ${elementPosition.y}px)`
}">
</div>.float-button {
position: absolute;
width: 42px;
height: 42px;
background: red;
border-radius: 5px;
user-select: none;
background-image: url(../assets/taobao.svg);
background-size: cover;
}
总结
使用 mousemove、translate 在 Vue3 中实现可以随意拖拽的 Icon 的案例就完成了,在本次案例中需要认真思考对应的几个坐标和移动时坐标如何更新,事件的使用要成对出现,如何在这个拖拽的 Icon 上增加点击事件时还需要多做一些处理,有答案的朋友可以留下你的想法~
The above is the detailed content of Teach you step by step how to use Vue3 to implement an elegant element dragging function. For more information, please follow other related articles on the PHP Chinese website!

Hot AI Tools

Undresser.AI Undress
AI-powered app for creating realistic nude photos

AI Clothes Remover
Online AI tool for removing clothes from photos.

Undress AI Tool
Undress images for free

Clothoff.io
AI clothes remover

Video Face Swap
Swap faces in any video effortlessly with our completely free AI face swap tool!

Hot Article
Hot Tools

Notepad++7.3.1
Easy-to-use and free code editor

SublimeText3 Chinese version
Chinese version, very easy to use

Zend Studio 13.0.1
Powerful PHP integrated development environment

Dreamweaver CS6
Visual web development tools

SublimeText3 Mac version
God-level code editing software (SublimeText3)
Hot Topics
 1670
1670
 14
1428
52
1329
25
1274
29
1256
24
14
1428
52
1329
25
1274
29
1256
24

 PHP and Vue: a perfect pairing of front-end development tools
Mar 16, 2024 pm 12:09 PM
PHP and Vue: a perfect pairing of front-end development tools
Mar 16, 2024 pm 12:09 PM
PHP and Vue: a perfect pairing of front-end development tools. In today's era of rapid development of the Internet, front-end development has become increasingly important. As users have higher and higher requirements for the experience of websites and applications, front-end developers need to use more efficient and flexible tools to create responsive and interactive interfaces. As two important technologies in the field of front-end development, PHP and Vue.js can be regarded as perfect tools when paired together. This article will explore the combination of PHP and Vue, as well as detailed code examples to help readers better understand and apply these two
 Is Django front-end or back-end? check it out!
Jan 19, 2024 am 08:37 AM
Is Django front-end or back-end? check it out!
Jan 19, 2024 am 08:37 AM
Django is a web application framework written in Python that emphasizes rapid development and clean methods. Although Django is a web framework, to answer the question whether Django is a front-end or a back-end, you need to have a deep understanding of the concepts of front-end and back-end. The front end refers to the interface that users directly interact with, and the back end refers to server-side programs. They interact with data through the HTTP protocol. When the front-end and back-end are separated, the front-end and back-end programs can be developed independently to implement business logic and interactive effects respectively, and data exchange.
 Exploring Go language front-end technology: a new vision for front-end development
Mar 28, 2024 pm 01:06 PM
Exploring Go language front-end technology: a new vision for front-end development
Mar 28, 2024 pm 01:06 PM
As a fast and efficient programming language, Go language is widely popular in the field of back-end development. However, few people associate Go language with front-end development. In fact, using Go language for front-end development can not only improve efficiency, but also bring new horizons to developers. This article will explore the possibility of using the Go language for front-end development and provide specific code examples to help readers better understand this area. In traditional front-end development, JavaScript, HTML, and CSS are often used to build user interfaces
 C# development experience sharing: front-end and back-end collaborative development skills
Nov 23, 2023 am 10:13 AM
C# development experience sharing: front-end and back-end collaborative development skills
Nov 23, 2023 am 10:13 AM
As a C# developer, our development work usually includes front-end and back-end development. As technology develops and the complexity of projects increases, the collaborative development of front-end and back-end has become more and more important and complex. This article will share some front-end and back-end collaborative development techniques to help C# developers complete development work more efficiently. After determining the interface specifications, collaborative development of the front-end and back-end is inseparable from the interaction of API interfaces. To ensure the smooth progress of front-end and back-end collaborative development, the most important thing is to define good interface specifications. Interface specification involves the name of the interface
 How to implement instant messaging on the front end
Oct 09, 2023 pm 02:47 PM
How to implement instant messaging on the front end
Oct 09, 2023 pm 02:47 PM
Methods for implementing instant messaging include WebSocket, Long Polling, Server-Sent Events, WebRTC, etc. Detailed introduction: 1. WebSocket, which can establish a persistent connection between the client and the server to achieve real-time two-way communication. The front end can use the WebSocket API to create a WebSocket connection and achieve instant messaging by sending and receiving messages; 2. Long Polling, a technology that simulates real-time communication, etc.
 Django: A magical framework that can handle both front-end and back-end development!
Jan 19, 2024 am 08:52 AM
Django: A magical framework that can handle both front-end and back-end development!
Jan 19, 2024 am 08:52 AM
Django: A magical framework that can handle both front-end and back-end development! Django is an efficient and scalable web application framework. It is able to support multiple web development models, including MVC and MTV, and can easily develop high-quality web applications. Django not only supports back-end development, but can also quickly build front-end interfaces and achieve flexible view display through template language. Django combines front-end development and back-end development into a seamless integration, so developers don’t have to specialize in learning
 Questions frequently asked by front-end interviewers
Mar 19, 2024 pm 02:24 PM
Questions frequently asked by front-end interviewers
Mar 19, 2024 pm 02:24 PM
In front-end development interviews, common questions cover a wide range of topics, including HTML/CSS basics, JavaScript basics, frameworks and libraries, project experience, algorithms and data structures, performance optimization, cross-domain requests, front-end engineering, design patterns, and new technologies and trends. . Interviewer questions are designed to assess the candidate's technical skills, project experience, and understanding of industry trends. Therefore, candidates should be fully prepared in these areas to demonstrate their abilities and expertise.
 Vue.js vs. React: Project-Specific Considerations
Apr 09, 2025 am 12:01 AM
Vue.js vs. React: Project-Specific Considerations
Apr 09, 2025 am 12:01 AM
Vue.js is suitable for small and medium-sized projects and fast iterations, while React is suitable for large and complex applications. 1) Vue.js is easy to use and is suitable for situations where the team is insufficient or the project scale is small. 2) React has a richer ecosystem and is suitable for projects with high performance and complex functional needs.
