

Learn more about the implementation principles of vuex

When asked in an interview about the implementation principle of vuex, how do you answer? The following article will give you an in-depth understanding of the implementation principle of vuex. I hope it will be helpful to you!

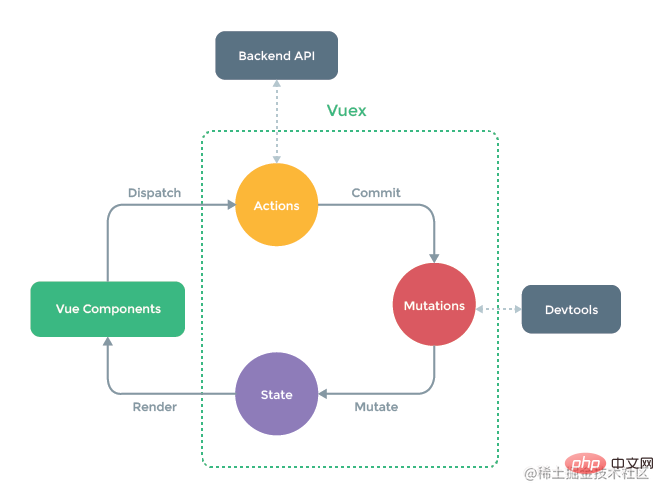
I won’t go into details about vuex. Let’s briefly review: When the application encounters multiple components sharing state, simply The One-way data flow is easily broken: first, multiple views rely on the same state; second, actions from different views require changes to the same state. If the former is solved by passing parameters, it is not suitable for multi-layer nested components and sibling components; if the latter is solved by using direct references from parent-child components or multiple copies of event changes and synchronization states, it is not conducive to code maintenance.
So, the best way is to extract the shared state of the component and manage it in a global singleton mode! This is the basic idea behind vuex.
[Related recommendations: vuejs video tutorial, web front-end development]
So, the general idea of vuex The framework is as follows:
class Store {
    constructor() {
        // state
        // getters
        // mutations
        // actions
    }
    // commit
    // dipatch
}Next, just write and read.
1. Create vue project
vue create vue2-vuex//创建vue2项目

yarn add vuex@next --save//安装vuex

yarn serve//启动项目
2. Implementation principle
1. State
(1) Use
//store.js
// 仓库
import Vue from 'vue'
import Vuex from 'vuex'
import extra from './extra.js'

Vue.use(Vuex) //引入vuex的方式,说明Store需要install方法
export default new Vuex.Store({
    // 仓库数据源
    state: {
        count: 1,
        dowhat: 'addCount'
    },
}//app.vue
<template>
<div class="testState">
<p>{{mycount}}</p>
<p>{{dowhat}}:{{count}}</p>
</div>
</template>
<script>
export default {
import {
mapState
} from 'vuex'
// 推荐方式
computed: mapState()({
mycount: state => state.count
}),
// 推荐方式的简写方式
computed: {
// 解构的是getters
...mapState(['count', 'dowhat'])
},
}
</script>(2) Note
Since Vuex’s state storage is responsive, from the store The simplest way to read state in an instance is to return a certain state in a computed property . This pattern causes the component to rely on the global state singleton . In a modular build system, each component that needs to use state needs to be imported frequently, and the state needs to be simulated when testing the component.
Vuex provides a A mechanism to "inject" state from the root component into each sub-component (need to call Vue.use(Vuex))
So in addition to the five internal attributes of
Store, we also need to consider a install method of the plug-in, so the general framework is as follows: <div class="code" style="position:relative; padding:0px; margin:0px;"><pre class='brush:php;toolbar:false;'>class Store {
constructor() {
// state
// getters
// mutations
// actions
//modules
}
// commit
// dipatch
}
let Vuex = {
Store,
Install
}
export default Vuex</pre><div class="contentsignin">Copy after login</div></div>So, next It can be implemented concretely,
class Store {
    constructor(options) {
        // state
        this.state = options.state
    }
}
let install = function(_Vue) {
    _Vue.mixin({
        beforeCreate() { //在组件创建之前自动调用,每个组件都有这个钩子
            if (this.$options && this.$options.store) { //this.$options读取根组件
                this.$store = this.$options.store
            } else {
                this.$store = this.$parent && this.$parent.$store
            }
        }
    })
}However, the above state implementation has a shortcoming: when the data is changed, the data of
state cannot be dynamically rendered. So how to make the data in state responsive becomes a key issue? In fact, similar to data in vue, you can also make it responsive in this way. Then you have to pass in Vue from the install method, so after the change: <div class="code" style="position:relative; padding:0px; margin:0px;"><pre class='brush:php;toolbar:false;'>let Vue=null
class Store {
constructor(options) {
// state
this.vm = new _Vue({
data: {
state: options.state//data中的数据才是响应式
}
})
}
get state() {
return this.vm.state
}
}
let install = function(_Vue) {//用于Vue.use(plugin)
Vue=_Vue
_Vue.mixin({
onBeforeCreate() { //在组件创建之前自动调用,每个组件都有这个钩子
if (this.$options && this.$options.store) { //this.$options读取根组件
this.$store = this.$options.store
} else {
this.$store = this.$parent && this.$parent.$store
}
}
})
}</pre><div class="contentsignin">Copy after login</div></div>
2, getters
(1) Use//store.js
export default new Vuex.Store({
// 计算属性
getters: {
// 这里的函数不需要调用,可以直接使用,官方默认前面有get
getCount(state) {//接受 state 作为其第一个参数
return state.count * 100;
}
},
}
Sometimes we need to derive it from the state in the store For some states (such as adding, deleting, filtering, etc.), Vuex allows us to define "getters" in the store (which can be thought of as computed properties of the store). Just like a computed property, the return value of a getter will be cached according to its dependencies, and will only be recalculated when its dependency values change. Getters accept state as their first parameter, and getters are accessed through methods. , the call will be made every time without caching the result
(3) Implementation // getters
let getters = options.getters || {}
this.getters = {}
Object.keys(getters).forEach(getterName => {
Object.defineProperty(this.getters, getterName, {
get: () => {
return getters[getterName](this.state)
}
})
})
3, mutations
(1) Use//store.js
export default new Vuex.Store({
// 相当于methods
mutations: {
// mutations内部的函数,天生具备一个形参
add(state, n) {
state.count += n;
},
decrease(state, n) {
state.count -= n;
}
},
}methods: {
submit() {
console.log('success');
},
// 解构仓库mutations里面的方法,要啥解构啥
...mapMutations(['add', 'decrease']),
// this.$store.commit('add'),
...mapActions(['addAction', 'decreaseAction']),
// this.addAction()调用actions里面的方法
// this.$store.dispatch('add'),
}
is the only way to change the state in the Vuex store The method is to submit the mutation. Mutation in Vuex is similar to events: each mutation has a string
event type (type) and a callback function (handler). This callback function is where state changes are made, and it accepts state as the first parameter and cannot directly call a mutation handler. This option is more like an event registration: "When a mutation of type increment is triggered, call this function." To wake up a mutation handler, you need to call store.commit# with the corresponding type. ## Method can pass in additional parameters to store.commit
payload of mutation . In most cases, the payload should be a Object, which can contain multiple fields and the recorded mutations will be more readable(3) Implementation
// mutations
let mutations = options.mutations || {}
this.mutations = {}
Object.keys(mutations).forEach(mutationName => {
this.mutations[mutationName] = (arg) => {//保证多个(第二个)参数的传入
mutations[mutationName](this.state, arg)
}
})
commit = (method, arg) => {//使用箭头函数改变被调用的this的指向
// console.log(this);
this.mutations[method](arg)
}(1) Use
//store.js
export default new Vuex.Store({
actions: {
addAction(context) {
// 在这里调用add方法
context.commit('add', 10);
},
decreaseAction({
commit
}) {
commit('decreaseAction', 5)
}
},
}- Action 提交的是 mutation,而不是直接变更状态。
- Action 可以包含任意异步操作
- Action 函数接受一个与 store 实例具有相同方法和属性的 context 对象
- Action 通过
store.dispatch方法触发 - Action 通常是异步的,
store.dispatch可以处理被触发的 action 的处理函数返回的 Promise,并且store.dispatch仍旧返回 Promise - 一个
store.dispatch在不同模块中可以触发多个 action 函数。在这种情况下,只有当所有触发函数完成后,返回的 Promise 才会执行
(3)实现
// actions
let actions = options.actions || {}
this.actions = {}
Object.keys(actions).forEach(actionName => {
this.actions[actionName] = (arg) => {
actions[actionName](this, arg)
}
})
dispatch=(method, arg) =>{
this.actions[method](arg)
}5、modules
(1)使用
// actions
let actions = options.actions || {}
this.actions = {}
Object.keys(actions).forEach(actionName => {
this.actions[actionName] = (arg) => {
actions[actionName](this, arg)
}
})
dispatch=(method, arg) =>{
this.actions[method](arg)
} //store.js
modules: {
extra: extra
}(2)注意
- 由于使用单一状态树,应用的所有状态会集中到一个比较大的对象。当应用变得非常复杂时,store 对象就有可能变得相当臃肿,Vuex 允许我们将 store 分割成模块(module) 。每个模块拥有自己的 state、mutation、action、getter、甚至是嵌套子模块——从上至下进行同样方式的分割
- 对于模块内部的 mutation 和 getter,接收的第一个参数是模块的局部状态对象
- 对于模块内部的 action,局部状态通过
context.state暴露出来,根节点状态则为context.rootState 对于模块内部的 getter,根节点状态(rootState)会作为第三个参数暴露出来
三、整体代码
let Vue = null//全局的_Vue
class Store {
constructor (options) {
// state
//this.state = options.state 写法不完美,当改变数据的时候,不能动态的渲染,所以需要把data中的数据做成响应式的
this.vm = new _Vue({
data: {
state: options.state//data中的数据才是响应式
}
})
 // getters
    let getters = options.getters || {}
    this.getters = {}
    Object.keys(getters).forEach(getterName => {
      Object.defineProperty(this.getters, getterName, {
        get: () => {
          return getters[getterName](this.state)
        }
      })
    })
// mutations
let mutations = options.mutations || {}
this.mutations = {}
Object.keys(mutations).forEach(mutationName => {
this.mutations[mutationName] = (arg) => {//保证多个(第二个)参数的传入
mutations[mutationName](this.state, arg)
}
})
// actions
let actions = options.actions || {}
this.actions = {}
Object.keys(actions).forEach(actionName => {
this.actions[actionName] = (arg) => {
actions[actionName](this, arg)
}
})
}
dispatch=(method, arg) =>{
this.actions[method](arg)
}
commit = (method, arg) => {
// console.log(this);
this.mutations[method](arg)
}
get state() {
return this.vm.state
}
}
let install = function(_Vue) {
Vue = _Vue
Vue.mixin({
beforeCreate() {//在组件创建之前自动调用,每个组件都有这个钩子
if (this.$options && this.$options.store) { // this.$options读取到根组件
this.$store = this.$options.store
} else { // //如果不是根组件的话,也把$store挂到上面,因为是树状组件
this.$store = this.$parent && this.$parent.$store
}
}
})
}
let Vuex = {
Store,
install
}
export default VuexThe above is the detailed content of Learn more about the implementation principles of vuex. For more information, please follow other related articles on the PHP Chinese website!

Hot AI Tools

Undresser.AI Undress
AI-powered app for creating realistic nude photos

AI Clothes Remover
Online AI tool for removing clothes from photos.

Undress AI Tool
Undress images for free

Clothoff.io
AI clothes remover

Video Face Swap
Swap faces in any video effortlessly with our completely free AI face swap tool!

Hot Article
Hot Tools

Notepad++7.3.1
Easy-to-use and free code editor

SublimeText3 Chinese version
Chinese version, very easy to use

Zend Studio 13.0.1
Powerful PHP integrated development environment

Dreamweaver CS6
Visual web development tools

SublimeText3 Mac version
God-level code editing software (SublimeText3)
Hot Topics
 1667
1667
 14
1426
52
1328
25
1273
29
1255
24
14
1426
52
1328
25
1273
29
1255
24

 How to implement an online speech recognition system using WebSocket and JavaScript
Dec 17, 2023 pm 02:54 PM
How to implement an online speech recognition system using WebSocket and JavaScript
Dec 17, 2023 pm 02:54 PM
How to use WebSocket and JavaScript to implement an online speech recognition system Introduction: With the continuous development of technology, speech recognition technology has become an important part of the field of artificial intelligence. The online speech recognition system based on WebSocket and JavaScript has the characteristics of low latency, real-time and cross-platform, and has become a widely used solution. This article will introduce how to use WebSocket and JavaScript to implement an online speech recognition system.
 WebSocket and JavaScript: key technologies for implementing real-time monitoring systems
Dec 17, 2023 pm 05:30 PM
WebSocket and JavaScript: key technologies for implementing real-time monitoring systems
Dec 17, 2023 pm 05:30 PM
WebSocket and JavaScript: Key technologies for realizing real-time monitoring systems Introduction: With the rapid development of Internet technology, real-time monitoring systems have been widely used in various fields. One of the key technologies to achieve real-time monitoring is the combination of WebSocket and JavaScript. This article will introduce the application of WebSocket and JavaScript in real-time monitoring systems, give code examples, and explain their implementation principles in detail. 1. WebSocket technology
 How to use JavaScript and WebSocket to implement a real-time online ordering system
Dec 17, 2023 pm 12:09 PM
How to use JavaScript and WebSocket to implement a real-time online ordering system
Dec 17, 2023 pm 12:09 PM
Introduction to how to use JavaScript and WebSocket to implement a real-time online ordering system: With the popularity of the Internet and the advancement of technology, more and more restaurants have begun to provide online ordering services. In order to implement a real-time online ordering system, we can use JavaScript and WebSocket technology. WebSocket is a full-duplex communication protocol based on the TCP protocol, which can realize real-time two-way communication between the client and the server. In the real-time online ordering system, when the user selects dishes and places an order
 How to implement an online reservation system using WebSocket and JavaScript
Dec 17, 2023 am 09:39 AM
How to implement an online reservation system using WebSocket and JavaScript
Dec 17, 2023 am 09:39 AM
How to use WebSocket and JavaScript to implement an online reservation system. In today's digital era, more and more businesses and services need to provide online reservation functions. It is crucial to implement an efficient and real-time online reservation system. This article will introduce how to use WebSocket and JavaScript to implement an online reservation system, and provide specific code examples. 1. What is WebSocket? WebSocket is a full-duplex method on a single TCP connection.
 JavaScript and WebSocket: Building an efficient real-time weather forecasting system
Dec 17, 2023 pm 05:13 PM
JavaScript and WebSocket: Building an efficient real-time weather forecasting system
Dec 17, 2023 pm 05:13 PM
JavaScript and WebSocket: Building an efficient real-time weather forecast system Introduction: Today, the accuracy of weather forecasts is of great significance to daily life and decision-making. As technology develops, we can provide more accurate and reliable weather forecasts by obtaining weather data in real time. In this article, we will learn how to use JavaScript and WebSocket technology to build an efficient real-time weather forecast system. This article will demonstrate the implementation process through specific code examples. We
 Simple JavaScript Tutorial: How to Get HTTP Status Code
Jan 05, 2024 pm 06:08 PM
Simple JavaScript Tutorial: How to Get HTTP Status Code
Jan 05, 2024 pm 06:08 PM
JavaScript tutorial: How to get HTTP status code, specific code examples are required. Preface: In web development, data interaction with the server is often involved. When communicating with the server, we often need to obtain the returned HTTP status code to determine whether the operation is successful, and perform corresponding processing based on different status codes. This article will teach you how to use JavaScript to obtain HTTP status codes and provide some practical code examples. Using XMLHttpRequest
 How to use insertBefore in javascript
Nov 24, 2023 am 11:56 AM
How to use insertBefore in javascript
Nov 24, 2023 am 11:56 AM
Usage: In JavaScript, the insertBefore() method is used to insert a new node in the DOM tree. This method requires two parameters: the new node to be inserted and the reference node (that is, the node where the new node will be inserted).
 JavaScript and WebSocket: Building an efficient real-time image processing system
Dec 17, 2023 am 08:41 AM
JavaScript and WebSocket: Building an efficient real-time image processing system
Dec 17, 2023 am 08:41 AM
JavaScript is a programming language widely used in web development, while WebSocket is a network protocol used for real-time communication. Combining the powerful functions of the two, we can create an efficient real-time image processing system. This article will introduce how to implement this system using JavaScript and WebSocket, and provide specific code examples. First, we need to clarify the requirements and goals of the real-time image processing system. Suppose we have a camera device that can collect real-time image data
