 Backend Development
 Python Tutorial
 Example code for implementing Windows scheduled shutdown function in Python
Example code for implementing Windows scheduled shutdown function in Python
It was the first few crawlers that introduced me to this new friend Python. Although I had only known him for a few days, I felt an inexplicable sense of tacit understanding. Whenever you can't find an idea elsewhere, you can always find a solution in Python. Automatic shutdown can be used when downloading large files or running programs. I just wrote a small program for automatic shutdown of Windows. The program is too simple, so just treat it as a play. Of course, there are many areas for improvement. Text below:
#ui production:
As usual, the author used Qt to produce the required ui, including label, label_2, label_3, lable_4, lineEdit, lineEdit_2, pushButton components. The general layout is as follows
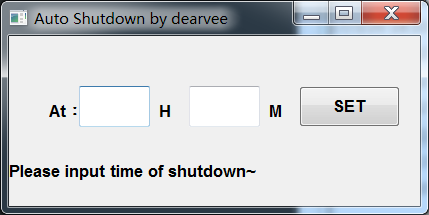
Two lineEdits wait for the user to enter the desired shutdown time. The following Label is used to display the return information after the operation. pushButton is used to submit commands. UI production is completed.
ui to py file:
Here the author installed PyQt5 and added environment variables. So the converted cmd command (cd to the directory where ui is located):
pyuic5 shut.ui -o shut.py
After successful execution, the shut.py file is generated in the directory where ui is located.
#Display window:
You cannot see the window when running the directly generated py file. We need to add some necessary content to display our window:
Code Add
import sys
to the top and finally add
if name == 'main':
 app = QtWidgets.QApplication(sys.argv)
 Form = QtWidgets.QWidget()
 ui = Ui_x()//其中Ui_x为生成的class名
 ui.setupUi(Form)
 Form.show()
 sys.exit(app.exec_())
and then run shutdown.py to see the window.
#Function implementation:
Think about the desired function of the program to make Windows shut down automatically. The cmd command is a good choice. So the author looked for a way to execute the cmd command in python:
os.popen('at 22:30 shutdown -s')Call cmd and execute the command. Among them, 22 and 30 are data waiting for user input. Therefore, the corresponding h and m should be replaced with the legal numbers obtained in the two lineEdits. Use the method to obtain the content of lineEdit:
h = self.lineEdit.text()
m = self.lineEdit_2.text()
Then replace the hours and minutes in the execution command with h and m.
Then comes the pushButton part. Add a listener for the event click for pushButton.
self.pushButton = QtWidgets.QPushButton(shut,clicked=self.sd)
Among them, self.sd is the operation that needs to be performed after the event is triggered.
#Complete code:
Some key parts have been described. As for the return information part, the author will not elaborate here. The complete code for Windows automatic shutdown is posted below:
# -*- coding: utf-8 -*-
# Form implementation generated from reading ui file 'shut.ui'
#
# Created: Mon Mar 20 18:10:31 2017
#  by: PyQt5 UI code generator 5.2.1
#
# WARNING! All changes made in this file will be lost!
import sys
import os
from PyQt5 import QtCore, QtGui, QtWidgets
class Ui_shut(object):
 flag = True
 def setupUi(self, shut):
  shut.setObjectName("shut")
  shut.resize(411, 170)
  shut.setFixedSize(411,170)
  self.label = QtWidgets.QLabel(shut)
  self.label.setGeometry(QtCore.QRect(40, 50, 41, 51))
  self.label.setFont(QtGui.QFont("Roman times",10,QtGui.QFont.Bold))
  self.label.setObjectName("label")
  self.lineEdit = QtWidgets.QLineEdit(shut)
  self.lineEdit.setGeometry(QtCore.QRect(70, 50, 71, 41))
  self.lineEdit.setFont(QtGui.QFont("Roman times",10,QtGui.QFont.Bold))
  self.lineEdit.setObjectName("lineEdit")
  self.label_2 = QtWidgets.QLabel(shut)
  self.label_2.setGeometry(QtCore.QRect(150, 60, 31, 31))
  self.label_2.setFont(QtGui.QFont("Roman times",10,QtGui.QFont.Bold))
  self.label_2.setObjectName("label_2")
  self.lineEdit_2 = QtWidgets.QLineEdit(shut)
  self.lineEdit_2.setGeometry(QtCore.QRect(180, 50, 71, 41))
  self.lineEdit_2.setFont(QtGui.QFont("Roman times",10,QtGui.QFont.Bold))
  self.lineEdit_2.setObjectName("lineEdit_2")
  self.label_3 = QtWidgets.QLabel(shut)
  self.label_3.setGeometry(QtCore.QRect(260, 60, 31, 31))
  self.label_3.setFont(QtGui.QFont("Roman times",10,QtGui.QFont.Bold))
  self.label_3.setObjectName("label_3")
  self.pushButton = QtWidgets.QPushButton(shut,clicked=self.sd)
  self.pushButton.setGeometry(QtCore.QRect(290, 50, 101, 41))
  self.pushButton.setFont(QtGui.QFont("Roman times",10,QtGui.QFont.Bold))
  self.pushButton.setObjectName("pushButton")
  self.label_4 = QtWidgets.QLabel(shut)
  self.label_4.setGeometry(QtCore.QRect(0, 120, 411, 31))
  self.label_4.setFont(QtGui.QFont("Roman times",10,QtGui.QFont.Bold))
  self.label_4.setObjectName("label_4")
  self.retranslateUi(shut)
  QtCore.QMetaObject.connectSlotsByName(shut)
 def retranslateUi(self, shut):
  _translate = QtCore.QCoreApplication.translate
  shut.setWindowTitle(_translate("shut", "Auto Shutdown by dearvee"))
  self.label.setText(_translate("shut", "At:"))
  self.label_2.setText(_translate("shut", "H"))
  self.label_3.setText(_translate("shut", "M"))
  self.label_4.setText(_translate("shut", "Please input time of shutdown~"))
  self.pushButton.setText(_translate("shut", "Set"))
 def sd(self,shut):
  h = self.lineEdit.text()
  m = self.lineEdit_2.text()
  if self.flag:
   self.flag = False
   try:
    os.popen('at '+h+':'+m+' shutdown -s')
    self.label_4.setText('Success! the system will shutdown at today '+h+':'+m+'.')
    self.pushButton.setText('Remove all')
    self.lineEdit.clear()
    self.lineEdit_2.clear()
   except:
    self.label_4.setText('Something is wrong~')
  else:
   self.flag = True
   try:
    os.popen('at /delete /yes')
    self.label_4.setText('Success! already removed~')
    self.pushButton.setText('Set')
    self.lineEdit.clear()
    self.lineEdit_2.clear()
   except:
    self.label_4.setText('Something is wrong~')
if name == 'main':
 app = QtWidgets.QApplication(sys.argv)
 Form = QtWidgets.QWidget()
 ui = Ui_shut()
 ui.setupUi(Form)
 Form.show()
sys.exit(app.exec_())After running, the operation window as shown in the figure will appear
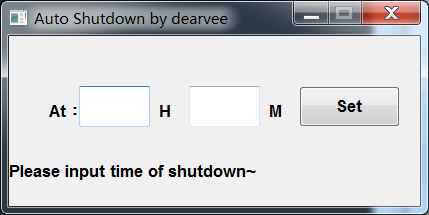
# Running effect:
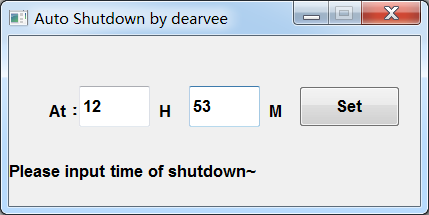
Run shut.py, enter 12 and 53 and click set. Then we check the task plan:
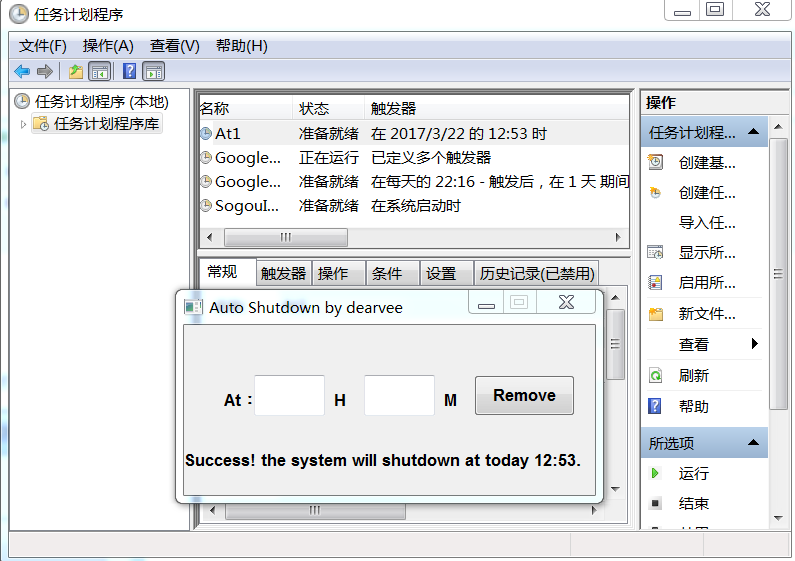
and find that the task is already in the plan . Click Remove to refresh the task plan.
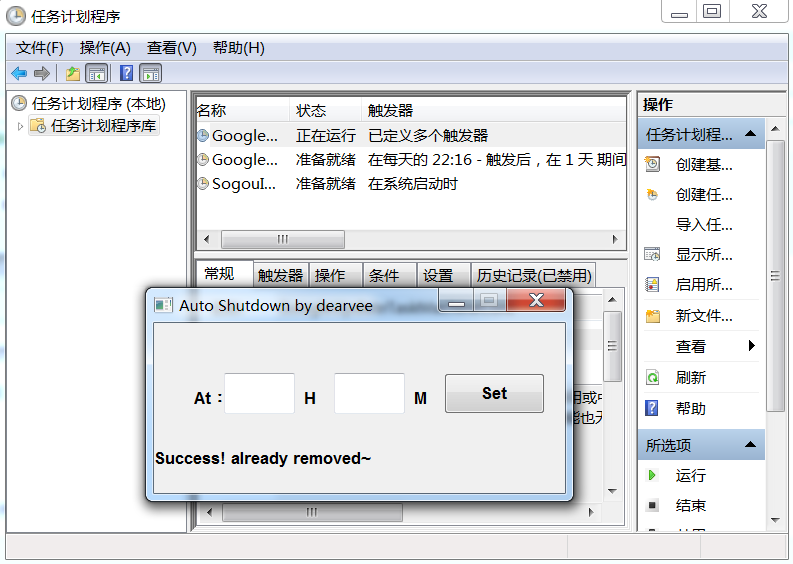
The task is successfully removed and the function is implemented
Of course, this can only be run if the user installs Python and installs related components. If you want to use it on any windows, you need the following operations.
#Packaging:
The author uses Python's Pyinstaller component for packaging. After cd to the directory where shutdown.py is located, execute the cmd command:
pyinstaller -w shut.py
At this time, a dist folder is generated in the directory where shutdown.py is located. Generated exe path. dist>>shut (Python source code file name)>>shut.exe. If everything goes well, double-clicking shut.exe will display the same window and operation as the previous source code. In this way, you can send the entire shutdown directory to your friends. They can then use your program by double-clicking shutdown.exe.
The above is the detailed content of Example code for implementing Windows scheduled shutdown function in Python. For more information, please follow other related articles on the PHP Chinese website!

Hot AI Tools

Undresser.AI Undress
AI-powered app for creating realistic nude photos

AI Clothes Remover
Online AI tool for removing clothes from photos.

Undress AI Tool
Undress images for free

Clothoff.io
AI clothes remover

Video Face Swap
Swap faces in any video effortlessly with our completely free AI face swap tool!

Hot Article

Hot Tools

Notepad++7.3.1
Easy-to-use and free code editor

SublimeText3 Chinese version
Chinese version, very easy to use

Zend Studio 13.0.1
Powerful PHP integrated development environment

Dreamweaver CS6
Visual web development tools

SublimeText3 Mac version
God-level code editing software (SublimeText3)

Hot Topics
 1657
1657
 14
14
 1415
1415
 52
52
 1309
1309
 25
25
 1257
1257
 29
29
 1230
1230
 24
24
 PHP and Python: Different Paradigms Explained
Apr 18, 2025 am 12:26 AM
PHP is mainly procedural programming, but also supports object-oriented programming (OOP); Python supports a variety of paradigms, including OOP, functional and procedural programming. PHP is suitable for web development, and Python is suitable for a variety of applications such as data analysis and machine learning.
 Choosing Between PHP and Python: A Guide
Apr 18, 2025 am 12:24 AM
PHP is suitable for web development and rapid prototyping, and Python is suitable for data science and machine learning. 1.PHP is used for dynamic web development, with simple syntax and suitable for rapid development. 2. Python has concise syntax, is suitable for multiple fields, and has a strong library ecosystem.
 PHP and Python: A Deep Dive into Their History
Apr 18, 2025 am 12:25 AM
PHP originated in 1994 and was developed by RasmusLerdorf. It was originally used to track website visitors and gradually evolved into a server-side scripting language and was widely used in web development. Python was developed by Guidovan Rossum in the late 1980s and was first released in 1991. It emphasizes code readability and simplicity, and is suitable for scientific computing, data analysis and other fields.
 Python vs. JavaScript: The Learning Curve and Ease of Use
Apr 16, 2025 am 12:12 AM
Python is more suitable for beginners, with a smooth learning curve and concise syntax; JavaScript is suitable for front-end development, with a steep learning curve and flexible syntax. 1. Python syntax is intuitive and suitable for data science and back-end development. 2. JavaScript is flexible and widely used in front-end and server-side programming.
 How to run sublime code python
Apr 16, 2025 am 08:48 AM
To run Python code in Sublime Text, you need to install the Python plug-in first, then create a .py file and write the code, and finally press Ctrl B to run the code, and the output will be displayed in the console.
 How to run python with notepad
Apr 16, 2025 pm 07:33 PM
Running Python code in Notepad requires the Python executable and NppExec plug-in to be installed. After installing Python and adding PATH to it, configure the command "python" and the parameter "{CURRENT_DIRECTORY}{FILE_NAME}" in the NppExec plug-in to run Python code in Notepad through the shortcut key "F6".
 Golang vs. Python: Key Differences and Similarities
Apr 17, 2025 am 12:15 AM
Golang and Python each have their own advantages: Golang is suitable for high performance and concurrent programming, while Python is suitable for data science and web development. Golang is known for its concurrency model and efficient performance, while Python is known for its concise syntax and rich library ecosystem.
 How to solve complex BelongsToThrough relationship problem in Laravel? Use Composer!
Apr 17, 2025 pm 09:54 PM
In Laravel development, dealing with complex model relationships has always been a challenge, especially when it comes to multi-level BelongsToThrough relationships. Recently, I encountered this problem in a project dealing with a multi-level model relationship, where traditional HasManyThrough relationships fail to meet the needs, resulting in data queries becoming complex and inefficient. After some exploration, I found the library staudenmeir/belongs-to-through, which easily installed and solved my troubles through Composer.


