

Photoshop 可爱的卡通小熊头像

本教程介绍简单的卡通动物头像的制作方法。大致过程:先用钢笔勾出脸部的大致轮廓,填充颜色后用加深和减淡工具来表现图像的立体感,五官及一些小装饰部分的制作方法完全相同。
最终效果 
1、新建一个600 * 600 像素的文件,背景选择白色。新建一个图层命名为“脸部轮廓”,用钢笔工具勾出脸部轮廓,转为选区如下图。 
<图1> 2、选择渐变工具,颜色设置如2,拉出图3所示的径向渐变。 
<图2> 
<图3>
3、新建一个图层,用钢笔勾出眼睛部分的选区,拉上右边所示的径向渐变色。 
<图4>
4、锁定图层后吧前景颜色设置为:#791E01,用画笔把底部涂上暗红色高光,效果如下图。 
<图5> 5、新建一个图层,用钢笔勾出高光部分的选区,填充白色,效果如下图。 
<图6>
6、新建一个图层,同样的方法制作另一只眼睛,效果如下图。 
<图7>
7、在“脸部轮廓”图层上面新建一个图层,把前景颜色设置为:#D37C2B,选择画笔工具,画笔不透明度设置为:5%左右,把左脸的暗部涂出来,效果如下图。 
<图8> 8、新建一个图层,用钢笔勾出嘴部暗调部分选区,按Ctrl + Alt + D 羽化8个像素后填充颜色:#D4802B,效果如下图。 
<图9> #p# 9、新建一个图层,用画笔涂出眼睛周围的暗调部分,效果如下图。 
<图10>
10、新建一个图层,选择椭圆选框工具拉出下图所示的椭圆选区,并拉上白色到浅灰色的线性渐变。 
<图11> 11、新建一个图层,同样的方法制作出鼻子和嘴巴部分,效果如12,13。 
<图12> 
<图13>
12、在“脸部轮廓”图层上面新建一个图层,把前景颜色设置为白色,然后用画笔涂出眼睛周围的高光部分,如图14,15。 
<图14> 
<图15> 13、在图层的最上面新建一个图层,用钢笔勾出帽子部分的选区,并加上渐变色和高光,效果如图16,17。 
<图16> 
<图17>
14、新建一个图层,同样的方法制作出头发和耳朵部分,如图18,19。 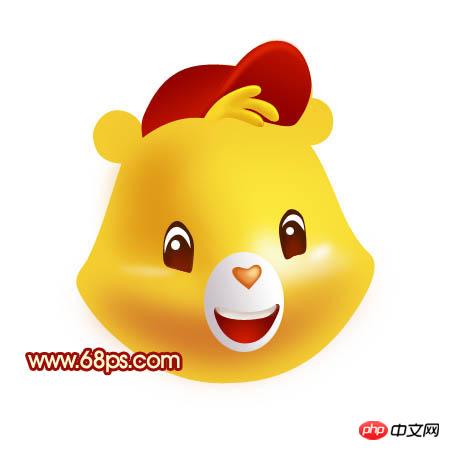
<图18> 
<图19> 15、新建一个图层,用钢笔勾出眉毛部分的选区,填充颜色:#EB5500,然后用加深工具把底部涂暗一点,效果如下图。 
<图20>
16、最后加上阴影,再调整一下细节,完成最终效果。
<图21>

Hot AI Tools

Undresser.AI Undress
AI-powered app for creating realistic nude photos

AI Clothes Remover
Online AI tool for removing clothes from photos.

Undress AI Tool
Undress images for free

Clothoff.io
AI clothes remover

Video Face Swap
Swap faces in any video effortlessly with our completely free AI face swap tool!

Hot Article
Hot Tools

Notepad++7.3.1
Easy-to-use and free code editor

SublimeText3 Chinese version
Chinese version, very easy to use

Zend Studio 13.0.1
Powerful PHP integrated development environment

Dreamweaver CS6
Visual web development tools

SublimeText3 Mac version
God-level code editing software (SublimeText3)
Hot Topics


 Use Python to convert photos into anime-style avatars.
Apr 22, 2023 pm 10:22 PM
Use Python to convert photos into anime-style avatars.
Apr 22, 2023 pm 10:22 PM
Recently, I encountered a problem. I needed to transform my avatar into an anime style. My first thought was to find ready-made wheels. ▲Convert pictures to pixel style to convert avatars into anime style, hoping to convert real photos into anime/cartoon style non-realistic images while maintaining the original image information and texture details. At present, in addition to Baidu API, there are many open source libraries on Github that we can use directly. Among them, AnimeGAN is a study from Wuhan University and Hubei University of Technology. It uses a combination of neural style transfer + generative adversarial network (GAN), and the effect is very consistent with our needs. AnimeGAN first used the Tensorflow framework, but after querying the information, it was found that the project already supports PyTorch.
 Tutorial to restore win11 default avatar
Jan 02, 2024 pm 12:43 PM
Tutorial to restore win11 default avatar
Jan 02, 2024 pm 12:43 PM
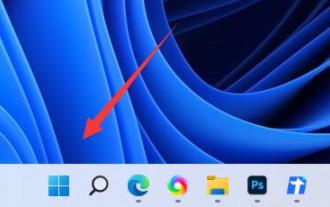
If we change our system account avatar but don’t want it anymore, we can’t find how to change the default avatar in win11. In fact, we only need to find the folder of the default avatar to restore it. Restore the default avatar in win11 1. First click on the "Windows Logo" on the bottom taskbar 2. Then find and open "Settings" 3. Then enter "Account" on the left column 4. Then click on "Account Information" on the right 5. After opening, click "Browse Files" in the selected photo. 6. Finally, enter the "C:\ProgramData\Microsoft\UserAccountPictures" path to find the system default avatar picture.
 How to change account name and avatar in Win10 - Detailed step-by-step guide
Jan 14, 2024 pm 01:45 PM
How to change account name and avatar in Win10 - Detailed step-by-step guide
Jan 14, 2024 pm 01:45 PM
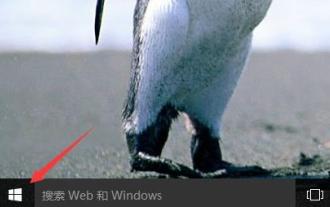
After registering a win10 account, many friends feel that their default avatars are not very good-looking. For this reason, they want to change their avatars. Here is a tutorial on how to change their avatars. If you want to know, you can come and take a look. . How to change the win10 account name and avatar: 1. First click on the lower left corner to start. 2. Then click the avatar above in the pop-up menu. 3. After entering, click "Change Account Settings". 4. Then click "Browse" under the avatar. 5. Find the photo you want to use as your avatar and select it. 6. Finally, the modification is completed successfully.
 How to change boss direct recruitment avatar back to default
Feb 23, 2024 pm 04:07 PM
How to change boss direct recruitment avatar back to default
Feb 23, 2024 pm 04:07 PM
How to change the boss direct recruitment avatar back to the default? The boss direct recruitment avatar can be adjusted at will, but most friends don’t know how to change the boss direct recruitment avatar back to the default. Next is the boss direct recruitment avatar brought to players by the editor. Change back to the default method tutorial, interested players come and take a look! How to change the Boss Direct Recruitment avatar back to the default 1. First open the Boss Direct Recruitment APP, click on the avatar above in the [My] area in the lower right corner of the main page; 2. Then enter the personal information interface and continue to click on the avatar; 3. Then select [ Take photo] and [Select from album] to change back to the default.
 How to modify the avatar in discuz
Aug 08, 2023 pm 03:53 PM
How to modify the avatar in discuz
Aug 08, 2023 pm 03:53 PM
How to modify the avatar in discuz: 1. Log in to the Discuz backend, find the "admin.php" or "admin" directory in the root directory of the website and log in; 2. Enter user management, find and click on the navigation menu on the left or top Enter; 3. Search for users and use the search function to find specific users; 4. Modify the avatar, on the editing page, you can find the avatar option and upload a new avatar; 5. Save the modification; 6. Refresh the page.
 How to implement avatar upload function in Vue
Nov 07, 2023 am 08:01 AM
How to implement avatar upload function in Vue
Nov 07, 2023 am 08:01 AM
Vue is a popular front-end framework that can be used to build highly interactive applications. During the development process, uploading avatars is one of the common requirements. Therefore, in this article, we will introduce how to implement the avatar upload function in Vue and provide specific code examples. Using a third-party library In order to implement the avatar upload function, we can use a third-party library, such as vue-upload-component. This library provides an upload component that can be easily integrated into Vue applications. Here is a simple example
 How to experience the avatar hiding feature of Win11 Canary 26231 preview version?
Jun 25, 2024 pm 10:58 PM
How to experience the avatar hiding feature of Win11 Canary 26231 preview version?
Jun 25, 2024 pm 10:58 PM
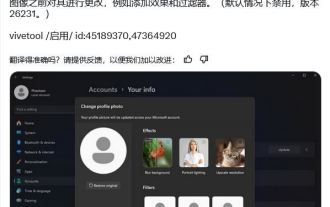
Microsoft released the Windows 11 Build 26231 preview update to the Canary channel yesterday, which mainly optimizes the narrator function. However, the new preview version hides a new feature that can optimize the avatar through filters and AI enhancement. The source @PhantomOfEarth tweeted on the X platform on June 7, digging and discovering hidden features in the preview version of Windows 11 Build 26231. After the user opens the "Account" page of the settings application, a new "Yourinfo" option will appear. . Custom filters Microsoft has brought 6 filters to user avatars, including Nashville, Sutro,
 How to change personal avatar in Google Chrome
Aug 19, 2024 pm 04:51 PM
How to change personal avatar in Google Chrome
Aug 19, 2024 pm 04:51 PM
How to change personal avatar in Google Chrome? Some friends want to make their Google Chrome browser show their personal characteristics, and the avatar is a manifestation of personal style characteristics. The avatar of Google Chrome is generally the default. If you want to modify it, we only need to set it from Settings-You and Google-Customize your Chrome profile. The detailed tutorial is below. If you are interested, come and take a look at this overview of how to modify your personal avatar in Google Chrome. Overview of the tutorial for modifying personal avatar in Google Chrome 1. In the first step, we first click to open Google Chrome, and then click to open the three vertical dots icon in the upper right corner of the browser page. (As shown in the picture) 2. In the second step, we find "Settings" in the menu list
