


How to use the EQ field to enter mathematical formulas in word2003
1. Edit the EQ field code to enter the fraction. It is very simple to enter the fraction by editing the EQ field in the Word document. For example, the steps for entering the fraction four-fifths are as follows: Press the Ctrl+F9 key combination at the corresponding position in the Word document. Enter the EQ field editing state (that is, an empty field with only a pair of curly braces), then position the cursor in the curly braces and enter the EQ field code [EQF(3,4)]. Step 2: Right-click this set of field codes and click the [Switch Field Code] command in the shortcut menu that opens to convert the EQ field code into the standard fraction four-fifths. 2. Edit the EQ field code Enter the radical formula. You can also easily enter the radical formula when editing the EQ field code in a Word document. Take entering the 3rd root of 9 as an example. The specific operations are as follows: Step 1
Apr 26, 2024 am 11:49 AM
How to make a cover picture for a PPT table_One trick to teach you how to make a tall table and quilt
First, we insert pictures into PPT and insert a table at the same time. The size of the table is customized and depends on your layout size. Then overlay the table on the picture, place the table under the picture, and then cut the picture. We then select all the cells in the table, right-click to set the shape format, check Picture or Texture Fill, Insert Picture from Clipboard, and check Tile Picture as Texture. The last step is the key step. Select the cells where you want to insert text, merge them, then fill the cells with color, and finally add text information. A very special table cover is ready. Isn't it very simple? Friends, go and insert the tables and pictures you want according to the above steps and try it out. This is how it works.
Apr 26, 2024 am 11:49 AM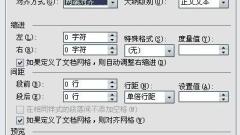
The solution to the sudden problem of a line with extremely large text spacing in Word
Select the modified text and click [Paragraph]. We see that the [conventional alignment method] is - [align both ends]. If the entire paragraph is pure text, modify [Alignment] - [Left Alignment], click [OK] and it will be OK. Just adjust the position according to the situation. Because the editor found that the above method did not work for the problem I encountered. How to adjust, how to delete, I want to adjust the following to the back of the text. It just doesn't work. It turns out that the problem lies here, because the line below the problem line is in English. Because under normal circumstances, English does not wrap lines, and the system is not so intelligent yet. English is uninterrupted. If it wraps lines automatically, the meaning may change. Select the text you want to modify, right-click, [Paragraph]. In [Chinese layout], [line break] allows Spanish characters to be placed in the middle of words
Apr 26, 2024 am 11:43 AM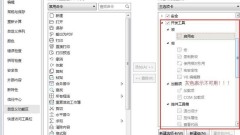
Why does the wps2019 development tool display gray vba_wps2019 development tool displays gray vba and how to deal with it cannot be used
1. First confirm that wps2019 is installed on the computer and can be used normally, then look at the functional area [File]-[Options]-[Customize Ribbon]. You can see that the development tools are basically gray and cannot be used. Use, let’s take a look at how to deal with this problem. 2. Download the VBA plug-in. As shown in the figure, the file with the .exe suffix is the installation package. - Double-click the installation file here to install. 3. The installation pop-up window [next]-[iagree]-[finish] 】The installation is complete. Re-open wps and you can see that the gray parts of [Development Tools] are basically displayed in black, indicating that they are available.
Apr 26, 2024 am 11:40 AM
How to deal with a few extra words in a word printed document
After the word document is processed, you find that there are a few words left on the last page of the document. Click the drop-down menu next to [Quick Access Toolbar] in the upper left corner of Word, and select [Other Commands] in the pop-up drop-down menu. At this time, the [Word Selection] dialog box will pop up. In the [Select a command from the drop-down list location] drop-down list, select [Select [All Commands from the drop-down list] (or select [Print Preview Tab])], and find it in the drop-down menu. [Reduce by one page] function button, select it, and then click the [Add] button to add it to the quick access toolbar list on the right. After returning to the main interface, I found that there is an additional tool button [Reduce by one page] in the quick access toolbar. Click the [Reduce by one page] button, and Word will automatically reduce the entire document based on the text content.
Apr 26, 2024 am 11:40 AM
Steps to continuously cut and copy in Word
1. Take the text below as an example. You need to cut and copy the red words and quickly paste them below. 2. Select a piece of text and use the shortcut key CTLR+F3 instead of the default cut and paste key CTLR+X. You can see that the text has been clipped. 3. Then use the same method to select other red words and cut them one by one. 4. Finally, press Enter to set the cursor to a blank space, use the shortcut keys CTLR+SHIFT+F3, and then you can see that all the previously cut and pasted text has been pasted together.
Apr 26, 2024 am 11:40 AM
How to print the cover in wps_The steps to print the cover in wps
1. Use wps text software to open a Word document. 2. Click the [WPS Text] button in the upper left corner, then click [Print], and then click the [Print Preview] button. 3. You can check the print preview and confirm it is correct. 4. Click the [Print] arrow in the upper left corner, and then click the [Print] button. 5. Generally, the cover page is the first page. After selecting the printer and setting the relevant parameters, click [OK] below.
Apr 26, 2024 am 11:37 AM
Steps to quickly hide paragraph marks in graphics in Word
1. Open word and create a blank document. 2. For example, click Insert Shape to draw a rectangle. 3. As you can see, there is no text in the graphic itself, and there are no paragraph marks. 4. However, if you accidentally click Add Text in the right-click menu on the shape. 5. But there is no need to enter text in the shape, then a paragraph symbol will appear in the shape. 6. Cancel the fill color of the shape, and the paragraph mark will be visible more clearly. If you take a screenshot to intercept this drawn graphic, the paragraph symbols will inevitably be intercepted, causing inappropriate effects. 7. Therefore, it is best to cancel the display of paragraph marks. Then enter the Word option settings window, click the Display tab on the left, and uncheck Display in the list on the right.
Apr 26, 2024 am 11:34 AM
The operation process of quickly aligning table lines in word tables
1. Select the entire table. 2. Move the mouse to the uppermost column line, and the mouse will change to ←‖→. 3. Double-click. The table lines are quickly aligned. 4. Hold down the alt key, the one next to the space, and drag the edge of the table to fine-tune it. It can meet your requirements without requiring a precise number of decimal places.
Apr 26, 2024 am 11:34 AM
Solution to the problem that word canvas cannot be moved
1. If you find that the canvas in Word2016 cannot be moved, you can click the button on the right side of the canvas after selecting it. 2. After clicking the button, a [Layout Options] panel will pop up. If [Embedded] is selected, the canvas cannot be moved. 3. If you want to move the canvas at this time, you can click to select other text wrapping options except embedded type. 4. After selecting other text wrapping options, the canvas can be moved. 5. If there is text around the canvas and you want the canvas to move with it when you move the text, you can click the [Move with text] option in the selection panel. 6. In addition, after selecting the canvas, you can also change the text wrapping method of the canvas in the [Wrap Text] drop-down list in the [Format] tab.
Apr 26, 2024 am 11:31 AM
How to divide columns in word
1. If you want to divide a document into columns, you must first open the document you want to modify. Just open the file directly. As shown in the figure, this document is one column. We are now going to divide the format of this document into Column two. 2. Click the format option on the word toolbar, as shown in the picture. If your software is version 2007 or 2010, then the column options will be displayed directly on the interface, and you can select it directly. 3. The menu that pops up after clicking Format has a column option, as shown in the picture. Click this option with the mouse. 4. Then a small page with specific column settings appears. In this page, the format of a document can be divided into multiple columns. You can directly click on the preview image above. For example, the editor clicks here to divide it into two columns.
Apr 26, 2024 am 11:31 AM
Detailed method of entering circled multiplication sign or plus sign in word
Open the word document, find the place where you want to insert the symbol, select the symbol button under the insert function, select other symbols under the symbol, select the font as symbol, find the symbol with the plus sign in this font, and the symbol with the multiplication sign in the circle is the same. method
Apr 26, 2024 am 11:31 AM
Detailed steps for saving word documents as web pages or XML files
1. Save the word document as a word template. A word template is a word document that contains fixed text format, page settings and layout. Using a word template can be used to create other word documents with the same settings. You can save the currently edited word document as a Word template for subsequent use. The specific operations to save the current word document as a word template are as follows: Step 1. Open the word document window and click the [File] → [Save] menu command in the menu bar. Step 2. In the [Save As] dialog box that opens, click the drop-down triangle button to the right of [Save as Type] and select the [Word Template] option in the drop-down menu. Then enter the word template name in the [File Name] edit box
Apr 26, 2024 am 11:30 AM
How to make a mountain column chart in PPT_This operation will make your chart look taller
First we insert a 3D column chart. Right-click to set the data series format, select [Series Options], and select [Complete Concave Cone] for the cylinder shape. Then we insert a picture material of a mountain peak and insert a triangle on the picture. After that, we first select the picture, then select the triangle, and select [Merge Shapes]-[Intersect] in [Drawing Tool Format], so that the triangle will have the effect of a mountain peak. Finally, cut the triangle, select the column chart, right-click to set the format, select the image or texture fill for fill, and insert the image for fill from the clipboard. In this way, a column chart with a mountainous effect is created. Isn’t it very beautiful?
Apr 26, 2024 am 11:30 AM
Hot tools Tags

Undresser.AI Undress
AI-powered app for creating realistic nude photos

AI Clothes Remover
Online AI tool for removing clothes from photos.

Undress AI Tool
Undress images for free

Clothoff.io
AI clothes remover

Video Face Swap
Swap faces in any video effortlessly with our completely free AI face swap tool!

Hot Article

Hot Tools

vc9-vc14 (32+64 bit) runtime library collection (link below)
Download the collection of runtime libraries required for phpStudy installation

VC9 32-bit
VC9 32-bit phpstudy integrated installation environment runtime library

PHP programmer toolbox full version
Programmer Toolbox v1.0 PHP Integrated Environment

VC11 32-bit
VC11 32-bit phpstudy integrated installation environment runtime library

SublimeText3 Chinese version
Chinese version, very easy to use
Hot Topics
 1655
1655
 14
1414
52
1307
25
1254
29
1228
24
14
1414
52
1307
25
1254
29
1228
24