


How to convert text to table in word
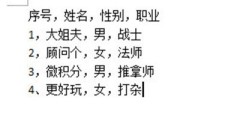
Take the following document as an example, which needs to be converted into a standard table with lines. Copy the text into a word document and select all. Press CTLR+H to bring up the find and replace window and replace all Chinese commas with English commas. This step is key. Click [Insert]-[Table]-[Convert text to table] above. In the dialog box, select [Comma] for [Text Splitting Position]. This is why we need to change the Chinese comma above to an English comma. Of course, you can also customize other characters, as long as they are unified. The last form is generated quickly. 6. After making the table, you can choose a beautiful table style in the [Design] tab above.
Apr 26, 2024 am 11:28 AM
How to make PPT page turning effect_Just one animation effect
First, we open the auxiliary lines in PPT, find the center line of the page, and then insert a rectangle at the center line of the page. Set the lines of this rectangle to no lines, the fill to gradient fill, the fill type to linear, the angle to 60 degrees, and then set two gradient apertures: dark gray/position 25%/transparency 0; dark gray/ Position 100%/Transparency 75. Then copy the rectangle to each page. After this operation, the written effect of the PPT page is completed. Finally, we set the page switching animation of PPT to [Page Curl], so that the page turning effect of PPT is completed, which is very real.
Apr 26, 2024 am 11:28 AM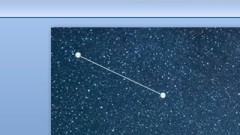
How to make a PPT meteor shower_just two animation effects
First we set a starry sky background in PPT, and then draw a thin white line. Then we add an [Erase] animation to this thin line, with the direction [from the left]. Then we add a [straight line] path animation again to guide the meteor shower's route, and set the starting and ending positions of the meteor shower. After finishing it, we will set the starting method of the path animation to [Before]. Finally, we copy a few more meteor showers and change the delay time. In this way, the effect of the meteor shower is completed.
Apr 26, 2024 am 11:25 AM
How to embed pictures into graphics in PPT_You need to learn this step
First, we insert graphics into the PPT page. We take a rectangle as an example here. After inserting, we adjust the position and size of the layout. Then import the picture you like in PPT and cut the picture with CTRL+X. Then CTRL+G combines the inserted graphics on the page, right-click to set the object and format, select [Picture or Texture Fill] in Fill, and insert the picture from the clipboard. After doing this, the picture you just inserted will be embedded in the graphic. Isn't it very simple?
Apr 26, 2024 am 11:25 AM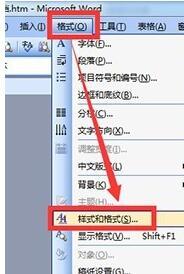
Steps to insert title in word2003
Enter specific text content on the word page. Click [Format] at the top of the interface and select [Style and Format] in the drop-down list. After calling up [Style and Format] on the right side of the interface, click and select which title you want. If the provided styles do not require the specific style, you can click the [New Style] button above. Set the specific format on the [New Style] that pops up, and then click [OK]. According to the above operation process, now you can try inserting a title into a word2003 document.
Apr 26, 2024 am 11:22 AM
Tutorial on setting the automatic scheduled backup interval in wps2019
Open wps2019, click the [File] menu in the upper left corner. In the open file drop-down menu, click the [Options] menu item in the lower left corner. At this time, the options window of wps2019 will open. Click the [Backup Center] button in the lower left corner of the window. In the opened Backup Center window, click the [Settings] button in the lower left corner. In the opened settings window, find the [Backup Mode Switching] setting item on the right, and click to select the [Enable Scheduled Backup] setting item below. Modify the subsequent automatic backup time so that wps2019 documents can be automatically backed up within the specified time.
Apr 26, 2024 am 11:22 AM
Detailed method to quickly create folded titles in word 2013
1. First open word2013. 2. Enter the title you want to add, as shown in the picture, and then select all your text. 3. In the title one on the upper right side of the stand-alone machine, you can also customize a title format. 4. This small symbol is on the lower right side of the stand-alone paragraph tab. 5. An operation bar appears. Click the check mark in the single machine circle and click OK. 6. At this point, a small triangle appears in the title. 7. Enter the main text under the title. Remember, it must be the main text. Then click the small triangle and the text will be folded.
Apr 26, 2024 am 11:22 AM
Tutorial on how to insert endnotes into a document in Word
1. First, we set the cursor to the position in the document where we want to insert the endnote. 2. Then click [Citation]-[Insert Endnote] above. 3. In this way, the endnote is inserted into it, and you can add the content of your endnote inside. If you want to remove the lines above the endnotes, you can do this: 1. First click [View] - [Outline View] above, and then click [References] - [Show Notes] above. 2. In this way, the endnotes can be displayed in the outline view. 3. Then select [Endnote Separator] in the endnote and delete the underline. It is very simple. If you want to delete the endnote, you need to notice that there is a small i icon where the endnote was previously inserted. Delete this icon and the endnote will be deleted.
Apr 26, 2024 am 11:22 AM
Detailed method of inserting and adjusting pictures in word2003
Open word2003, click the [Insert] button at the top of the interface to open the insert function options, as shown in the figure. In the options that open, click [Picture] inside, as shown in the picture. Click [From File] in it, and do not click on anything else to open the file selection window, as shown in the figure. Then click inside to select a picture to be inserted, and click the [Insert] button, as shown in the picture. After that, you can see that the picture is inserted successfully, but the position and size are inappropriate, as shown in the picture. Then click on the inserted picture and adjust the size of the picture through the surrounding points. Press and hold the mouse on the picture and move the mouse to adjust the position of the picture, as shown in the picture.
Apr 26, 2024 am 11:20 AM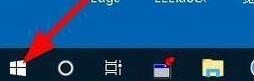
Steps to reset problematic plug-ins in wps2019
Find the Windows logo key in the lower left corner of the computer desktop and click the [Start/wpsOffice/Configuration Tools] menu item. At this time, the wpsOffice configuration tool window will open. Click the [Advanced] button below in the window. The configuration tool window will open. Click the [Reset Repair] tab in the window. In the reset repair window that opens, click the [Reset Plug-in] button. At this time, wps2019 will automatically reset the plug-in. After the reset is completed, the prompt "Reset plug-in completed" will pop up. Click OK.
Apr 26, 2024 am 11:20 AM
How to operate three-dimensional data display in word
1. First, we open the Word document that requires data three-dimensionalization (I use a blank document as an example). Click the Insert button in the function box to insert the shape. Click the function expansion box of the shape and select the stereogram in the basic shape. Click OK to insert the graphic into the document and complete the first step. 3. Continue to select Format in the menu function box, find the drawing tool function in the Format column, and select Shape Fill. 4. Finally, we draw different colors on different surfaces according to the needs of the actual situation, and the data stereogram is completed.
Apr 26, 2024 am 11:20 AM
How to export PPT images_This operation allows you to easily extract images
First, we will make a separate copy of the PPT file from which the picture will be extracted, and then rename it, changing the suffix PPTX to rar or zip compression format. If you cannot see the suffix for your file, you can enter the system file options and remove the [Hide extensions for known file types] option. Then we open the modified RAR file and press the [PPT]-[media] path to enter. Then you can see that all the image files in the PPT are inside. You can just unzip it and extract it.
Apr 26, 2024 am 11:19 AM
PPT multi-paragraph text formatting skills_Teach you a very practical trick
First, we select the text box of the multi-paragraph text, position the mouse before the paragraph, and click [Increase List Level] above to grade the paragraphs. Then we select the Chinese text frame, click [Convert to SmartArt] - [Other SmartArt Graphics] in the [Start] bar above, select [Vertical Frame List] in [List], and click OK. Finally, the text is formatted, and then we can right-click on it to select the style, color and layout, and beautify it. Does the text typesetting in this way look much better than before? Of course, you can also choose other styles for typesetting. It depends on your own preferences. Go and try it according to the steps.
Apr 26, 2024 am 11:13 AM
The operation process of making conference seat cards in word
First, integrate all the personnel lists together and arrange them according to one name per line. Take the following document as an example: first select all the name text, right-click and select [Paragraph] in the menu, select [Line Break and Page Break], and check Select [Page before paragraph]. This way all names are paged separately. Enter [Page Layout], click the expansion arrow next to it in [Page Settings] to enter the settings page, change the page vertical alignment in [Layout] to [Centered], and change the paper orientation to [Landscape]. Finally, select all text to change the font size and font of the text and center it. In this way, all the lists are made into meeting seat cards.
Apr 26, 2024 am 11:13 AM
Hot tools Tags

Undresser.AI Undress
AI-powered app for creating realistic nude photos

AI Clothes Remover
Online AI tool for removing clothes from photos.

Undress AI Tool
Undress images for free

Clothoff.io
AI clothes remover

Video Face Swap
Swap faces in any video effortlessly with our completely free AI face swap tool!

Hot Article

Hot Tools

vc9-vc14 (32+64 bit) runtime library collection (link below)
Download the collection of runtime libraries required for phpStudy installation

VC9 32-bit
VC9 32-bit phpstudy integrated installation environment runtime library

PHP programmer toolbox full version
Programmer Toolbox v1.0 PHP Integrated Environment

VC11 32-bit
VC11 32-bit phpstudy integrated installation environment runtime library

SublimeText3 Chinese version
Chinese version, very easy to use
Hot Topics
 1655
1655
 14
1414
52
1307
25
1253
29
1227
24
14
1414
52
1307
25
1253
29
1227
24