

Graphic tutorial for installing JDK, Tomcat and MySQL on Linux

This article will introduce in detail how to install JDK, Tomcat and MySQL in Linux after installing a virtual machine on Windows. If you are interested, you can learn more
This article will introduce in detail how to install a virtual machine on Windows. How to install JDK, Tomcat and MySQL in Linux, I hope it can help you.
First of all, these installations are run in xshell, what, no xshell? Well, I'll give you the resources. After installation, there will be xshell inside, just open it and use it.
1. Install JDK
I personally recommend using the rpm package when installing. The rpm in Linux is equivalent to the exe in Windows. There is no need to manually set up using the installation method in this article. environment variables.
Here is a resource for JDK-8.
1.1 Upload the local JDK file to the server (Linux)
Many people will use xftp to drag directly to Linux. Although the same effect can be achieved, But this is what a rookie does. Today we will use another method, which is quite crude: typing commands.
Knocking the command will use a software. In the future, yum will be used first to install software. yum puts some popular Linux packages on some relatively fast domestic servers. It downloads the installation package in rpm format and installs it.
Okay, let’s install this software first, command: yum -y install lrzsz;


1.2 Get the rpm package
Use the command:yum -y install jdk-8u141-linux-x64.rpm;

2. Install Tomcat
2.1 Put the Tomcat installation package into Linux
You can use the command line. To save trouble, there is no need for commands here. Just use xftp to drag it into Linux (forgive me). Here is a resource for Tomcat. (How about various resources, I’m pretty good, haha) It is recommended to put all the software you need to decompress under the /data directory. If there is no such directory, you can directly Create this directory under the root directory. The command to create this directory: mkdir /data Enter the /data directory and copy (cut) the Tomcat compressed package to the /data directory:
2.2 Decompress the Tomcat compressed package
Use the command: tar -xzvf apache-tomcat-8.0.45.tar. gzAmong them:V: represents the display of the decompression process;
Z: represents whether this is a compressed package, Generally speaking, if it ends with gz, it means a compressed package;
F: means recursive decompression;

2.3 Check whether Tomcat is started
Some people may have questions, why don’t you check whether Tomcat is started? Sometimes the Tomcat port is occupied, so Will fail to start. Check whether the command is started: ps aux|grep tomcat
2.4 Stop the firewall
Command:service iptables stop


3. Install the latest version mysql 5.7
On the official website of MySQL, there is a link: A Quick Guide to Using the MySQL Yum Repository.
Now, I will walk you through the installation process according to this address.
3.1 Create yum source
Create yum source. The file name can be chosen casually, but the official website recommends naming it mysql-community.repo, so create a new file with the extension repo and the file content. As follows:
[mysql57-community]
name=MySQL 5.7 Community Server
baseurl=http://repo.mysql.com/yum/mysql-5.7-community/el/6/$basearch/
enabled=1
gpgcheck=0
gpgkey=file:///etc/pki/rpm-gpg/RPM-GPG-KEY-mysql
Upload this file to /etc/yum.repos.d/.
Then use the command: yum search mysql, you will find an extra line at the bottom:

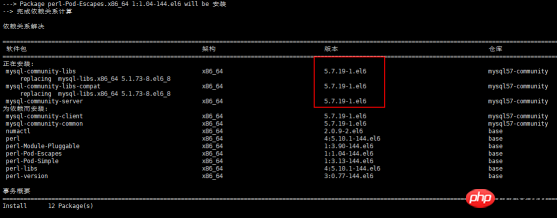
3.2 Install mysql
Use command: yum install mysql-community-server
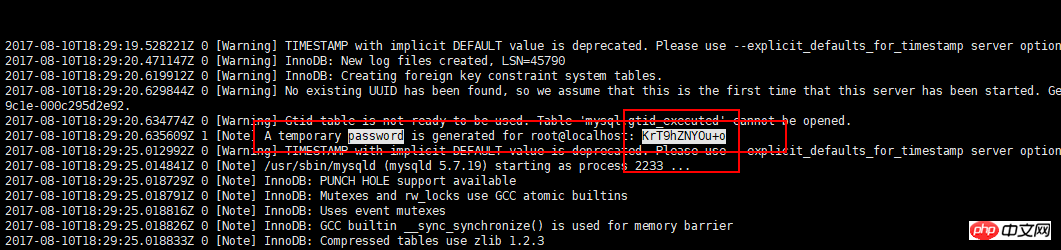
##3.3 Restart mysql
Use command:service mysqld restart
3.4 View login password

3.5 Log in to the mysql client
Use the command:mysql -u root -p

ALTER USER 'root'@'localhost' IDENTIFIED BY 'MyNewPass4!';
uninstall plugin validate_password;
ALTER USER 'root'@'localhost' IDENTIFIED BY '123456';
Copy code The code is as follows:
grant all privileges on *.* to 'root'@'%' identified by '123456' with grant option;Then use Navicat under Windows to connect to the database.3.6 Modify the default encoding
After using Navicat to connect to the database, the default encoding format is Latin, so you need to modify the default encoding format. Modify the configuration file /etc/my.cnf. When changing the file again, develop a habit of making a backup copy before modifying it. Use vi /etc/my.cnf, then find mysqld, add a linecharacter_set_server=utf8

The above is the detailed content of Graphic tutorial for installing JDK, Tomcat and MySQL on Linux. For more information, please follow other related articles on the PHP Chinese website!

Hot AI Tools

Undresser.AI Undress
AI-powered app for creating realistic nude photos

AI Clothes Remover
Online AI tool for removing clothes from photos.

Undress AI Tool
Undress images for free

Clothoff.io
AI clothes remover

Video Face Swap
Swap faces in any video effortlessly with our completely free AI face swap tool!

Hot Article
Hot Tools

Notepad++7.3.1
Easy-to-use and free code editor

SublimeText3 Chinese version
Chinese version, very easy to use

Zend Studio 13.0.1
Powerful PHP integrated development environment

Dreamweaver CS6
Visual web development tools

SublimeText3 Mac version
God-level code editing software (SublimeText3)
Hot Topics
 1662
1662
 14
1419
52
1313
25
1262
29
1236
24
14
1419
52
1313
25
1262
29
1236
24

 MySQL and phpMyAdmin: Core Features and Functions
Apr 22, 2025 am 12:12 AM
MySQL and phpMyAdmin: Core Features and Functions
Apr 22, 2025 am 12:12 AM
MySQL and phpMyAdmin are powerful database management tools. 1) MySQL is used to create databases and tables, and to execute DML and SQL queries. 2) phpMyAdmin provides an intuitive interface for database management, table structure management, data operations and user permission management.
 Docker on Linux: Containerization for Linux Systems
Apr 22, 2025 am 12:03 AM
Docker on Linux: Containerization for Linux Systems
Apr 22, 2025 am 12:03 AM
Docker is important on Linux because Linux is its native platform that provides rich tools and community support. 1. Install Docker: Use sudoapt-getupdate and sudoapt-getinstalldocker-cedocker-ce-clicotainerd.io. 2. Create and manage containers: Use dockerrun commands, such as dockerrun-d--namemynginx-p80:80nginx. 3. Write Dockerfile: Optimize the image size and use multi-stage construction. 4. Optimization and debugging: Use dockerlogs and dockerex
 Explain the purpose of foreign keys in MySQL.
Apr 25, 2025 am 12:17 AM
Explain the purpose of foreign keys in MySQL.
Apr 25, 2025 am 12:17 AM
In MySQL, the function of foreign keys is to establish the relationship between tables and ensure the consistency and integrity of the data. Foreign keys maintain the effectiveness of data through reference integrity checks and cascading operations. Pay attention to performance optimization and avoid common errors when using them.
 Compare and contrast MySQL and MariaDB.
Apr 26, 2025 am 12:08 AM
Compare and contrast MySQL and MariaDB.
Apr 26, 2025 am 12:08 AM
The main difference between MySQL and MariaDB is performance, functionality and license: 1. MySQL is developed by Oracle, and MariaDB is its fork. 2. MariaDB may perform better in high load environments. 3.MariaDB provides more storage engines and functions. 4.MySQL adopts a dual license, and MariaDB is completely open source. The existing infrastructure, performance requirements, functional requirements and license costs should be taken into account when choosing.
 SQL vs. MySQL: Clarifying the Relationship Between the Two
Apr 24, 2025 am 12:02 AM
SQL vs. MySQL: Clarifying the Relationship Between the Two
Apr 24, 2025 am 12:02 AM
SQL is a standard language for managing relational databases, while MySQL is a database management system that uses SQL. SQL defines ways to interact with a database, including CRUD operations, while MySQL implements the SQL standard and provides additional features such as stored procedures and triggers.
 CentOS: Security, Stability, and Performance
Apr 21, 2025 am 12:11 AM
CentOS: Security, Stability, and Performance
Apr 21, 2025 am 12:11 AM
CentOS is the first choice for server and enterprise environments for its superior security, stability and performance. 1) Security provides forced access control through SELinux to improve system security. 2) Stability is supported by the LTS version for up to 10 years to ensure the stability of the system. 3) Performance significantly improves system response speed and resource utilization by optimizing kernel and system configuration.
 How does MySQL differ from Oracle?
Apr 22, 2025 pm 05:57 PM
How does MySQL differ from Oracle?
Apr 22, 2025 pm 05:57 PM
MySQL is suitable for rapid development and small and medium-sized applications, while Oracle is suitable for large enterprises and high availability needs. 1) MySQL is open source and easy to use, suitable for web applications and small and medium-sized enterprises. 2) Oracle is powerful and suitable for large enterprises and government agencies. 3) MySQL supports a variety of storage engines, and Oracle provides rich enterprise-level functions.
 Linux: A Deep Dive into Its Fundamental Parts
Apr 21, 2025 am 12:03 AM
Linux: A Deep Dive into Its Fundamental Parts
Apr 21, 2025 am 12:03 AM
The core components of Linux include kernel, file system, shell, user and kernel space, device drivers, and performance optimization and best practices. 1) The kernel is the core of the system, managing hardware, memory and processes. 2) The file system organizes data and supports multiple types such as ext4, Btrfs and XFS. 3) Shell is the command center for users to interact with the system and supports scripting. 4) Separate user space from kernel space to ensure system stability. 5) The device driver connects the hardware to the operating system. 6) Performance optimization includes tuning system configuration and following best practices.
