
 Database
Mysql Tutorial
Detailed explanation of the installation tutorial of MySQL5.6.36 under Windows x64 version (picture)
Database
Mysql Tutorial
Detailed explanation of the installation tutorial of MySQL5.6.36 under Windows x64 version (picture)
Detailed explanation of the installation tutorial of MySQL5.6.36 under Windows x64 version (picture)

This article mainly introduces the Installation tutorial of MySQL 5.6.36 Windows x64-bit version. It is very good and has reference value. Friends who need it can refer to it
1, Target environment
Windows 7 64-bit
2,Material
(1) VC++2010 release package (64-bit)
(2) MySQL 5.6.36 Windows x64-bit version (non-MSI, you can get the free version from the official website)
(3) EditPlus (optional)
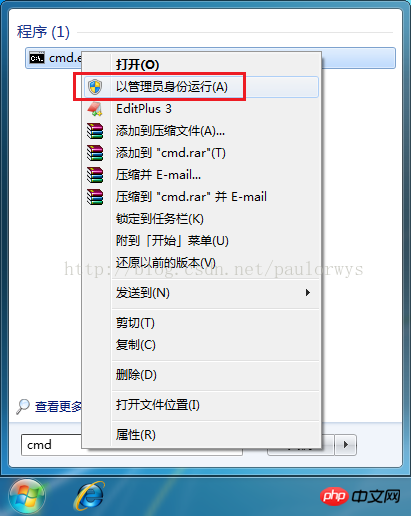
Part of this article The operation needs to be performed as an administrator + command line.
4, step
(1) (Extract to the current folder) Unzip the installation package , edit the my-default.ini file, mainly 2 items:
①basedir is the mysql base folder, in the shape of: C:\mysql-5.6.36-winx64
②datadir is the mysq data folder, in the shape of: C:\mysql-5.6.36-winx64\data
(2) Install VC++2010 release package 64-bit release package
(3) Install mysql service
Use the command line (run as administrator) to execute mysqld.exe under the bin folder in the mysql installation folder: mysqld -install
If the machine has not installed mysql database, it will prompt OK, otherwise it will prompt an error that the service already exists. You need to deletethe installed service first.
(4) [Optional] Delete the existing mysql service
sc delete mysql (administrator rights required), and then install the service (step 3)
(5) Start the service
net start mysql
(Stop the service: net stop mysql)
(6) Set the password of the root user
mysqladmin -u root -p password (这里的password用来指明管理类型,不是具体要设置的密码)
① Enter the original password first, and if the original password is empty, just press Enter
② and ③Enter the new password
##5, others
Modification of related configurations or operations requires restarting the service (stop and restart) to be effective. ①Allow remote host access Log in to the mysql database (system database) locally on the server, enter the user table of the mysql library, Just stop and start the mysql service.The above is the detailed content of Detailed explanation of the installation tutorial of MySQL5.6.36 under Windows x64 version (picture). For more information, please follow other related articles on the PHP Chinese website!

Hot AI Tools

Undresser.AI Undress
AI-powered app for creating realistic nude photos

AI Clothes Remover
Online AI tool for removing clothes from photos.

Undress AI Tool
Undress images for free

Clothoff.io
AI clothes remover

Video Face Swap
Swap faces in any video effortlessly with our completely free AI face swap tool!

Hot Article
Hot Tools

Notepad++7.3.1
Easy-to-use and free code editor

SublimeText3 Chinese version
Chinese version, very easy to use

Zend Studio 13.0.1
Powerful PHP integrated development environment

Dreamweaver CS6
Visual web development tools

SublimeText3 Mac version
God-level code editing software (SublimeText3)
Hot Topics


 Laravel Introduction Example
Apr 18, 2025 pm 12:45 PM
Laravel Introduction Example
Apr 18, 2025 pm 12:45 PM
Laravel is a PHP framework for easy building of web applications. It provides a range of powerful features including: Installation: Install the Laravel CLI globally with Composer and create applications in the project directory. Routing: Define the relationship between the URL and the handler in routes/web.php. View: Create a view in resources/views to render the application's interface. Database Integration: Provides out-of-the-box integration with databases such as MySQL and uses migration to create and modify tables. Model and Controller: The model represents the database entity and the controller processes HTTP requests.
 Solve database connection problem: a practical case of using minii/db library
Apr 18, 2025 am 07:09 AM
Solve database connection problem: a practical case of using minii/db library
Apr 18, 2025 am 07:09 AM
I encountered a tricky problem when developing a small application: the need to quickly integrate a lightweight database operation library. After trying multiple libraries, I found that they either have too much functionality or are not very compatible. Eventually, I found minii/db, a simplified version based on Yii2 that solved my problem perfectly.
 Laravel framework installation method
Apr 18, 2025 pm 12:54 PM
Laravel framework installation method
Apr 18, 2025 pm 12:54 PM
Article summary: This article provides detailed step-by-step instructions to guide readers on how to easily install the Laravel framework. Laravel is a powerful PHP framework that speeds up the development process of web applications. This tutorial covers the installation process from system requirements to configuring databases and setting up routing. By following these steps, readers can quickly and efficiently lay a solid foundation for their Laravel project.
 MySQL vs. Other Programming Languages: A Comparison
Apr 19, 2025 am 12:22 AM
MySQL vs. Other Programming Languages: A Comparison
Apr 19, 2025 am 12:22 AM
Compared with other programming languages, MySQL is mainly used to store and manage data, while other languages such as Python, Java, and C are used for logical processing and application development. MySQL is known for its high performance, scalability and cross-platform support, suitable for data management needs, while other languages have advantages in their respective fields such as data analytics, enterprise applications, and system programming.
 MySQL and phpMyAdmin: Core Features and Functions
Apr 22, 2025 am 12:12 AM
MySQL and phpMyAdmin: Core Features and Functions
Apr 22, 2025 am 12:12 AM
MySQL and phpMyAdmin are powerful database management tools. 1) MySQL is used to create databases and tables, and to execute DML and SQL queries. 2) phpMyAdmin provides an intuitive interface for database management, table structure management, data operations and user permission management.
 How to solve complex BelongsToThrough relationship problem in Laravel? Use Composer!
Apr 17, 2025 pm 09:54 PM
How to solve complex BelongsToThrough relationship problem in Laravel? Use Composer!
Apr 17, 2025 pm 09:54 PM
In Laravel development, dealing with complex model relationships has always been a challenge, especially when it comes to multi-level BelongsToThrough relationships. Recently, I encountered this problem in a project dealing with a multi-level model relationship, where traditional HasManyThrough relationships fail to meet the needs, resulting in data queries becoming complex and inefficient. After some exploration, I found the library staudenmeir/belongs-to-through, which easily installed and solved my troubles through Composer.
 MySQL for Beginners: Getting Started with Database Management
Apr 18, 2025 am 12:10 AM
MySQL for Beginners: Getting Started with Database Management
Apr 18, 2025 am 12:10 AM
The basic operations of MySQL include creating databases, tables, and using SQL to perform CRUD operations on data. 1. Create a database: CREATEDATABASEmy_first_db; 2. Create a table: CREATETABLEbooks(idINTAUTO_INCREMENTPRIMARYKEY, titleVARCHAR(100)NOTNULL, authorVARCHAR(100)NOTNULL, published_yearINT); 3. Insert data: INSERTINTObooks(title, author, published_year)VA
 laravel installation code
Apr 18, 2025 pm 12:30 PM
laravel installation code
Apr 18, 2025 pm 12:30 PM
To install Laravel, follow these steps in sequence: Install Composer (for macOS/Linux and Windows) Install Laravel Installer Create a new project Start Service Access Application (URL: http://127.0.0.1:8000) Set up the database connection (if required)
