
 Database
Mysql Tutorial
MySQL - Detailed explanation of reading and writing separation based on Amoeba (picture and text)
Database
Mysql Tutorial
MySQL - Detailed explanation of reading and writing separation based on Amoeba (picture and text)
MySQL - Detailed explanation of reading and writing separation based on Amoeba (picture and text)

Today, we continue the topic of MySQL, and today we bring you an article on a solution to realize MySQL read-write separation based on Amoeba, so let’s go directly to the topic of today.
1. Server planning
| Host name | IP address | Node |
| liuyazhuang152 | 192.168.0.152 | amoeba |
| liuyazhuang153 | 192.168.0.153 | Write library |
| liuyazhuang154 | 192.168.0.154 | Read library |
2. Test plan
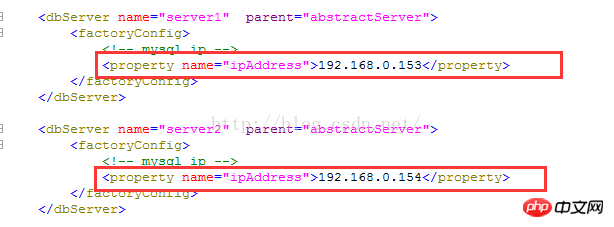
We installed amoeba on 192.168.0.152, and installed mysql on 192.168.0.153 and 192.168.0.154. There is no intersection between these two mysql servers. By configuring amoeba, 192.168. MySQL on 0.153 is configured as a writing database, and MySQL on 192.168.0.154 is configured as a reading database; our client connects to amoeba, and amoeba operates the database. We write data to the corresponding database through amoeba, and use query: The 192.168.0.153 server MySQL has inserted relevant data, but the MySQL server on 192.168.0.154 does not; then, we think that amoeba has helped our program complete the read-write separation function;
3. Install MySQL
Please refer to the blog post "MySQL-CentOS6.5 Compile and Install MySQL5.6.16 Detailed Code Introduction"
4. Install and configure Amoeba
1 , Download Amoeba
We can go to https://sourceforge.net/projects/amoeba/ to download Amoeba. What I downloaded here is amoeba-mysql-binary-2.2 .0.tar.gz
2. Install Amoeba
Amoeba is written in Java, so we need our server to configure the Java operating environment. I will not talk about how to configure Java here. Running environment
Since there are no files directly after Amoeba is decompressed, we need to create a folder in advance. I will create a folder under /usr/local: amoeba-mysql-binary-2.2.0
Then enter the following command on the command line
tar -zxvf amoeba-mysql-binary-2.2.0.tar.gz -C /usr/local/amoeba-mysql-binary-2.2.0
Extract Amoeba to the /usr/local/amoeba-mysql-binary-2.2.0 directory. At this time, we have completed the installation.
3. Configure Amoeba
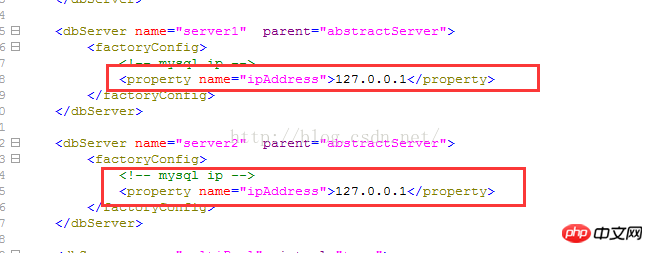
We go to Amoeba’s conf directory and see the following Configuration file:
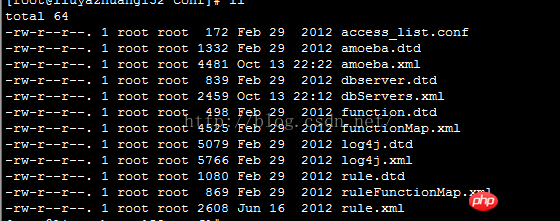
Here we focus on amoeba.xml and dbServers.xml files.
3.1 Configure amoeba.xml
We open the amoeba.xml file and find the following code:
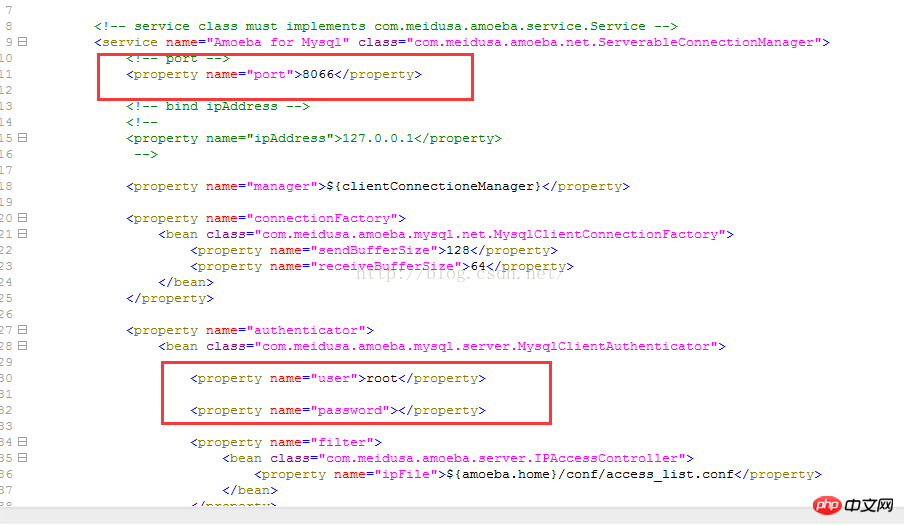
We Configure the user name and password, of which 8066 is the default port of Amoeba. The configured effect is as follows:


comment , the effect is as follows:

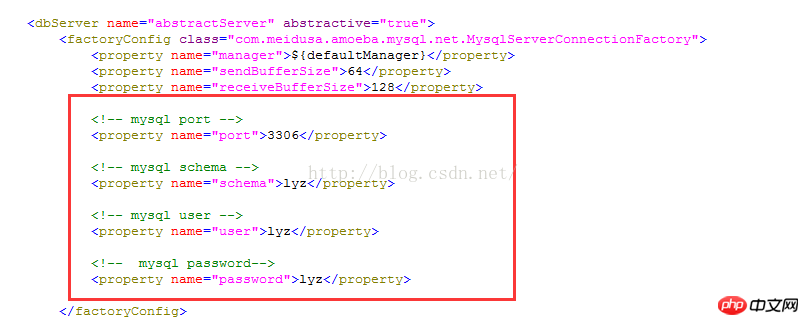
grant all on lyz.* to lyz@192.168.0.152 identified by 'lyz';
./amoeba start &


此时我们重新输入命令
./amoeba start &

启动成功
6、测试
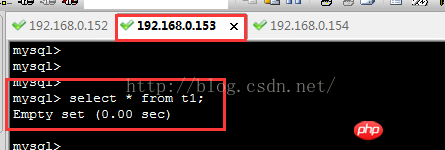
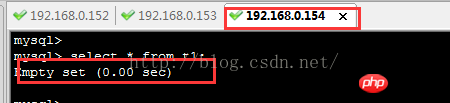
6.1 查询数据
我们先分别查询MySQL数据库表上的相关数据,未通过Amoeba操作数据库的时候,我们是新建的数据库lyz和表t1,此时192.168.0.153和192.168.0.154上MySQL数据表都应该为空,如下图:
6.2登录Amoeba
我们在192.168.0.152上输入如下命令登录Amoeba,通过Amoeba访问数据库
mysql -h192.168.0.152 -uroot -proot -P 8066
注意:我们这里输入的端口是8066,此端口是Amoeba配置的端口,我们需要登录Amoeba而不是直接登录MySQL
登录成功如下图所示:

6.3测试
此时我们在终端查询数据表数据,显示为空,如下图:

我们在Amoeba服务器终端插入一条数据,如下:

同时,我们在Amoeba上查询数据如下:

数据为空。
我们登录192.168.0.153数据库,查看表数据如下:
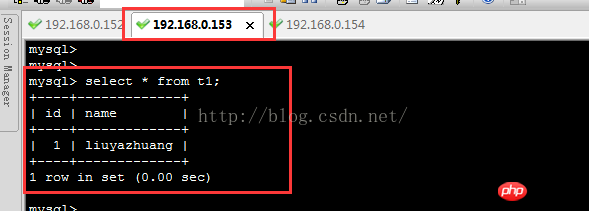
如图,说明Amoeba向192.168.0.153库插入了数据。
我们在登录192.168.0.154数据库查看数据信息,如下:
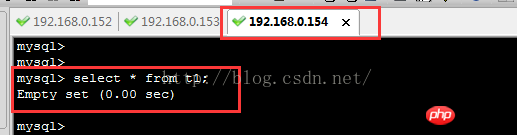
说明Amoeba没有向192.168.0.154库插入数据,并从192.168.0.154库读取数据。
至此,基于Amoeba实现MySQL读写分离全部配置完成。
五、附录
./amoeba start & 启动amoeba
./amoeba stop  关闭amoeba
The above is the detailed content of MySQL - Detailed explanation of reading and writing separation based on Amoeba (picture and text). For more information, please follow other related articles on the PHP Chinese website!

Hot AI Tools

Undresser.AI Undress
AI-powered app for creating realistic nude photos

AI Clothes Remover
Online AI tool for removing clothes from photos.

Undress AI Tool
Undress images for free

Clothoff.io
AI clothes remover

Video Face Swap
Swap faces in any video effortlessly with our completely free AI face swap tool!

Hot Article
Hot Tools

Notepad++7.3.1
Easy-to-use and free code editor

SublimeText3 Chinese version
Chinese version, very easy to use

Zend Studio 13.0.1
Powerful PHP integrated development environment

Dreamweaver CS6
Visual web development tools

SublimeText3 Mac version
God-level code editing software (SublimeText3)
Hot Topics


 MySQL: An Introduction to the World's Most Popular Database
Apr 12, 2025 am 12:18 AM
MySQL: An Introduction to the World's Most Popular Database
Apr 12, 2025 am 12:18 AM
MySQL is an open source relational database management system, mainly used to store and retrieve data quickly and reliably. Its working principle includes client requests, query resolution, execution of queries and return results. Examples of usage include creating tables, inserting and querying data, and advanced features such as JOIN operations. Common errors involve SQL syntax, data types, and permissions, and optimization suggestions include the use of indexes, optimized queries, and partitioning of tables.
 How to connect to the database of apache
Apr 13, 2025 pm 01:03 PM
How to connect to the database of apache
Apr 13, 2025 pm 01:03 PM
Apache connects to a database requires the following steps: Install the database driver. Configure the web.xml file to create a connection pool. Create a JDBC data source and specify the connection settings. Use the JDBC API to access the database from Java code, including getting connections, creating statements, binding parameters, executing queries or updates, and processing results.
 MySQL's Place: Databases and Programming
Apr 13, 2025 am 12:18 AM
MySQL's Place: Databases and Programming
Apr 13, 2025 am 12:18 AM
MySQL's position in databases and programming is very important. It is an open source relational database management system that is widely used in various application scenarios. 1) MySQL provides efficient data storage, organization and retrieval functions, supporting Web, mobile and enterprise-level systems. 2) It uses a client-server architecture, supports multiple storage engines and index optimization. 3) Basic usages include creating tables and inserting data, and advanced usages involve multi-table JOINs and complex queries. 4) Frequently asked questions such as SQL syntax errors and performance issues can be debugged through the EXPLAIN command and slow query log. 5) Performance optimization methods include rational use of indexes, optimized query and use of caches. Best practices include using transactions and PreparedStatemen
 Why Use MySQL? Benefits and Advantages
Apr 12, 2025 am 12:17 AM
Why Use MySQL? Benefits and Advantages
Apr 12, 2025 am 12:17 AM
MySQL is chosen for its performance, reliability, ease of use, and community support. 1.MySQL provides efficient data storage and retrieval functions, supporting multiple data types and advanced query operations. 2. Adopt client-server architecture and multiple storage engines to support transaction and query optimization. 3. Easy to use, supports a variety of operating systems and programming languages. 4. Have strong community support and provide rich resources and solutions.
 MySQL's Role: Databases in Web Applications
Apr 17, 2025 am 12:23 AM
MySQL's Role: Databases in Web Applications
Apr 17, 2025 am 12:23 AM
The main role of MySQL in web applications is to store and manage data. 1.MySQL efficiently processes user information, product catalogs, transaction records and other data. 2. Through SQL query, developers can extract information from the database to generate dynamic content. 3.MySQL works based on the client-server model to ensure acceptable query speed.
 How to start mysql by docker
Apr 15, 2025 pm 12:09 PM
How to start mysql by docker
Apr 15, 2025 pm 12:09 PM
The process of starting MySQL in Docker consists of the following steps: Pull the MySQL image to create and start the container, set the root user password, and map the port verification connection Create the database and the user grants all permissions to the database
 Laravel Introduction Example
Apr 18, 2025 pm 12:45 PM
Laravel Introduction Example
Apr 18, 2025 pm 12:45 PM
Laravel is a PHP framework for easy building of web applications. It provides a range of powerful features including: Installation: Install the Laravel CLI globally with Composer and create applications in the project directory. Routing: Define the relationship between the URL and the handler in routes/web.php. View: Create a view in resources/views to render the application's interface. Database Integration: Provides out-of-the-box integration with databases such as MySQL and uses migration to create and modify tables. Model and Controller: The model represents the database entity and the controller processes HTTP requests.
 Solve database connection problem: a practical case of using minii/db library
Apr 18, 2025 am 07:09 AM
Solve database connection problem: a practical case of using minii/db library
Apr 18, 2025 am 07:09 AM
I encountered a tricky problem when developing a small application: the need to quickly integrate a lightweight database operation library. After trying multiple libraries, I found that they either have too much functionality or are not very compatible. Eventually, I found minii/db, a simplified version based on Yii2 that solved my problem perfectly.
