
 Operation and Maintenance
Linux Operation and Maintenance
Linux Learning Part 3: Detailed Introduction to Centos7 Installation of Mysql5.7.16 Database
Operation and Maintenance
Linux Operation and Maintenance
Linux Learning Part 3: Detailed Introduction to Centos7 Installation of Mysql5.7.16 Database
Linux Learning Part 3: Detailed Introduction to Centos7 Installation of Mysql5.7.16 Database

This article mainly introduces the third article of LinuxLearning in detail, Centos7installationmysql5.7.16 database, which has certain reference value. Interested friends can refer to
Foreword: Installing mysql under Linux is not as simple as under Windows, but it is not difficult either. This article explains to you how to install mysql5.7 version under Centos7. If there are any problems or errors, please point them out.
Version: mysql-5.7.16-1.el7.x86_64.rpm-bundle.tar
Note: Before installation, you need to confirm whether the current system has mysql. If so, it must be uninstalled (centos7 comes with the mariaDb database, so the first The first step is to uninstall the database)
View mysql database:
rpm -qa | grep -i mysql
Uninstall the mysql database:
rpm -e [mysql文件名]
If there are associated files, you cannot uninstall it directly. You can use the following command to force uninstall
rpm -e --nodeps [mysql文件名]
1. Copy mysql-5.7.16-1.el7.x86_64.rpm-bundle.tar to /home/ (When installing software under Linux, you generally need to copy the files to the home directory)
cp mysql-5.7.16-1.el7.x86_64.rpm-bundle.tar /home/
2. Unzip the files
tar -xvf mysql-5.7.16-1.el7.x86_64.rpm-bundle.tar
The following are all the rpm files extracted

3. Unzip and install the rpm file
1. Generally, you only need to install the following files
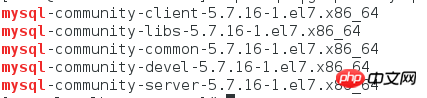
2. Next, use the command to decompress the rpm files one by one and install them.
Note: There is a detail here Everyone needs to pay attention to the fact that the above files are also in order during installation, and they have corresponding priorities. So you need to unzip and install one by one in the following order
mysql-community-common-5.7.16-1.el7.x86_64
mysql-community-libs-5.7.16-1.el7.x86_64
mysql-community-client-5.7.16-1.el7.x86_64
mysql-community-server-5.7.16-1.el7.x86_64
mysql-community-devel-5.7.16-1.el7.x86_64
4. After the installation is successful, start the mysql service
systemctl start mysqld.service
5. Check the 3306 port Whether to enable
netstat -ln | grep 3306

6. Modify the my.cnf configuration file
1. This The first step is to find the my.cnf file. The default path of the my.cnf file is /etc/my.cnf
2. Edit my.cnf
vim /etc/my.cnf
3. Press 'i' to enter After inserting the mode, insert the following code
[mysqld]
datadir=/var/lib/mysql
socket=/var/lib/mysql/mysql.sock
symbolic-links=0
log-error=/var/log/mysqld.log
pid-file=/var/run/mysqld/mysqld.pid
validate_password=off
default-storage-engine=INNODB
character-set-server=utf8
collation-server=utf8_general_ci
Note: validate_password=off means to turn off the password verification plug-in (this sentence must be added because when changing the password It will be very troublesome if you don’t add it.)
4. Save and Exit (After pressing 'esc', enter ':wq')

5 Restart the mysql service
systemctl restart mysqld.service
7. This step is particularly important. Each previous step must be carefully tested and executed successfully.
1. Initialization table
/user/sbin/mysqld --initialize --user=mysql
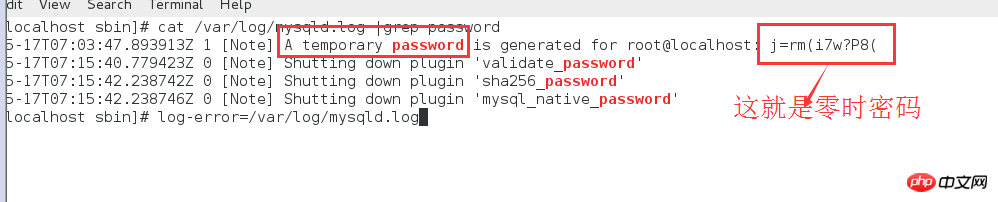
2. After initialization, a mysql zero-time login password will be generated, so where can I check it? The log path configured in the my.cnf file is log-error=/var/log/mysqld.log. Check the mysqld.log log under this path and find the zero-hour password
cat /var/log/mysqld.log |grep password
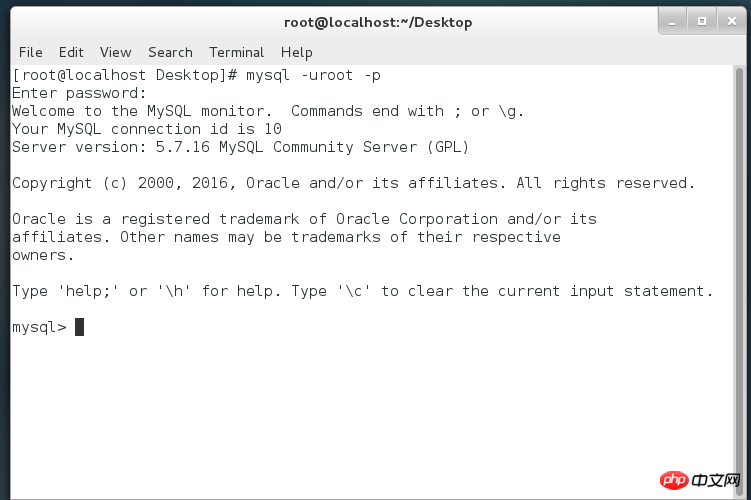
3. Re-modify the password of the mysql database based on the zero-hour password
mysql_secure_installation
4. After pressing Enter, he will ask you to enter the password. You only need to enter the zero-hour password.
5. After entering the correct password, enter the new password and confirm.
8. After successfully changing the password, you can log in to mysql
The above is the detailed content of Linux Learning Part 3: Detailed Introduction to Centos7 Installation of Mysql5.7.16 Database. For more information, please follow other related articles on the PHP Chinese website!

Hot AI Tools

Undresser.AI Undress
AI-powered app for creating realistic nude photos

AI Clothes Remover
Online AI tool for removing clothes from photos.

Undress AI Tool
Undress images for free

Clothoff.io
AI clothes remover

Video Face Swap
Swap faces in any video effortlessly with our completely free AI face swap tool!

Hot Article
Hot Tools

Notepad++7.3.1
Easy-to-use and free code editor

SublimeText3 Chinese version
Chinese version, very easy to use

Zend Studio 13.0.1
Powerful PHP integrated development environment

Dreamweaver CS6
Visual web development tools

SublimeText3 Mac version
God-level code editing software (SublimeText3)
Hot Topics
 1664
1664
 14
1423
52
1317
25
1268
29
1243
24
14
1423
52
1317
25
1268
29
1243
24

 Linux Architecture: Unveiling the 5 Basic Components
Apr 20, 2025 am 12:04 AM
Linux Architecture: Unveiling the 5 Basic Components
Apr 20, 2025 am 12:04 AM
The five basic components of the Linux system are: 1. Kernel, 2. System library, 3. System utilities, 4. Graphical user interface, 5. Applications. The kernel manages hardware resources, the system library provides precompiled functions, system utilities are used for system management, the GUI provides visual interaction, and applications use these components to implement functions.
 How to check the warehouse address of git
Apr 17, 2025 pm 01:54 PM
How to check the warehouse address of git
Apr 17, 2025 pm 01:54 PM
To view the Git repository address, perform the following steps: 1. Open the command line and navigate to the repository directory; 2. Run the "git remote -v" command; 3. View the repository name in the output and its corresponding address.
 vscode Previous Next Shortcut Key
Apr 15, 2025 pm 10:51 PM
vscode Previous Next Shortcut Key
Apr 15, 2025 pm 10:51 PM
VS Code One-step/Next step shortcut key usage: One-step (backward): Windows/Linux: Ctrl ←; macOS: Cmd ←Next step (forward): Windows/Linux: Ctrl →; macOS: Cmd →
 How to run java code in notepad
Apr 16, 2025 pm 07:39 PM
How to run java code in notepad
Apr 16, 2025 pm 07:39 PM
Although Notepad cannot run Java code directly, it can be achieved by using other tools: using the command line compiler (javac) to generate a bytecode file (filename.class). Use the Java interpreter (java) to interpret bytecode, execute the code, and output the result.
 How to run sublime after writing the code
Apr 16, 2025 am 08:51 AM
How to run sublime after writing the code
Apr 16, 2025 am 08:51 AM
There are six ways to run code in Sublime: through hotkeys, menus, build systems, command lines, set default build systems, and custom build commands, and run individual files/projects by right-clicking on projects/files. The build system availability depends on the installation of Sublime Text.
 What is the main purpose of Linux?
Apr 16, 2025 am 12:19 AM
What is the main purpose of Linux?
Apr 16, 2025 am 12:19 AM
The main uses of Linux include: 1. Server operating system, 2. Embedded system, 3. Desktop operating system, 4. Development and testing environment. Linux excels in these areas, providing stability, security and efficient development tools.
 laravel installation code
Apr 18, 2025 pm 12:30 PM
laravel installation code
Apr 18, 2025 pm 12:30 PM
To install Laravel, follow these steps in sequence: Install Composer (for macOS/Linux and Windows) Install Laravel Installer Create a new project Start Service Access Application (URL: http://127.0.0.1:8000) Set up the database connection (if required)
 git software installation
Apr 17, 2025 am 11:57 AM
git software installation
Apr 17, 2025 am 11:57 AM
Installing Git software includes the following steps: Download the installation package and run the installation package to verify the installation configuration Git installation Git Bash (Windows only)
