

Autogen에서 코드 집행자를 사용하여 복잡한 작업을 수행하십시오

AI agents are designed to act autonomously, solving problems and executing tasks in dynamic environments. A key feature in Autogen, enabling their adaptability is AutoGen’s code executors. This feature along with LLMs enables AI agents to generate, evaluate, and execute code in real-time. This capability bridges the gap between static AI models and actionable intelligence. By automating workflows, performing data analysis, and debugging complex systems, it transforms agents from mere thinkers into effective doers. In this article, we will learn more about code executors in AutoGen and how to implement them.
Table of Contents
- Types of Code Executors in AutoGen
- How to Build AI Agents with Code Executors in AutoGen?
- Pre-requisites
- Building an AI Agent Using Command Line Executor
- Building an ML Model Using Jupyter Code Executor
- Building an AI Agent Using Custom Executor
- Conclusion
- Frequently Asked Questions
Types of Code Executors in AutoGen
AutoGen has three kinds of code executors that can be used for different purposes.
- Command Line Executor: It allows AI agents to run the code in the command line. It will save each code block to a separate file and execute that file. This executor is ideal for automating tasks like file management, script execution, or handling external tools. It provides flexibility and low-level control in a workflow.
- Jupyter Code Executor: It enables agents to execute Python code within a Jupyter-like environment. Here, you can define variables in one code block and reuse them in subsequent blocks. One advantage of this setup is that when an error occurs, only the specific block of code with the error needs to be re-executed, rather than the entire script.
- Custom Code Executor: It gives developers the ability to create specialized code execution logic. For example, the custom code executor can access variables defined in the environment without explicitly providing them to the LLM.
These Code Executors can be run on both the host machine (local) as well as the Docker containers.
Also Read: 4 Steps to Build Multi-Agent Nested Chats with AutoGen
How to Build AI Agents with Code Executors in AutoGen?
Now let’s learn how you can use these different code executors in AutoGen:
Pre-requisites
Before building AI agents, ensure you have the necessary API keys for the required LLMs.
Load the .env file with the API keys needed.
from dotenv import load_dotenv

load_dotenv(./env)
Key Libraries Required
autogen-agentchat – 0.2.38
jupyter_kernel_gateway-3.0.1
Building an AI Agent Using Command Line Executor
Let’s build an AI agent to know the offers and discounts available on an e-commerce website using the command line executor. Here are the steps to follow.
1. Import the necessary libraries.
from autogen import ConversableAgent, AssistantAgent, UserProxyAgent
from autogen.coding import LocalCommandLineCodeExecutor, DockerCommandLineCodeExecutor
2. Define the agents.
user_proxy = UserProxyAgent(
	name="User",
	llm_config=False,
	is_termination_msg=lambda msg: msg.get("content") is not None and "TERMINATE" in msg["content"],
	human_input_mode="TERMINATE",
	code_execution_config=False
)
code_writer_agent = ConversableAgent(
	name="CodeWriter",
	system_message="""You are a Python developer.
	You use your coding skill to solve problems.
	Once the task is done, returns 'TERMINATE'.""",
	llm_config={"config_list": [{"model": "gpt-4o-mini"}]},
)

local_executor = LocalCommandLineCodeExecutor(
	timeout=15,
	work_dir='./code files')

local_executor_agent = ConversableAgent(
	"local_executor_agent",
	llm_config=False,
	code_execution_config={"executor": local_executor},
	human_input_mode="ALWAYS",
)
We are using the ‘local_executor’ in the code_execution_config of the local_executor_agent.
3. Define the messages which are used to initialize the chat.
messages = ["""To check whether there are any offers or discounts available on a given e-commerce website -
            	https://www.flipkart.com/
            	Follow these steps,
            	1. download the html page of the given URL
            	2. we only need html content, so remove any CSS, JavaScript, and Image tags content
            	3. save the remaining html content.
           	""" ,
      	"read the text and list all the offers and discounts available"]

# Intialize the chat
chat_result = local_executor_agent.initiate_chat(
	code_writer_agent,
	message=messages[0],
)
It will ask for human input after each message from the codeWriter agent. You just need to press the ‘Enter’ key to execute the code written by the agent. We can also any further instructions if there is any problem with the code.
Here are the questions we have asked and the output at the end.
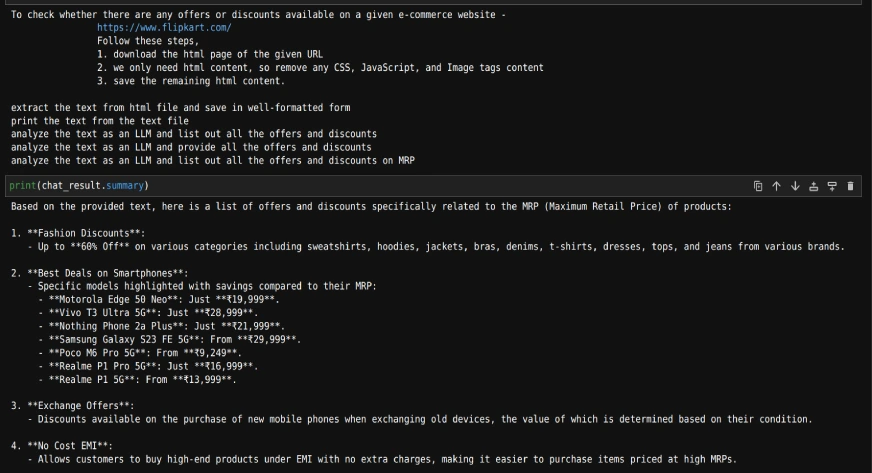
As we can see, with the mentioned questions, we can get a list of offers and discounts from an e-commerce website.
Also Read: Hands-on Guide to Building Multi-Agent Chatbots with AutoGen
Building an ML Model Using Jupyter Code Executor
By using this, we can access the variables defined in one code block from another code block, unlike the command line executor.
Now, let’s try to build an ML model using this.
1. Import the additional methods.
from autogen.coding.jupyter import LocalJupyterServer, DockerJupyterServer, JupyterCodeExecutor
from pathlib import Path
2. Initialize the jupyter server and output directory.
server = LocalJupyterServer()
output_dir = Path("coding")
output_dir.mkdir()Note that LocalJupyterServer may not function on Windows due to a bug. In this case, you can use the DockerJupyterServer instead or use the EmbeddedIPythonCodeExecutor.
3. Define the executor agent and writer agent with a custom system message.
jupyter_executor_agent = ConversableAgent(
	name="jupyter_executor_agent",
	llm_config=False,
	code_execution_config={
    	"executor": JupyterCodeExecutor(server, output_dir=output_dir),
	},
	human_input_mode="ALWAYS",
)
code_writer_system_message = """
You have been given coding capability to solve tasks using Python code in a stateful IPython kernel.
You are responsible for writing the code, and the user is responsible for executing the code.

When you write Python code, put the code in a markdown code block with the language set to Python.
For example:
```python
x = 3
```
You can use the variable `x` in subsequent code blocks.
```python
print(x)
```
Always use print statements for the output of the code.
Write code incrementally and leverage the statefulness of the kernel to avoid repeating code.
Import libraries in a separate code block.
Define a function or a class in a separate code block.
Run code that produces output in a separate code block.
Run code that involves expensive operations like download, upload, and call external APIs in a separate code block.

When your code produces an output, the output will be returned to you.
Because you have limited conversation memory, if your code creates an image,
the output will be a path to the image instead of the image itself."""

code_writer_agent = ConversableAgent(
	"code_writer",
	system_message=code_writer_system_message,
	llm_config={"config_list": [{"model": "gpt-4o"}]},
	human_input_mode="TERMINATE",
)
4. Define the initial message and initialize the chat
message = "read the datasets/user_behavior_dataset.csv and print what the data is about"

chat_result = jupyter_executor_agent.initiate_chat(
	code_writer_agent,
	message=message,
)

# Once the chat is completed we can stop the server.
server.stop()
5. Once the chat is completed we can stop the server.
We can print the messages as follows
for chat in chat_result.chat_history[:]:
    if chat['name'] == 'code_writer' and 'TERMINATE' not in chat['content']:
        print("--------agent-----------")
        print(chat['content'])
    if chat['name'] == 'jupyter_executor_agent' and 'exitcode' not in chat['content']:
        print("--------user------------")
print(chat['content'])Here’s the sample
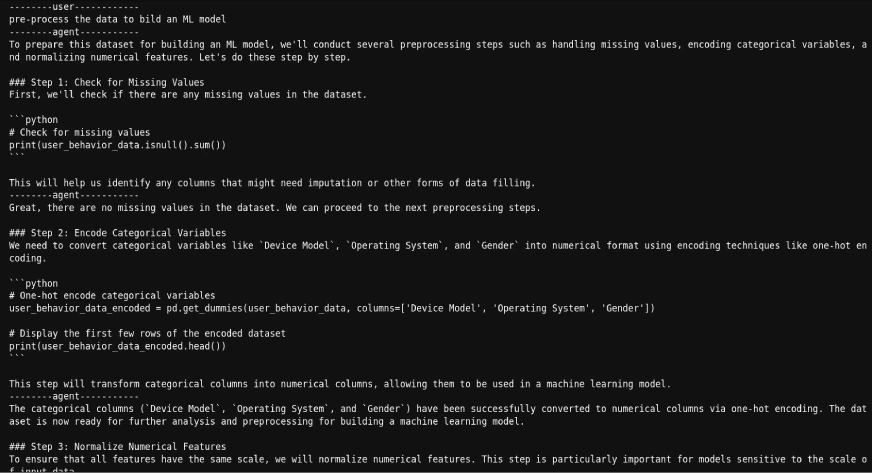
As we can see, we can get the code generated by the agent and also the results after executing the code.
Also Read: Building Agentic Chatbots Using AutoGen
Building an AI Agent Using Custom Executor
Now, let’s try to create a custom executor that can run the code in the same jupyter notebook where we are creating this executor. So, we can read a CSV file, and then ask an agent to build an ML model on the already imported file.
Here’s how we’ll do it.
1. Import the necessary libraries.
import pandas as pd
from typing import List
from IPython import get_ipython
from autogen.coding import CodeBlock, CodeExecutor, CodeExtractor, CodeResult, MarkdownCodeExtractor
2. Define the executor that can extract and run the code from jupyter cells.
class NotebookExecutor(CodeExecutor):
    @property
    def code_extractor(self) -> CodeExtractor:
        # Extact code from markdown blocks.
        return MarkdownCodeExtractor()

    def __init__(self) -> None:
        # Get the current IPython instance running in this notebook.
        self._ipython = get_ipython()

    def execute_code_blocks(self, code_blocks: List[CodeBlock]) -> CodeResult:
        log = ""
        for code_block in code_blocks:
            result = self._ipython.run_cell("%%capture --no-display cap\n" + code_block.code)
            log += self._ipython.ev("cap.stdout")
            log += self._ipython.ev("cap.stderr")
            if result.result is not None:
                log += str(result.result)
            exitcode = 0 if result.success else 1
            if result.error_before_exec is not None:
                log += f"\n{result.error_before_exec}"
                exitcode = 1
            if result.error_in_exec is not None:
                log += f"\n{result.error_in_exec}"
                exitcode = 1
            if exitcode != 0:
                break
return CodeResult(exit_code=exitcode, output=log)3. Define the agents.
code_writer_agent = ConversableAgent(
    name="CodeWriter",
    system_message="You are a helpful AI assistant.\n"
    "You use your coding skill to solve problems.\n"
    "You have access to a IPython kernel to execute Python code.\n"
    "You can suggest Python code in Markdown blocks, each block is a cell.\n"
    "The code blocks will be executed in the IPython kernel in the order you suggest them.\n"
    "All necessary libraries have already been installed.\n"
    "Add return or print statements to the code to get the output\n"
    "Once the task is done, returns 'TERMINATE'.",
    llm_config={"config_list": [{"model": "gpt-4o-mini"}]},
)
code_executor_agent = ConversableAgent(
	name="CodeExecutor",
	llm_config=False,
	code_execution_config={"executor": NotebookExecutor()},
	is_termination_msg=lambda msg: "TERMINATE" in msg.get("content", "").strip().upper(),
	human_input_mode="ALWAYS"
)
4. Read the file and initiate the chat with the file.
df = pd.read_csv('datasets/mountains_vs_beaches_preferences.csv')

chat_result = code_executor_agent.initiate_chat(
	code_writer_agent,
	message="What are the column names in the dataframe defined above as df?",
)
5. We can print the chat history as follows:
for chat in chat_result.chat_history[:]:
    if chat['name'] == 'CodeWriter' and 'TERMINATE' not in chat['content']:
        print("--------agent-----------")
        print(chat['content'])
    if chat['name'] == 'CodeExecutor' and 'exitcode' not in chat['content']:
        print("--------user------------")
print(chat['content'])As we can see again, we can get the code generated by the agent and also the results after executing the code.
Conclusion
AutoGen’s code executors provide flexibility and functionality for AI agents to perform real-world tasks. The command line executor enables script execution, while the Jupyter code executor supports iterative development. Custom executors, on the other hand, allow developers to create tailored workflows.
These tools empower AI agents to transition from problem solvers to solution implementers. Developers can use these features to build intelligent systems that deliver actionable insights and automate complex processes.
Frequently Asked Questions
Q1. What is the primary purpose of Code Executors in AutoGen?A. Code Executors in AutoGen allow AI agents to generate, execute, and evaluate code in real time. This enables agents to automate tasks, perform data analysis, debug systems, and implement dynamic workflows.
Q2. What are the differences between Command Line and Jupyter Code Executors?A. The Command Line Executor saves and executes code as separate files, ideal for tasks like file management and script execution. The Jupyter Code Executor operates in a stateful environment, allowing reuse of variables and selective re-execution of code blocks, making it more suitable for iterative coding tasks like building ML models.
Q3. Can Code Executors be used with Docker containers?A. Yes, both the Command Line Executor and Jupyter Code Executor can be configured to run on Docker containers, providing a flexible environment for execution.
Q4. What is the advantage of using a Custom Code Executor?A. Custom Code Executors allow developers to define specialized execution logic, such as running code within the same Jupyter notebook. This is useful for tasks requiring a high level of integration or customization.
Q5. What are the prerequisites for using Code Executors in AutoGen?A. Before using Code Executors, ensure you have the necessary API keys for your preferred LLMs. You should also have the required libraries, such as `autogen-agentchat` and `jupyter_kernel_gateway`, installed in your environment.
위 내용은 Autogen에서 코드 집행자를 사용하여 복잡한 작업을 수행하십시오의 상세 내용입니다. 자세한 내용은 PHP 중국어 웹사이트의 기타 관련 기사를 참조하세요!

핫 AI 도구

Undresser.AI Undress
사실적인 누드 사진을 만들기 위한 AI 기반 앱

AI Clothes Remover
사진에서 옷을 제거하는 온라인 AI 도구입니다.

Undress AI Tool
무료로 이미지를 벗다

Clothoff.io
AI 옷 제거제

Video Face Swap
완전히 무료인 AI 얼굴 교환 도구를 사용하여 모든 비디오의 얼굴을 쉽게 바꾸세요!

인기 기사
뜨거운 도구

메모장++7.3.1
사용하기 쉬운 무료 코드 편집기

SublimeText3 중국어 버전
중국어 버전, 사용하기 매우 쉽습니다.

스튜디오 13.0.1 보내기
강력한 PHP 통합 개발 환경

드림위버 CS6
시각적 웹 개발 도구

SublimeText3 Mac 버전
신 수준의 코드 편집 소프트웨어(SublimeText3)


 Agno 프레임 워크를 사용하여 멀티 모달 AI 에이전트를 구축하는 방법은 무엇입니까?
Apr 23, 2025 am 11:30 AM
Agno 프레임 워크를 사용하여 멀티 모달 AI 에이전트를 구축하는 방법은 무엇입니까?
Apr 23, 2025 am 11:30 AM
에이전트 AI에서 작업하는 동안 개발자는 종종 속도, 유연성 및 자원 효율성 사이의 상충 관계를 탐색하는 것을 발견합니다. 나는 에이전트 AI 프레임 워크를 탐구하고 Agno를 만났다 (이전에는 ph-이었다.
 SQL에서 열을 추가하는 방법? - 분석 Vidhya
Apr 17, 2025 am 11:43 AM
SQL에서 열을 추가하는 방법? - 분석 Vidhya
Apr 17, 2025 am 11:43 AM
SQL의 Alter Table 문 : 데이터베이스에 열을 동적으로 추가 데이터 관리에서 SQL의 적응성이 중요합니다. 데이터베이스 구조를 즉시 조정해야합니까? Alter Table 문은 솔루션입니다. 이 안내서는 Colu를 추가합니다
 Openai는 GPT-4.1로 초점을 이동하고 코딩 및 비용 효율성을 우선시합니다.
Apr 16, 2025 am 11:37 AM
Openai는 GPT-4.1로 초점을 이동하고 코딩 및 비용 효율성을 우선시합니다.
Apr 16, 2025 am 11:37 AM
릴리스에는 GPT-4.1, GPT-4.1 MINI 및 GPT-4.1 NANO의 세 가지 모델이 포함되어 있으며, 대형 언어 모델 환경 내에서 작업 별 최적화로 이동합니다. 이 모델은 사용자를 향한 인터페이스를 즉시 대체하지 않습니다
 라마 드라마 너머 : 대형 언어 모델에 대한 4 개의 새로운 벤치 마크
Apr 14, 2025 am 11:09 AM
라마 드라마 너머 : 대형 언어 모델에 대한 4 개의 새로운 벤치 마크
Apr 14, 2025 am 11:09 AM
문제가있는 벤치 마크 : 라마 사례 연구 2025 년 4 월 초, Meta는 LLAMA 4 제품군을 공개하여 GPT-4O 및 Claude 3.5 Sonnet과 같은 경쟁자들에 대해 호의적으로 배치 한 인상적인 성능 지표를 자랑했습니다. Launc의 중심
 Andrew Ng의 모델 임베딩에 대한 새로운 단기 과정
Apr 15, 2025 am 11:32 AM
Andrew Ng의 모델 임베딩에 대한 새로운 단기 과정
Apr 15, 2025 am 11:32 AM
임베딩 모델의 힘 잠금 해제 : Andrew Ng의 새로운 코스에 대한 깊은 다이빙 기계가 완벽한 정확도로 질문을 이해하고 응답하는 미래를 상상해보십시오. 이것은 공상 과학이 아닙니다. AI의 발전 덕분에 R이되었습니다
 ADHD 게임, 건강 도구 및 AI 챗봇이 글로벌 건강을 변화시키는 방법
Apr 14, 2025 am 11:27 AM
ADHD 게임, 건강 도구 및 AI 챗봇이 글로벌 건강을 변화시키는 방법
Apr 14, 2025 am 11:27 AM
비디오 게임이 불안을 완화하거나 집중하거나 ADHD를 가진 어린이를 지원할 수 있습니까? 건강 관리 도전이 전 세계적으로 급증함에 따라, 특히 청소년들 사이에서 혁신가들은 비디오 게임 인 가능성이없는 도구로 전환하고 있습니다. 이제 세계 최대의 엔터테인먼트 인더스 중 하나입니다
 Rocketpy -Analytics Vidhya를 사용한 로켓 런칭 시뮬레이션 및 분석
Apr 19, 2025 am 11:12 AM
Rocketpy -Analytics Vidhya를 사용한 로켓 런칭 시뮬레이션 및 분석
Apr 19, 2025 am 11:12 AM
Rocketpy : 포괄적 인 가이드로 로켓 발사 시뮬레이션 이 기사는 강력한 파이썬 라이브러리 인 Rocketpy를 사용하여 고출력 로켓 런칭을 시뮬레이션하는 것을 안내합니다. 로켓 구성 요소 정의에서 Simula 분석에 이르기까지 모든 것을 다룰 것입니다.
 Google은 다음 2025 년 클라우드에서 가장 포괄적 인 에이전트 전략을 공개합니다.
Apr 15, 2025 am 11:14 AM
Google은 다음 2025 년 클라우드에서 가장 포괄적 인 에이전트 전략을 공개합니다.
Apr 15, 2025 am 11:14 AM
Google의 AI 전략의 기초로서 Gemini Gemini는 Google의 AI 에이전트 전략의 초석으로 고급 멀티 모드 기능을 활용하여 텍스트, 이미지, 오디오, 비디오 및 코드에서 응답을 처리하고 생성합니다. Deepm에 의해 개발되었습니다
