

How to develop a two-dimensional week view calendar using Javascript
This article mainly introduces you to the relevant information on how to use Javascript to develop a two-dimensional weekly view calendar. The article introduces it in great detail through sample code. It has certain reference learning value for everyone's study or work. It is needed Friends, please follow the editor to learn together.
Preface
This article introduces to you the relevant content of Javascript development of two-dimensional weekly view calendar, that is, a month view calendar was previously implemented. Today we will implement a two-dimensional week view calendar.
The key parts are analyzed below.
Structure preparation
The difference is that it also has a classification axis based on the calendar to display different categories. Mainly used for scheduling, meeting arrangements, etc. within a week.
The two-dimensional calendar is different from the previous single one. When switching dates, the two-dimensional calendar does not need to be re-rendered. The classification does not need to be changed, only the displayed date is changed.
And because it is two-dimensional, the inserted content must belong to a category and a time period at the same time. The content can definitely span time (that is, the date axis), so the inserted content cannot be directly inserted like the beginning The calendar is placed directly in the calendar grid. But to be processed separately.
In addition, as long as the classification remains unchanged, the grid composed of dates and categories does not need to be redrawn.
Considering the above situation, the insertion of content and the grid need to be separated. I made the ready-made calendar into a 3D effect:
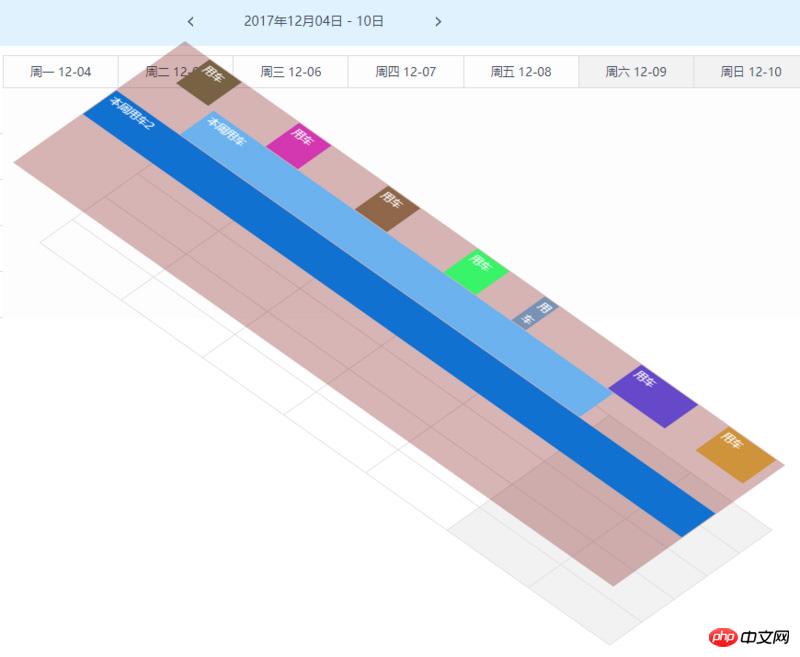
That is, the layer for inserting content is placed separately above the grid composed of time and category.
Based on the above analysis, first build the following basic structure:
1 2 3 4 5 6 7 8 9 10 11 12 13 14 15 16 17 18 19 20 21 22 23 24 25 26 27 28 29 30 31 32 33 34 35 36 |
|
The structure is as above, and the implementation code does not need to be shown.
Drawing implementation
After the necessary structure is initially completed, we proceed with the drawing of the calendar.
Classification Drawing
The first thing to deal with is classification. In the weekly view, the number of days in a week is fixed. Only when the classification is determined can the main part of the grid be drawn.
For classification, temporarily consider the following necessary data format:
1 2 3 4 5 |
|
The implementation is as follows:
1 2 3 4 5 6 7 8 9 10 11 12 13 14 15 16 17 18 19 20 21 22 23 24 25 26 27 28 29 30 31 32 33 34 35 36 37 38 39 40 41 42 43 44 45 46 47 48 49 50 51 52 53 54 55 56 57 |
|
The above sets the classification data setCategory as the entry point to call the drawing classification method, which also calls _renderChanged This method is used to redraw the variable parts of the calendar, such as the title, date and its contents, which will be introduced later.
Date drawing
The classification axis has been prepared above, and the date axis needs to be drawn. For the week view, the implementation of the week It's very simple, just render 7 days in sequence based on the start date of the week. Pay attention to providing the necessary information of the date to the corresponding event during the drawing process, so that the user can personalize the event.
1 2 3 4 5 6 7 8 9 10 11 12 13 14 15 16 17 18 19 20 21 22 23 24 25 26 27 28 29 30 31 32 33 34 35 36 37 38 39 40 41 42 43 44 45 46 47 48 49 50 51 52 53 54 55 56 57 58 59 60 61 62 63 64 65 66 |
|
Grid and content
The two axes in the two-dimensional view have been prepared above, and then the grid and content layer can be drawn.
Grid
Here the categories are drawn in the Y direction (rows) and the dates are drawn in the X direction (columns):
1 2 3 4 5 6 7 8 9 10 11 12 13 14 15 16 17 18 19 20 21 22 23 24 25 26 27 28 29 30 31 32 33 34 35 36 37 38 39 40 41 |
|
Content
Theoretically speaking, two dimensions should support both cross-row and cross-column situations, that is, the content area should be a whole block of elements. But when combined with actual situations, cross-time requirements are common (one thing is used continuously over a period of time). Cross-classification does not have much practical significance. It must be managed separately by classification, and then cross-classification becomes complicated again. And even if it is necessary to use multiple things at the same time for a period of time, it can be implemented directly (category A is used in the XX time period, and B is used in the XX time period, but the XX is exactly the same at this time).
Therefore, only cross-time situations are dealt with here. The content can be drawn by rows or categories, which can simplify many calculations when inserting content components.
1 2 3 4 5 6 7 8 9 10 11 12 13 14 15 16 17 18 19 20 21 22 23 24 25 26 27 28 29 |
|
If you must achieve cross-row and cross-column situations, you can directly draw the content into a whole block of elements. However, when clicking events and inserting content components, you need to calculate the corresponding classification and date and time at the same time.
Difficulties in implementation
Content component insertion
We implement this two-dimensional week view calendar The main purpose is to support the insertion of arbitrary content. The DOM element for inserting content has been prepared above. What needs to be done here is to draw the data into DOM and place it in the appropriate position.
Consider the necessary content component data structure as follows:
1 2 3 4 5 6 7 8 9 |
|
Since the content area is drawn directly according to the classification, the corresponding classification already exists after getting the data. The key point is to calculate the start and end positions based on the specified start and end times.
Consider the following:
Consider responsiveness, and the position calculation is based on percentage
一周的总时间是固定的,开始日期时间和这周开始日期时间的差额占总时间的百分比即开始位置的百分比
结束日期时间和开始时间的差额占总时间的百分比即为结束时间距离最左侧的百分比
注意处理开始和结束时间溢出本周的情况
因此关于位置计算可以用如下代码处理:
1 2 3 4 5 6 7 8 9 10 11 12 13 14 15 16 17 18 19 20 21 22 23 24 25 26 27 28 29 30 31 32 33 34 35 36 37 38 39 40 41 42 43 44 45 46 47 48 49 50 51 52 |
|
上面就拿到了一个数据所对应的开始位置和结束位置。基本上是已经完成了,但是还需要再处理一个情况:相同分类下的时间冲突问题。
考虑以如下方式进行:
没添加一个就记录下其数据
新增的如果和当前分类下已有的存在时间重叠,则认为冲突。
实现如下:
1 2 3 4 5 6 7 8 9 10 11 12 13 14 15 16 17 18 19 20 21 22 23 24 25 26 |
|
完成以上两步就可以往我们的内容区域中插入了
1 2 3 4 5 6 7 8 9 10 11 12 13 14 15 16 17 18 19 20 21 22 23 24 25 26 27 28 29 30 31 32 33 34 35 36 37 38 39 40 41 42 43 44 45 46 47 48 49 50 51 52 53 54 55 56 57 58 59 60 61 62 63 64 65 66 67 68 69 70 71 72 73 74 75 76 77 78 79 80 81 82 83 84 85 86 87 88 89 90 91 92 93 94 95 96 97 98 99 |
|
点击事件和范围选择
此控件不仅用于结果展示,还要可用于点击进行添加,需要处理其点击事件,但是由于要展示内容,内容是覆盖在分类和日期构成的网格之上的,用户的点击是点击不到网格元素的,必须要根据点击的位置进行计算来获取所点击的日期和所在分类。
同时,由于展示的部件都是时间范围的,因此点击返回某天和某个分类是不够的,还需要能够支持鼠标按下拖动再松开,来直接选的一段时间。
考虑到以上需求,点击事件不能直接使用 click 来实现,考虑使用 mousedown 和 mouseup 来处理点击事件,同时需要在 mousemove 中实时给出用户响应。
1 2 3 4 5 6 7 8 9 10 11 12 13 14 15 16 17 18 19 20 21 22 23 24 25 26 27 28 29 30 31 32 33 34 35 36 37 38 39 40 41 42 43 44 45 46 47 48 49 50 51 52 53 54 55 56 57 58 59 60 61 62 63 64 65 66 67 68 69 70 71 72 73 74 75 76 77 78 79 80 81 82 83 84 85 86 87 88 89 90 91 92 93 94 95 96 |
|
此过程要注意的问题是:mousedown 必须绑定在日历上,而 mouseup 和 mousemove 则不能绑定在日历上,具体原因已经写在上面代码注释中了。
另外需要注意,由于范围点击选择使用了 mousedown 和 mouseup 来模拟,那么日历内容区域中插入的数据部件的点击事件也要用 mousedown 和 mouseup 来模拟,因为 mouseup 触发比 click 早,如果使用 click ,会导致先触发日历上的日期点击或日期范围点击。
使用
此日历实现基于一个控件基类扩展而来,其必要功能仅为一套事件机制,可参考实现一套自定义事件机制
实测一下效果吧:
1 2 3 4 5 6 7 8 9 10 11 12 13 14 15 16 17 18 19 20 21 22 23 24 25 26 27 28 29 30 31 32 33 34 35 36 37 38 39 40 41 42 43 44 45 46 47 48 49 50 51 52 53 54 55 56 57 58 |
|
上面是我整理给大家的,希望今后会对大家有帮助。
相关文章:
The above is the detailed content of How to develop a two-dimensional week view calendar using Javascript. For more information, please follow other related articles on the PHP Chinese website!

Hot AI Tools

Undresser.AI Undress
AI-powered app for creating realistic nude photos

AI Clothes Remover
Online AI tool for removing clothes from photos.

Undress AI Tool
Undress images for free

Clothoff.io
AI clothes remover

Video Face Swap
Swap faces in any video effortlessly with our completely free AI face swap tool!
Hot Article
Hot Tools

Notepad++7.3.1
Easy-to-use and free code editor

SublimeText3 Chinese version
Chinese version, very easy to use

Zend Studio 13.0.1
Powerful PHP integrated development environment

Dreamweaver CS6
Visual web development tools

SublimeText3 Mac version
God-level code editing software (SublimeText3)
Hot Topics
 1662
1662
 14
1419
52
1311
25
1261
29
1234
24
14
1419
52
1311
25
1261
29
1234
24

 What should I do if the win11 dual-screen calendar does not exist on the second monitor?
Jun 12, 2024 pm 05:47 PM
What should I do if the win11 dual-screen calendar does not exist on the second monitor?
Jun 12, 2024 pm 05:47 PM
An important tool for organizing your daily work and routine in Windows 11 is the display of time and date in the taskbar. This feature is usually located in the lower right corner of the screen and gives you instant access to the time and date. By clicking this area, you can bring up your calendar, making it easier to check upcoming appointments and dates without having to open a separate app. However, if you use multiple monitors, you may run into issues with this feature. Specifically, while the clock and date appear on the taskbar on all connected monitors, the ability to click the date and time on a second monitor to display the calendar is unavailable. As of now, this feature only works on the main display - it's unlike Windows 10, where clicking on any
 Win10 calendar displays week numbers
Jan 04, 2024 am 08:41 AM
Win10 calendar displays week numbers
Jan 04, 2024 am 08:41 AM
Many users want to use the win10 calendar tool to check the current number of days, but the calendar does not automatically display this function. In fact, we only need to make simple settings to see the cumulative number of weeks this year ~ win10 calendar displays weeks Digital setting tutorial: 1. Enter calendar in the search in the lower left corner of the desktop and open the application. 2. In the open calendar application, click the "gear" icon in the lower left corner, and the settings will pop up on the right. We click "Calendar Settings" 3. Continue in the open calendar settings, find "Week Number" and then change the week Just adjust the number option to "the first day of the year". 4. After completing the above settings, click "Week" to see this year's week number statistics.
 Outlook calendar not syncing;
Mar 26, 2024 am 09:36 AM
Outlook calendar not syncing;
Mar 26, 2024 am 09:36 AM
If your Outlook calendar cannot sync with Google Calendar, Teams, iPhone, Android, Zoom, Office account, etc., please follow the steps below to resolve the issue. The calendar app can be connected to other calendar services such as Google Calendar, iPhone, Android, Microsoft Office 365, etc. This is very useful because it can sync automatically. But what if OutlookCalendar fails to sync with third-party calendars? Possible reasons could be selecting the wrong calendar for synchronization, calendar not visible, background application interference, outdated Outlook application or calendar application, etc. Preliminary fix for Outlook calendar not syncing
 Can't open the calendar in the lower right corner of win10
Dec 26, 2023 pm 05:07 PM
Can't open the calendar in the lower right corner of win10
Dec 26, 2023 pm 05:07 PM
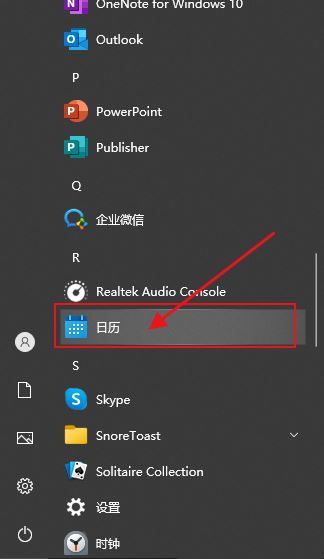
Some friends who use the win0 system have encountered the situation where the win10 calendar cannot be opened. This is just a normal computer glitch. It can be solved in the privacy settings of the win10 system. Today, the editor has brought a detailed solution. Below Let’s take a look. Solution to the problem that the calendar cannot be opened in the lower right corner of win10 1. Click Start in the win10 system → click the program list button above → find Pinyin (Chinese) R → Calendar 2. When using it for the first time, new events may not be opened (mouse If you lean up, there will be no dark blue selected), you can set it in privacy. Click the three-bar icon in the upper left corner of the desktop → there will be a settings menu at the bottom; 3. Click Privacy in the pop-up interface; 4. If you have used settings before, you can click on the left
 How to implement an online speech recognition system using WebSocket and JavaScript
Dec 17, 2023 pm 02:54 PM
How to implement an online speech recognition system using WebSocket and JavaScript
Dec 17, 2023 pm 02:54 PM
How to use WebSocket and JavaScript to implement an online speech recognition system Introduction: With the continuous development of technology, speech recognition technology has become an important part of the field of artificial intelligence. The online speech recognition system based on WebSocket and JavaScript has the characteristics of low latency, real-time and cross-platform, and has become a widely used solution. This article will introduce how to use WebSocket and JavaScript to implement an online speech recognition system.
 What should I do if there are no pop-up reminders for calendar events in Win10? How to recover if calendar event reminders are gone in Win10
Jun 09, 2024 pm 02:52 PM
What should I do if there are no pop-up reminders for calendar events in Win10? How to recover if calendar event reminders are gone in Win10
Jun 09, 2024 pm 02:52 PM
The calendar can help users record your schedule and even set reminders. However, many users are asking what to do if calendar event reminders do not pop up in Windows 10? Users can first check the Windows update status or clear the Windows App Store cache to perform the operation. Let this site carefully introduce to users the analysis of the problem of Win10 calendar event reminder not popping up. To add calendar events, click the "Calendar" program in the system menu. Click the left mouse button on a date in the calendar. Enter the event name and reminder time in the editing window, and click the "Save" button to add the event. Solving the problem of win10 calendar event reminder not popping up
 WebSocket and JavaScript: key technologies for implementing real-time monitoring systems
Dec 17, 2023 pm 05:30 PM
WebSocket and JavaScript: key technologies for implementing real-time monitoring systems
Dec 17, 2023 pm 05:30 PM
WebSocket and JavaScript: Key technologies for realizing real-time monitoring systems Introduction: With the rapid development of Internet technology, real-time monitoring systems have been widely used in various fields. One of the key technologies to achieve real-time monitoring is the combination of WebSocket and JavaScript. This article will introduce the application of WebSocket and JavaScript in real-time monitoring systems, give code examples, and explain their implementation principles in detail. 1. WebSocket technology
 How to stop Outlook from automatically adding events to my calendar
Feb 26, 2024 am 09:49 AM
How to stop Outlook from automatically adding events to my calendar
Feb 26, 2024 am 09:49 AM
As an email manager application, Microsoft Outlook allows us to schedule events and appointments. It enables us to stay organized by providing tools to create, manage and track these activities (also called events) in the Outlook application. However, sometimes unwanted events are added to the calendar in Outlook, which creates confusion for users and spams the calendar. In this article, we will explore various scenarios and steps that can help us prevent Outlook from automatically adding events to my calendar. Outlook Events – A brief overview Outlook events serve multiple purposes and have many useful features as follows: Calendar Integration: In Outlook
