
 Web Front-end
JS Tutorial
Detailed explanation of the steps to use npm to publish the vue2.0+ plug-in
Web Front-end
JS Tutorial
Detailed explanation of the steps to use npm to publish the vue2.0+ plug-in
Detailed explanation of the steps to use npm to publish the vue2.0+ plug-in
This time I will bring you a detailed explanation of the steps to publish the vue2.0 plug-in using npm. What are the precautions for vue2.0 plug-in using npm to publish. The following is a practical case, let's take a look.
This article will try to be as detailed and clear as possible from the development of vue plug-ins to the release of npm. Thinking about showing what you have made to the majority of "netizens", I feel a little excited...^_ ^
First upload the plug-in renderings------github portal

Let’s talk about the detailed method below:
1 |
|
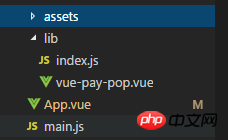
Create a simple project using vue, Delete except main.js and app.vue in src External files, clear the useless content in app.vue
After finishing the project directory
2. Write plug-in
vue-pay -pop (you can get the source code from github)
1 2 3 4 5 6 7 8 9 10 11 12 13 14 15 16 17 18 19 20 21 22 23 24 25 26 27 28 29 30 31 32 33 34 35 36 37 38 39 |
|
1 2 3 4 5 6 7 8 9 10 11 12 13 14 15 16 17 18 19 20 21 22 23 24 25 26 27 28 29 30 31 32 33 34 35 36 37 38 39 40 41 42 43 44 45 46 47 48 49 50 51 52 53 54 55 56 57 58 59 60 61 62 63 64 65 66 67 68 69 70 71 72 73 74 75 |
|
The basic source code is here. The implementation method is relatively simple, so I won’t introduce it here...
3. Try to use
Let’s first try to use
1 2 3 4 |
|
1 2 3 4 5 6 7 8 9 10 11 12 13 14 15 16 17 18 19 20 21 22 23 24 25 26 27 28 29 |
|
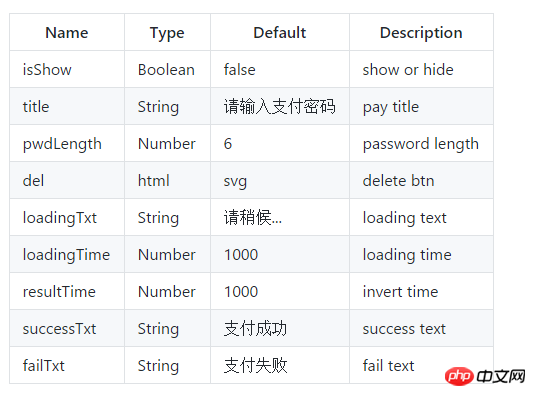
in the local app.vue. Among them, isShow in payPopOptions is a required item, which is used to control the display and hiding of the pop-up box.
Other parameters are optional
4. Change the configuration file
ok , now we go to change the configuration file to prepare for our release
index.js
1 2 3 4 5 6 7 8 9 10 11 |
|
package.json
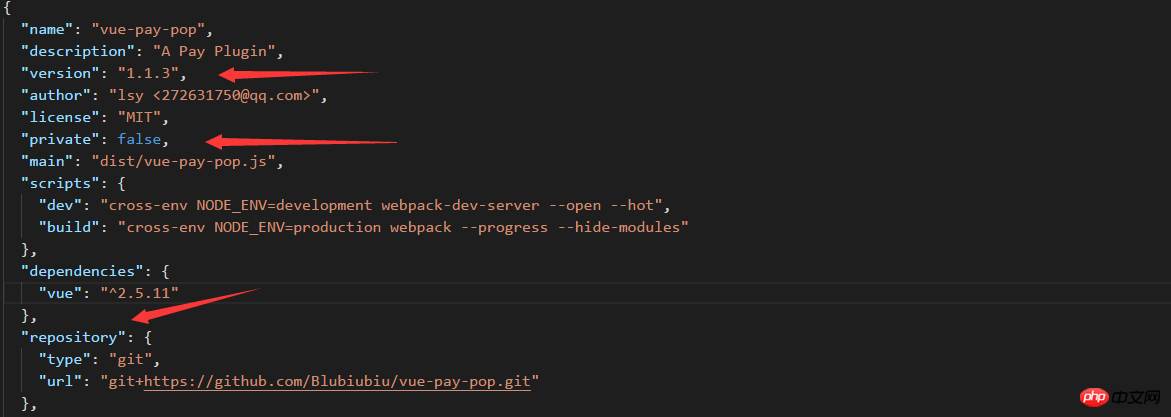
Modify arrow As mentioned in
1. Your plug-in version number needs to be changed every time youuploadnpm
2. It cannot be published unless it is set to false
3. Fill in your own github hosting address (I won’t talk about how to upload the code to github, you can refer to the Git tutorial---Liao Xuefeng)
webpack.config.js
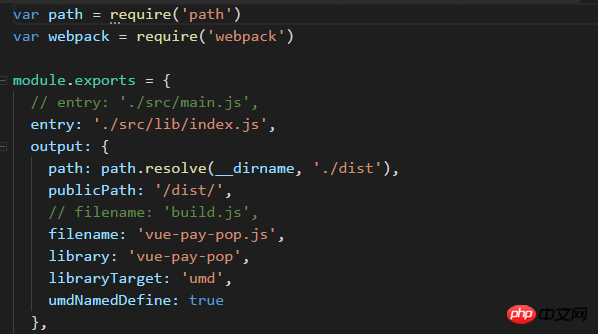
Modify the entry and filename
index.html
1 2 |
|
dist file. Enter npm run build on the command line and it will be customized.
5. Publish npm
You need to go to the npm official website to register an npm account
After registering

Enter you User name, password, and email address (the password is not displayed)
After successfully logging in, we enter

ok, and we publish successfully!
6. Reference
In your project npm install vue-pay-pop --save download our package
main.js
1 2 |
|
So we can quote it directly in our vue file...
ok, then our content ends here.
In addition, if you find it useful, you are welcome to give your star on github. Of course, you can also ask me your questions and suggestions in the comments or issues. Thank you very much.
I believe you have mastered the method after reading the case in this article. For more exciting information, please pay attention to other related articles on the php Chinese website!
Recommended reading:
JS to create folding and unfolding animation (with code)
JS implements transparency gradient function
The above is the detailed content of Detailed explanation of the steps to use npm to publish the vue2.0+ plug-in. For more information, please follow other related articles on the PHP Chinese website!

Hot AI Tools

Undresser.AI Undress
AI-powered app for creating realistic nude photos

AI Clothes Remover
Online AI tool for removing clothes from photos.

Undress AI Tool
Undress images for free

Clothoff.io
AI clothes remover

Video Face Swap
Swap faces in any video effortlessly with our completely free AI face swap tool!
Hot Article
Hot Tools

Notepad++7.3.1
Easy-to-use and free code editor

SublimeText3 Chinese version
Chinese version, very easy to use

Zend Studio 13.0.1
Powerful PHP integrated development environment

Dreamweaver CS6
Visual web development tools

SublimeText3 Mac version
God-level code editing software (SublimeText3)
Hot Topics


 How to make Google Maps the default map in iPhone
Apr 17, 2024 pm 07:34 PM
How to make Google Maps the default map in iPhone
Apr 17, 2024 pm 07:34 PM
The default map on the iPhone is Maps, Apple's proprietary geolocation provider. Although the map is getting better, it doesn't work well outside the United States. It has nothing to offer compared to Google Maps. In this article, we discuss the feasible steps to use Google Maps to become the default map on your iPhone. How to Make Google Maps the Default Map in iPhone Setting Google Maps as the default map app on your phone is easier than you think. Follow the steps below – Prerequisite steps – You must have Gmail installed on your phone. Step 1 – Open the AppStore. Step 2 – Search for “Gmail”. Step 3 – Click next to Gmail app
 Steps to upgrade to the latest version of WeChat (Easily master the upgrade method to the latest version of WeChat)
Jun 01, 2024 pm 10:24 PM
Steps to upgrade to the latest version of WeChat (Easily master the upgrade method to the latest version of WeChat)
Jun 01, 2024 pm 10:24 PM
WeChat is one of the social media platforms in China that continuously launches new versions to provide a better user experience. Upgrading WeChat to the latest version is very important to keep in touch with family and colleagues, to stay in touch with friends, and to keep abreast of the latest developments. 1. Understand the features and improvements of the latest version. It is very important to understand the features and improvements of the latest version before upgrading WeChat. For performance improvements and bug fixes, you can learn about the various new features brought by the new version by checking the update notes on the WeChat official website or app store. 2. Check the current WeChat version We need to check the WeChat version currently installed on the mobile phone before upgrading WeChat. Click to open the WeChat application "Me" and then select the menu "About" where you can see the current WeChat version number. 3. Open the app
 This Apple ID is not yet in use in the iTunes Store: Fix
Jun 10, 2024 pm 05:42 PM
This Apple ID is not yet in use in the iTunes Store: Fix
Jun 10, 2024 pm 05:42 PM
When logging into iTunesStore using AppleID, this error saying "This AppleID has not been used in iTunesStore" may be thrown on the screen. There are no error messages to worry about, you can fix them by following these solution sets. Fix 1 – Change Shipping Address The main reason why this prompt appears in iTunes Store is that you don’t have the correct address in your AppleID profile. Step 1 – First, open iPhone Settings on your iPhone. Step 2 – AppleID should be on top of all other settings. So, open it. Step 3 – Once there, open the “Payment & Shipping” option. Step 4 – Verify your access using Face ID. step
 Why can't Xiaohongshu publish videos of works? How does it publish its work?
Mar 21, 2024 pm 06:36 PM
Why can't Xiaohongshu publish videos of works? How does it publish its work?
Mar 21, 2024 pm 06:36 PM
With the rapid development of social media, short video platforms have become the main channel for many users to express themselves and share their lives. Many users may encounter various problems when publishing videos of their works on Xiaohongshu. This article will discuss the reasons that may cause the video publishing of Xiaohongshu works to fail and provide the correct publishing method. 1. Why can’t Xiaohongshu publish videos of works? The Xiaohongshu platform may occasionally experience system failures, which may be caused by system maintenance or upgrades. In this case, users may encounter the problem of being unable to publish videos of their works. Users need to wait patiently for the platform to return to normal before trying to publish. An unstable or slow network connection may prevent users from posting videos of their work on Xiaohongshu. Users should confirm their network environment to ensure that the connection is stable and
 How to publish works on Xiaohongshu How to publish articles and pictures on Xiaohongshu
Mar 22, 2024 pm 09:21 PM
How to publish works on Xiaohongshu How to publish articles and pictures on Xiaohongshu
Mar 22, 2024 pm 09:21 PM
You can view various contents on Xiaohongshu, which can provide you with various help and help you discover a better life. If you have anything you want to share, you can post it here so that everyone can take a look. , and at the same time, it can bring you profits. It is very cost-effective. If you don’t know how to publish your works here, you can check out the tutorial. You can use this software every day and publish various contents to help everyone use it better. Don’t miss it if you need it! 1. Open Xiaohongshu and click the plus icon below. 2. There are [Video] [Picture] [Live Picture] options here; select the content you want to publish and click to check. 3. Select [Next] on the content editing page. 4. Enter the text content you want to publish and click [Publish Pen]
 Shazam app not working in iPhone: Fix
Jun 08, 2024 pm 12:36 PM
Shazam app not working in iPhone: Fix
Jun 08, 2024 pm 12:36 PM
Having issues with the Shazam app on iPhone? Shazam helps you find songs by listening to them. However, if Shazam isn't working properly or doesn't recognize the song, you'll have to troubleshoot it manually. Repairing the Shazam app won't take long. So, without wasting any more time, follow the steps below to resolve issues with Shazam app. Fix 1 – Disable Bold Text Feature Bold text on iPhone may be the reason why Shazam is not working properly. Step 1 – You can only do this from your iPhone settings. So, open it. Step 2 – Next, open the “Display & Brightness” settings there. Step 3 – If you find that “Bold Text” is enabled
 Why can't Xiaohongshu be released? What should I do if the content published by Xiaohongshu cannot be displayed?
Mar 21, 2024 pm 07:47 PM
Why can't Xiaohongshu be released? What should I do if the content published by Xiaohongshu cannot be displayed?
Mar 21, 2024 pm 07:47 PM
As a lifestyle sharing platform, Xiaohongshu has attracted a large number of users to share their daily life and grow products. Many users have reported that their published content cannot be displayed. What is going on? This article will analyze the possible reasons why Xiaohongshu cannot be released and provide solutions. 1. Why can’t Xiaohongshu be released? Xiaohongshu implements strict community guidelines and has zero tolerance for publishing advertisements, spam, vulgar content, etc. If the user's content violates the regulations, the system will block it and the content will not be displayed. Xiaohongshu requires users to publish high-quality and valuable content, and the content needs to be unique and innovative. If the content is too generic and lacks innovation, it may not pass review and therefore not be displayed on the platform. 3. Account abnormality
 When is the best time to publish Xiaohongshu? Where does it post the most traffic recommendations from?
Mar 21, 2024 pm 08:11 PM
When is the best time to publish Xiaohongshu? Where does it post the most traffic recommendations from?
Mar 21, 2024 pm 08:11 PM
In today's social network era, Xiaohongshu has become an important platform for young people to share their lives and obtain information. Many users hope to attract more attention and traffic by publishing content on Xiaohongshu. So, when is the best time to post content? This article will explore in detail the selection of Xiaohongshu’s publishing time and the publishing location with the most traffic recommendations. 1. When is the best time to publish Xiaohongshu? The best time to publish content on Xiaohongshu is usually during periods of high user activity. According to the characteristics and behavioral habits of Xiaohongshu users, there are several time periods that are more appropriate. During the time period from 7 pm to 9 pm, most users have returned home from get off work and started browsing content on their mobile phones in search of relaxation and entertainment. Therefore, content posted during this period is more likely to attract users
