

How to deploy HTTPS in Node.js
This time I will show you how to deploy HTTPS in Node.js. What are the precautions for deploying HTTPS in Node.js? The following is a practical case, let's take a look.
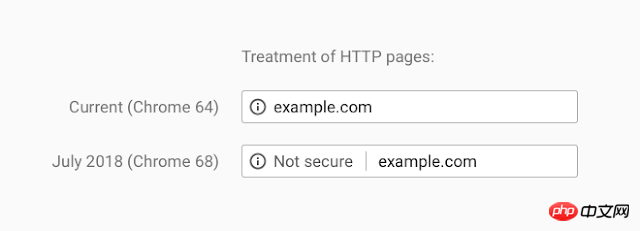
With the rapid development of the Internet, Internet information security has attracted more and more attention.HTTPS should be one of the technologies that major manufacturers have been trying to popularize in the past two years. Major domestic manufacturers have basically fully popularized HTTPS.
Node.js How to deploy free HTTPS and simple deploymentHTTP/ 2.
HTTPS Certificate Services.


Services provided by ISRG (Internet Security Research Group, Internet Security Research Group), free, fast access, stable, etc.So the certificate deployed this time also revolves around
Let's Encrypt.
To deploy Let's Enctrypt certificate, you only need to introduce this package and use it:
- Automatic registration
Let's Encrypt
Certificate - Automatic renewal (about 80 days), and the server does not need to be restarted
- Supports # #And
The related certificate ecosystem is very complete, and there is also greenlock-koa that supports koa. Installation and use
Install via
npmgreenlock-express:<div class="code" style="position:relative; padding:0px; margin:0px;"><pre class="brush:php;toolbar:false">$ npm install --save greenlock-express@2.x</pre><div class="contentsignin">Copy after login</div></div>It’s very simple to use, it’s
The demo provided by default: <div class="code" style="position:relative; padding:0px; margin:0px;"><pre class="brush:php;toolbar:false">const greenlock = require('greenlock-express')
require('greenlock-express').create({
// 测试
server: 'staging',
// 联系邮箱
email: 'john.doe@example.com',
// 是否同意 Let's Encrypt 条款... 这必须为 true 啊,不然走不下去
agreeTos: true,
// 申请的域名列表,不支持通配符
approveDomains: [ 'tasaid.com', 'www.tasaid.com' ],
// 绑定 express app
app: require('express')().use('/', function (req, res) {
res.end('Hello, World!');
})
}).listen(80, 443)</pre><div class="contentsignin">Copy after login</div></div>The certificate exists
. Of course the above code can only be used in the test/development environment, because it does not apply for a valid certificate, but generates a self-signed certificate (the same as the previous 12306 self-signed certificate), which is used Debugging in a development environment.
API
greenlock-express’s create(options) Function parameters are signed as follows:
1 2 3 4 5 6 7 8 9 10 11 12 13 14 15 16 17 18 19 20 21 22 23 24 25 26 27 28 29 30 31 32 33 34 |
|
must be a function, and passing an array will not take effect. Production environment
Deployment in the production environment also requires some configuration changes and the introduction of some packages.
Update package:
1 2 3 4 |
|
Production code:
1 2 3 4 5 6 7 8 9 10 11 12 13 14 15 16 17 18 19 20 21 22 23 24 25 26 27 28 29 30 31 32 33 34 35 36 37 38 39 40 41 42 43 44 45 |
|
If it does not take effect, you can check the certificate information of
~/letsencrypt and whether port 443 is correct Open. Deploying HTTP/2
HTTP/2 is an upgraded version of HTTP/1.1, which mainly improves the following aspects:
- Binary protocol: Using binary streams
- Multiplexing: Multiplexing pipelines for one request
服务器推送:解决 HTTP/1.x 时代最大的痛点
值的注意的是,HTTP/2 是支持 HTTP 协议的,只不过浏览器厂商都不愿意支持 HTTP,所以基本上可以认为,用上 HTTP/2 的前置条件是必须部署 HTTPS。
SPDY
早在 2009 年,Google 开发了一个实验性协议,叫做 SPDY,目的解决 HTTP/1.x 中的一些设计缺陷。在 SPDY 发布几年后,这个新的实验性协议得到了 Chrome、Firefox 和 Opera 的支持,应用越来越广泛。然后 HTTP 工作组 (HTTP-WG) 在这个 SPDY 的基础上,设计了 HTTP/2,所以可以说 SPDY 是 HTTP/2 的前身。
关于 HTTP/2 的详情可以参考 这篇文章。
部署 HTTP/2
引入 HTTP/2 在 Node.js 中也十分简单,只需要引入 spdy 包即可:
1 |
|
然后我们把上一节的代码做一点修改即可支持 HTTP/2:
1 2 3 4 5 6 7 8 9 10 11 12 13 14 15 16 17 18 19 20 21 22 23 24 25 26 27 28 29 30 31 32 33 34 35 36 37 38 39 40 41 42 43 |
|
相信看了本文案例你已经掌握了方法,更多精彩请关注php中文网其它相关文章!
推荐阅读:
The above is the detailed content of How to deploy HTTPS in Node.js. For more information, please follow other related articles on the PHP Chinese website!

Hot AI Tools

Undresser.AI Undress
AI-powered app for creating realistic nude photos

AI Clothes Remover
Online AI tool for removing clothes from photos.

Undress AI Tool
Undress images for free

Clothoff.io
AI clothes remover

Video Face Swap
Swap faces in any video effortlessly with our completely free AI face swap tool!
Hot Article
Hot Tools

Notepad++7.3.1
Easy-to-use and free code editor

SublimeText3 Chinese version
Chinese version, very easy to use

Zend Studio 13.0.1
Powerful PHP integrated development environment

Dreamweaver CS6
Visual web development tools

SublimeText3 Mac version
God-level code editing software (SublimeText3)
Hot Topics


 How to implement an online speech recognition system using WebSocket and JavaScript
Dec 17, 2023 pm 02:54 PM
How to implement an online speech recognition system using WebSocket and JavaScript
Dec 17, 2023 pm 02:54 PM
How to use WebSocket and JavaScript to implement an online speech recognition system Introduction: With the continuous development of technology, speech recognition technology has become an important part of the field of artificial intelligence. The online speech recognition system based on WebSocket and JavaScript has the characteristics of low latency, real-time and cross-platform, and has become a widely used solution. This article will introduce how to use WebSocket and JavaScript to implement an online speech recognition system.
 WebSocket and JavaScript: key technologies for implementing real-time monitoring systems
Dec 17, 2023 pm 05:30 PM
WebSocket and JavaScript: key technologies for implementing real-time monitoring systems
Dec 17, 2023 pm 05:30 PM
WebSocket and JavaScript: Key technologies for realizing real-time monitoring systems Introduction: With the rapid development of Internet technology, real-time monitoring systems have been widely used in various fields. One of the key technologies to achieve real-time monitoring is the combination of WebSocket and JavaScript. This article will introduce the application of WebSocket and JavaScript in real-time monitoring systems, give code examples, and explain their implementation principles in detail. 1. WebSocket technology
 How to use JavaScript and WebSocket to implement a real-time online ordering system
Dec 17, 2023 pm 12:09 PM
How to use JavaScript and WebSocket to implement a real-time online ordering system
Dec 17, 2023 pm 12:09 PM
Introduction to how to use JavaScript and WebSocket to implement a real-time online ordering system: With the popularity of the Internet and the advancement of technology, more and more restaurants have begun to provide online ordering services. In order to implement a real-time online ordering system, we can use JavaScript and WebSocket technology. WebSocket is a full-duplex communication protocol based on the TCP protocol, which can realize real-time two-way communication between the client and the server. In the real-time online ordering system, when the user selects dishes and places an order
 How to implement an online reservation system using WebSocket and JavaScript
Dec 17, 2023 am 09:39 AM
How to implement an online reservation system using WebSocket and JavaScript
Dec 17, 2023 am 09:39 AM
How to use WebSocket and JavaScript to implement an online reservation system. In today's digital era, more and more businesses and services need to provide online reservation functions. It is crucial to implement an efficient and real-time online reservation system. This article will introduce how to use WebSocket and JavaScript to implement an online reservation system, and provide specific code examples. 1. What is WebSocket? WebSocket is a full-duplex method on a single TCP connection.
 JavaScript and WebSocket: Building an efficient real-time weather forecasting system
Dec 17, 2023 pm 05:13 PM
JavaScript and WebSocket: Building an efficient real-time weather forecasting system
Dec 17, 2023 pm 05:13 PM
JavaScript and WebSocket: Building an efficient real-time weather forecast system Introduction: Today, the accuracy of weather forecasts is of great significance to daily life and decision-making. As technology develops, we can provide more accurate and reliable weather forecasts by obtaining weather data in real time. In this article, we will learn how to use JavaScript and WebSocket technology to build an efficient real-time weather forecast system. This article will demonstrate the implementation process through specific code examples. We
 Simple JavaScript Tutorial: How to Get HTTP Status Code
Jan 05, 2024 pm 06:08 PM
Simple JavaScript Tutorial: How to Get HTTP Status Code
Jan 05, 2024 pm 06:08 PM
JavaScript tutorial: How to get HTTP status code, specific code examples are required. Preface: In web development, data interaction with the server is often involved. When communicating with the server, we often need to obtain the returned HTTP status code to determine whether the operation is successful, and perform corresponding processing based on different status codes. This article will teach you how to use JavaScript to obtain HTTP status codes and provide some practical code examples. Using XMLHttpRequest
How to use insertBefore in javascript
Nov 24, 2023 am 11:56 AM
Usage: In JavaScript, the insertBefore() method is used to insert a new node in the DOM tree. This method requires two parameters: the new node to be inserted and the reference node (that is, the node where the new node will be inserted).
 How to configure https in tomcat
Jan 05, 2024 pm 05:15 PM
How to configure https in tomcat
Jan 05, 2024 pm 05:15 PM
Configuration steps: 1. Obtain the SSL certificate; 2. Configure the SSL certificate; 3. Edit the Tomcat configuration file; 4. Restart Tomcat. Detailed introduction: 1. You need to obtain an SSL certificate, either a self-signed certificate or a valid SSL certificate from a certification agency (such as Let's Encrypt); 2. Place the obtained SSL certificate and private key files on the server and ensure that these files Located in a safe location, only users with sufficient permissions can access; 3. Edit Tomcat configuration files, etc.
