
 Web Front-end
JS Tutorial
Detailed explanation of React and Webpack construction and packaging optimization examples
Web Front-end
JS Tutorial
Detailed explanation of React and Webpack construction and packaging optimization examples
Detailed explanation of React and Webpack construction and packaging optimization examples

This article mainly introduces a brief discussion of React + Webpack construction and packaging optimization. The editor thinks it is quite good. Now I will share it with you and give it as a reference. Let’s follow the editor to take a look, I hope it can help everyone.
Use babel-react-optimize to optimize React code
Check unused libraries and remove import references
Package the classes used as needed Libraries, such as lodash, echart, etc.
lodash can be optimized using babel-plugin-lodash.
It should be noted that
The babel-plugin-transform-react-remove-prop-types plugin is used in babel-react-optimize. Normally, if you don't reference the component's PropTypes in your code, it's totally fine. Using this plugin may cause problems if your component uses it.
See:
https://github.com/oliviertassinari/babel-plugin-transform-react-remove-prop-types#is-it-safe
Webpack build and package optimization
The problems in Webpack build and package mainly focus on the following two aspects:
Webpack build speed is slow
The file size after Webpack package is too large
Webpack build speed is slow
You can use Webpack.DDLPlugin, HappyPack to improve build speed. For details, please refer to Xiaoming’s documentation on DMP DDLPlugin. The original text is as follows:
Webpack.DLLPlugin
Adding a webpack.dll.config.js
mainly uses a DllPlugin plug-in to independently package some third-party resources and place them at the same time In a manifest.json configuration file,
In this way, after updating in the component, these third-party resources will not be rebuilt,
At the same time, configure dll/vendors independently .js file, provided to webpack.dll.config.js
Modify package.json
Add: "dll": "webpack --config webpack.dll.config.js --progress --colors ", .
After executing npm run dll, two files vendor-manifest.json and vendor.dll.js will be generated in the dll directory.
Configure the webpack.dev.config.js file and add one DllReferencePlugin plug-in, and specify the vendor-manifest.json file
new webpack.DllReferencePlugin({
 context: join(__dirname, 'src'),
 manifest: require('./dll/vendor-manifest.json')
})Modify html
<% if(htmlWebpackPlugin.options.NODE_ENV ==='development'){ %>
<script src="dll/vendor.dll.js"></script>
<% } %>Note, you need to configure the NODE_ENV parameter in the htmlWebpackPlugin plug-in
Happypack
Improve rebuild efficiency through multi-threading, caching, etc. https://github.com/amireh/ happypack
Create multiple HappyPacks for different resources in webpack.dev.config.js, such as 1 js, 1 less, and set the id
new HappyPack({
 id: 'js',
 threadPool: happyThreadPool,
 cache: true,
 verbose: true,
 loaders: ['babel-loader?babelrc&cacheDirectory=true'],
}),
new HappyPack({
 id: 'less',
 threadPool: happyThreadPool,
 cache: true,
 verbose: true,
 loaders: ['css-loader', 'less-loader'],
})Configure use in module.rules to happypack/loader, set the id
{
 test: /\.js$/,
 use: [
 'happypack/loader?id=js'
 ],
 exclude: /node_modules/
}, {
 test: /\.less$/,
 loader: extractLess.extract({
 use: ['happypack/loader?id=less'],
 fallback: 'style-loader'
 })
}Reduce the file size after Webpack packaging Size
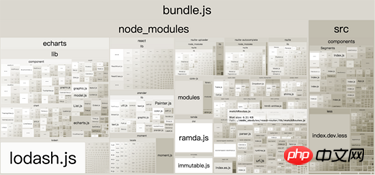
First we need to analyze our entire bundle, what it consists of and the size of each component.
Webpack-bundle-analyzer is recommended here. After installation, just add the plug-in in webpack.dev.config.js, and the analysis results will be automatically opened on the website after each startup, as shown below
plugins.push( new BundleAnalyzerPlugin());
In addition, you can also output the packaging process into a json file
webpack --profile --json -> stats.json
Then go to the following two websites for analysis
webpack/analyse
Webpack Chart
It can be clearly seen from the above chart analysis that the entire bundle .js components and corresponding sizes.
The solution to the excessive size of bundle.js is as follows:
Enable compression and other plug-ins in the production environment and remove unnecessary plug-ins
-
Split business code and third-party libraries and public modules
webpack Enable gzip compression
Load on demand
Enable compression and other plug-ins in the production environment, and remove unnecessary plug-ins.
Make sure to start webpack.DefinePlugin and webpack.optimize.UglifyJsPlugin in the production environment.
const plugins = [
 new webpack.DefinePlugin({
  'process.env.NODE_ENV': JSON.stringify(process.env.NODE_ENV || 'production')
 }),
  new webpack.optimize.UglifyJsPlugin({
  compress: {
   warnings: false,
   drop_console: false //eslint-disable-line
  }
  })
]Split business code and third-party libraries and public modules
Due to the high frequency of business code changes in the project, Code changes in third-party libraries are relatively infrequent. If the business code and the third library are packaged into the same chunk, at each build, even if the business code only changes one line, even if the code of the third-party library does not change, the hash of the entire chunk will be different from the last time. . This is not the result we want. What we want is that if the code of the third-party library does not change, then we must ensure that the corresponding hash does not change when building, so that we can use the browser cache to better improve page loading performance and shorten page loading time.
因此可以将第三库的代码单独拆分成 vendor chunk,与业务代码分离。这样就算业务代码再怎么发生变化,只要第三方库代码没有发生变化,对应的 hash 就不变。
首先 entry 配置两个 app 和 vendor 两个chunk
entry: {
 vendor: [path.join(__dirname, 'dll', 'vendors.js')],
 app: [path.join(__dirname, 'src/index')]
},
output: {
 path: path.resolve(__dirname, 'build'),
 filename: '[name].[chunkhash:8].js'
},其中 vendros.js 是自己定义的哪些第三方库需要纳入 vendor 中,如下:
require('babel-polyfill');
require('classnames');
require('intl');
require('isomorphic-fetch');
require('react');
require('react-dom');
require('immutable');
require('redux');
然后通过 CommonsChunkPlugin 拆分第三库
plugins.push(
 // 拆分第三方库
 new webpack.optimize.CommonsChunkPlugin({ name: 'vendor' }),
 // 拆分 webpack 自身代码
 new webpack.optimize.CommonsChunkPlugin({
  name: 'runtime',
  minChunks: Infinity
 })
);上面的配置有两个细节需要注意
使用 chunkhash 而不用 hash
单独拆分 webpack 自身代码
使用 chunkhash 而不用 hash
先来看看这二者有何区别:
hash 是 build-specific ,任何一个文件的改动都会导致编译的结果不同,适用于开发阶段
chunkhash 是 chunk-specific ,是根据每个 chunk 的内容计算出的 hash,适用于生产
因此为了保证第三方库不变的情况下,对应的 vendor.js 的 hash 也要保持不变,我们再 output.filename 中采用了 chunkhash
单独拆分 webpack 自身代码
Webpack 有个已知问题:
webpack 自身的 boilerplate 和 manifest 代码可能在每次编译时都会变化。
这导致我们只是在 入口文件 改了一行代码,但编译出的 vendor 和 entry chunk 都变了,因为它们自身都包含这部分代码。
这是不合理的,因为实际上我们的第三方库的代码没变,vendor 不应该在我们业务代码变化时发生变化。
因此我们需要将 webpack 这部分代码分离抽离
new webpack.optimize.CommonsChunkPlugin({
   name: "runtime",
   minChunks: Infinity
}),其中的 name 只要不在 entry 即可,通常使用 "runtime" 或 "manifest" 。
另外一个参数 minChunks 表示:在传入公共chunk(commons chunk) 之前所需要包含的最少数量的 chunks。数量必须大于等于2,或者少于等于 chunks的数量,传入 Infinity 会马上生成 公共chunk,但里面没有模块。
拆分公共资源
同 上面的拆分第三方库一样,拆分公共资源可以将公用的模块单独打出一个 chunk,你可以设置 minChunk 来选择是共用多少次模块才将它们抽离。配置如下:
new webpack.optimize.CommonsChunkPlugin({
 name: 'common',
 minChunks: 2,
}),是否需要进行这一步优化可以自行根据项目的业务复用度来判断。
开启 gzip
使用 CompressionPlugin 插件开启 gzip 即可:
// 添加 gzip
new CompressionPlugin({
 asset: '[path].gz[query]',
 algorithm: 'gzip',
 test: /\.(js|html)$/,
 threshold: 10240,
 minRatio: 0.8
})大家学会了吗?赶紧动手尝试一下吧。
相关推荐:
The above is the detailed content of Detailed explanation of React and Webpack construction and packaging optimization examples. For more information, please follow other related articles on the PHP Chinese website!

Hot AI Tools

Undresser.AI Undress
AI-powered app for creating realistic nude photos

AI Clothes Remover
Online AI tool for removing clothes from photos.

Undress AI Tool
Undress images for free

Clothoff.io
AI clothes remover

Video Face Swap
Swap faces in any video effortlessly with our completely free AI face swap tool!

Hot Article
Hot Tools

Notepad++7.3.1
Easy-to-use and free code editor

SublimeText3 Chinese version
Chinese version, very easy to use

Zend Studio 13.0.1
Powerful PHP integrated development environment

Dreamweaver CS6
Visual web development tools

SublimeText3 Mac version
God-level code editing software (SublimeText3)
Hot Topics


 PHP, Vue and React: How to choose the most suitable front-end framework?
Mar 15, 2024 pm 05:48 PM
PHP, Vue and React: How to choose the most suitable front-end framework?
Mar 15, 2024 pm 05:48 PM
PHP, Vue and React: How to choose the most suitable front-end framework? With the continuous development of Internet technology, front-end frameworks play a vital role in Web development. PHP, Vue and React are three representative front-end frameworks, each with its own unique characteristics and advantages. When choosing which front-end framework to use, developers need to make an informed decision based on project needs, team skills, and personal preferences. This article will compare the characteristics and uses of the three front-end frameworks PHP, Vue and React.
 Integration of Java framework and front-end React framework
Jun 01, 2024 pm 03:16 PM
Integration of Java framework and front-end React framework
Jun 01, 2024 pm 03:16 PM
Integration of Java framework and React framework: Steps: Set up the back-end Java framework. Create project structure. Configure build tools. Create React applications. Write REST API endpoints. Configure the communication mechanism. Practical case (SpringBoot+React): Java code: Define RESTfulAPI controller. React code: Get and display the data returned by the API.
 How to enable administrative access from the cockpit web UI
Mar 20, 2024 pm 06:56 PM
How to enable administrative access from the cockpit web UI
Mar 20, 2024 pm 06:56 PM
Cockpit is a web-based graphical interface for Linux servers. It is mainly intended to make managing Linux servers easier for new/expert users. In this article, we will discuss Cockpit access modes and how to switch administrative access to Cockpit from CockpitWebUI. Content Topics: Cockpit Entry Modes Finding the Current Cockpit Access Mode Enable Administrative Access for Cockpit from CockpitWebUI Disabling Administrative Access for Cockpit from CockpitWebUI Conclusion Cockpit Entry Modes The cockpit has two access modes: Restricted Access: This is the default for the cockpit access mode. In this access mode you cannot access the web user from the cockpit
 what does web mean
Jan 09, 2024 pm 04:50 PM
what does web mean
Jan 09, 2024 pm 04:50 PM
The web is a global wide area network, also known as the World Wide Web, which is an application form of the Internet. The Web is an information system based on hypertext and hypermedia, which allows users to browse and obtain information by jumping between different web pages through hyperlinks. The basis of the Web is the Internet, which uses unified and standardized protocols and languages to enable data exchange and information sharing between different computers.
 Is PHP front-end or back-end in web development?
Mar 24, 2024 pm 02:18 PM
Is PHP front-end or back-end in web development?
Mar 24, 2024 pm 02:18 PM
PHP belongs to the backend in web development. PHP is a server-side scripting language, mainly used to process server-side logic and generate dynamic web content. Compared with front-end technology, PHP is more used for back-end operations such as interacting with databases, processing user requests, and generating page content. Next, specific code examples will be used to illustrate the application of PHP in back-end development. First, let's look at a simple PHP code example for connecting to a database and querying data:
 How to implement h5 to slide up on the web side to load the next page
Mar 11, 2024 am 10:26 AM
How to implement h5 to slide up on the web side to load the next page
Mar 11, 2024 am 10:26 AM
Implementation steps: 1. Monitor the scroll event of the page; 2. Determine whether the page has scrolled to the bottom; 3. Load the next page of data; 4. Update the page scroll position.
 Vue.js vs. React: Project-Specific Considerations
Apr 09, 2025 am 12:01 AM
Vue.js vs. React: Project-Specific Considerations
Apr 09, 2025 am 12:01 AM
Vue.js is suitable for small and medium-sized projects and fast iterations, while React is suitable for large and complex applications. 1) Vue.js is easy to use and is suitable for situations where the team is insufficient or the project scale is small. 2) React has a richer ecosystem and is suitable for projects with high performance and complex functional needs.
 Golang's browser support: building an interactive web
Apr 07, 2024 pm 04:03 PM
Golang's browser support: building an interactive web
Apr 07, 2024 pm 04:03 PM
Go builds interactive web applications that run in the browser. Steps: Create Go project and main.go file, add HTTP handler to display messages. Add forms using HTML and JavaScript for user input and submission. Add handling of POST requests in your Go application, receive user messages and return responses. Use FetchAPI to send POST requests and handle server responses.
