

How to specify color and transparency when drawing HTML5 Canvas

This article mainly introduces the method of specifying color and transparency when drawing HTML5 Canvas, including the introduction of the global transparent globalAlpha attribute. Friends in need can refer to the following
Specifying color
Black is the default color for Canvas drawing. If you want to change to a different color, you must specify the color before actually drawing.
JavaScript CodeCopy content to clipboard
ctx.strokeStyle = color
Specify the color of the drawn line:
JavaScript CodeCopy content to clipboard
ctx.fillStyle = color
Specify fill color:
Let’s see a practical example:
JavaScript
JavaScript CodeCopy content to the clipboard
onload = function() {
draw();
};
function draw() {
var canvas = document.getElementById('c1');
if ( ! canvas || ! canvas.getContext ) { return false; }
var ctx = canvas.getContext('2d');
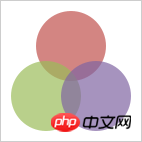
ctx.beginPath();
ctx.fillStyle = 'rgb(192, 80, 77)'; // 红
ctx.arc(70, 45, 35, 0, Math.PI*2, false);
ctx.fill();
ctx.beginPath();
ctx.fillStyle = 'rgb(155, 187, 89)'; // 绿
ctx.arc(45, 95, 35, 0, Math.PI*2, false);
ctx.fill();
ctx.beginPath();
ctx.fillStyle = 'rgb(128, 100, 162)'; // 紫
ctx.arc(95, 95, 35, 0, Math.PI*2, false);
ctx.fill();
}The effect is as follows:
Specify Transparency
is the same as in ordinary CSS. When we specify the color, we can also bring an alpha value (but it is not used much, and it was not supported before IE9). Look at the code:
JavaScript
JavaScript CodeCopy the content to the clipboard
onload = function() {
  draw();
};
function draw() {
  var canvas = document.getElementById('c1');
  if ( ! canvas || ! canvas.getContext ) { return false; }
  var ctx = canvas.getContext('2d');
  ctx.beginPath();
  ctx.fillStyle = 'rgba(192, 80, 77, 0.7)'; //
  ctx.arc(70, 45, 35, 0, Math.PI*2, false);
  ctx.fill();
  ctx.beginPath();
  ctx.fillStyle = 'rgba(155, 187, 89, 0.7)'; //
  ctx.arc(45, 95, 35, 0, Math.PI*2, false);
  ctx.fill();
  ctx.beginPath();
  ctx.fillStyle = 'rgba(128, 100, 162, 0.7)'; //
  ctx.arc(95, 95, 35, 0, Math.PI*2, false);
  ctx.fill();
}The result is as follows:
There is basically no change from the above code, except that rgb(r, g, b) is changed to rgba(r, g, b, a). The value of a is also 0~1. 0 means completely transparent, 1 means completely opaque (so the alpha value is actually "opacity").
Global transparency globalAlpha
This is also a very simple attribute. The default value is 1.0, which means completely opaque. The value range is 0.0 (completely transparent) ~1.0. This property is the same as the shadow setting. If you don't want to set the opacity globally, you have to reset globalAlpha before drawing next time.
To summarize: What are the state-based attributes?
——globalAlpha
——globalCompositeOpeartion
——strokeStyle
——textAlign,textBaseline
——lineCap,lineJoin, lineWidth,miterLimit
——fillStyle
——font
——shadowBlur,shadowColor,shadowOffsetX,shadowOffsetY
We use a code to experience the magic of globalAlpha Where~
JavaScript CodeCopy content to clipboard
<!DOCTYPE html>
<html lang="zh">
<head>
    <meta charset="UTF-8">
    <title>全局透明</title>
    <style>
        body { background: url("./images/bg3.jpg") repeat; }
        #canvas { border: 1px solid #aaaaaa; display: block; margin: 50px auto; }
    </style>
</head>
<body>
<p id="canvas-warp">
    <canvas id="canvas">
        你的浏览器居然不支持Canvas?!赶快换一个吧!!
    </canvas>
</p>
<script>
    window.onload = function(){
        var canvas = document.getElementById("canvas");
        canvas.width = 800;
        canvas.height = 600;
        var context = canvas.getContext("2d");
        context.fillStyle = "#FFF";
        context.fillRect(0,0,800,600);
        context.globalAlpha = 0.5;
        for(var i=0; i<=50; i++){
            var R = Math.floor(Math.random() * 255);
            var G = Math.floor(Math.random() * 255);
            var B = Math.floor(Math.random() * 255);
            context.fillStyle = "rgb(" + R + "," + G + "," + B + ")";
            context.beginPath();
            context.arc(Math.random() * canvas.width, Math.random() * canvas.height, Math.random() * 100, 0, Math.PI * 2);
            context.fill();
        }
    };
</script>
</body>
</html>Run result: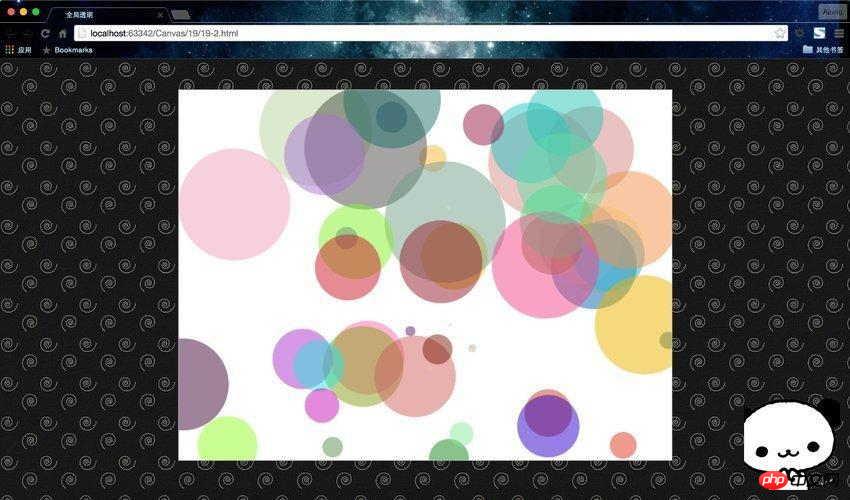
Isn't it very cool? I finally feel like an artist.
Related recommendations:
Use HTML5 Canvas to fill images with color and texture
The above is the detailed content of How to specify color and transparency when drawing HTML5 Canvas. For more information, please follow other related articles on the PHP Chinese website!

Hot AI Tools

Undresser.AI Undress
AI-powered app for creating realistic nude photos

AI Clothes Remover
Online AI tool for removing clothes from photos.

Undress AI Tool
Undress images for free

Clothoff.io
AI clothes remover

Video Face Swap
Swap faces in any video effortlessly with our completely free AI face swap tool!

Hot Article
Hot Tools

Notepad++7.3.1
Easy-to-use and free code editor

SublimeText3 Chinese version
Chinese version, very easy to use

Zend Studio 13.0.1
Powerful PHP integrated development environment

Dreamweaver CS6
Visual web development tools

SublimeText3 Mac version
God-level code editing software (SublimeText3)
Hot Topics


 Table Border in HTML
Sep 04, 2024 pm 04:49 PM
Table Border in HTML
Sep 04, 2024 pm 04:49 PM
Guide to Table Border in HTML. Here we discuss multiple ways for defining table-border with examples of the Table Border in HTML.
 Nested Table in HTML
Sep 04, 2024 pm 04:49 PM
Nested Table in HTML
Sep 04, 2024 pm 04:49 PM
This is a guide to Nested Table in HTML. Here we discuss how to create a table within the table along with the respective examples.
 HTML margin-left
Sep 04, 2024 pm 04:48 PM
HTML margin-left
Sep 04, 2024 pm 04:48 PM
Guide to HTML margin-left. Here we discuss a brief overview on HTML margin-left and its Examples along with its Code Implementation.
 HTML Table Layout
Sep 04, 2024 pm 04:54 PM
HTML Table Layout
Sep 04, 2024 pm 04:54 PM
Guide to HTML Table Layout. Here we discuss the Values of HTML Table Layout along with the examples and outputs n detail.
 HTML Input Placeholder
Sep 04, 2024 pm 04:54 PM
HTML Input Placeholder
Sep 04, 2024 pm 04:54 PM
Guide to HTML Input Placeholder. Here we discuss the Examples of HTML Input Placeholder along with the codes and outputs.
 HTML Ordered List
Sep 04, 2024 pm 04:43 PM
HTML Ordered List
Sep 04, 2024 pm 04:43 PM
Guide to the HTML Ordered List. Here we also discuss introduction of HTML Ordered list and types along with their example respectively
 Moving Text in HTML
Sep 04, 2024 pm 04:45 PM
Moving Text in HTML
Sep 04, 2024 pm 04:45 PM
Guide to Moving Text in HTML. Here we discuss an introduction, how marquee tag work with syntax and examples to implement.
 HTML onclick Button
Sep 04, 2024 pm 04:49 PM
HTML onclick Button
Sep 04, 2024 pm 04:49 PM
Guide to HTML onclick Button. Here we discuss their introduction, working, examples and onclick Event in various events respectively.
