

缓存远程二维码图片到本地

第一步,以下代码扔到functions.php function get_qr($url,$path,$qrpic){ set_time_limit (10); //设置十秒超时$destination_folder = $path?$path.'/':''; $localname = $destination_folder .$qrpic; $file = fopen ($url, "rb"); //fopen函数的r+模式: 读
第一步,以下代码扔到functions.php
function get_qr($url,$path,$qrpic){
	set_time_limit (10); //设置十秒超时
	$destination_folder = $path?$path.'/':'';
	$localname = $destination_folder .$qrpic;
	$file = fopen ($url, "rb"); //fopen函数的r+模式: 读写方式打开 文件指针指向文件头
	if ($file) {
		$newf = fopen ($localname, "wb"); // w+,读写方式打开 文件指针指向文件头 如果文件不存在则尝试创建之
		if ($newf)
			while(!feof($file)) {
				fwrite( $newf, fread($file, 1024 * 2 ), 1024 * 2 ); //写入文件,fread控制文件最大的大小,这里是2M
			}
	}
	if ($file) {
		fclose($file);  //关闭fopen打开的文件
	}
	if ($newf) {
		fclose($newf);
	}
} 第二步,在网站根目录建立一个叫qrcode的新文件夹,确保有写入权限,
第三步,以下代码放到需要输出二维码图片的地方,如single.php
<?php $localqr =  ABSPATH .'qrcode/'.get_the_id().'.jpg';
if (!file_exists($localqr)) {//如果图片已经存在,则不会再次保存
	get_qr( "http://chart.googleapis.com/chart?cht=qr&chs=100x100&choe=UTF-8&chld=L|4&chl=".get_permalink() ,"qrcode", get_the_id().".jpg");//图片名以文章id命名
}
?>
<img src="<?php%20echo%20home_url(%20''%20);%20?>/qrcode/<?php%20the_id()?>.jpg"    style="max-width:90%"  style="max-width:90%" alt="QR 码">
<!--默认二维码图片大小是100*100,如果要改,需要改4个地方,已经用蓝色标注-->
教程已经结束了,下面是写这段代码过程中我的一些感想,
- 关于PHP的
fopen函数fopen不能直接获取https打头的url
- 关于wordpress的
the_permalink和get_permalink函数前者是display直接输出结果,后者是return返回值,在自定义函数中使用此类变量需要使用后者
例如the_id和get_the_id用法也是如此
fopen-qr is coded by xiaohudie. Any posts here is one hundred percent original, so please keep my link so as not to hurt this pretty girl

Hot AI Tools

Undresser.AI Undress
AI-powered app for creating realistic nude photos

AI Clothes Remover
Online AI tool for removing clothes from photos.

Undress AI Tool
Undress images for free

Clothoff.io
AI clothes remover

Video Face Swap
Swap faces in any video effortlessly with our completely free AI face swap tool!

Hot Article
Hot Tools

Notepad++7.3.1
Easy-to-use and free code editor

SublimeText3 Chinese version
Chinese version, very easy to use

Zend Studio 13.0.1
Powerful PHP integrated development environment

Dreamweaver CS6
Visual web development tools

SublimeText3 Mac version
God-level code editing software (SublimeText3)
Hot Topics


 How to solve the problem of automatically saving pictures when publishing on Xiaohongshu? Where is the automatically saved image when posting?
Mar 22, 2024 am 08:06 AM
How to solve the problem of automatically saving pictures when publishing on Xiaohongshu? Where is the automatically saved image when posting?
Mar 22, 2024 am 08:06 AM
With the continuous development of social media, Xiaohongshu has become a platform for more and more young people to share their lives and discover beautiful things. Many users are troubled by auto-save issues when posting images. So, how to solve this problem? 1. How to solve the problem of automatically saving pictures when publishing on Xiaohongshu? 1. Clear the cache First, we can try to clear the cache data of Xiaohongshu. The steps are as follows: (1) Open Xiaohongshu and click the "My" button in the lower right corner; (2) On the personal center page, find "Settings" and click it; (3) Scroll down and find the "Clear Cache" option. Click OK. After clearing the cache, re-enter Xiaohongshu and try to post pictures to see if the automatic saving problem is solved. 2. Update the Xiaohongshu version to ensure that your Xiaohongshu
 How to post pictures in TikTok comments? Where is the entrance to the pictures in the comment area?
Mar 21, 2024 pm 09:12 PM
How to post pictures in TikTok comments? Where is the entrance to the pictures in the comment area?
Mar 21, 2024 pm 09:12 PM
With the popularity of Douyin short videos, user interactions in the comment area have become more colorful. Some users wish to share images in comments to better express their opinions or emotions. So, how to post pictures in TikTok comments? This article will answer this question in detail and provide you with some related tips and precautions. 1. How to post pictures in Douyin comments? 1. Open Douyin: First, you need to open Douyin APP and log in to your account. 2. Find the comment area: When browsing or posting a short video, find the place where you want to comment and click the "Comment" button. 3. Enter your comment content: Enter your comment content in the comment area. 4. Choose to send a picture: In the interface for entering comment content, you will see a "picture" button or a "+" button, click
 How to make ppt pictures appear one by one
Mar 25, 2024 pm 04:00 PM
How to make ppt pictures appear one by one
Mar 25, 2024 pm 04:00 PM
In PowerPoint, it is a common technique to display pictures one by one, which can be achieved by setting animation effects. This guide details the steps to implement this technique, including basic setup, image insertion, adding animation, and adjusting animation order and timing. Additionally, advanced settings and adjustments are provided, such as using triggers, adjusting animation speed and order, and previewing animation effects. By following these steps and tips, users can easily set up pictures to appear one after another in PowerPoint, thereby enhancing the visual impact of the presentation and grabbing the attention of the audience.
 What should I do if the images on the webpage cannot be loaded? 6 solutions
Mar 15, 2024 am 10:30 AM
What should I do if the images on the webpage cannot be loaded? 6 solutions
Mar 15, 2024 am 10:30 AM
Some netizens found that when they opened the browser web page, the pictures on the web page could not be loaded for a long time. What happened? I checked that the network is normal, so where is the problem? The editor below will introduce to you six solutions to the problem that web page images cannot be loaded. Web page images cannot be loaded: 1. Internet speed problem The web page cannot display images. It may be because the computer's Internet speed is relatively slow and there are more softwares opened on the computer. And the images we access are relatively large, which may be due to loading timeout. As a result, the picture cannot be displayed. You can turn off the software that consumes more network speed. You can go to the task manager to check. 2. Too many visitors. If the webpage cannot display pictures, it may be because the webpages we visited were visited at the same time.
 How to arrange two pictures side by side in wps document
Mar 20, 2024 pm 04:00 PM
How to arrange two pictures side by side in wps document
Mar 20, 2024 pm 04:00 PM
When using WPS office software, we found that not only one form is used, tables and pictures can be added to the text, pictures can also be added to the table, etc. These are all used together to make the content of the entire document look richer. , if you need to insert two pictures into the document and they need to be arranged side by side. Our next course can solve this problem: how to place two pictures side by side in a wps document. 1. First, you need to open the WPS software and find the picture you want to adjust. Left-click the picture and a menu bar will pop up, select "Page Layout". 2. Select "Tight wrapping" in text wrapping. 3. After all the pictures you need are confirmed to be set to "Tight text wrapping", you can drag the pictures to the appropriate position and click on the first picture.
 How to view and refresh dns cache in Linux
Mar 07, 2024 am 08:43 AM
How to view and refresh dns cache in Linux
Mar 07, 2024 am 08:43 AM
DNS (DomainNameSystem) is a system used on the Internet to convert domain names into corresponding IP addresses. In Linux systems, DNS caching is a mechanism that stores the mapping relationship between domain names and IP addresses locally, which can increase the speed of domain name resolution and reduce the burden on the DNS server. DNS caching allows the system to quickly retrieve the IP address when subsequently accessing the same domain name without having to issue a query request to the DNS server each time, thereby improving network performance and efficiency. This article will discuss with you how to view and refresh the DNS cache on Linux, as well as related details and sample code. Importance of DNS Caching In Linux systems, DNS caching plays a key role. its existence
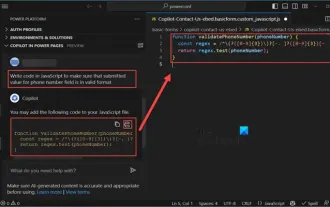 How to use Copilot to generate code
Mar 23, 2024 am 10:41 AM
How to use Copilot to generate code
Mar 23, 2024 am 10:41 AM
As a programmer, I get excited about tools that simplify the coding experience. With the help of artificial intelligence tools, we can generate demo code and make necessary modifications as per the requirement. The newly introduced Copilot tool in Visual Studio Code allows us to create AI-generated code with natural language chat interactions. By explaining functionality, we can better understand the meaning of existing code. How to use Copilot to generate code? To get started, we first need to get the latest PowerPlatformTools extension. To achieve this, you need to go to the extension page, search for "PowerPlatformTool" and click the Install button
 How to set pencil grayscale artistic effect on PPT pictures
Mar 21, 2024 pm 02:51 PM
How to set pencil grayscale artistic effect on PPT pictures
Mar 21, 2024 pm 02:51 PM
On many occasions, we may want to add some artistic processing to the pictures in PPT to enhance the visual effect or better fit the overall theme. Among them, the pencil grayscale artistic effect has become the first choice of many people with its unique charm and excellent performance. This effect can not only give the picture a hand-drawn texture like a pencil, but also convert it into grayscale color, that is, black and white, thereby removing the interference of color on the vision. However, many users do not understand it when using ppt. How to achieve this effect, then the editor of this website will bring you a detailed production tutorial below, I hope it can help you! Method for setting pencil grayscale artistic effects on PPT pictures 1. Open the PPT2021 software and insert a picture. 2. Choose
