

photoshop教程:制作证件照

友情提示:教程最后照片尺寸参数及常见证件照对应尺寸
此方法适合制作少批量的证件照
打开一张已裁剪好的2英寸证件照(规格:3.3cmX4.8cm,分辨率:320像素/英寸),如图1:

打开应用程序菜单,执行“图像>画布大小(CS3中的快捷键为“Alt+Ctrl+C”)”的命令,画布大小设置为:宽3.5cm,高5.0cm,如图2

打开应用程序菜单,执行“选择>全部(快捷键为“Ctrl+A”)”的命令,
执行“编辑>拷贝(快捷键为“Ctrl+C”)”的命令,
执行“图像>画布大小(CS3中的快捷键为“Alt+Ctrl+C”)”的命令,画布大小设置为:宽8.0cm,高12.0cm,注意给图像的定位,如图3:

执行“编辑>粘贴(快捷键为Ctrl+V)”的命令,定位图像,再粘贴(还要几张就粘贴几张),定位,如图4:

合并图层后,再次设置画布大小:宽8.9cm,高12.7 cm(就是3R照片的尺寸),如图5:

完事了,可以拿到彩扩店去扩印了。
此方法的原理看懂后,其它尺寸的证件照也可以排版,如在3R照片上排1英寸的证件照,在4R、5R上排1英寸、2英寸的证件照,等等。
相关参数
照片规格(英寸) (厘米) (像素) 数码相机类型 1寸 2.5*3.5cm 413*295 身份证大头照 3.3*2.2cm
390*260 2寸 3.5*5.3cm 626*413 小2寸(护照) 4.8*3.3cm 567*390 5 寸 5x3.5cm 12.7*8.9
1200x840以上 100万像素 6 寸 6x4cm 15.2*10.2 1440x960以上 130万像素 7 寸 7x5cm 17.8*12.7
1680x1200以上 200万像素 8 寸 8x6cm 20.3*15.2 1920x1440以上 300万像素 10寸 10x8cm 25.4*20.3
2400x1920以上 400万像素 12寸 12x10cm 30.5*20.3 2500x2000以上 500万像素 15寸 15x10cm
38.1*25.4 3000x2000 600万像素
常见证件照对应尺寸
1英寸=25mm×35mm
2英寸=35mm×49mm
3英寸=35mm×52mm
港澳通行证=33mm×48mm
赴美签证=50mm×50mm
日本签证=45mm×45mm
大二寸=35mm×45mm
护照=33mm×48mm
毕业生照=33mm×48mm
身份证=22mm×32mm
驾照=21mm×26mm
车照=60mm×91mm

Hot AI Tools

Undresser.AI Undress
AI-powered app for creating realistic nude photos

AI Clothes Remover
Online AI tool for removing clothes from photos.

Undress AI Tool
Undress images for free

Clothoff.io
AI clothes remover

Video Face Swap
Swap faces in any video effortlessly with our completely free AI face swap tool!

Hot Article
Hot Tools

Notepad++7.3.1
Easy-to-use and free code editor

SublimeText3 Chinese version
Chinese version, very easy to use

Zend Studio 13.0.1
Powerful PHP integrated development environment

Dreamweaver CS6
Visual web development tools

SublimeText3 Mac version
God-level code editing software (SublimeText3)
Hot Topics


 Tutorial on how to use Dewu
Mar 21, 2024 pm 01:40 PM
Tutorial on how to use Dewu
Mar 21, 2024 pm 01:40 PM
Dewu APP is currently a very popular brand shopping software, but most users do not know how to use the functions in Dewu APP. The most detailed usage tutorial guide is compiled below. Next is the Dewuduo that the editor brings to users. A summary of function usage tutorials. Interested users can come and take a look! Tutorial on how to use Dewu [2024-03-20] How to use Dewu installment purchase [2024-03-20] How to obtain Dewu coupons [2024-03-20] How to find Dewu manual customer service [2024-03-20] How to check the pickup code of Dewu [2024-03-20] Where to find Dewu purchase [2024-03-20] How to open Dewu VIP [2024-03-20] How to apply for return or exchange of Dewu
 In summer, you must try shooting a rainbow
Jul 21, 2024 pm 05:16 PM
In summer, you must try shooting a rainbow
Jul 21, 2024 pm 05:16 PM
After rain in summer, you can often see a beautiful and magical special weather scene - rainbow. This is also a rare scene that can be encountered in photography, and it is very photogenic. There are several conditions for a rainbow to appear: first, there are enough water droplets in the air, and second, the sun shines at a low angle. Therefore, it is easiest to see a rainbow in the afternoon after the rain has cleared up. However, the formation of a rainbow is greatly affected by weather, light and other conditions, so it generally only lasts for a short period of time, and the best viewing and shooting time is even shorter. So when you encounter a rainbow, how can you properly record it and photograph it with quality? 1. Look for rainbows. In addition to the conditions mentioned above, rainbows usually appear in the direction of sunlight, that is, if the sun shines from west to east, rainbows are more likely to appear in the east.
 How to delete win11 widgets? One command to uninstall Windows 11 widgets function tips
Apr 11, 2024 pm 05:19 PM
How to delete win11 widgets? One command to uninstall Windows 11 widgets function tips
Apr 11, 2024 pm 05:19 PM
Widgets are a new feature of the Win11 system. They are turned on by default. However, it is inevitable that some users do not use widgets very much and want to disable them because they take up space. So how should they do this? The editor below will teach you how to operate it, and you can try it out. What are widgets? Widgets are small cards that display dynamic content from your favorite apps and services on your Windows desktop. They appear on the widget board, where you can discover, pin, unpin, arrange, resize, and customize widgets to reflect your interests. The widget board is optimized to display relevant widgets and personalized content based on usage. Open the widget panel from the left corner of the taskbar, where you can see live weather
 What software is photoshopcs5? -photoshopcs5 usage tutorial
Mar 19, 2024 am 09:04 AM
What software is photoshopcs5? -photoshopcs5 usage tutorial
Mar 19, 2024 am 09:04 AM
PhotoshopCS is the abbreviation of Photoshop Creative Suite. It is a software produced by Adobe and is widely used in graphic design and image processing. As a novice learning PS, let me explain to you today what software photoshopcs5 is and how to use photoshopcs5. 1. What software is photoshop cs5? Adobe Photoshop CS5 Extended is ideal for professionals in film, video and multimedia fields, graphic and web designers who use 3D and animation, and professionals in engineering and scientific fields. Render a 3D image and merge it into a 2D composite image. Edit videos easily
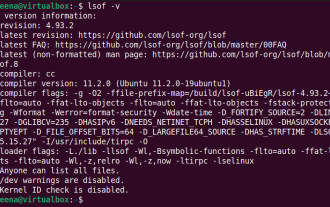 How to use LSOF to monitor ports in real time
Mar 20, 2024 pm 02:07 PM
How to use LSOF to monitor ports in real time
Mar 20, 2024 pm 02:07 PM
LSOF (ListOpenFiles) is a command line tool mainly used to monitor system resources similar to Linux/Unix operating systems. Through the LSOF command, users can get detailed information about the active files in the system and the processes that are accessing these files. LSOF can help users identify the processes currently occupying file resources, thereby better managing system resources and troubleshooting possible problems. LSOF is powerful and flexible, and can help system administrators quickly locate file-related problems, such as file leaks, unclosed file descriptors, etc. Via LSOF Command The LSOF command line tool allows system administrators and developers to: Determine which processes are currently using a specific file or port, in the event of a port conflict
 Tutorial on how to turn off the payment sound on WeChat
Mar 26, 2024 am 08:30 AM
Tutorial on how to turn off the payment sound on WeChat
Mar 26, 2024 am 08:30 AM
1. First open WeChat. 2. Click [+] in the upper right corner. 3. Click the QR code to collect payment. 4. Click the three small dots in the upper right corner. 5. Click to close the voice reminder for payment arrival.
 Specific method to create film movement effect in PPT
Mar 26, 2024 pm 04:00 PM
Specific method to create film movement effect in PPT
Mar 26, 2024 pm 04:00 PM
1. Start PPT, create a new blank document, select all text boxes and delete them. 2. Execute the Insert-Shape command, drag a rectangle in the document, and fill the shape with black. 3. Drag the rectangle to elongate it, execute the Insert-Shape command, drag out the small square, and set the fill color to white. 4. Copy and paste the small squares one by one so that the top and bottom are evenly distributed on both sides of the film. After selecting them all with ctrl+a, right-click and select Group. 5. Execute the Insert-Picture command, find the picture to be inserted in the pop-up dialog box, click to open, and adjust the size and position of the picture. 6. Repeat step 5 to insert and set the remaining pictures in order to form a film picture. 7. Select the film, execute animation-add animation command
 How to set the pixel height of Meitu Xiuxiu
Mar 27, 2024 am 11:00 AM
How to set the pixel height of Meitu Xiuxiu
Mar 27, 2024 am 11:00 AM
In the digital age, pictures have become an integral part of our daily lives and work. Whether it is sharing on social media or presenting in a work report, high-quality pictures can add a lot of points to us. However, many times the pixels of the pictures in our hands are not satisfactory. In this case, we need to use some tools to adjust the pixel height to meet the needs of different scenes. So this tutorial guide will introduce in detail how to use Meitu Xiuxiu to adjust the pixels of pictures. I hope it can help you! First of all, please find the [Meitu Xiu Xiu] icon on your mobile phone, click to enter the main interface, and then click on the [Beautify Pictures] item. 2. The second step, next, we come to the [Camera Roll] page as shown in the picture, please click on yourself
