

Photoshop设计制作出非常飘逸的绿色绸缎

绸缎在设计中应用是非常广泛的,飘逸并带有古典韵味,可以给作品增色不少。单独制作一条绸缎也并不难,首先需要构思造型,要把飘逸的感觉渲染出来,可以多找一些实物图来参考,然后再刻画表面的质感即可。
最终效果
1、效果图是对称图形,制作的时候只需要完成一半即可,需要制作的效果如下图。
<图1>
2、新建一个1024 * 768像素的文档,背景填充淡绿色:#ECFEF0,效果如下图。
<图2>
3、现在来制作丝带的中间位置,需要完成的效果如下图。
<图3>
4、新建一个组,用钢笔勾出下图所示的选区,然后给组添加图层蒙版,如下图。
<图4>
5、在组里新建一个图层,填充绿色:#189347,效果如下图。
<图5>
6、新建一个图层,用钢笔勾出右侧底部的高光区域,羽化6个像素后填充稍亮的绿色:#2CD018,如图6,取消选区后添加图层蒙版,用透明度较低的黑色画笔把顶部的过渡擦出来,效果如图7。
<图6> 
<图7>
7、新建一个图层,用钢笔勾出高光中间的亮部选区,羽化3个像素后填充淡绿色,混合模式改为“滤色”,效果如下图。
<图8>
8、新建一个图层,用钢笔勾出顶部的高光选区,羽化30个像素后填充稍亮的绿色:#35B405,效果如下图。
<图9>
9、新建一个图层,用钢笔勾出中间暗部选区,羽化3个像素后填充暗绿色:#0A7122。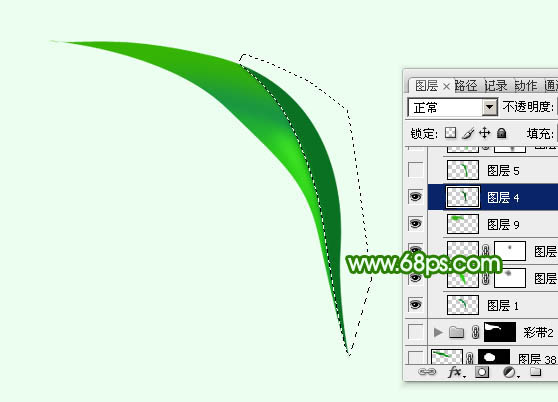
<图10>
10、新建一个图层,用钢笔勾出右边的高光选区,羽化5个像素后填充稍填充绿色:#18991B,如下图。
<图11>
11、新建一个图层,用钢笔勾出右侧边缘高光选区,羽化6个像素后填充稍亮的绿色:#62DC65,如下图。
<图12>
12、新建一个图层,用钢笔勾出右侧中间高光选区,羽化2个像素后填充浅绿色,混合模式改为“滤色”,如下图。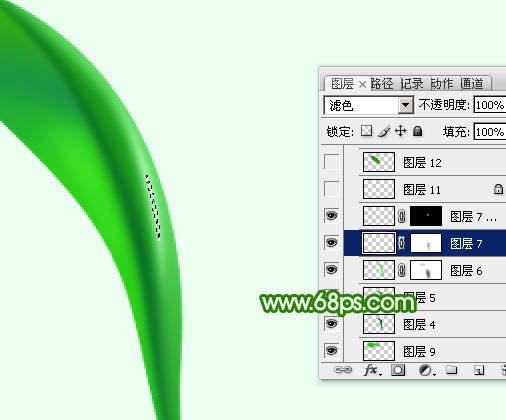
<图13>
13、新建一个图层,用钢笔勾出顶部下侧的暗部选区,羽化6个像素后填充暗绿色:#2F9602,如下图。
<图14>
14、新建一个图层,用钢笔勾出中间的暗部选区,羽化1个像素后填充暗绿色,过渡不自然的部分可以用蒙版修饰一下。
<图15>
15、新建一个图层,用钢笔勾出底部边缘的高光选区,羽化1个像素后填充绿色:#38D925,如下图。
<图16>
16、新建一个图层,用钢笔勾出顶部高光选区,羽化5个像素后填充稍亮的绿色,如下图。
<图17>
17、在当前组下面新建一个组,用钢笔勾出第二段丝绸选区,再给组添加图层蒙版,如下图。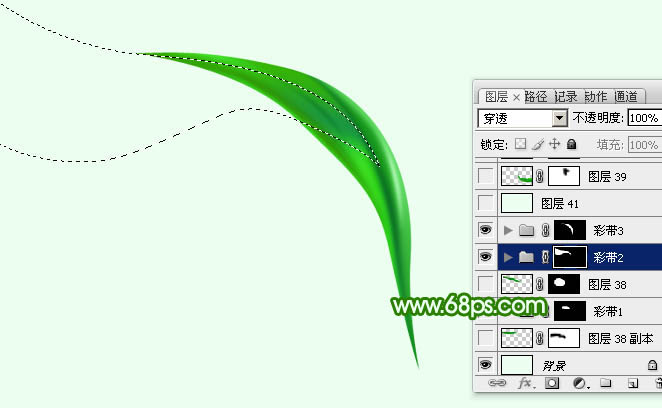
<图18>
18、在组里新建一个图层,填充绿色,如下图。
<图19>
19、新建一个图层,同上的方法制作其他高光和暗部,过程如图20 - 23。
<图20> 
<图21> 
<图22> 
<图23>
20、同上的方法制作其他部分的丝绸,效果如图24,25。
<图24> 
<图25>
最后把做好的丝绸复制后对接一下,完成最终效果。
以上就是Photoshop设计制作出非常飘逸的绿色绸缎的内容,更多相关内容请关注PHP中文网(www.php.cn)!

Hot AI Tools

Undresser.AI Undress
AI-powered app for creating realistic nude photos

AI Clothes Remover
Online AI tool for removing clothes from photos.

Undress AI Tool
Undress images for free

Clothoff.io
AI clothes remover

Video Face Swap
Swap faces in any video effortlessly with our completely free AI face swap tool!

Hot Article
Hot Tools

Notepad++7.3.1
Easy-to-use and free code editor

SublimeText3 Chinese version
Chinese version, very easy to use

Zend Studio 13.0.1
Powerful PHP integrated development environment

Dreamweaver CS6
Visual web development tools

SublimeText3 Mac version
God-level code editing software (SublimeText3)
Hot Topics
 1677
1677
 14
1431
52
1334
25
1279
29
1257
24
14
1431
52
1334
25
1279
29
1257
24

 Advanced Photoshop Tutorial: Master Retouching & Compositing
Apr 17, 2025 am 12:10 AM
Advanced Photoshop Tutorial: Master Retouching & Compositing
Apr 17, 2025 am 12:10 AM
Photoshop's advanced photo editing and synthesis technologies include: 1. Use layers, masks and adjustment layers for basic operations; 2. Use image pixel values to achieve photo editing effects; 3. Use multiple layers and masks for complex synthesis; 4. Use "liquefaction" tools to adjust facial features; 5. Use "frequency separation" technology to perform delicate photo editing, these technologies can improve image processing level and achieve professional-level effects.
 Photoshop's Key Features: A Deep Dive
Apr 19, 2025 am 12:08 AM
Photoshop's Key Features: A Deep Dive
Apr 19, 2025 am 12:08 AM
Key features of Photoshop include layers and masks, adjustment tools, filters and effects. 1. Layers and masks allow independent editing of image parts. 2. Adjust tools such as brightness/contrast can modify image tone and brightness. 3. Filters and effects can quickly add visual effects. Mastering these features can help creative professionals achieve their creative vision.
 Using Photoshop: Creative Possibilities and Practical Uses
Apr 22, 2025 am 12:09 AM
Using Photoshop: Creative Possibilities and Practical Uses
Apr 22, 2025 am 12:09 AM
Photoshop is very practical and creative in practical applications. 1) It provides basic editing, repairing and synthesis functions, suitable for beginners and professionals. 2) Advanced features such as content recognition fill and layer style can improve image effects. 3) Mastering shortcut keys and optimizing layer structure can improve work efficiency.
 Photoshop and Digital Art: Painting, Illustration, and Compositing
Apr 18, 2025 am 12:01 AM
Photoshop and Digital Art: Painting, Illustration, and Compositing
Apr 18, 2025 am 12:01 AM
Photoshop's applications in digital art include painting, illustration and image synthesis. 1) Painting: Using brushes, pencils and mixing tools, the artist can create realistic effects. 2) Illustration: With vector and shape tools, artists can accurately draw complex graphics and add effects. 3) Synthesis: Using mask and layer blending mode, artists can seamlessly blend different image elements.
 Using Photoshop for Graphic Design: Branding and More
Apr 16, 2025 am 12:02 AM
Using Photoshop for Graphic Design: Branding and More
Apr 16, 2025 am 12:02 AM
The steps to using Photoshop for brand design include: 1. Use the Pen tool to draw basic shapes, 2. Add shadows and highlights through layer styles, 3. Adjust colors and details, 4. Use smart objects and actions to automatically generate different versions of the design. Photoshop helps designers create and optimize brand elements with the flexibility of layers and masks, ensuring consistency and professionalism of designs, from simple logos to complex branding guides.
 Photoshop for Photographers: Enhancing and Retouching Images
Apr 25, 2025 am 12:01 AM
Photoshop for Photographers: Enhancing and Retouching Images
Apr 25, 2025 am 12:01 AM
Enhance and retouching photos in Photoshop can be achieved by adjusting brightness and contrast, using the Repair Brush Tool. 1) Adjust brightness and contrast: Increase brightness and contrast to improve underexposed photos through the Image->Adjustments->Brightness/Contrast menu. 2) Use the Repair Brush Tool: Select HealingBrushTool in the toolbar and apply to remove miscellaneous points or scars in the image.
 What Photoshop Does Best: Common Tasks and Projects
Apr 23, 2025 am 12:06 AM
What Photoshop Does Best: Common Tasks and Projects
Apr 23, 2025 am 12:06 AM
Photoshop is specialized in image editing, layering and masking, digital painting and a variety of design applications. 1) Image editing and repair: remove defects and adjust color and brightness. 2) Layers and masks: non-destructive editing and creation. 3) Digital paintings and illustrations: create art works. 4) Practical applications: graphic design, web design and digital art creation.
 Photoshop: A Versatile Tool for Image Manipulation
Apr 27, 2025 am 12:13 AM
Photoshop: A Versatile Tool for Image Manipulation
Apr 27, 2025 am 12:13 AM
Photoshop is so powerful in the field of image processing because of its versatility and intuitive operating interface. 1) It can handle various tasks from basic adjustment to complex synthesis, such as adjusting brightness and contrast. 2) Working based on layers and masks allows non-destructive editing. 3) Examples of usage include adjusting color balance and creating layer masks. 4) Common errors such as excessive editing can be avoided through the History panel. 5) Performance optimization suggestions include the use of smart objects and shortcut keys.
