

ps消失点滤镜的运用方法以及简单新手入门教程

消失点是这样一种功能,它允许您在包含透视平面(例如,建筑物侧面或任何矩形对象)的图像中进行透视校正编辑。
通过使用消失点,您可以在图像中指定平面,然后应用诸如绘画、仿制、拷贝或粘贴以及变换等编辑操作。 所有编辑操作都将采用您所处理平面的透视。
利用消失点,您不用再好像所有图像内容都在面对您的单一平面上一样来修饰图像。 相反,您将以立体方式在图像中的透视平面上工作。
当您使用消失点来修饰、添加或移去图像中的内容时,结果将更加逼真,因为系统可正确确定这些编辑操作的方向,并且将它们缩放到透视平面。
要使用消失点,请打开“消失点”对话框(选取“滤镜” >“消失点”),该对话框包含用于定义透视平面的工具、用于编辑图像的工具以及一个您在其中工作的图像预览。
首先在预览图像中指定透视平面,然后就可以在这些平面中绘制、仿制、拷贝、粘贴和变换内容。 消失点工具(选框、图章、画笔及其他工具)的工作方式与
Photoshop 主工具箱中的对应工具十分类似。 您甚至可以使用相同的键盘快捷键来设置工具选项。
不知道大家有木有见过这种方法,在李涛视频中看到的觉得蛮有意思的,比较适合运用在包装设计贴图中,而且很快,平时可能会有人用自由变换来调整透视,
大家都知道这样会严重破坏图片,(大家也可以先转换为矢量哦!图层/智能对象/转换为智能对象。这样可减小图片的损坏,)下面咱们大家把玩一下咯!嘿嘿!
文字同理!很简单哦!
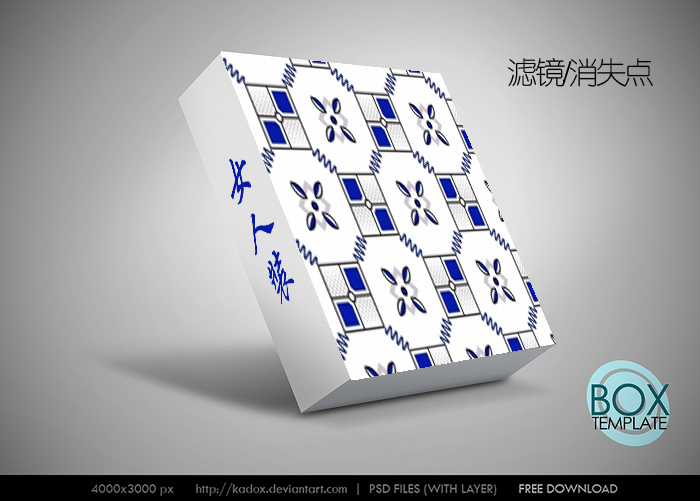
效果前后展示图如下:
教程原图:

效果图:
步骤图展示如下:
1.打开要贴花纹的立方体素材。

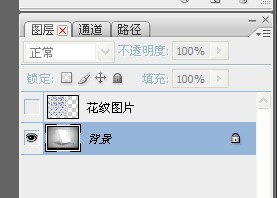
打开一幅花纹图片,复制(Ctrl+C),然后将花纹图层隐藏。
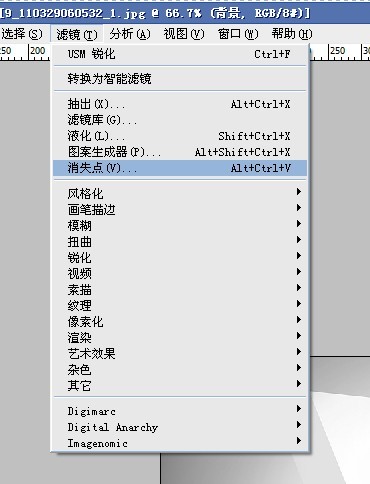
2.进行消失点滤镜
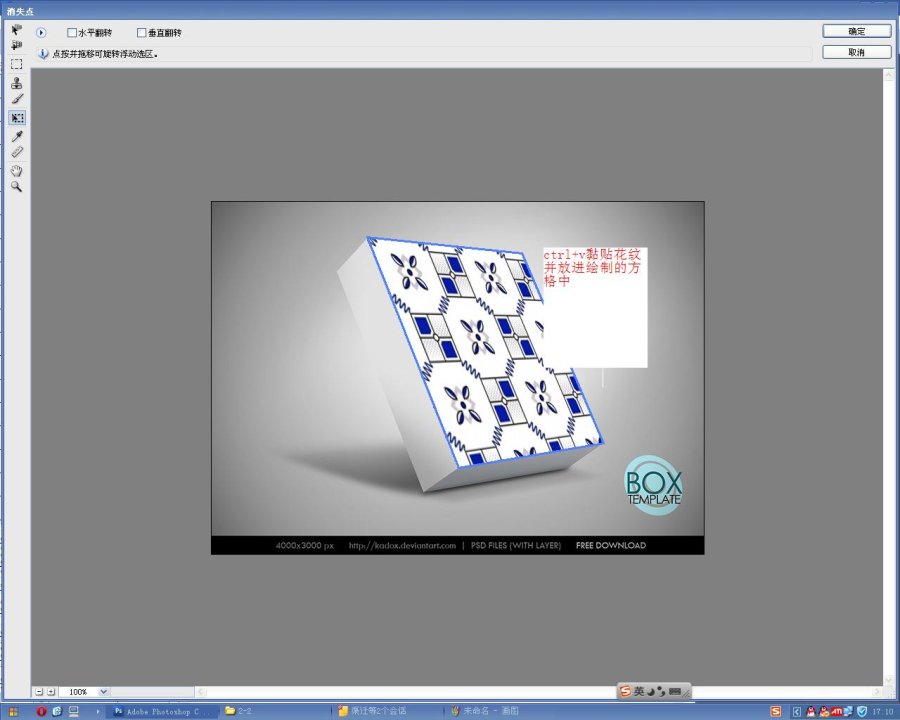
用这个‘创建平面工具’在要贴花纹的面上绘制网格。

3.然后Ctrl+V将花纹粘贴进来就OK了!

Hot AI Tools

Undresser.AI Undress
AI-powered app for creating realistic nude photos

AI Clothes Remover
Online AI tool for removing clothes from photos.

Undress AI Tool
Undress images for free

Clothoff.io
AI clothes remover

Video Face Swap
Swap faces in any video effortlessly with our completely free AI face swap tool!

Hot Article
Hot Tools

Notepad++7.3.1
Easy-to-use and free code editor

SublimeText3 Chinese version
Chinese version, very easy to use

Zend Studio 13.0.1
Powerful PHP integrated development environment

Dreamweaver CS6
Visual web development tools

SublimeText3 Mac version
God-level code editing software (SublimeText3)
Hot Topics
 1664
1664
 14
1423
52
1318
25
1269
29
1248
24
14
1423
52
1318
25
1269
29
1248
24

 Photoshop's Value: Weighing the Cost Against Its Features
Apr 11, 2025 am 12:02 AM
Photoshop's Value: Weighing the Cost Against Its Features
Apr 11, 2025 am 12:02 AM
Photoshop is worth the investment because it provides powerful features and a wide range of application scenarios. 1) Core functions include image editing, layer management, special effects production and color adjustment. 2) Suitable for professional designers and photographers, but amateurs may consider alternatives such as GIMP. 3) Subscribe to AdobeCreativeCloud can be used as needed to avoid high one-time spending.
 Advanced Photoshop Tutorial: Master Retouching & Compositing
Apr 17, 2025 am 12:10 AM
Advanced Photoshop Tutorial: Master Retouching & Compositing
Apr 17, 2025 am 12:10 AM
Photoshop's advanced photo editing and synthesis technologies include: 1. Use layers, masks and adjustment layers for basic operations; 2. Use image pixel values to achieve photo editing effects; 3. Use multiple layers and masks for complex synthesis; 4. Use "liquefaction" tools to adjust facial features; 5. Use "frequency separation" technology to perform delicate photo editing, these technologies can improve image processing level and achieve professional-level effects.
 Photoshop's Key Features: A Deep Dive
Apr 19, 2025 am 12:08 AM
Photoshop's Key Features: A Deep Dive
Apr 19, 2025 am 12:08 AM
Key features of Photoshop include layers and masks, adjustment tools, filters and effects. 1. Layers and masks allow independent editing of image parts. 2. Adjust tools such as brightness/contrast can modify image tone and brightness. 3. Filters and effects can quickly add visual effects. Mastering these features can help creative professionals achieve their creative vision.
 Using Photoshop: Creative Possibilities and Practical Uses
Apr 22, 2025 am 12:09 AM
Using Photoshop: Creative Possibilities and Practical Uses
Apr 22, 2025 am 12:09 AM
Photoshop is very practical and creative in practical applications. 1) It provides basic editing, repairing and synthesis functions, suitable for beginners and professionals. 2) Advanced features such as content recognition fill and layer style can improve image effects. 3) Mastering shortcut keys and optimizing layer structure can improve work efficiency.
 Is Photoshop Free? Understanding Subscription Plans
Apr 12, 2025 am 12:11 AM
Is Photoshop Free? Understanding Subscription Plans
Apr 12, 2025 am 12:11 AM
Photoshop is not free, but there are several ways to use it at low cost or free: 1. The free trial period is 7 days, and you can experience all functions during this period; 2. Student and teacher discounts can cut costs by half, and school proof is required; 3. The CreativeCloud package is suitable for professional users and includes a variety of Adobe tools; 4. PhotoshopElements and Lightroom are low-cost alternatives, with fewer functions but lower prices.
 Photoshop: Investigating Free Trials and Discount Options
Apr 14, 2025 am 12:06 AM
Photoshop: Investigating Free Trials and Discount Options
Apr 14, 2025 am 12:06 AM
You can get the access to Photoshop in the most economical way: 1. Experience the software features with a 7-day free trial; 2. Find student or teacher discounts, as well as seasonal promotions; 3. Use coupons on third-party websites; 4. Subscribe to Adobe CreativeCloud's monthly or annual plan.
 Photoshop for Designers: Creating Visual Concepts
Apr 13, 2025 am 12:09 AM
Photoshop for Designers: Creating Visual Concepts
Apr 13, 2025 am 12:09 AM
Creating visual concepts in Photoshop can be achieved through the following steps: 1. Create a new document, 2. Add a background layer, 3. Use the brush tool to draw basic shapes, 4. Adjust colors and brightness, 5. Add text and graphics, 6. Use masks for local editing, 7. Apply filter effects, these steps help designers build a complete visual work from scratch.
 Photoshop and Digital Art: Painting, Illustration, and Compositing
Apr 18, 2025 am 12:01 AM
Photoshop and Digital Art: Painting, Illustration, and Compositing
Apr 18, 2025 am 12:01 AM
Photoshop's applications in digital art include painting, illustration and image synthesis. 1) Painting: Using brushes, pencils and mixing tools, the artist can create realistic effects. 2) Illustration: With vector and shape tools, artists can accurately draw complex graphics and add effects. 3) Synthesis: Using mask and layer blending mode, artists can seamlessly blend different image elements.
